[ESP-ENG] Tutorial: Beautiful Long Earrings
Feliz y bendecido día tengan todos, ya finalizando la semana les quise acompañar para compartir con ustedes un muy sencillo, elegante y colorido diseño de zarcillos largos, para todas las que nos gusta esta clase de pendientes un poco extravagantes, es un diseño muy cómodo a la hora de usar pues no sin pesados. También son muy fácil y económica de elaborar desde la comodidad de tu hogar, para todos ustedes este sencillo tutorial.
Happy and blessed day everyone, and at the end of the week I wanted to accompany you to share with you a very simple, elegant and colorful design of long earrings, for all of us who like this kind of slightly extravagant earrings, it is a design Very comfortable when using it, not without heavy.
They are also very easy and cheap to make from the comfort of your home, for all of you this simple tutorial.
- Alambre de bisutería calibre 20.
- alambre de bisutería calibre 26.
- Piedras perladas medianas.
- retazo de foami escarchado.
- Tijera.
- pinza de bisutería.
- 20 gauge jewelry wire.
- 26 gauge jewelry wire.
- Medium pearl stones.
- piece of frosted foami.
- Scissors.
- jewelry clip.

✴️ Paso 1: para iniciar la elaboración lo primero que debemos hacer es corta un pedacito de aproximadamente 6 cm de alambre de bisutería calibre 20, y hoy comenzaremos por lo que siempre elaboro al final, por el anzuelo para nuestro pendiente, en esta ocasión quise darle un toque lindo y especial por lo que con ayuda de un palillo plástico de chupetas moldearemos una forma de pequeño corazoncito en uno de los extremos del alambre. Seguidamente el alambre que nos queda hacia abajo de la forma de corazón debemos doblarlo hacia arriba y una vez allí doblamos con la pinza y moldeamos el gancho, quedandonos un anzuelo diferente.
✴️ Step 1: to start the elaboration, the first thing we must do is cut a small piece of approximately 6 cm of 20-gauge costume jewelry wire, and today we will begin with what I always elaborate at the end, with the hook for our earring, in This time I wanted to give it a cute and special touch, so with the help of a plastic lollipop toothpick we will mold a small heart shape on one end of the wire.
Next, we must bend the wire that remains down from the heart shape upwards and once there we bend with the pliers and shape the hook, leaving a different hook.

✴️ Step 2: Now we will proceed to take the 26 gauge jewelry wire and taking a 10cm piece, we begin by taking the small toothpick and making a very small circular shape at the tip of the wire. The circle we will bend is to place it as the base of the glass and avoid the wire coming out.
Now in the upper part of the glass with the toothpick we will mold another ring type circle.
We will elaborate this procedure 4 times for each Tendril.

✴️ Paso 3: para continuar con el palillo moldearemos pequeñas argollas con alambre de bisutería calibre 20.
✴️ Step 3: to continue with the toothpick we will shape small rings with 20 gauge jewelry wire.

✴️ Paso 4: Después tomamos una argollita Introducimos dos de las piezas elaboradas con los cristales y la colocamos colgando de nuestra base principal en el corazoncito. Volvemos a tomar otra argolla e Introducimos dos cristales y lo sujetámos de la pieza que colocamos antes. Y después colocaremos dos argollitas más debajo de estás.
✴️ Step 4: Then we take a ring. We introduce two of the pieces made with the crystals and place it hanging from our main base in the little heart.
We take another ring again and insert two crystals and hold it from the piece that we placed before.
And then we will place two more rings under these.

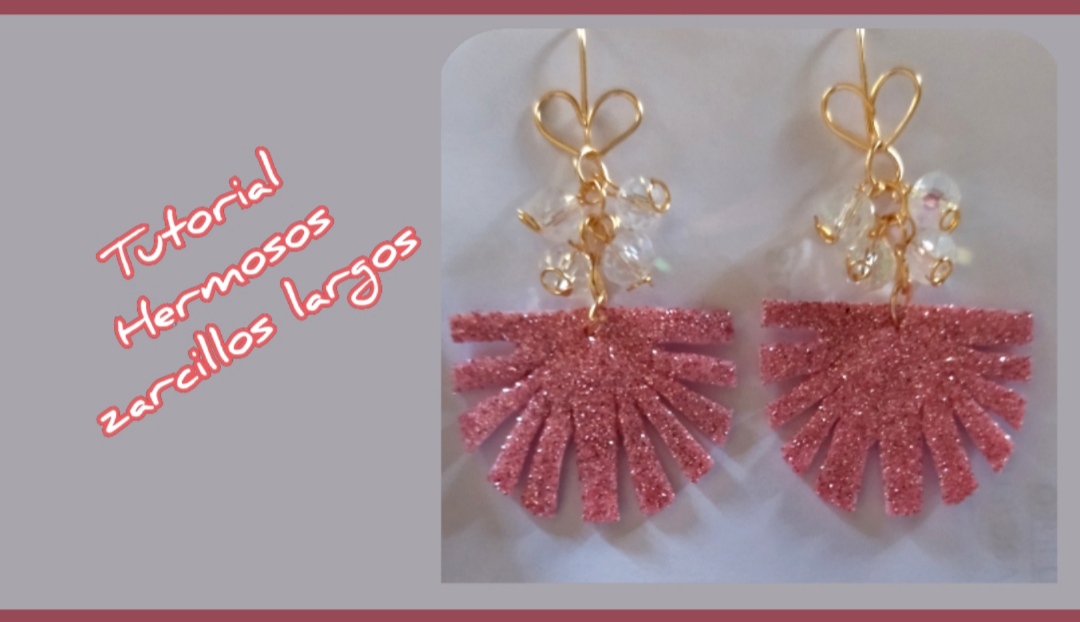
✴️ Paso 5: para culminar con tomaremos el foami y cortaremos una forma semi circular, medio círculo el cual doblaremos a la mitad y cortaremos pedacitos intermedios creando una hermosa forma con varias puntas. Luego realizamos un pequeño agujero en su parte superior dónde colocaremos una argolla y está la llevaremos a nuestra Elaboración y lo sujetámos de la última argollita y listo.
✴️ Step 5: to culminate with we will take the foami and cut a semi-circular shape, half a circle which we will fold in half and cut intermediate pieces creating a beautiful shape with several tips.
Then we make a small hole in its upper part where we will place a ring and we will take it to our Elaboration and we hold it to the last ring and that's it.


Todas las Fotos son de mi autoría y fueron tomadas con mi Celular Redmi 9And so we will be able to make these beautiful long earrings, ideal to wear on special occasions, dear friends, I hope this tutorial is useful and beneficial to you, I have to say goodbye on this occasion, thanking you for your visit and wishing you a great weekend.
All Photos are my authorship and were taken with my Redmi 9 Cellphone
that's a beautiful earring
Nicely
thank you so much.
Genial! Simplemente hermosos
Me alegra que te haya gustado.
Lindos aretes largos muy coqueto y me encantó tu técnica de alambre
They are super nice, these earrings look so striking, a day ago I was thinking of making some with this material and for so many outings I've had, to make them has already passed me one of these days I encourage me and I follow the idea, thanks for sharing and motivate us.
I love pretty earrings, and this is definitely one, so beautiful, thanks for sharing with us the making process.
Sencillo trabajo con un resultado hermoso y delicado, me encantó! 😍 Me gusta mucho hacer bisutería y aprender cosas nuevas, gracias por compartir. Saludos y bendiciones! ❤️🙏
Amén amiga, gracias por su comentario.