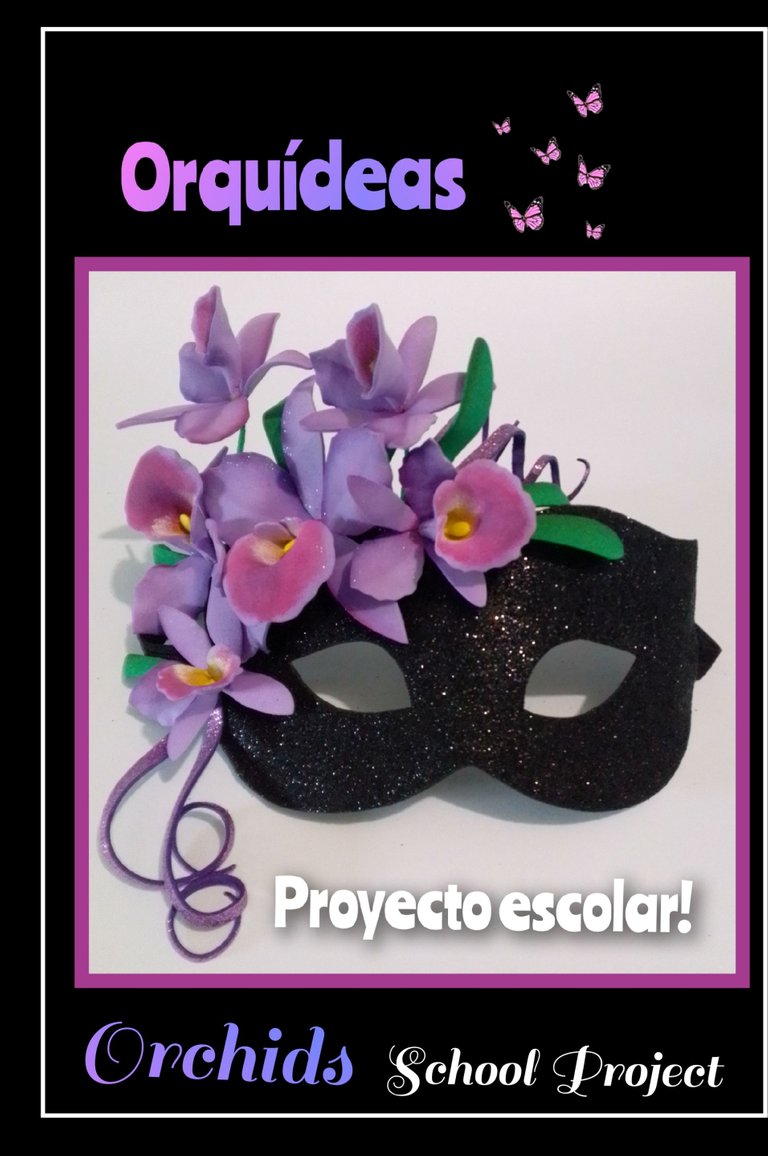
Orquídea (Flor de Mayo) Proyecto escolar. Aprende conmigo como hacerlo. Orchid (May Flower) School project. Learn with me how to make it.
Buenas noches y bienvenidos todos mis amigos y creadores de contenidos a mi Blog.
Hoy les mostraré como se realiza una Orquídea, para los que no son Venenzolanos, la Orquídea es nuestra Flor Nacional y su nombre científico es Cattleya Mossiae.
Fué nombrada así, el 23 de mayo de 1951, por eso su nombre Flor de Mayo, las hay de diversas formas, tamaños y distintos colores pero, la que más nos respresenta es la de color morado, también la usan para decorar la Cruz de Mayo y como ayer era su día me toco ayudar a mi sobrina en un proyecto escolar que era hacer un antifaz decorado con nuestra Flor Nacional, debajo te dejaré la fuente de información para que conozcas más sobre ella.
Ahora te mostraré como lo hice:
Necesitarás:
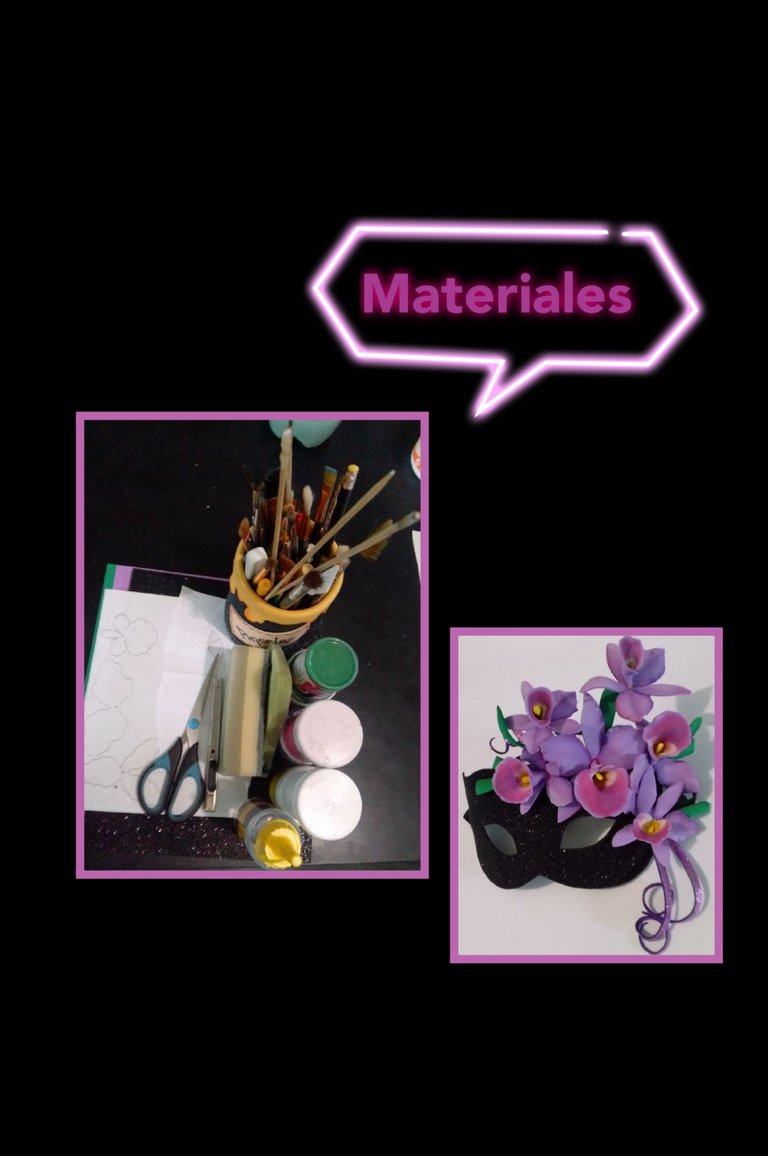
| Molde de Orquídea | Foami escarchado y mate |
|---|---|
| Tijera | Pinturas y pinceles |
| Goma espuma | Lápiz o palito de madera |
| Alambre | Papel crepé |
| Silicón líquido | Acocador |
| Elástica | Cuchilla |
| Pistola de silicón | Plancha eléctrica |
Es hora de comenzar:
Paso 1:
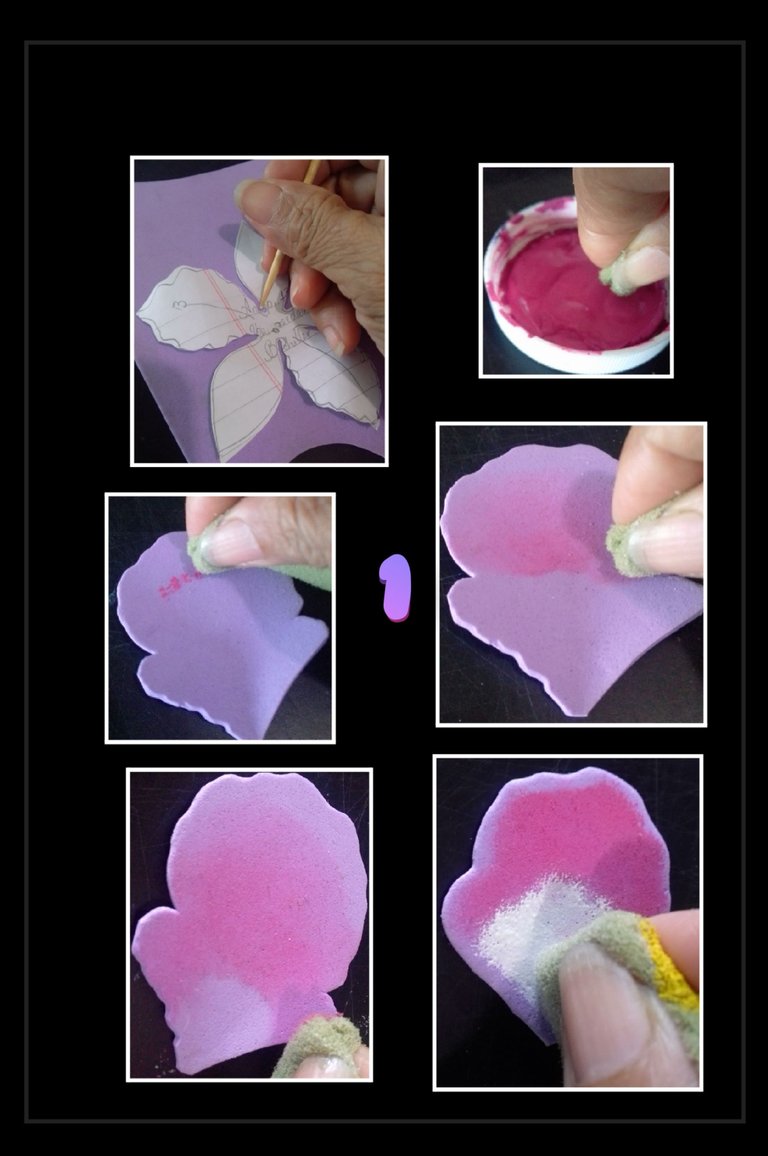
- Recorta el molde de la orquídea y con un palito de madera marca sobre el foami por todo el contorno, luego recorta y moja un pedacito de goma espuma en pintura fucsia y comienza a motear en la parte del centro y luego con otro pedacito de goma espuma humedecido en agua riega la pintura con movimientos circulares hacia abajo, degradando el color.
- Ahora toma otro pedacito de goma espuma y pinta en blanco como muestro en la foto y deja secar.
Paso 2:
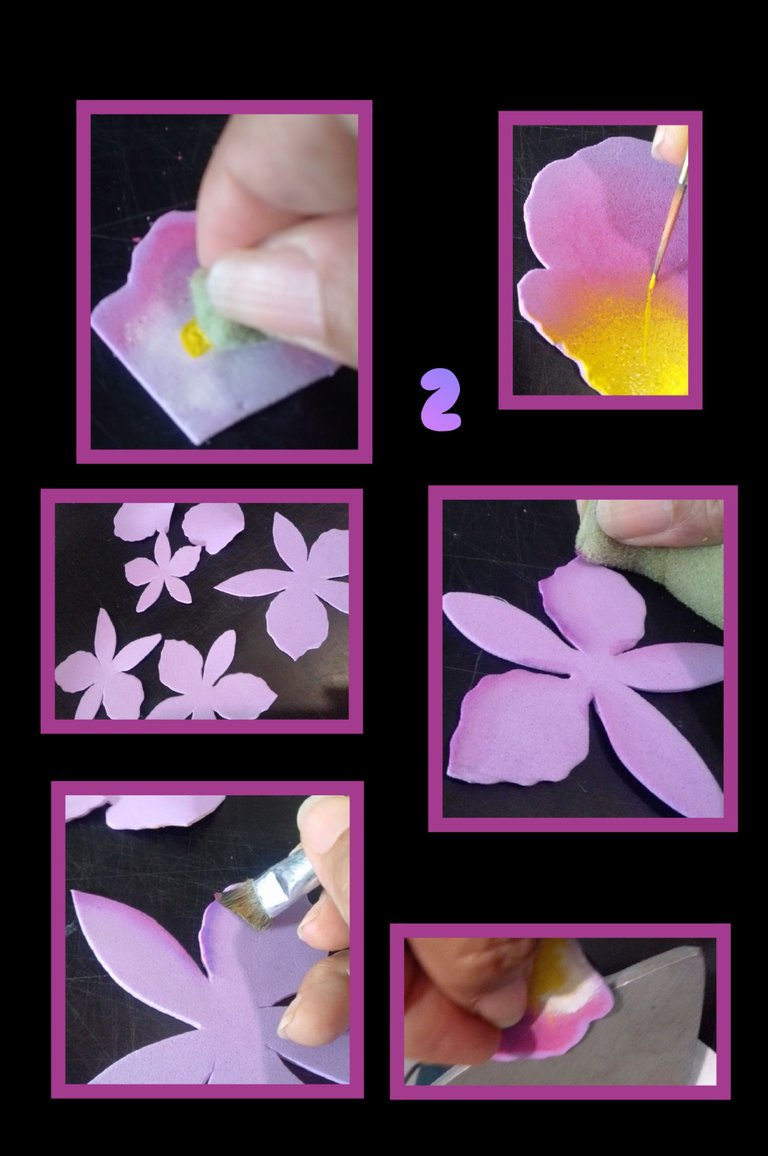
- Ahora moja la goma espuma en pintura amarilla y motea y pinta el centro del pétalo mayor de la orquídea y con un pincel delineador, haz unas pocas líneas con pintura amarilla.
- Luego con una esponja o pincel pasa pintura morada por el contorno de la flor igualmente deja secar.
- Calienta la plancha y coloca una parte del borde del pétalo central y haz pequeños dobleces en el borde.
Paso 3:
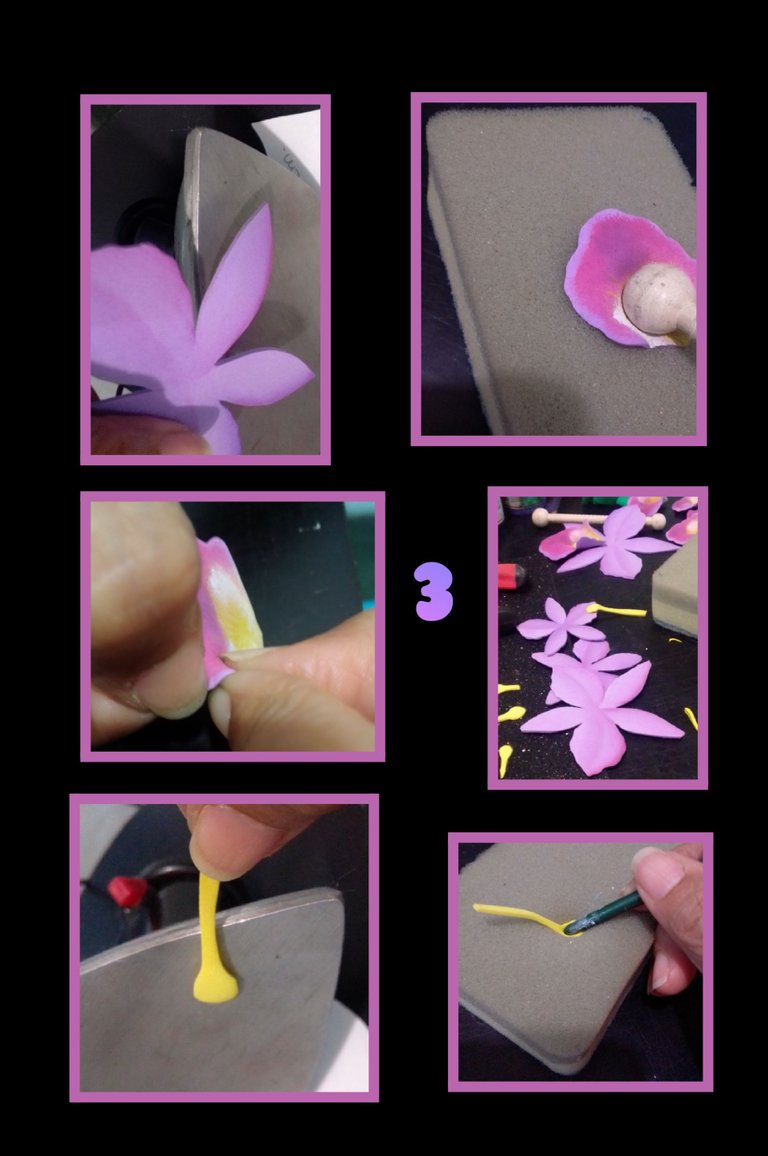
- Igualmente calienta uno a uno los pétalos de la flor y dobla un poco hacia atrás los pétalo lisos.
- Luego calienta el medio del pétalo central, coloca sobre la goma espuma y con el acocador presiona en el centro, después recorta unos pistilos en forma de cucharilla, coloca sobre la plancha calienta y en el centro presiona con un palito de pincel.
Paso 4:
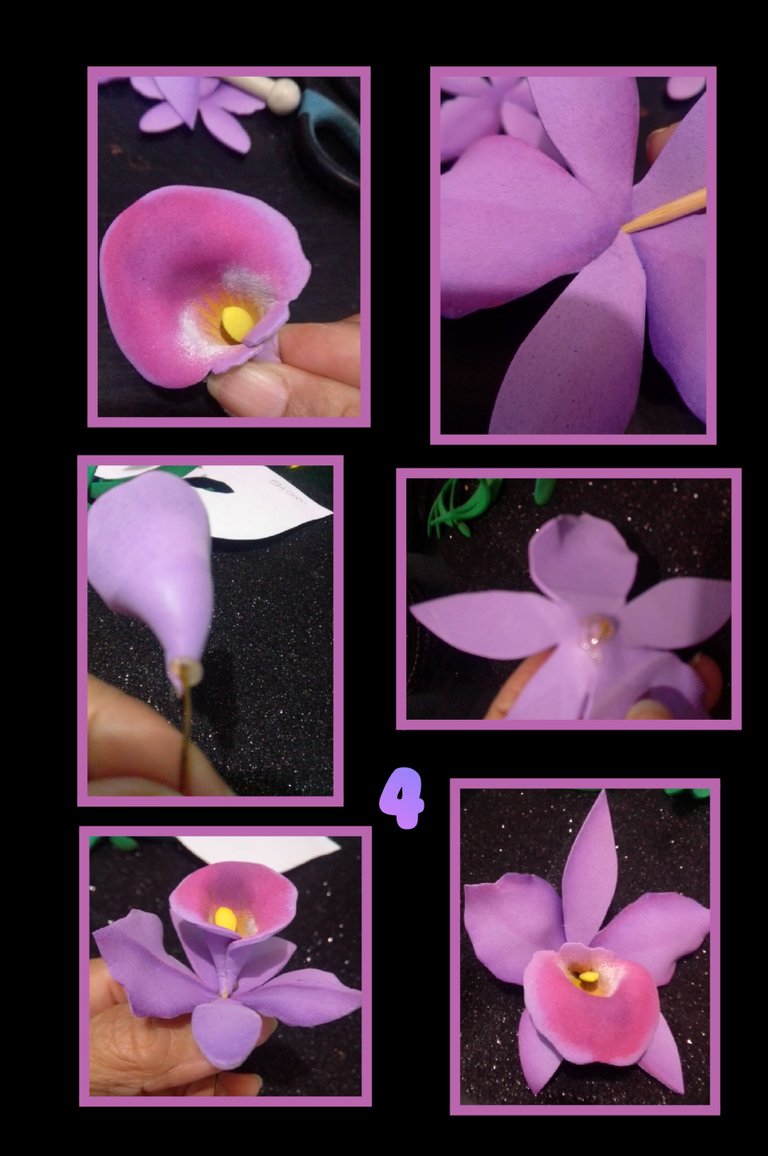
- Ahora aplica silicón en el pistilo y en uno de los bordes de la parte inferior del pétalo central y pega sobre el otro borde para cerrar el pétalo y presiona hasta que seque.
- Aparte con un palito, haz un orificio en el centro de la flor.
- Recorta un pedacito de alambre e inserta el la parte inferior del pétalo central, aplica silicón en el centro de la flor y mete el alambre.
Así quedará armada nuestra orquídea.
Paso 5:
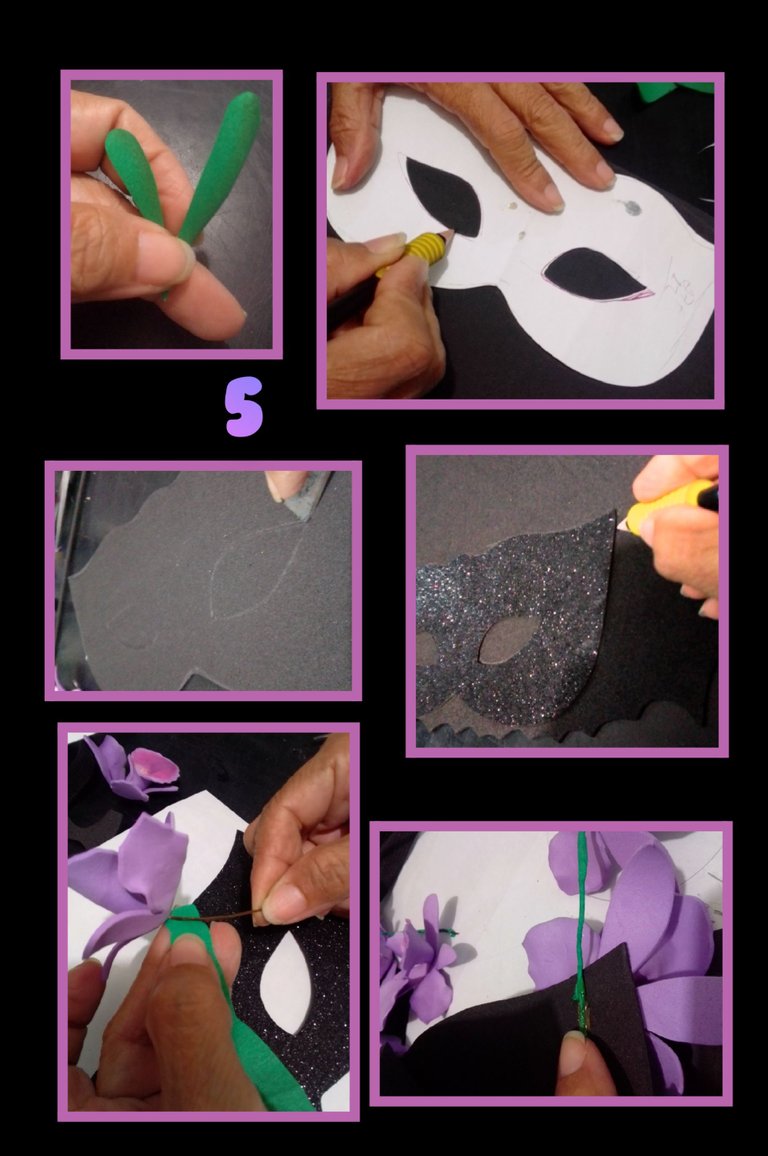
- Recorta hojitas en forma de lágrimas largas y pinta con esponja con color verde más oscuro.
- Ahora marca el antifaz sobre el foami escarchado negro, recorta el borde con la tijera y luego con la cuchilla saca la forma de los ojos, luego coloca esta pieza sobre otro foami negro mate, marca y recorta.
- Luego con papel crepé forra los alambres y comienza a pegar las flores las que no tienen alambre pega en la parte frontal y las que si tienen en la parte trasera del antifaz, ubicando en el sitio que prefieras.
Paso 6
- Ahora toca recortar la elástica, esto lo tienes que hacer colocando el antifaz al niño, niña o adulto y mides de extremo a extremo la cantidad de elástica que necesitas, luego aplica silicón caliente en la elástica y pega al foami.
- Después aplica silicón en la parte trasera del antifáz y pega la otra cara para tapar los alambres y la elástica, recuerda que siempre hay que dar un buen acabado a nuestros trabajos.
- Por ultimo recorta 4 tiras en foami escarchado morado de 2 ó 3 milímetros, calienta y da forma en las puntas y pega para decorar.
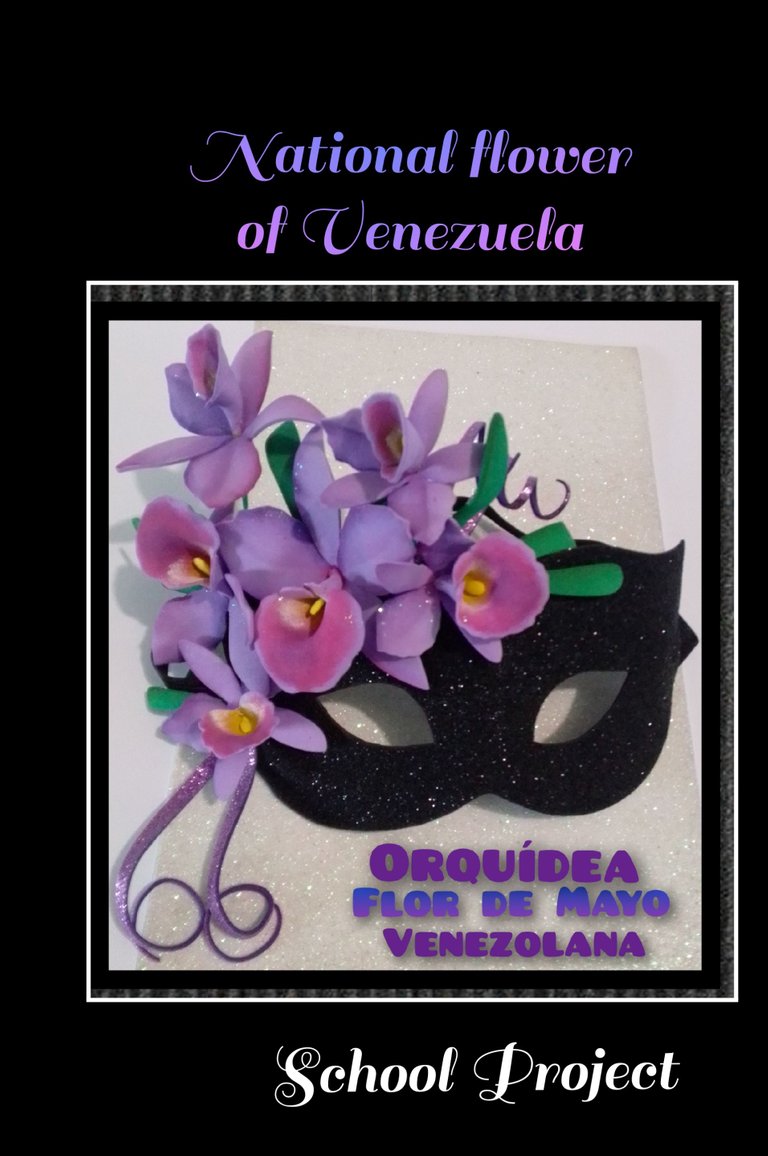
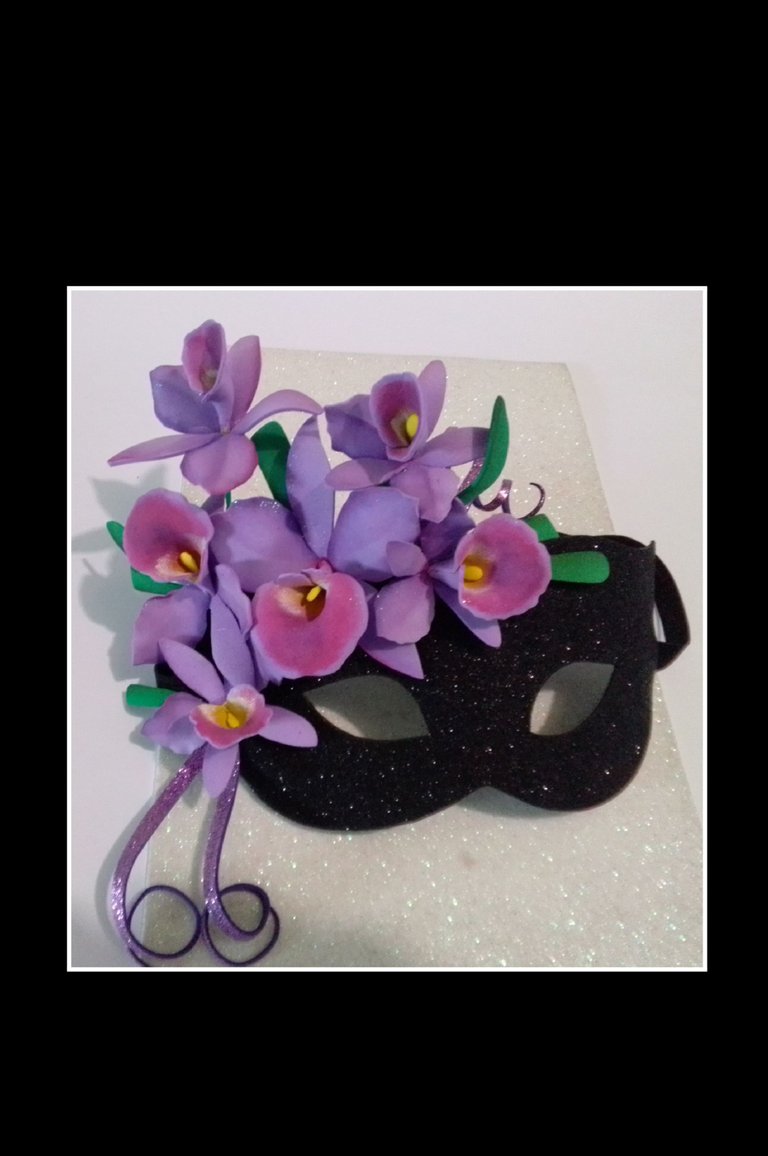
Ahora te muestro como quedó este Hermoso antifaz decorado con nuestra flor nacional.
Fuentes:
https://es.wikipedia.org/wiki/Flor_Nacional_de_Venezuela
https://www.pinterest.es/pin/476255729358439970/
Bueno ya está terminado, espero mi tutorial te guste y sirva de guía si en alguna oportunidad necesitas un proyecto así.
con DeepL, usando etiquetas HTML, mi teléfono BLU G5 y edité fotos con GridArt.
Me despido feliz de haber compartido este paso a paso contigo, gracias por tu apoyo y si es de tu agrado comentar, con mucho gusto te responderé.
Saludos.
English:
Good evening and welcome all my friends and content creators to my Blog.
Today I will show you how to make an Orchid, for those who are not Venenzolanos, the Orchid is our National Flower and its scientific name is Cattleya Mossiae.
It was named this way, on May 23, 1951, that's why its name Flor de Mayo, there are different shapes, sizes and colors but the one that represents us the most is the purple one, it is also used to decorate the May Cross and since yesterday was its day I had to help my niece in a school project that was to make a mask decorated with our National Flower, below I will leave you the source of information so you can know more about it.
Now I'll show you how I did it:
You will need:
| Orchid Mold | Frosted and matte Foami |
|---|---|
| Scissors | Paints and brushes |
| Foam rubber | Pencil or wooden stick |
| Wire | Crepe paper |
| Liquid silicone | Acocador |
| Elastic | Blade |
| Silicone gun | Electric iron |
It's time to get started:
Step 1:
- Cut out the orchid mold and with a wooden stick mark on the foami all around the contour, then cut out and dip a piece of foam rubber in fuchsia paint and start dabbing in the center part and then with another piece of foam rubber dipped in water sprinkle the paint with circular movements downwards, degrading the color.
- Now take another little piece of foam rubber and paint in white as I show in the picture and let dry.
Step 2:
- Now dip the foam rubber in yellow paint and dab and paint the center of the largest petal of the orchid and with an eyeliner brush, make a few lines with yellow paint.
- Then with a sponge or paintbrush run purple paint around the outline of the flower and let it dry.
- Heat the iron and place a part of the edge of the center petal and make small folds on the edge.
Step 3:
- Heat the flower petals one by one and fold back the smooth petals a little.
- Then heat the middle of the central petal, place it on the foam rubber and press it in the center with the applicator, then cut out some pistils in the shape of a teaspoon, place it on the heated iron and press it in the center with a brush stick.
Step 4:
- Now apply silicone on the pistil and on one of the edges of the bottom of the central petal and glue on the other edge to close the petal and press until dry.
- Separately with a stick, poke a hole in the center of the flower.
- Cut a small piece of wire and insert it in the bottom of the central petal, apply silicone in the center of the flower and insert the wire.
This is how our orchid will be assembled.
Step 5:
- Cut out small leaves in the shape of long teardrops and paint with sponge with darker green color.
- Now mark the mask on the black frosted foami, cut the edge with the scissors and then with the knife cut out the shape of the eyes, then place this piece on another matte black foami, mark and cut out.
- Then with crepe paper line the wires and start gluing the flowers, the ones without wires glue them on the front and the ones with wires on the back of the mask, placing them wherever you prefer.
Step 6:
- Now it's time to cut the elastic, this you have to do by placing the mask on the boy, girl or adult and measure from end to end the amount of elastic you need, then apply hot silicone on the elastic and glue to the foami.
- Then apply silicone on the back of the mask and glue the other side to cover the wires and the elastic, remember to always give a good finish to our work.
- Finally cut 4 strips of frosted purple foami of 2 or 3 millimeters, heat and shape the ends and glue to decorate.
Now I show you how this beautiful mask decorated with our national flower turned out.
Sources:
https://es.wikipedia.org/wiki/Flor_Nacional_de_Venezuela
https://www.pinterest.es/pin/476255729358439970/
Well it's finished, I hope you like my tutorial and serve as a guide if you ever need a project like this.
with DeepL, using HTML tags, my BLU G5 phone and I edited photos with GridArt.
I say goodbye happy to have shared this step by step with you, thank you for your support and if you like to comment, I will gladly answer you.
Greetings.
Has sido votado por
PROYECTO ENLACE
'Conectando Ideas y Comunidades'
PROYECTO ENLACE es un proyecto de curación de habla hispana enfocado en recompensar contenido de calidad y apoyar autores en su proceso de crecimiento en HIVE.
Creemos y apostamos por el futuro de esta gran plataforma, y estamos muy emocionados de poder hacerla crecer junto a esta comunidad. Así que te invitamos a publicar en nuestra COMUNIDAD y estar atento a todas las actividades que tenemos preparadas y que estaremos publicando en breve.
¿QUIERES AUTOMATIZAR TUS GANANCIAS DE CURACIÓN? SE PARTE DEL PROYECTO ENLACE APOYANDO A NUESTRO TRAIL EN HIVE.VOTE INGRESA AQUÍ PARA CONOCER LOS DETALLES.
¿QUIERES INVERTIR ENLACE? DESCUBRE COMO HACERLO Y GENERAR INGRESOS DE FORMA SEMANAL MEDIANTE TU DELEGACIÓN DE HP AQUÍ TE EXPLICAMOS COMO.
Te invitamos a participar en nuestro servidor de Discord: https://discord.gg/3S9y7BbWfS
Atentamente
EQUIPO ENLACE 2023
Buen día Equipo @enlace, felizmente agradecida por el apoyo a mi publicación.
Saludos.
Es un gran resultado, el acabado es verdaderamente hermoso!
Orchids are beautiful both in real world and in your DIY world. Very nice work.
Gracias @diyhub por tan bonito comentario y apoyo a mi publicación.
Saludos.
!DIY
!discovery 23
This post was shared and voted inside the discord by the curators team of discovery-it
Join our Community and follow our Curation Trail
Discovery-it is also a Witness, vote for us here
Delegate to us for passive income. Check our 80% fee-back Program
Buen día @discovery-it muchas gracias por su voto y apoyo!
Saludos.
Te ha quedado demasiado lindo. Las orquídeas son flores hermosas. Me gustaría un antifaz así, se ve súper bonito, el color negro del antifaz me encanta porque permite que luzcan más las orquídeas.
Gracias amiga Lelys, un placer haberlo compartido y que lástima que no estés cerca de mí, para obsequiartelo.
Y si amiga el fondo del negro escarchado realza las flores y su color.
Gracias por comentar.
Saludos.
Ya con la intención basta. Te lo agradezco.
Quedó muy hermoso, quedé fascinada 🤩
Que bueno que te gustó y Muchas gracias por comentar!
Saludos
Muy lindo trabajo, la verdad me gustó el trabajo que hiciste con las flores, es genial.
Recuerda apoyar a otros usuarios de la comunidad con tus valioso comentarios.
Saludos cordiales.
Muchas gracias por comentar, que bueno que saber que te gustó!
Feliz tarde, saludos también para ti.
Me gustó mucho este trabajo @elmundodebetty el paso. Paso está muy bien detallado y el resultado final es precioso. Te felicito.
!PIZZA 🍕
Buenas tardes @chacald.dcymt, muchas gracias por el comentario.
Saludos.
Ha quedado hermoso, un trabajo genial 👍
Gracias amiga, que bueno que te gustó!
Yay! 🤗
Your content has been boosted with Ecency Points, by @hive-130560.
Use Ecency daily to boost your growth on platform!
Support Ecency
Vote for new Proposal
Delegate HP and earn more
Esa orquídea quedó preciosa, me gustó cómo explicaste el proceso y también el maquetado, es muy agradable a la vista. Éxitos y bendiciones para ti. Te envío un abrazo desde la distancia 🤗
Hola amiga, muchas gracias por comentar mi publicación, feliz de que te haya gustado.
Igualmente, espero y deseo bendiciones para ti.🌈