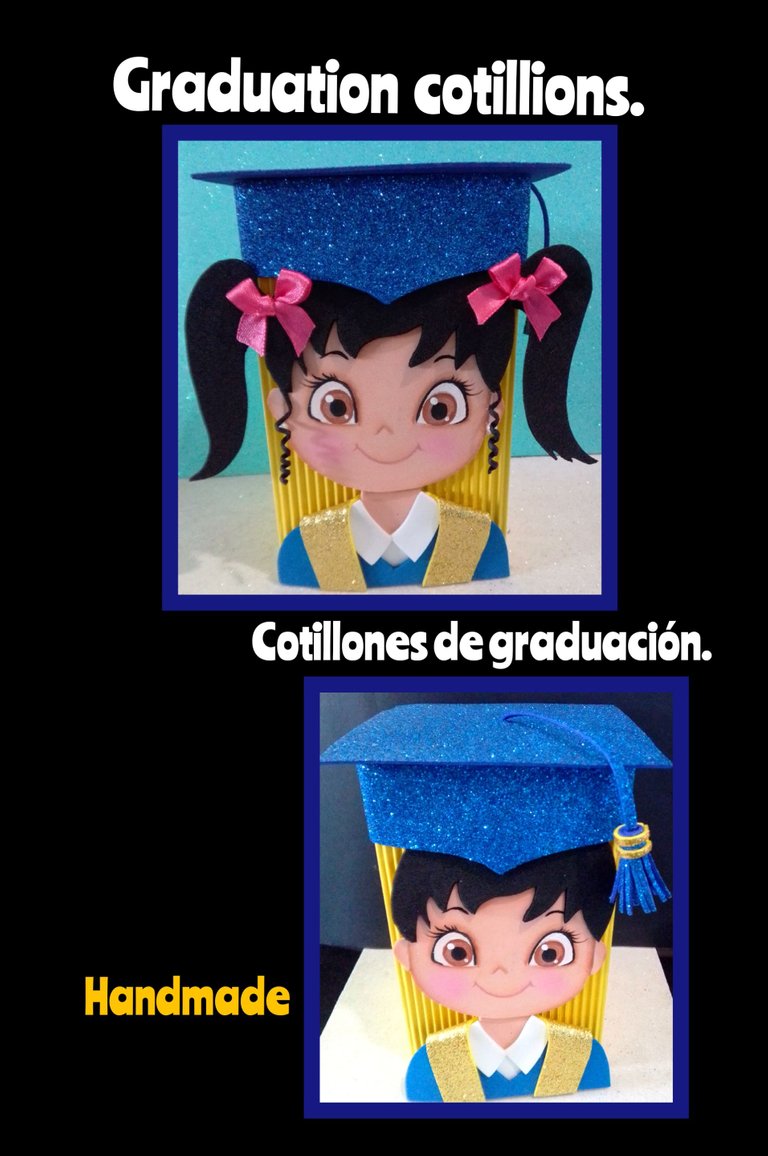
Hagamos cotillones escolares de graduación. Let's have school graduation cotillions.
Buenas noches querida comunidad de hive.
Bienvenidos todos los que están de visita en mi Blog.
En mi tutorial de hoy les enseñaré como hacer cotillones escolares, sabes que ya se acerca la fecha de culminación del año y las maestras están pidiendo con tiempo a los representantes la carpeta, el cotillón y birrete para los niños que pasan de una etapa escolar a otra, y como el presupuesto está corto, es bueno que vayas comprando el material para que los vayas haciendo poco a poco.
Entonces voy a comenzar haciendo el cotillón y quiero invitarte a que me acompañes, aprendas y lo hagas conmigo, luego te mostraré en otros tutoriales como hacer la carpeta y el birrete.
Vas a necesitar:
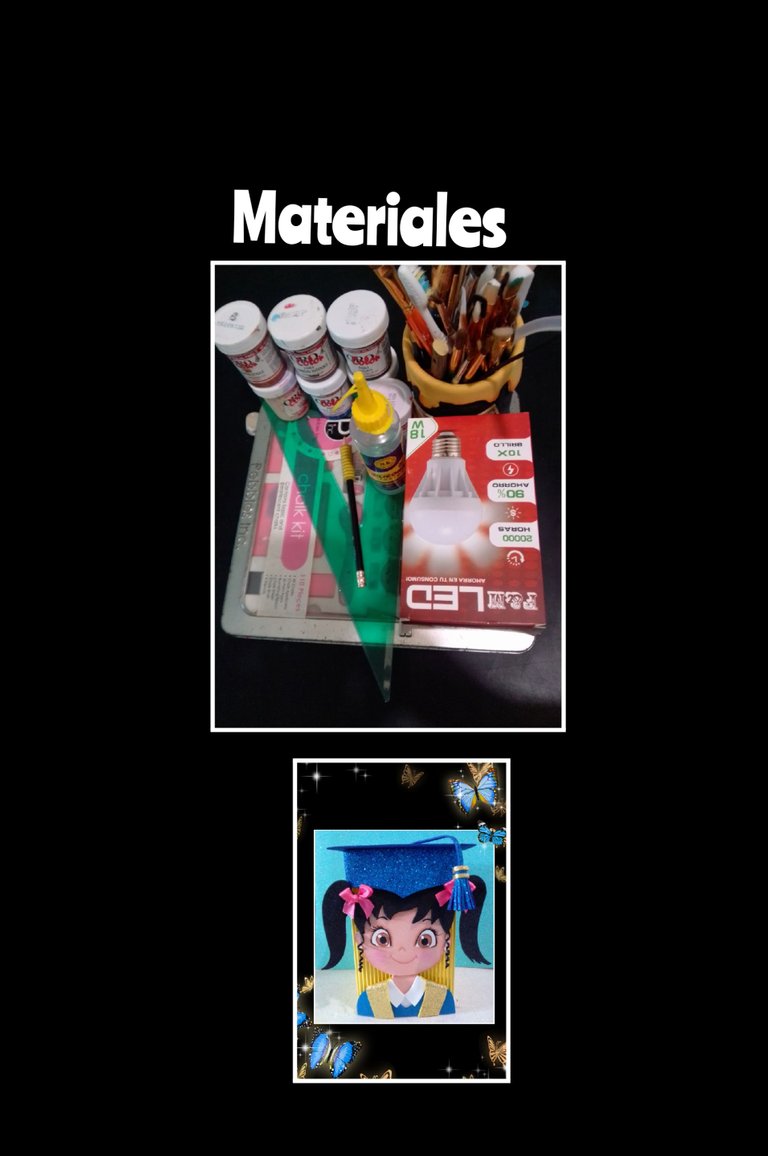
| Cartulina corrugada | Caja de bombillo |
|---|---|
| Foami escarchado y mate | Regla |
| Pinturas y pinceles | Lápiz |
| Tijera y cuchilla | Cinta de tela |
| Tiza | Perlitas |
| Palito de madera | Dibujo |
| Plancha eléctrica | Anime |
Listos los materiales no esperemos más y comencemos!
Paso 1:

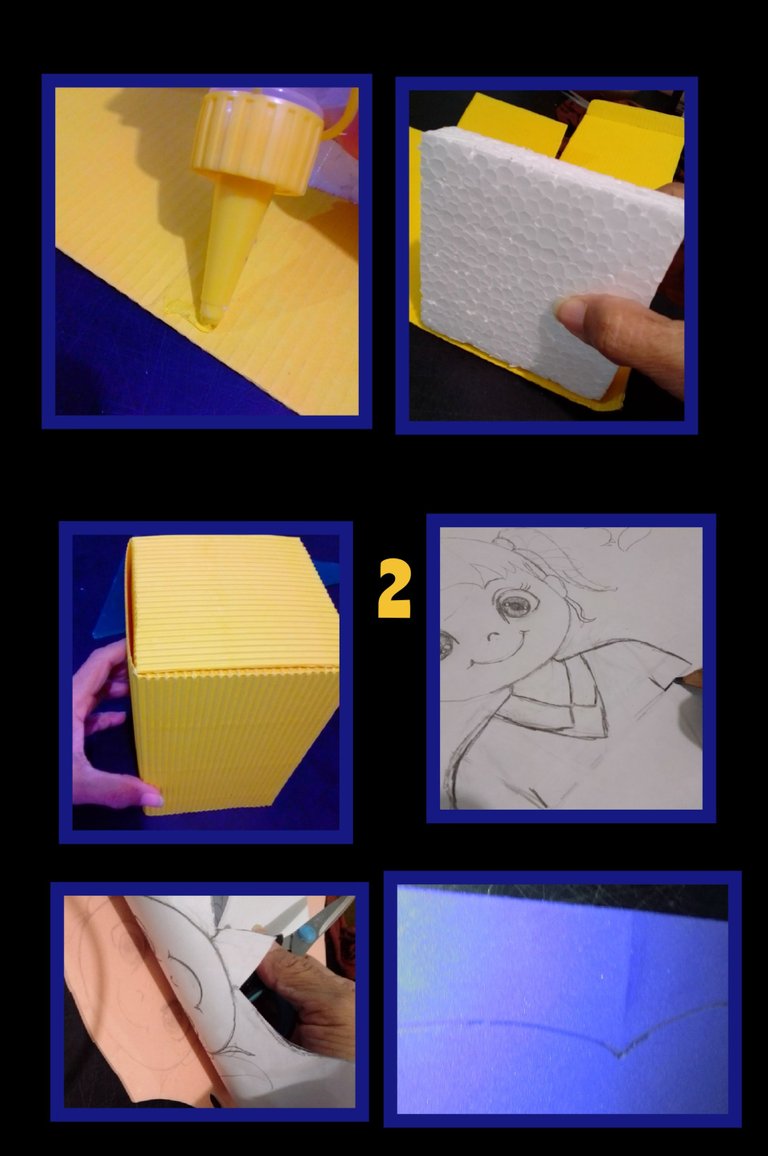
- Lo primero será desarmar la caja de la bombilla grande, luego coloca sobre la cartulina corrugada y marca todo el contorno menos las pestañas de la parte inferior como se vé en la foto.
- Después de marcar, recorta y remarca con la punta de la tijera o bolígrafo sin tinta pero suavemente por todas las líneas trazadas y haz los dobleces.
- Aparte mide el ancho de la caja esta mide 9x9cm y marca sobre un pedazo de anime y recorta con cuchilla.
Paso 2:
- Ahora aplica silicón en la pestaña lateral y en la parte baja de la caja, luego pega el anime y cierra la caja, como puedes ver es un proceso muy fácil.
- Luego remarca el dibujo del graduando y comienza a transferir cada pieza sobre el color foami correspondiente, colocando el dibujo arriba y frota con la tijera para que se marque y recorta.
- Aparte recorta una tira de foami escarchado azul de 3,5cm de ancho y del tamaño del contorno de ancho de la caja.
- Ahora en el centro de la tira, recorta la forma del frente del birrete.
Paso 3:
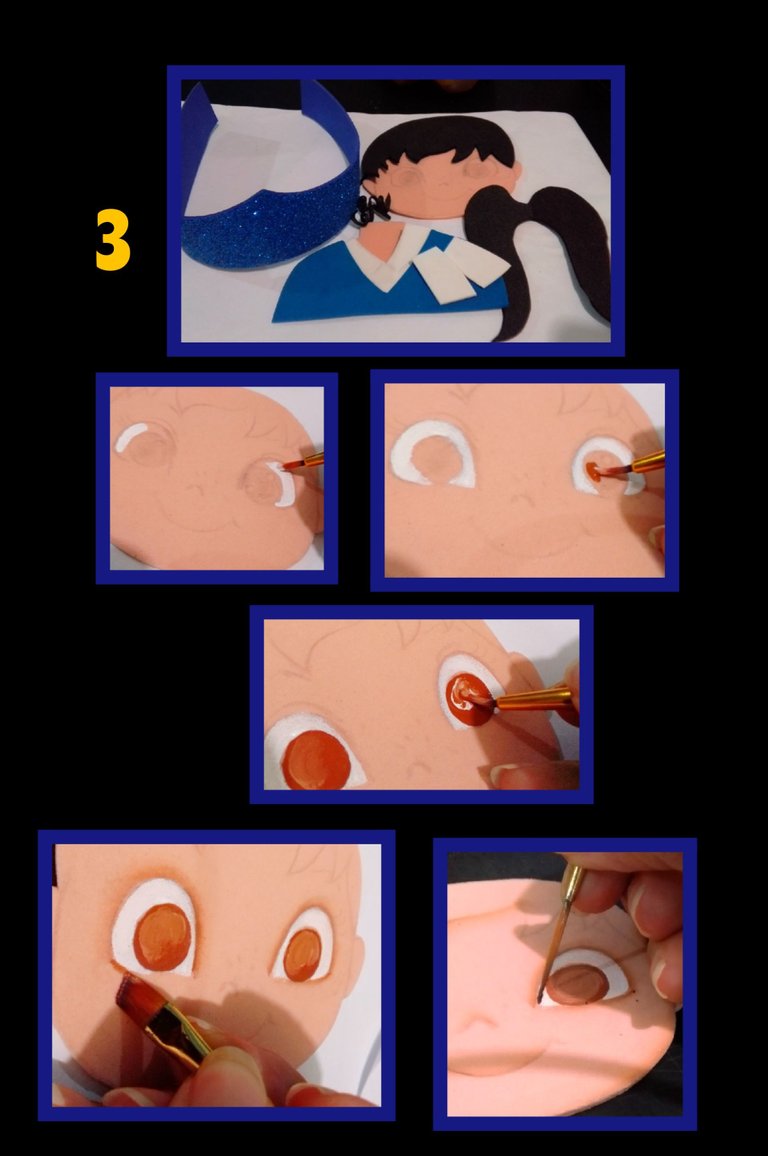
- Después de recortar todas las piezas, comienza a pintar la carita, aplica pintura blanca en los ojos y deja secar, luego aplica el color deseado y liga con pintura blanca y riega y deja secar.
- Aparte sombrea con pintura ocre el contorno de los ojos, también puedes usar tiza, Luego delinea con pintura negra o marrón oscuro los ojos, pestañas, cejas, nariz y boca.
Paso 4:

- Ahora aplica silicón en la parte alta de la cara y pega el cabello, luego recorta un cuadrado en foami azul de 11x11 para la tapa, un cuadrito de 3,5x 4cm y recorta en tiritas para la borla.
- Aparte arma el busto pegando cuello y bufanda.
- Luego coloca la tapa de foami centrando con la tapa de la caja y haz un orificio en el centro con un palito de madera.
Paso 5:

- Aplica silicón en la tapa (foami azul), voltea la caja y pega cuadrando las dos tapas y deja secar bien, luego inserta la tirita por el orificio pero, de adentro hacia afuera, aplica silicón y pega en la base de la tapa de cartulina.
- Ahora aplica silicón al cuadrito de flequillos y enrolla para formar la borla y luefo decora con tiritas doradas.
Paso 6
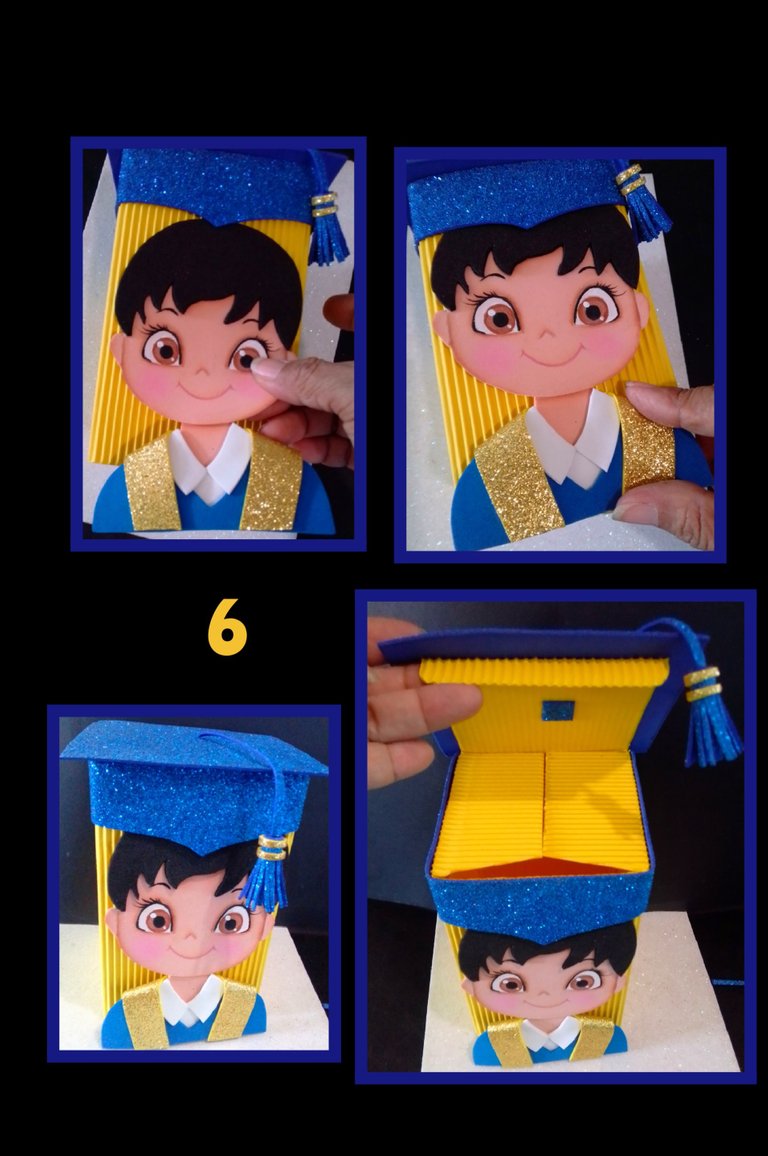
- Aplica silicón en la parte trasera de la figura y pega sobre la caja centrando que quede la forma del birrete en la frente del muñequito.
- Así queda terminado este hermoso cotillón para niños.
Paso 7:
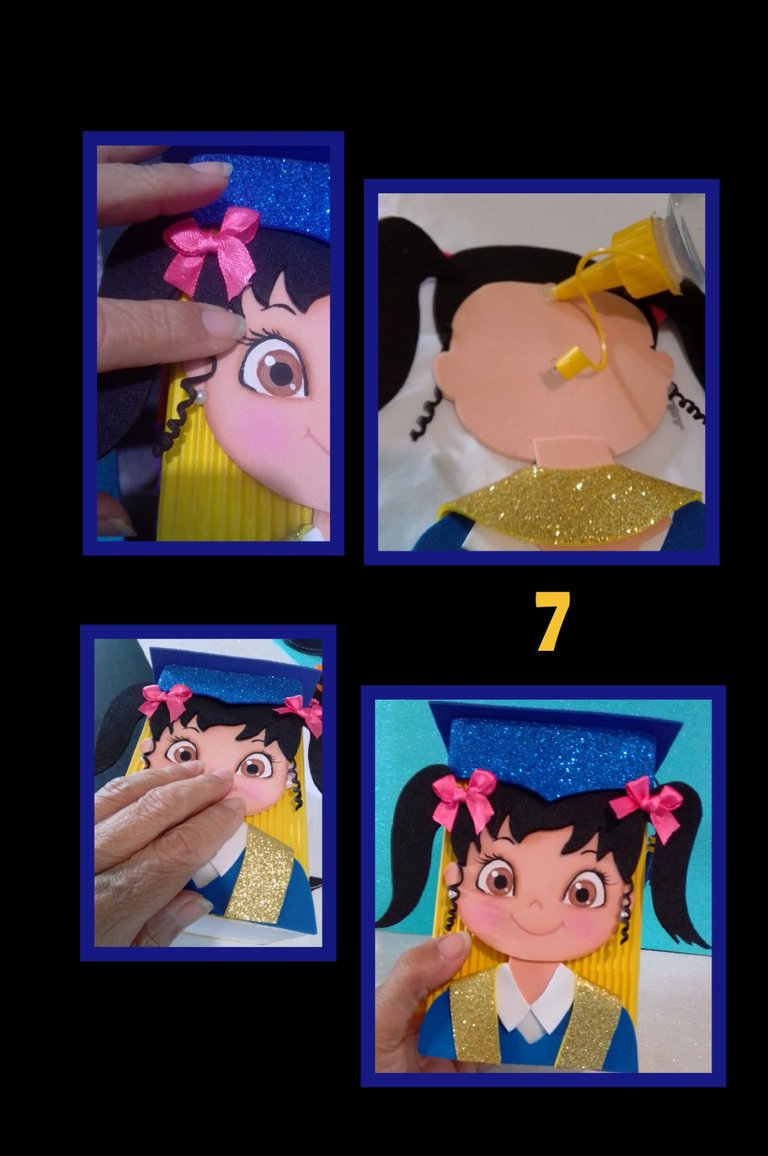
- Con el mismo molde puedes hacer hembra y varón, sólo que a la niña vas a hacer moños, rulos y pondrás lazos y zarcillos.
- Para hacer los rulos, recorta una tira de foami como de 1,5 a 2mm, enrolla en un palito o alambre, sujeta las puntas con hilo o type, calienta la plancha y,gira para que caliente por todos lado los rulos y deja enfriar.
- Aplica silicón y pega a la caja.
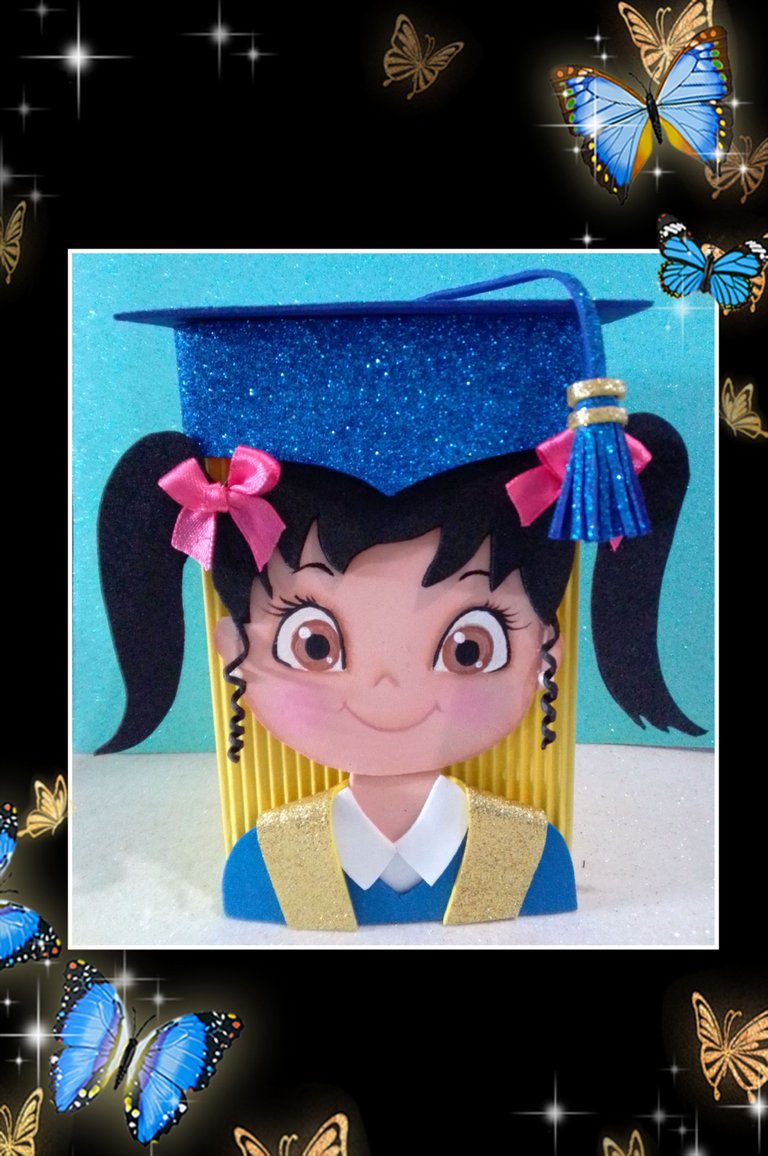
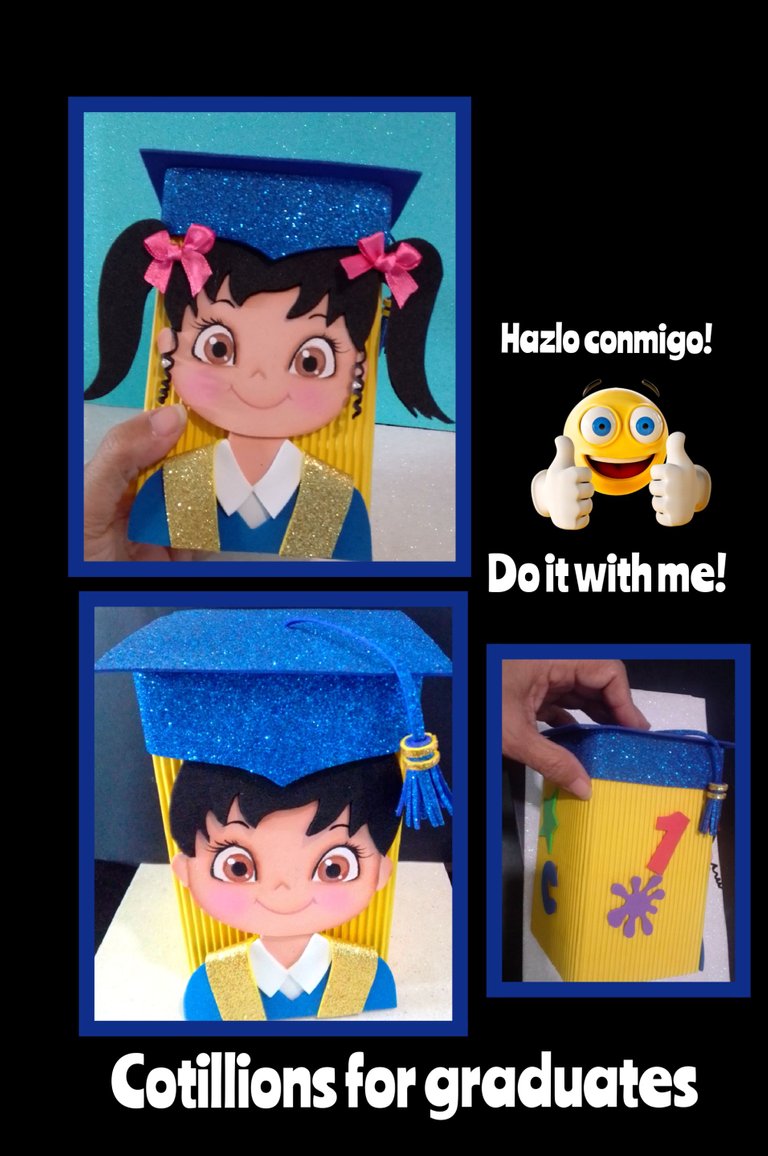
Ahora te muestro como quedaron!
Fuente:https://www.pinterest.es/pin/476255729358527690/
Mi publicación está traducida con DeepL
Usé Etiquetas HTML
Teléfono BLU G5
Editor de fotos GridArt
Y con esto llegó la hora de despedirme no sin antes agradecer tu visita, apoyo y si gustas deja tu comentario. feliz estaré para responderte.
Hasta mi próximo tutorial.
English:
Good evening dear hive community.
Welcome to all of you who are visiting my Blog.
In my tutorial today I will show you how to make school cotillions, you know that the end of the year is approaching and the teachers are asking with time to the representatives the folder, the cotillion and cap for the children who pass from one school stage to another, and as the budget is short, it is good that you go buying the material so that you go making them little by little.
So I'm going to start making the cotillion and I want to invite you to join me, learn and do it with me, then I'll show you in other tutorials how to make the folder and the biretta.
You will need:
| Corrugated cardboard | Light bulb box |
|---|---|
| Frosted and matte Foami | Ruler |
| Paints and paintbrushes | Pencil |
| Scissors and razor | Cloth ribbon |
| Chalk | Beads |
| Wooden stick | Drawing |
| Electric iron | Anime |
With the materials ready, let's not wait any longer and get started!
Step 1
- The first thing is to disassemble the box of the big bulb, then place it on the corrugated cardboard and mark all the contour except the tabs at the bottom as shown in the photo.
- After marking, cut out and outline with the tip of the scissors or pen without ink but gently along all the lines drawn and make the folds.
- Then measure the width of the box which measures 9x9cm and mark on a piece of anime and cut out with a knife.
Step 2
- Now apply silicone on the side flange and on the bottom of the box, then glue the anime and close the box, as you can see it is a very easy process.
- Then mark the drawing of the graduate and start transferring each piece on the corresponding foami color, placing the drawing on top and rub with the scissors to mark it and cut it out.
- Cut a strip of blue frosted foami 3.5cm wide and the size of the width of the box.
- Now in the center of the strip, cut out the shape of the front of the biretta.
Step 2
- Now apply silicone on the side flap and on the bottom of the box, then glue the anime and close the box, as you can see it is a very easy process.
- Then mark the drawing of the graduate and start transferring each piece on the corresponding foami color, placing the drawing on top and rub with the scissors to mark it and cut it out.
- Cut a strip of blue frosted foami 3.5cm wide and the size of the width of the box.
- Now in the center of the strip, cut out the shape of the front of the biretta.
Step 3.
- After cutting out all the pieces, start painting the face, apply white paint on the eyes and let dry, then apply the desired color and bind with white paint and water and let dry.
- Then outline with black or dark brown paint the eyes, eyelashes, eyebrows, nose and mouth.
Step 4
- Now apply silicone on the upper part of the face and glue the hair, then cut a square in blue foami 11x11 for the lid, a square of 3.5x 4cm and cut into strips for the tassel.
- Then assemble the bust by gluing the neck and scarf.
- Then place the foami lid centering it with the box lid and make a hole in the center with a wooden stick.
Paso 5:
- Apply silicone to the lid (blue foami), turn the box upside down and glue the two lids together and let dry well, then insert the strip through the hole but from the inside out, apply silicone and glue to the base of the cardboard lid.
- Now apply silicone to the fringe square and roll up to form the tassel and then decorate with gold strips.
Step 6
- Apply silicone to the back of the figure and glue on the box, centering the shape of the biretta on the doll's forehead.
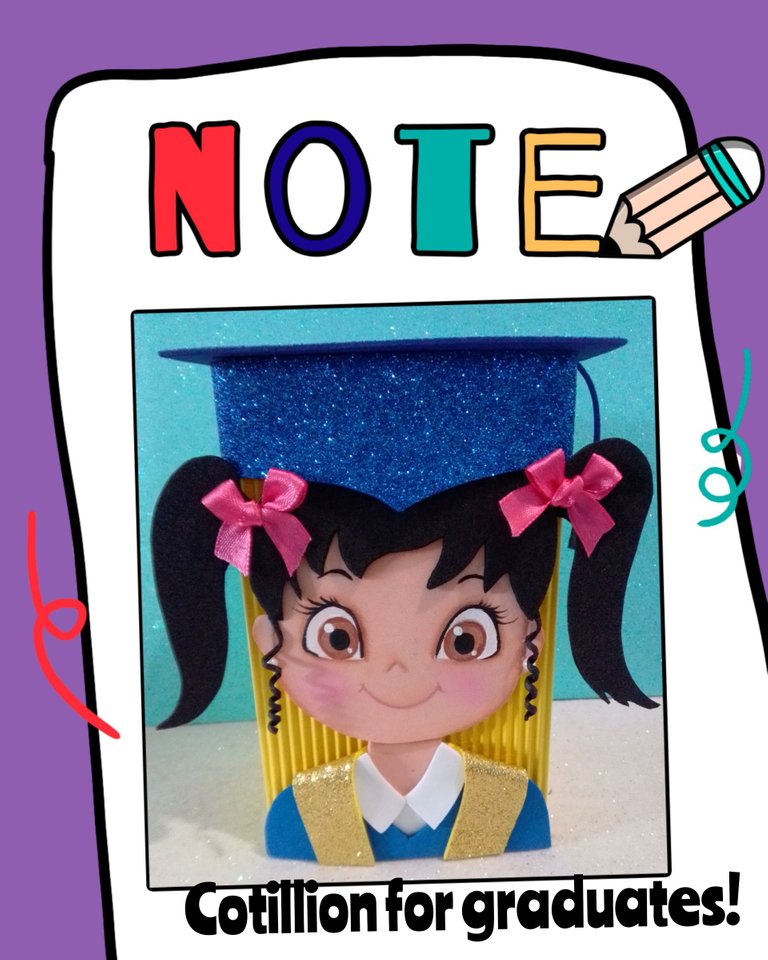
- This is how this beautiful cotillion for children is finished.
Step 7
- With the same mold you can make a boy and a girl, only that you will make bows, curls, bows and tendrils for the girl.
- To make the curls, cut a strip of foami about 1.5 to 2mm, roll it on a stick or wire, fasten the ends with thread or type, heat the iron and turn it so that it heats the curls on all sides and let it cool.
- Apply silicone and glue to the box.
Now I'll show you how they turned out.
source: https://www.pinterest.es/pin/476255729358527690/
My post is translated with DeepL
I used HTML Tags
BLU G5 phone
GridArt photo editor
And with this it's time to say goodbye, but first I want to thank you for your visit, support and if you like, leave your comment, I'll be happy to answer you.
Until my next tutorial.
Que trabajo tan hermoso e impecable , son dejar de resaltar la belleza de los ojos de cada muñequito quedaron excelente. Gran trabajo 👌
Buen dia amiga, gracias por tus palabras en el comentario.
Hecho con amor para compartir con ustedes.
Quedaron hermosos, me encantaron 😍
Gracias amiga, me alegra que te hayan gustado.
Feliz día.
Has sido curado por @visualblock / You've been curated by @visualblock
Bienvenidas delegaciones / Delegations welcome
Encuentra nuestra comunidad aquí / Find our community here
Trail de Curación / Curation Trail
@visualblock agradecida por el apoyo.
Feliz tarde.
Yay! 🤗
Your content has been boosted with Ecency Points, by @hive-130560.
Use Ecency daily to boost your growth on platform!
Support Ecency
Vote for new Proposal
Delegate HP and earn more
Buenas tardes @ecency y @hive-130560 muchas gracias por el apoyo a mi publicación.