Macramé bracelet with snake stitch technique - Step by step [ESP/ENG]
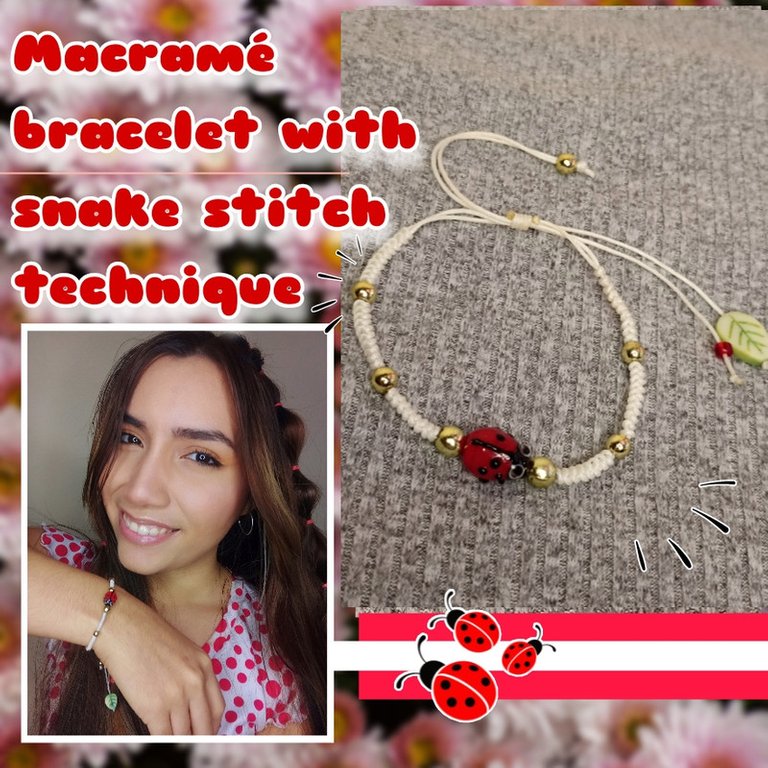
Hola queridos amigos de Hive ❤️ un saludo para todos los que me visitan el día de hoy 🤗. En esta oportunidad les quiero compartir y mostrar una vez más un tutorial súper sencillo para realizar una pulsera en macramé fabricada con la técnica del nudo de serpiente que es muy bonito y super usado para este tipo de accesorio. Para ello dedici decorarla con cuentas doradas intercaladas y una piedra central en forma de mariquita, una idea que puedes tomar como guía para tu imaginación usando los hilos y piedras que quieras, hoy te invito a que aprendas junto a mi a realizarlo. Y ahora sí, sin más que agregar... Comencémos!!
Hello dear friends of Hive ❤️ greetings to all who visit me today 🤗. This time I want to share and show you once again a super simple tutorial to make a macrame bracelet made with the snake knot technique which is very nice and super used for this type of accessory. To do this dedici decorate it with gold beads interspersed and a central stone in the shape of ladybug, an idea that you can take as a guide for your imagination using the threads and stones you want, today I invite you to learn with me to do it. And now, without further ado.... Let's get started!

Texto sin editar
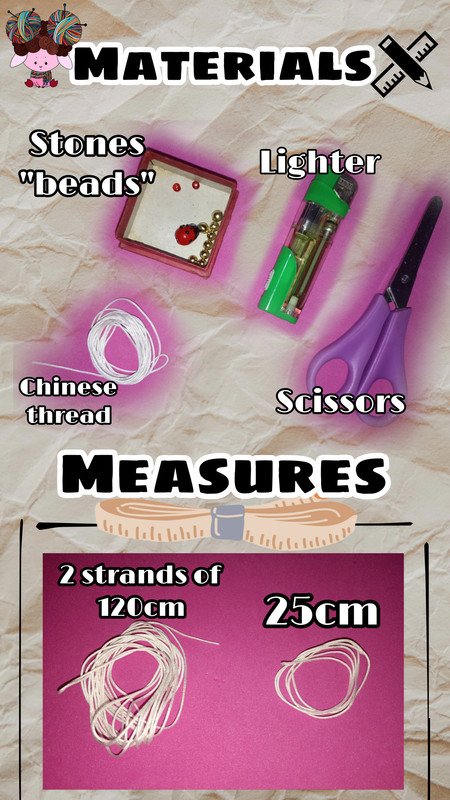
Materiales:
- Hilo chino
- tijeras
- encendedor
- cuentas
Medidas:
- 2 hebras de 120cm
- 1 hebra de 25cm
Unedited text
Materials:
- Chinese thread
- scissors
- lighter
- beads
Measures:
- 2 strands of 120cm
- 1 strand of 25cm

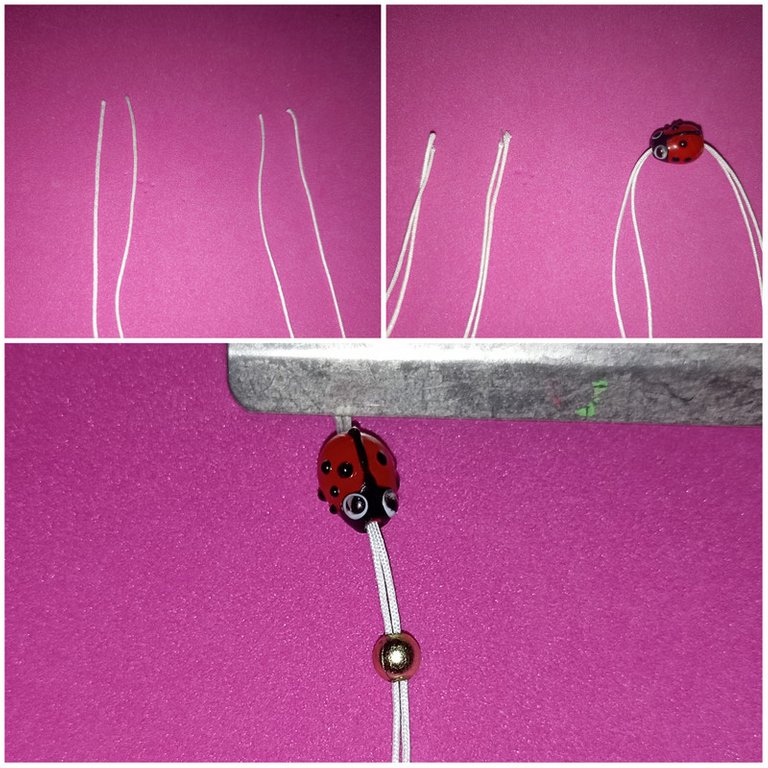
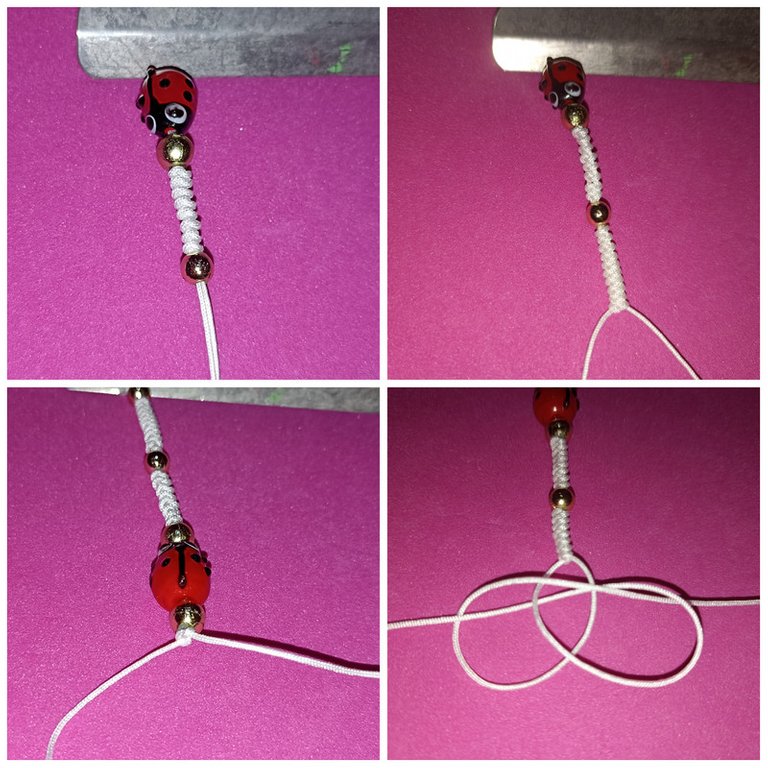
Iniciaremos primero usando los dos hilos de 120cm, yo usaré uno de color blanco a combinación con el resto de piedras, pero si deseas puedes usar el color que quieras. Luego ubicaremos el centro e introduciremos la piedra central, en mi caso la mariquita y una de las cuentas, lo coloco en mi tabla con un gancho para sujetar y empezaremos a tejer.
We will start first using the two strands of 120cm, I will use a white one in combination with the rest of the stones, but if you want you can use the color you want. Then we will place the center and introduce the central stone, in my case the ladybug and one of the beads, I place it on my board with a hook to hold it and we will start weaving.
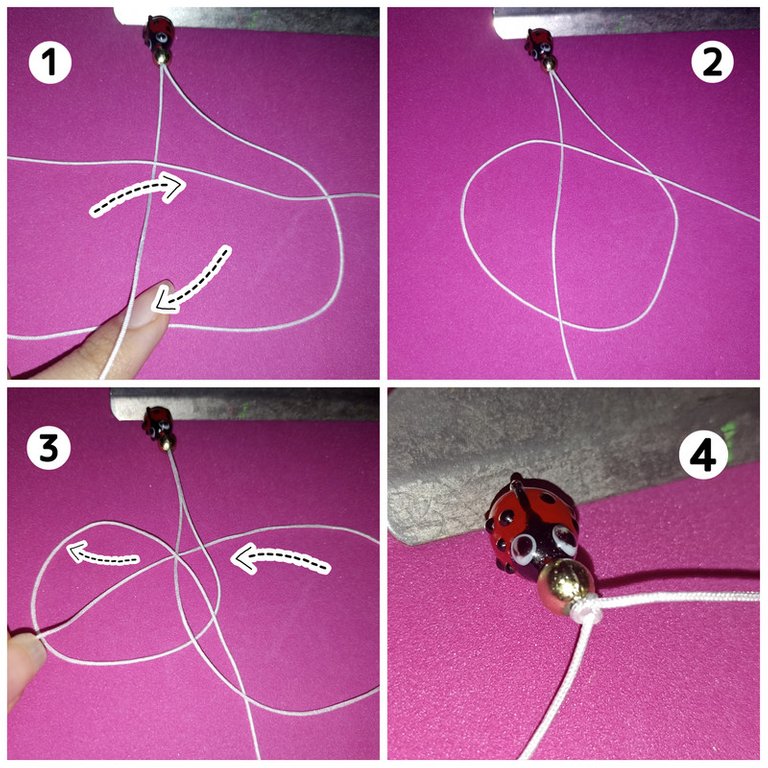
Para realizar este nudo vamos a tomar el hilo del lado derecho y lo pasaremos por debajo del izquierdo y luego por encima. Luego con el hilo izquierdo lo pasaremos por encima del hilo sobrante del lado derecho, y por último lo pasamos por debajo en el centro y lo sacamos por el círculo que formamos anteriormente. Jalamos ambos hilos con cuidado hasta que se presione y forme el nudo.
To make this knot we are going to take the thread from the right side and pass it under the left one and then over it. Then with the left thread we will pass it over the excess thread on the right side, and finally we pass it under the center and pull it out through the circle we formed previously. We pull both threads carefully until it is pressed and forms the knot.
De allí continúe realizando 8 nudos e introduci una cuenta, realice 10 nudos y volvi a introducir otra cuenta. Volteamos el tejido y Repetimos el proceso ahora del otro lado.
From there continue making 8 knots and introduce a bead, make 10 knots and introduce another bead. Turn the fabric over and repeat the process now on the other side.
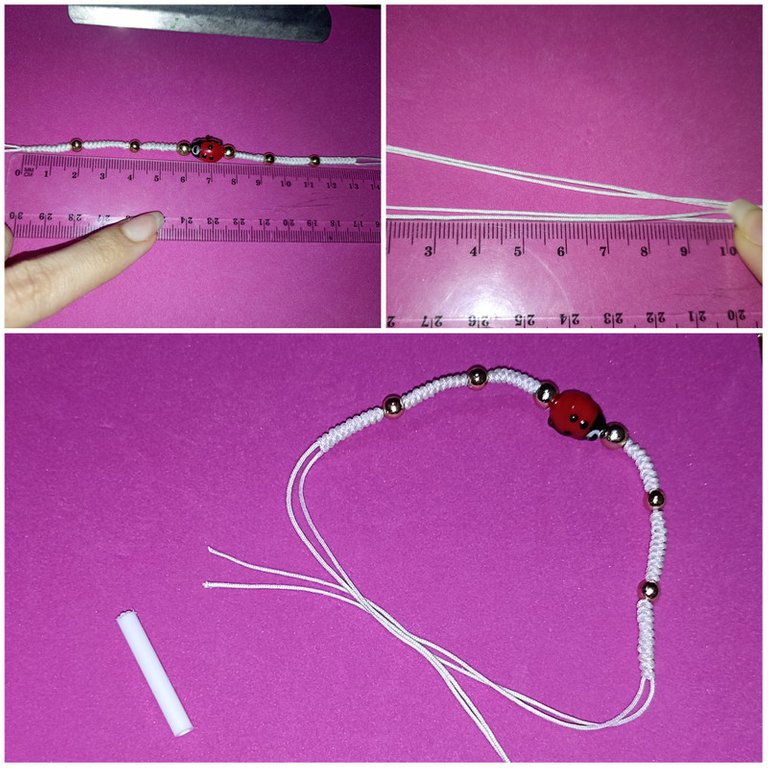
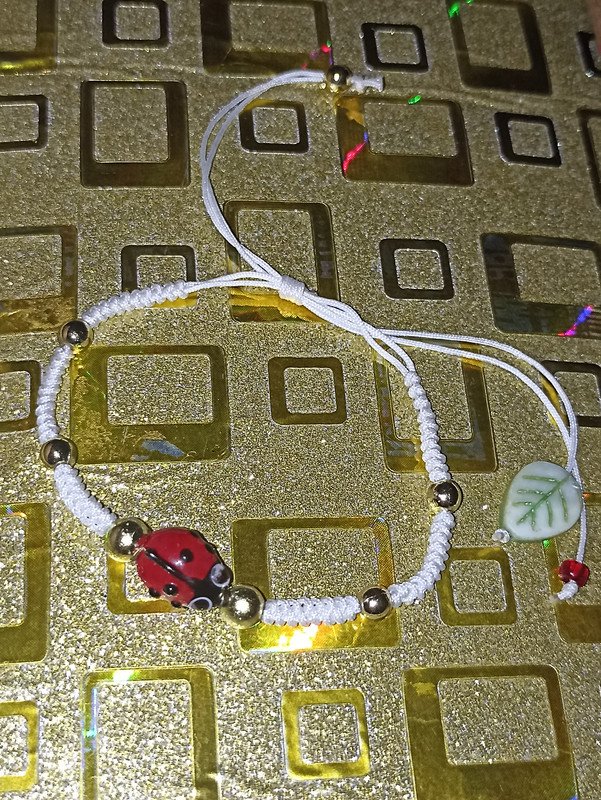
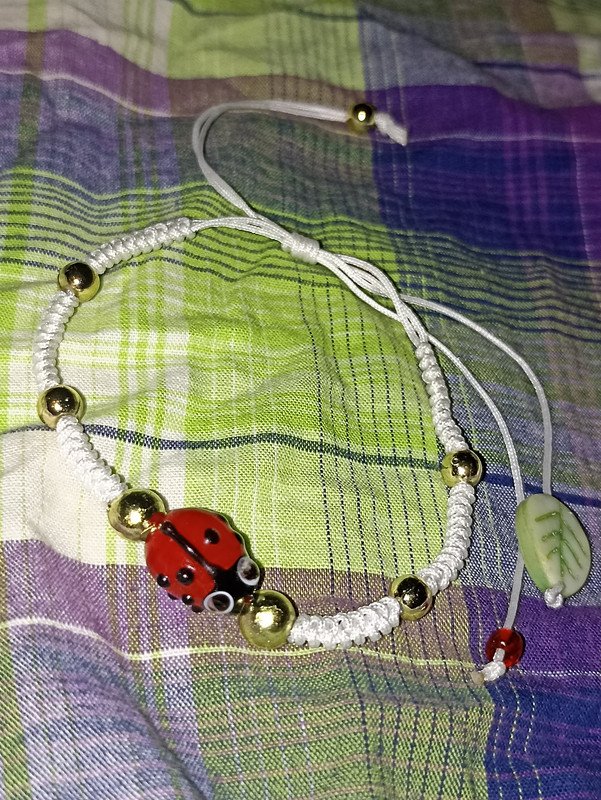
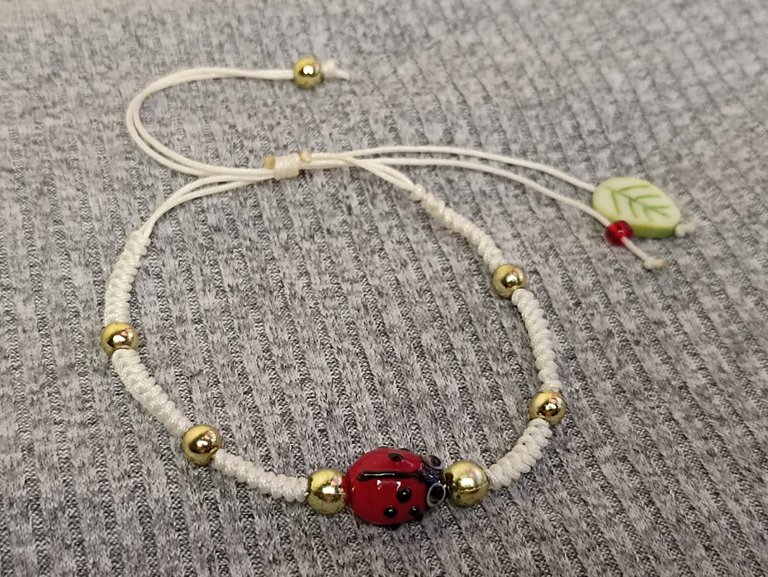
Al final la pulsera mediria 13cm aproximadamente, y los hilos restantes 10cm. Y ahora para realizar el nudo para que nuestra pulsera cierre, vamos a necesitar un tubo pequeño de plástico, como de chupeta, de aproximadamente 3cm.
In the end the bracelet would measure approximately 13cm, and the remaining threads 10cm. And now to make the knot for our bracelet to close, we will need a small plastic tube, like a lollipop, of about 3cm.
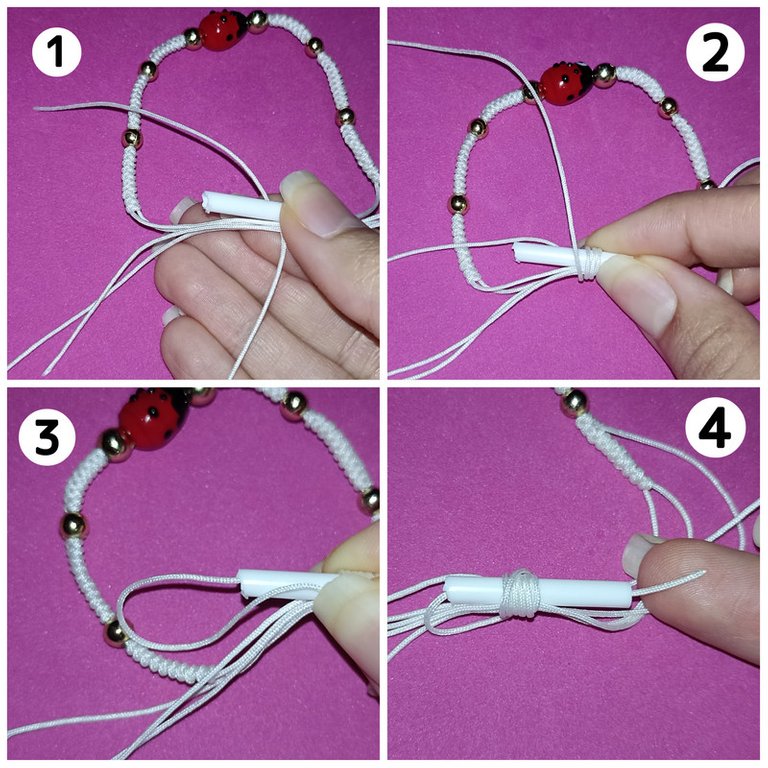
Ahora vamos a colocar el tubo en el centro de ambos hilos y empezaremos a enrollar de derecha a izquierda, con 5 vueltas esta perfecto, luego introducimos el hilo por el agujero del tubo y lo sacamos por el otro lado, jalamos y apretamos hasta formar el nudo.
Now we are going to place the tube in the center of both threads and start winding from right to left, with 5 turns it is perfect, then we introduce the thread through the hole in the tube and pull it out on the other side, pull and tighten until the knot is formed.
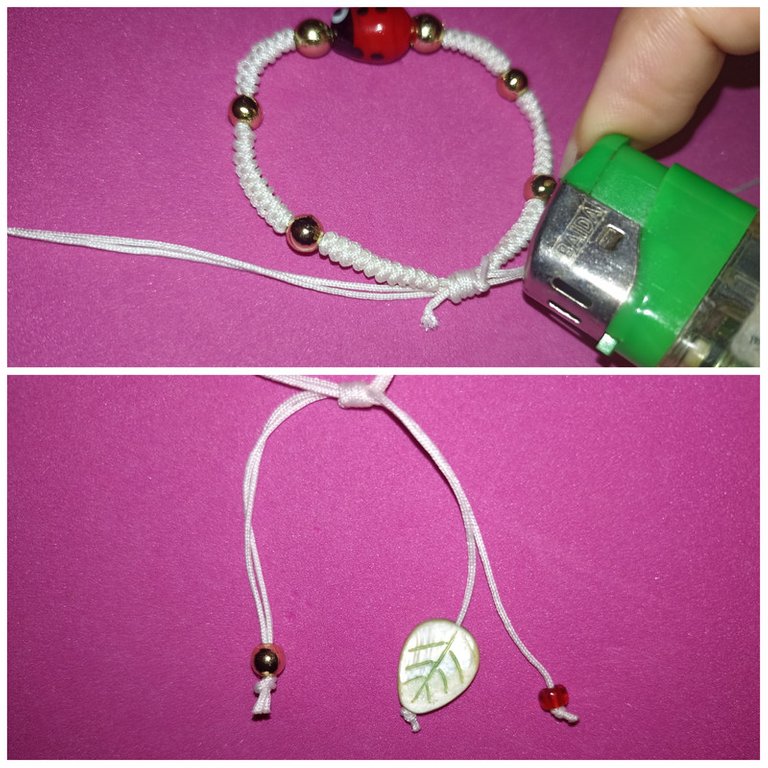
Recortamos el excedente y quemamos las puntas. Luego como decoración agregaremos en los hilos sobrantes una cuenta y otras piedras a combinación, los introducimos por ambos hilos y hacemos un nudo al final.
We trim the excess and burn the ends. Then as decoration we will add a bead and other stones in combination to the excess threads, we introduce them through both threads and we make a knot at the end.
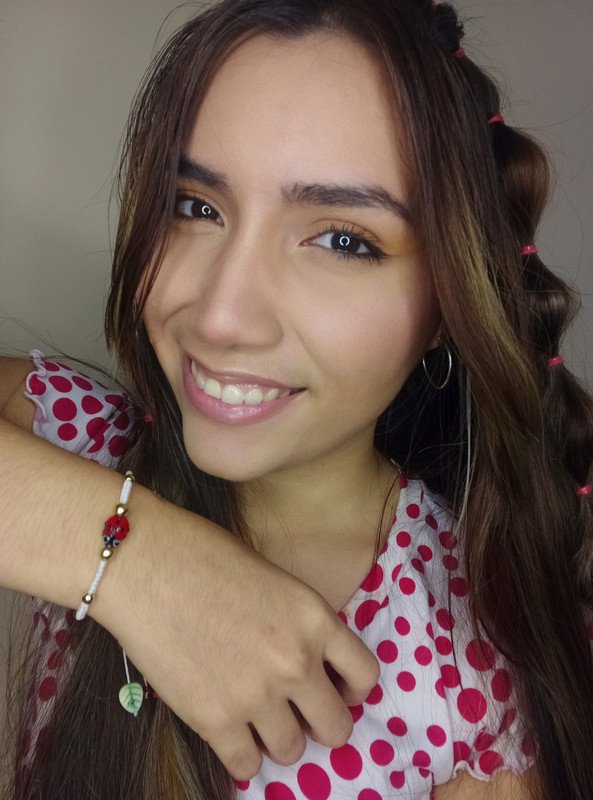
Y aquí les muestro la pulsera terminada, como ven aunque parece complicada y un tanto enredada, realmente no lo es una vez le agarras el truco y la práctica, este tipo de técnica me gustó mucho porque la hace lucir muy bonita y muy llamativa además que la puedes combinar como más te guste con la diferentes tipos de piedras y colores de hilo. No le temas a los nudos ! Es súper sencilla de hacer y si te gusto te animo a que lo intentes y lo hagas a tu gusto y con el diseño que más te guste, solo es cuestión de práctica, mucha creatividad y por supuesto un toque secreto de amor para que el trabajo quede con el mejor acabado 🥰. Espero les haya gustado, me encantó mostrarles este pequeño tutorial con la técnica del Macramé de nudo de serpiente inspirada en una mariquita ☺️, espero compartirles muy pronto nuevos trabajos, con mucho cariño me despido y será hasta la próxima 💕.
And here I show you the finished bracelet, as you can see although it seems complicated and a bit tangled, it really is not once you get the hang of it and practice, I really liked this type of technique because it makes it look very pretty and very striking plus you can combine it as you like with different types of stones and thread colors. Don't be afraid of knots ! It is super simple to do and if you like it I encourage you to try it and do it to your liking and with the design that you like, it's just a matter of practice, lots of creativity and of course a secret touch of love so that the work is with the best finish 🥰. I hope you liked it, I loved to show you this little tutorial with the Macramé snake knot technique inspired by a ladybug ☺️, I hope to share with you very soon new works, with much love I say goodbye and will be until next time 💕.
Todo el contenido es de mi autoría y las imágenes son de mi propiedad
Cámara: Redmi note 10s
Uso un aro de luz LED como base para mi teléfono y tomarme las fotos
All content is my own and images are my property
Camera: Redmi note 10s
I use an LED light ring as a base for my phone to take pictures of myself

Edición y Separador|Editing and Separator
App Picmonkey - Picsart
Traductor|Translator
DeepL

You have received a 1UP from @thecuriousfool!
@ccc-curator, @pimp-curator, @pal-curator
And they will bring !PIZZA 🍕.
Learn more about our delegation service to earn daily rewards. Join the Cartel on Discord.
Nos encanta está técnica que nos has enseñado, el coqueto queda 👏 maravilloso, gran trabajo que nos regalas.
Aw muchas gracias 🤗☺️...la verdad que esta fue una muestra de práctica, pero de los nudos que he hecho, este me gustó mucho porque queda tal como una que mire en una tienda..y ya por fin podré hacérmela 😋. Un placer compartirlo y que así como yo, otros también lo puedan hacer!!. Un saludito y gracias por su apoyo!!💕
Que hermoso 😍!
Muchas gracias bella!! Me alegra que te gustara ☺️💕
A simple yet lovely bracelet. Thank you for sharing the steps on how did you made it. 😊
!1UP