DIY- Zarcillos largos en tonos rojos 🍎❤️ || Long tendrils in shades of red 🍎❤️ [ESP/ENG]
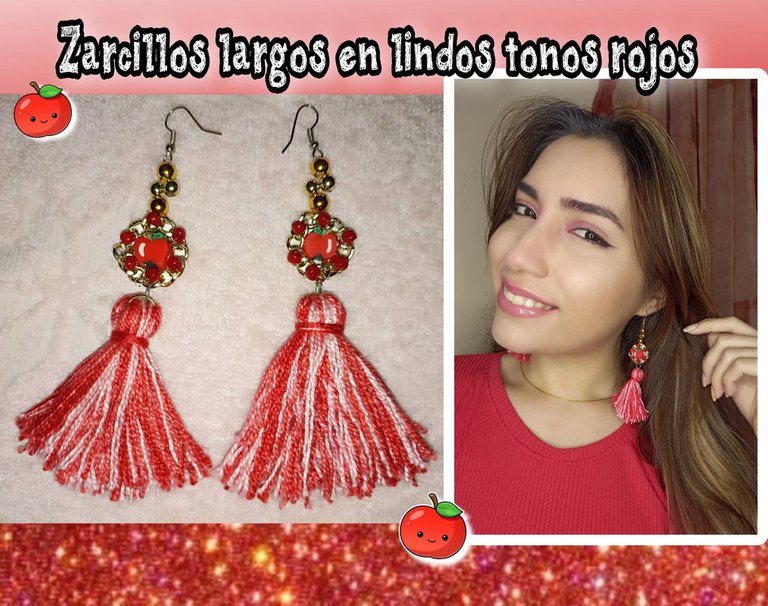


Hola amigos de Hive ❤️ hoy les quiero compartir una vez más un pequeño tutorial para realizar unos lindos zarcillos o pendientes en lindos tonos rojos y algunos dorados también 😁, pero no les hablo de cualquier zarcillo, sino unos largos o maxi zarcillos como también se le conocen. La verdad es que curiosamente antes este estilo no me gustaban del todo, pero ya buscando ideas y millones de diseños me resultaron bastante atractivos al final, además que hoy en día están súper de moda, llevando incluso solo uno de ellos como solitarios. El diseño que les mostraré a continuación tendrá como centro protagonista una piedra o cuenta en forma de manzana, una borla con matices rojos y algunos detalles en dorado que creo le darán ese toque a nuestros zarcillos. Si te gusta, te animo a que me acompañes y aprendas junto a mi a realizarlo, y ahora sí, sin más que agregar... Comencémos!! 🤗

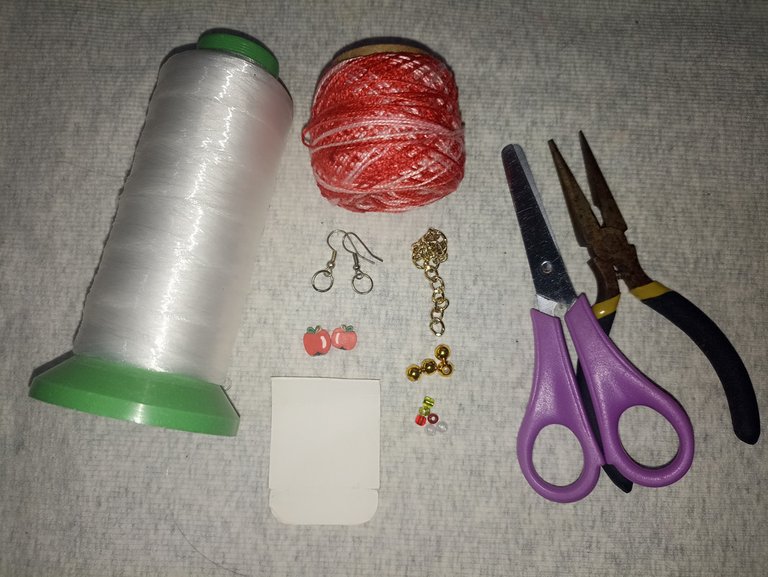
Materiales:
- 30cm Hilo nylon
- Hilo matizado
- Cadena
- Cuentas
- Dijes en forma de manzana
- Perlas doradas
- Cartón
- Tijera
- Pinzas
- Silicon liquido
- Anzuelos para zarcillos

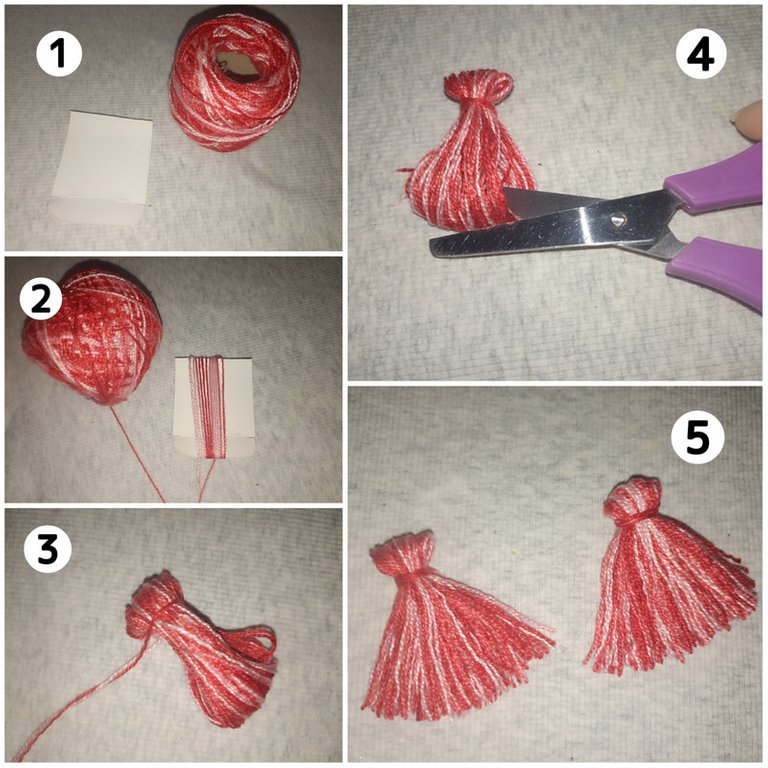
Para este tutorial voy a dividir los pasos, así que primero voy a mostrarles cómo realice las borlas, para ello utilizaré un cuadrado de cartón, que luego usaré más adelante, y empezaré a enrollar con el hilo de tejer matizado, yo use este que es más fino y delgado, pero si deseas puedes usar el que prefieras. Una vez haya dado suficientes vueltas, sacamos el pequeño rollo de hilo del cartón, amarramos con otro trozo de hilo en la parte superior para sujetarlo y darle forma y luego cortamos todo el dobles del hilo en la parte inferior.
Lo siguiente que haremos será el dije central para nuestros zarcillos, para ello colocaremos cómo guía la piedra en forma de manzana sobre el cartón, incluso de una vez la podemos pegar con silicón, luego cortaremos una tira de cadena para formar un círculo que cubra toda la piedra, la pegamos también y finalmente recortamos el cartón siguiendo la misma forma circular.
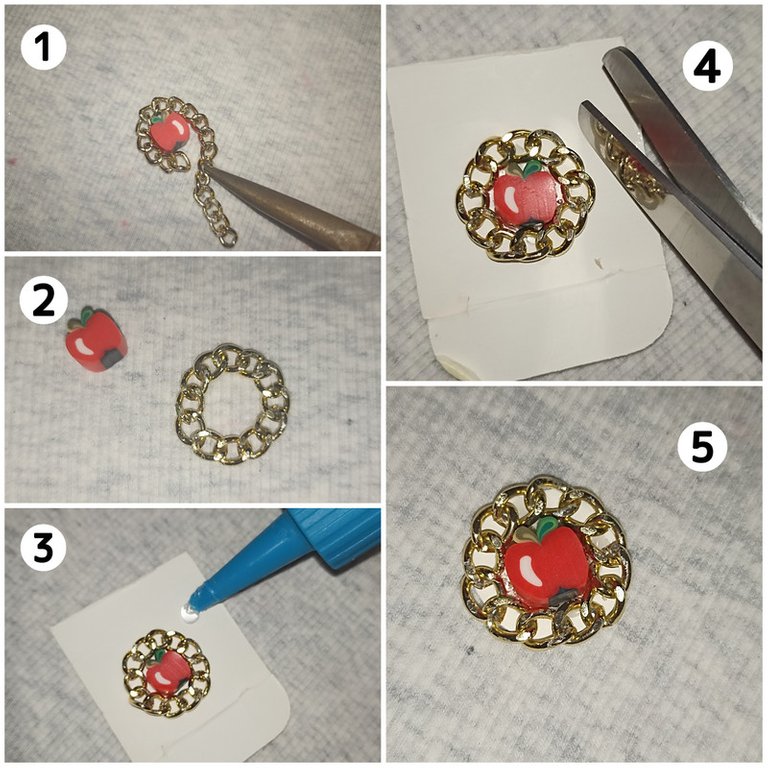
Ahora vamos agregarle aún más detalle al dije, para ello decidí añadirle algunas cuentas de color rojo, con el hilo nylon lo pasaré entre cada eslabón de la cadena y me devuelvo por mismo dejando un agujero de por medio, así hasta terminar todo el círculo. Una vez terminada esa parte introducire un aro en la borla y otra al dije para unirlos, repito esto para el otro zarcillo.
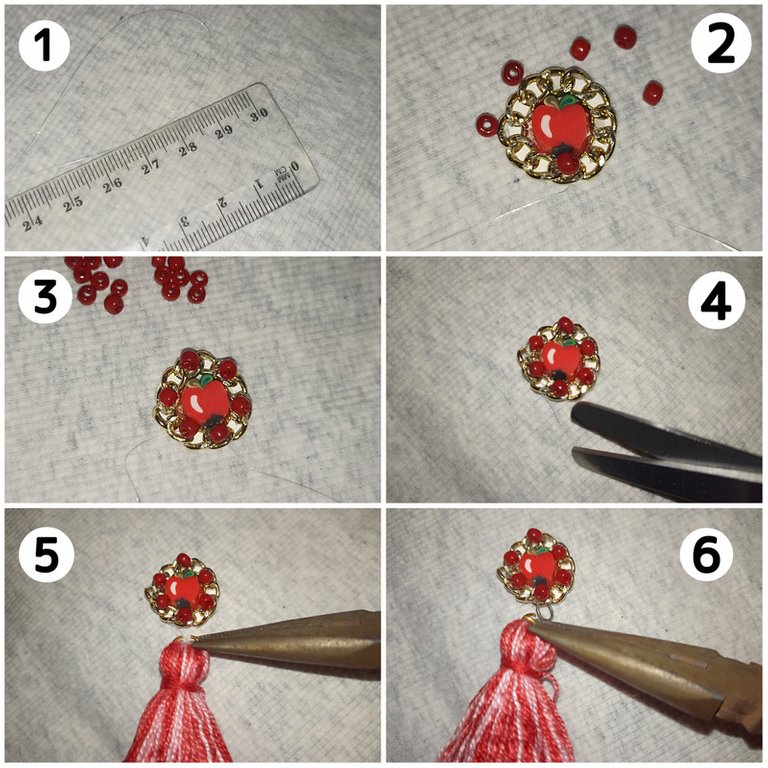
Ya casi para terminar voy a añadir otra hebra de hilo nylon en la parte superior del dije e introducire cuatro perlas doradas, una grande por ambas hebras, dos más pequeñas por cada hebra y una grande nuevamente por ambas a la vez, termino haciendo un nudo en el anzuelo, corto el hilo, quemo para cerrar y asegurar y ya estaría listo para usar!! ☺️
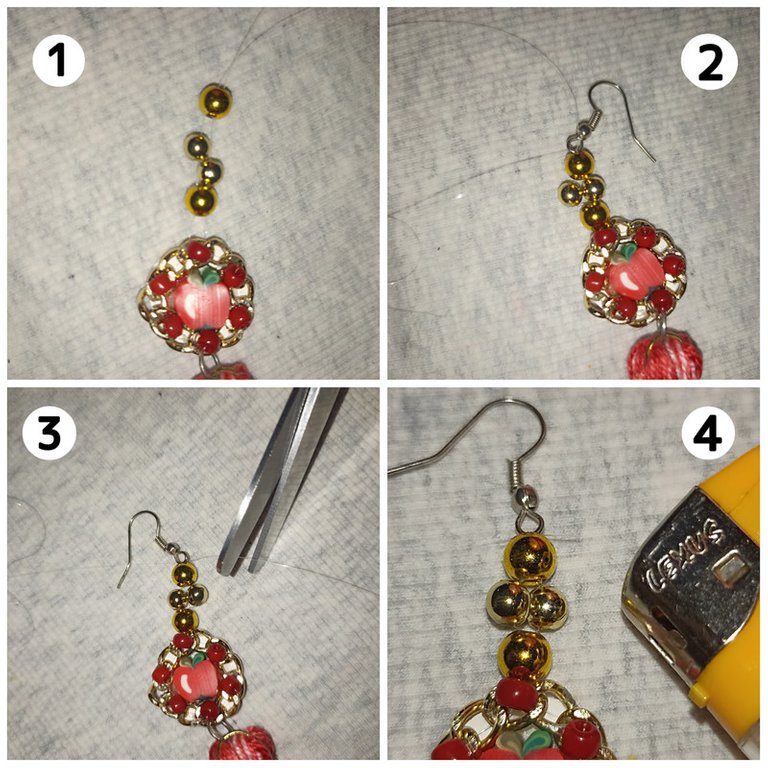

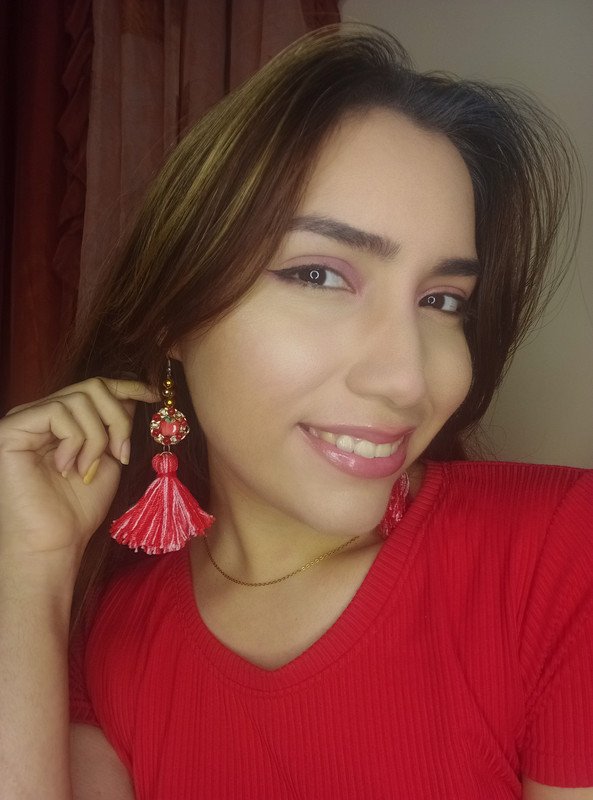
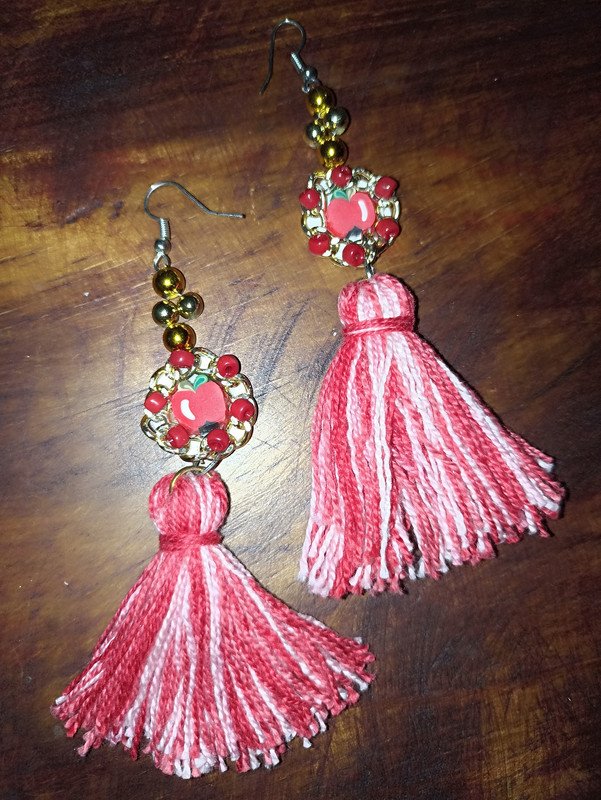
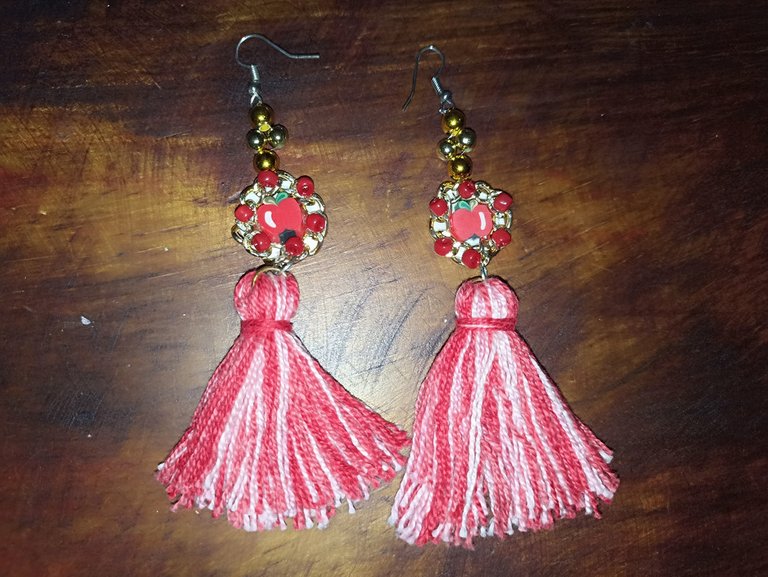
Y aquí les muestro los zarcillos terminados!!. Puedes seguir mi guía tutorial o puedes dejar volar tu imaginación y hacerlo combinando los colores, piedras, cristales y el diseño que quieras...o en éste caso, de la fruta que quieras 🥰🍎❤️. La creatividad es tuya y por supuesto un toque secreto de amor para que el trabajo quede con el mejor acabado 🥰.!! si te gusto te animo a que lo intentes, me encantó mostrarles este pequeño tutorial, para tu uso personal, emprender o para regalar 😁...espero compartirles muy pronto nuevos trabajos, con mucho cariño me despido y será hasta la próxima !!💕


Hello friends of Hive ❤️ today I want to share with you once again a small tutorial to make some nice earrings or earrings in pretty red tones and some gold too 😁, but I'm not talking about just any earrings, but some long or maxi earrings as they are also known. The truth is that curiously before this style I did not like them at all, but already looking for ideas and millions of designs I found them quite attractive in the end, plus today they are super trendy, wearing even just one of them as solitaires. The design that I will show you next will have as the main center an apple-shaped stone or bead, a tassel with red shades and some details in gold that I think will give that touch to our earrings. If you like it, I encourage you to join me and learn with me how to make it, and now, without further ado.... Let's get started!!! 🤗
Materials:
- 30cm Nylon thread
- Weaving yarn
- Chain
- Beads
- Apple shaped charms
- Golden pearls
- Cardboard
- Scissors
- Tweezers
- Liquid silicon
- Hooks for tendrils

For this tutorial I am going to divide the steps, so first I am going to show you how to make the tassels, for this I will use a square of cardboard, which I will use later, and I will start winding with the weaving thread, I used this one which is thinner and thinner, but if you want you can use the one you prefer. Once you have enough turns, take the small roll of yarn out of the cardboard, tie with another piece of yarn at the top to hold it and give it shape and then cut all the doubles of yarn at the bottom.
The next thing we will do will be the central pendant for our tendrils, for this we will place as a guide the apple-shaped stone on the cardboard, even at once we can glue it with silicone, then we will cut a strip of chain to form a circle that covers the entire stone, we also glue it and finally we cut the cardboard following the same circular shape.
Now let's add even more detail to the pendant, for this I decided to add some red beads, with the nylon thread I will pass it between each link of the chain and I return through it leaving a hole in between, so until I finish the whole circle. Once this part is finished I will introduce a ring in the tassel and another one in the pendant to join them, I repeat this for the other tendril.
Almost to finish I will add another strand of nylon thread at the top of the pendant and introduce four golden pearls, a large one through both strands, two smaller ones through each strand and a large one again through both at the same time, I finish by tying a knot on the hook, cut the thread, burn to close and secure and it would be ready to use!!!! ☺️
And here I show you the finished tendrils!!!. You can follow my tutorial guide or you can let your imagination fly and do it combining colors, stones, crystals and the design you want...or in this case, of the fruit you want 🥰🍎❤️. The creativity is yours and of course a secret touch of love so that the work is with the best finish 🥰.!!! if you like I encourage you to try it, I loved to show you this little tutorial, for your personal use, undertake or to give away 😁...I hope to share very soon new works, with much love I say goodbye and will be until next time !!!💕
Todo el contenido es de mi autoría y las imágenes son de mi propiedad
Cámara: Redmi note 10s
Uso un aro de luz LED como base para mi teléfono y tomarme las fotos
All content is my own and images are my property
Camera: Redmi note 10s
I use an LED light ring as a base for my phone to take pictures of myself

Edición y Separador|Editing and Separator
App PicMonkey - App Picsart - App Canva
Traductor|Translator
DeepL


Thank you for sharing this post on HIVE!
Your content got selected by our fellow curator stevenson7 & you just received a little thank you upvote from us for your great work! Your post will be featured in one of our recurring compilations which are aiming to offer you a stage to widen your audience within the DIY scene of Hive. Stay creative & HIVE ON!
Please vote for our hive witness <3
https://twitter.com/1484196455719915527/status/1613219027068850178
https://twitter.com/1484281013413023756/status/1613264159843700736
The rewards earned on this comment will go directly to the people( @dayadam ) sharing the post on Twitter as long as they are registered with @poshtoken. Sign up at https://hiveposh.com.
Me encantaron tus zarcillos @edwarlyn, muy bonitos y te tengo una noticia están de moda los aretes largos, y a ti esos se te ven muy bien, saluditos.
Que belleza de pendientes amiga @edwarlyn11, cada uno de los detalles que usaste para la elaboración, lo hiciste de manera muy creativa. Me encantaron. Felicidades y muchos éxitos... 💕
!PIZZA
I gifted $PIZZA slices here:
@dayadam(1/5) tipped @edwarlyn11 (x1)
Join us in Discord!
Felicidades!!! Quedaron realmente muy hermosos y coquetos con las manzanitas