DIY- Restaurando un viejo accesorio con piedras y foami 💎✨ paso a paso || Restoring an old accessory with stones and foami 💎✨ step by step [ESP/ENG]


Hola amigos de Hive ❤️ hoy les quiero compartir un pequeño tutorial súper sencillo de un nuevo trabajo de reciclaje que me animé a realizar usando un accesorio que ya tenía tiempo sin usar y que además estaba un poco desgastado. Este tipo de trabajos me gustan porque con pocos materiales podemos crear nuevos a partir de algo viejo. Para esta ocasión use un dije en forma de búho porque era uno de mis favoritos pero ya estaba súper desgastado, así que se me ocurrió la idea de restaurarlo con el poder del arte, la bisutería usando algunas piedras y perlas brillantes, además de algunos trozos de foami y estambre, y también mucha imaginación 😊. . Si te gusta la idea, te animo a que me acompañes en este sencillo tutorial y aprendas junto a mi a realizarlo, y ahora sí, sin más que agregar... Comencémos!!

Texto sin editar
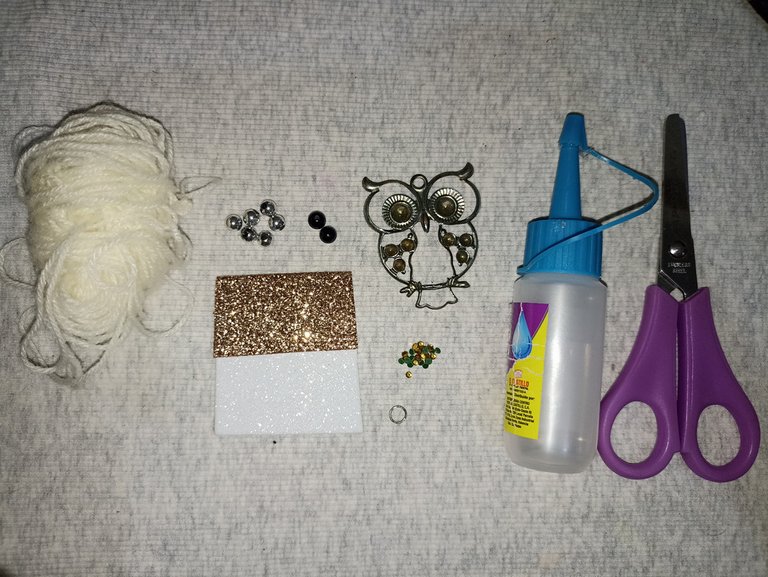
Materiales:
- Estambre
- Accesorio de alambre
- Foami
- Perlas
- Piedras decorativas
- Silicón liquido
- Tijera
- Escarcha / glitter

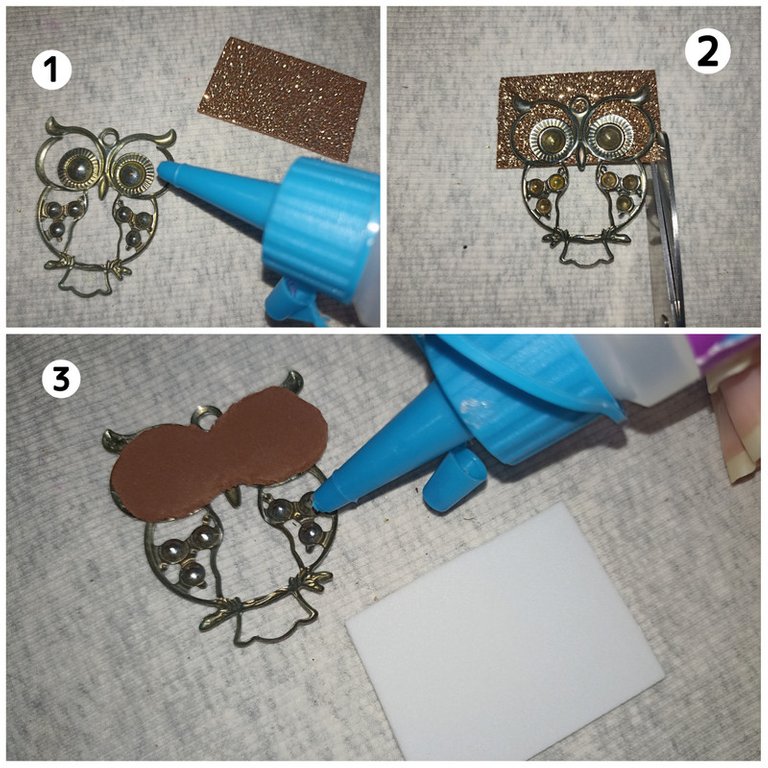
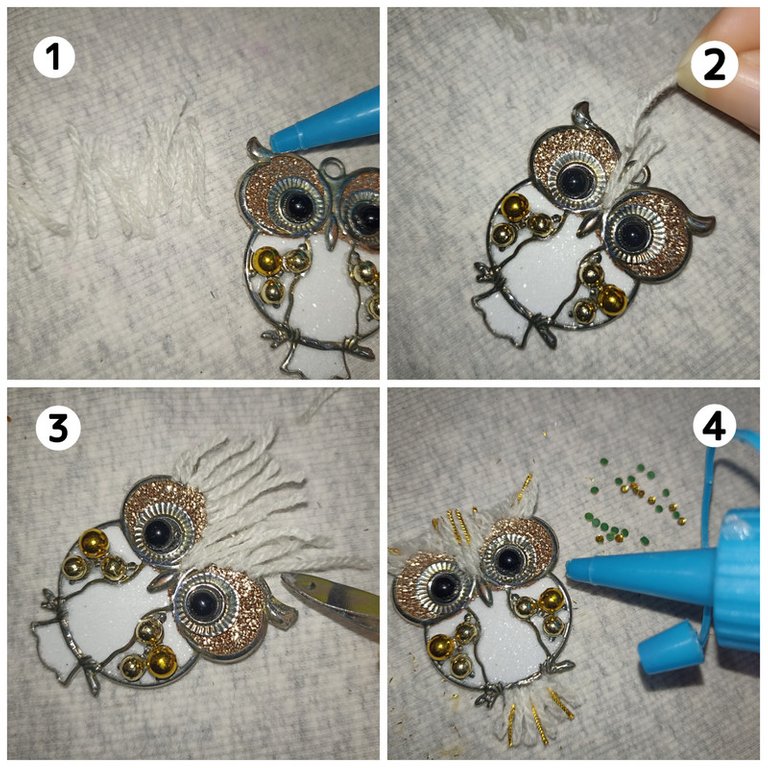
Primero voy a colocar mi accesorio de alambre por el revés, en este caso usaré de búho, y echaré silicón líquido por todo el borde, luego coloco el foami y corto el sobrante.
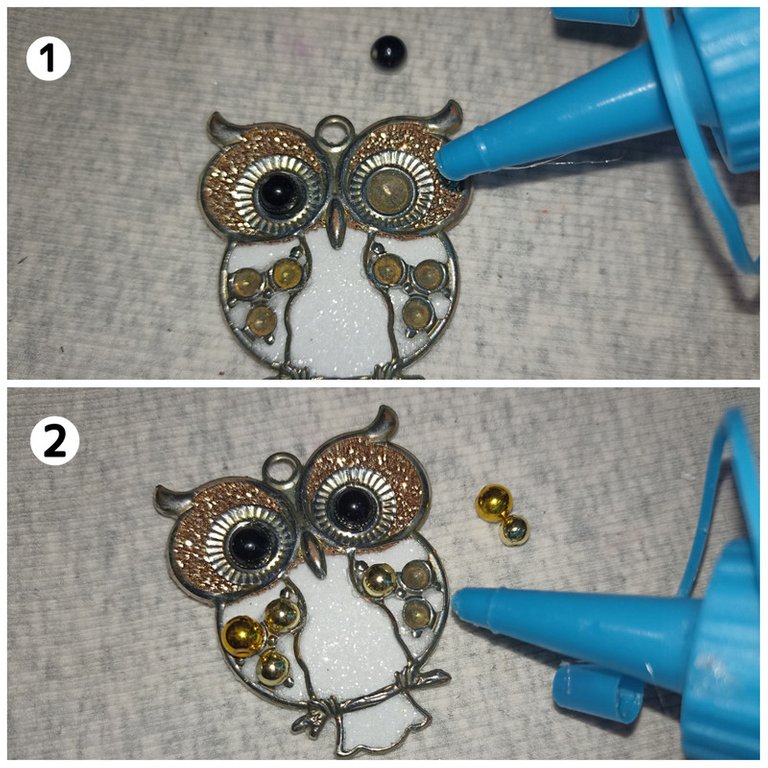
Ahora le agregaremos las piedras en algunas partes para darle brillo, para ello le pegare piedras decorativas, un par de perlas en los ojos, en el área del cuerpo y las alas.
Para darle un poco más de realismo voy a cortar algunas tiras de estambre blanco y las pegare para simular las plumas del búho. En éste caso las colocaré una a una en el área de la cabeza y la cola con un poco de Silicón. También le agregué algunas tiras de hilo dorado y las coloque intercaladas, además le agregué alrededor de los ojos, el pico y las patas algunas piedras doradas para que se viera un lindo contraste.
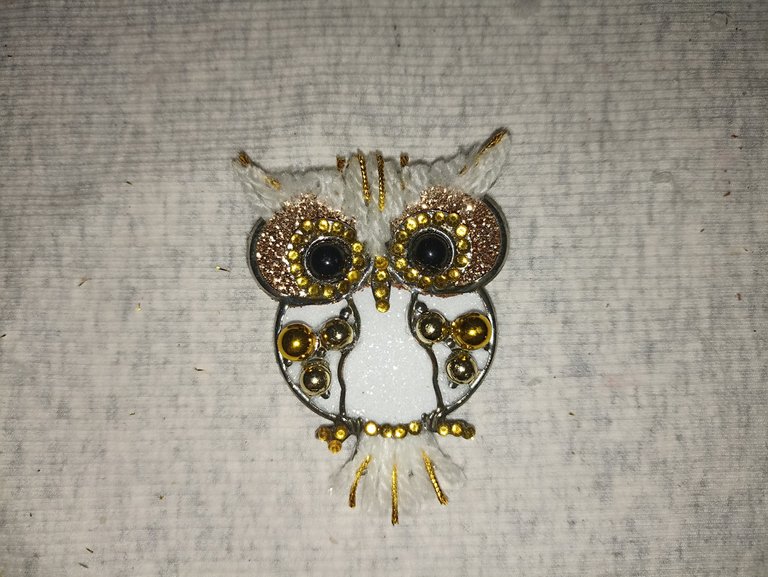
Y aquí les muestro el accesorio terminado y listo para usar!!. Siguiendo un poco con mis trabajos anteriores, lo traté de hacer usando gran parte materiales de manualidades para crear un nuevo diseño unico y a nuestro gusto. Puedes seguir mi guía tutorial o puedes dejar volar tu imaginación y hacerlo combinando los colores, piedras, cristales y el diseño que quieras... La creatividad es tuya y por supuesto un toque secreto de amor para que el trabajo quede con el mejor acabado 🥰.!! si te gusto te animo a que lo intentes, me encantó mostrarles este pequeño tutorial sencillo, fácil y elegante para tu uso personal o para regalar 😁...espero compartirles muy pronto nuevos trabajos, con mucho cariño me despido y será hasta la próxima !!💕


Hello friends of Hive ❤️ today I want to share with you a super simple tutorial of a new recycling work that I decided to make using an accessory that I had not used for a long time and that was also a little worn. I like this kind of work because with few materials we can create new ones from something old. For this occasion I used an owl-shaped pendant because it was one of my favorites but it was already super worn, so I came up with the idea of restoring it with the power of art, costume jewelry using some stones and shiny pearls, plus some pieces of foami and yarn, and also a lot of imagination 😊 . If you like the idea, I encourage you to join me in this simple tutorial and learn together with me how to make it, and now yes, without more to add..... Let's get started!!!
Unedited text
Materials:
- Wool
- Wire accessory
- Foami
- Beads
- Decorative stones
- Liquid silicone
- Scissors
- Frosting / glitter

First I am going to place my wire accessory on the reverse side, in this case I will use the owl, and I will pour liquid silicone all around the edge, then I place the foami and cut the excess.
Now we will add the stones in some parts to give it shine, for this I will glue decorative stones, a couple of pearls in the eyes, in the area of the body and wings.
To give it a little more realism I will cut some strips of white yarn and glue them to simulate the owl's feathers. In this case I will place them one by one in the head and tail area with some Silicone. I also added some strips of gold thread and placed them in between, plus I added some gold stones around the eyes, beak and legs for a nice contrast.
And here I show you the finished accessory ready to use. Following a little bit with my previous works, I tried to make it using mostly craft materials to create a new design unique and to our liking. You can follow my tutorial guide or you can let your imagination fly and make it combining colors, stones, crystals and the design you want.... The creativity is yours and of course a secret touch of love so that the work is with the best finish 🥰.!!! if you like I encourage you to try it, I loved to show you this little tutorial simple, easy and elegant for your personal use or to give away 😁...I hope to share very soon new works, with much love I say goodbye and will be until next time !!!💕
Todo el contenido es de mi autoría y las imágenes son de mi propiedad
Cámara: Redmi note 10s
Uso un aro de luz LED como base para mi teléfono y tomarme las fotos
All content is my own and images are my property
Camera: Redmi note 10s
I use an LED light ring as a base for my phone to take pictures of myself

Edición y Separador|Editing and Separator
App PicMonkey - App Picsart - App Canva
Traductor|Translator
DeepL


Wowwwwww 😍😍😍 Esta pieza restaurada y decorada te quedo hermosa. ME ENCANTA, que búho tan bello. Felicidades hiciste un gran trabajo.
Que tengas un bello, bendecido y prospero feliz año. Éxitos para ti. Abrazos...💕
!PIZZA
Muchas gracias ☺️☺️ yo quedé feliz con el resultado, como si tuviera un accesorio nuevo 😄..me alegra mucho haber compartido este tutorial con ustedes y quizás les de una idea para hacer lo mismo!!✨ Igualmente amiga @dayadam mis mejores deseos para ti...💕🎄✨
I gifted $PIZZA slices here:
@dayadam(4/5) tipped @edwarlyn11 (x1)
Learn more at https://hive.pizza!
https://twitter.com/1484281013413023756/status/1608249866496401408
The rewards earned on this comment will go directly to the people( @dayadam ) sharing the post on Twitter as long as they are registered with @poshtoken. Sign up at https://hiveposh.com.
Te quedo muy bonita la restauración, es bonito ver como.le has dado nueva vida y luce tan bonito, con tan solo un buen foami y la creatividad, excelente trabajo 👏
Hoola amiga @yolimarag 🤗 me alegra que te haya gustado mi trabajo al revivir un accesorio que ya prácticamente lo daba por perdido 😄, quien diría que con algunos pocos materiales podemos crear lindas cosas ...un Saludito y feliz día 💕✨
Que espectacular te quedo @edwarlyn11 sinceramente te felicito y que la fuente divina te bendiga tu creatividad.
Thank you for sharing this post on HIVE!
Your content got selected by our fellow curator sharminmim & you just received a little thank you upvote from us for your great work! Your post will be featured in one of our recurring compilations which are aiming to offer you a stage to widen your audience within the DIY scene of Hive. Stay creative & HIVE ON!
Please vote for our hive witness <3