DIY- Pulsera personalizada nudo espiral ✨ || Personalized spiral knot bracelet ✨ [ESP/ENG]


Hola amigos de Hive ❤️ y amantes de los accesorios 🥰💎 hoy les quiero enseñar la elaboración de una pulsera que desde que la hice es una de mis favoritas, una pulsera personalizada con la palabra en inglés "joy" que significa alegría, agregándole cómo detalle adicional una piedra en forma de carita feliz para simbolizar la buena vibra y llevarla con nosotros a todos lados. La técnica macramé que estaremos realizando se llama nudo espiral, consta solo de dos hilos con los que vamos a tejer toda nuestra pulsera y con los que vamos a introducir nuestras piedras. Yo elegí un lindo y delicado tono rosa, pero si deseas hacerla mucho más alegre puedes usar un hilo matizado o de tu color favorito, si deseas usarla para ti, venderla o como regalo especial. Si te gusta, te animo a que me acompañes y aprendas junto a mi a realizarla, y ahora sí, sin más que agregar... Comencémos!!

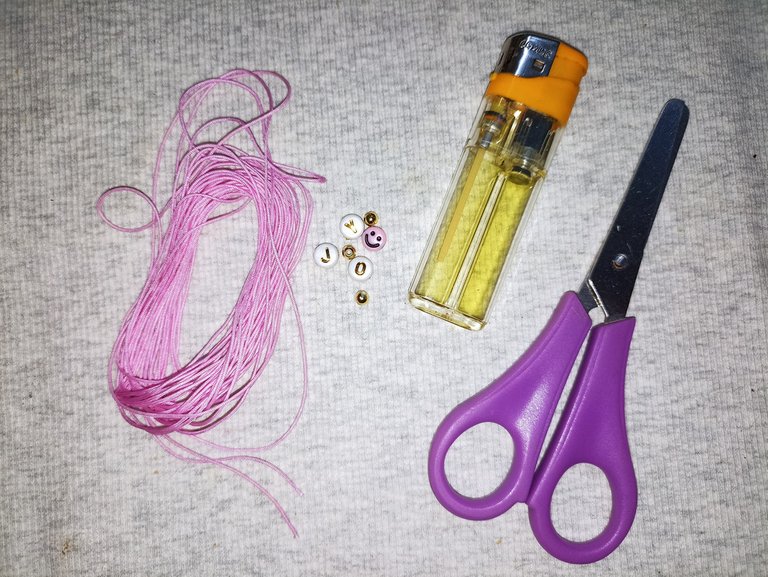
- 1 hebra de hilo chino 120cm
- 1 hebra de hilo chino 30cm
- Piedra de letras (joy)
- Piedra carita
- Perlas doradas 3mm
- Tijera
- Encendedor
- Tabla con pinza

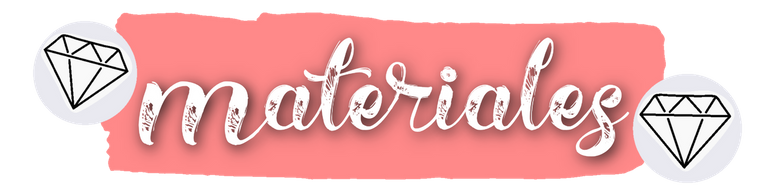
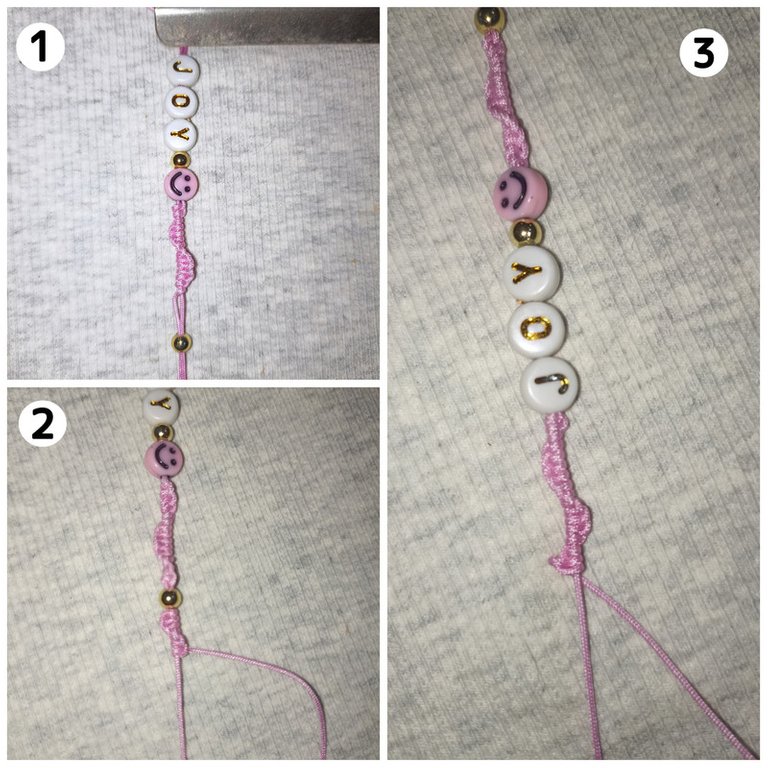
Primero vamos a necesitar una hebra larga de 120 cm que doblaremos a la mitad para tejer nuestro nudo con ellas. También necesitaremos otra hebra del mismo color para hacer el cierre al terminar la pulsera. Una vez tengamos nuestros hilos cortados, vamos a ubicar la hebra mas larga a la mitad en la tabla, introducimos todas nuestras piedras ordenadas y pasamos al siguiente paso.
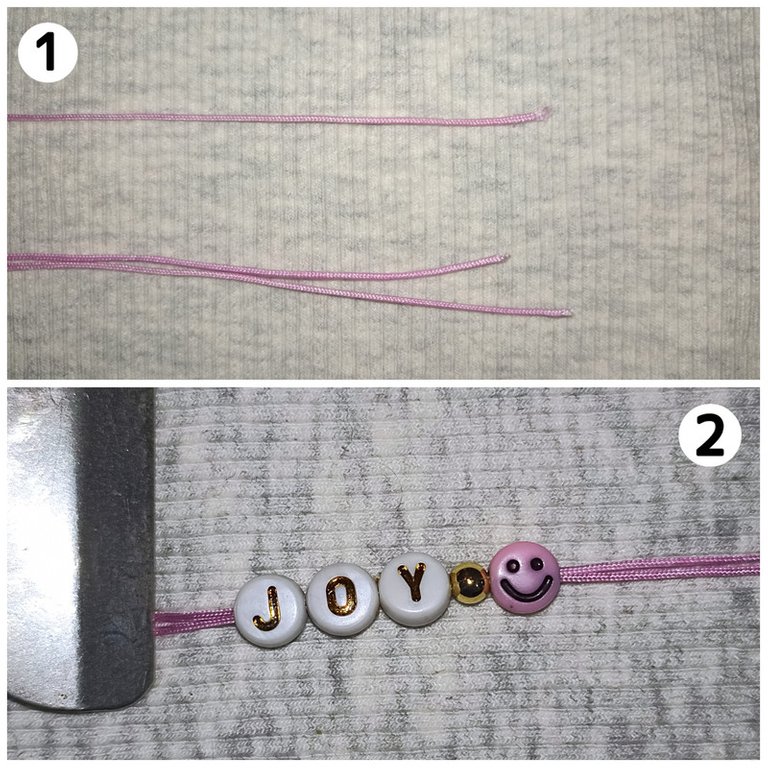
Para hacer este nudo vamos a doblar una de las hebras, como una especie de "4", la pasamos por debajo del otro hilo y nos devolvemos por el espacio que dejamos al principio, vamos apretando y ajustando a medida que halamos, y así repetimos 4 a 5 veces más. Vamos a notar que nuestro nudo se va torciendo, y es normal no se asusten 😄, lo que debemos hacer es continuar siempre en la misma dirección y con el mismo hilo formando un "4", si vemos que esa hebra va quedando corta, podemos alternar con el otro hilo recordando seguir la misma forma para que el nudo vaya formando una espiral.
Cuando hayamos repetido el nudo unas 5 veces o cuando notemos que haya dado la vuelta, unimos ambas hebras e introducimos una perla, y luego seguimos tejiendo siguiendo el patrón hasta tener el largo deseado o en mi caso 6 cm aproximadamente. Terminado esta parte volteamos la pulsera y repetimos todo el proceso, tanto de nudos como de perlas para que nos quede igual de ambos lados.
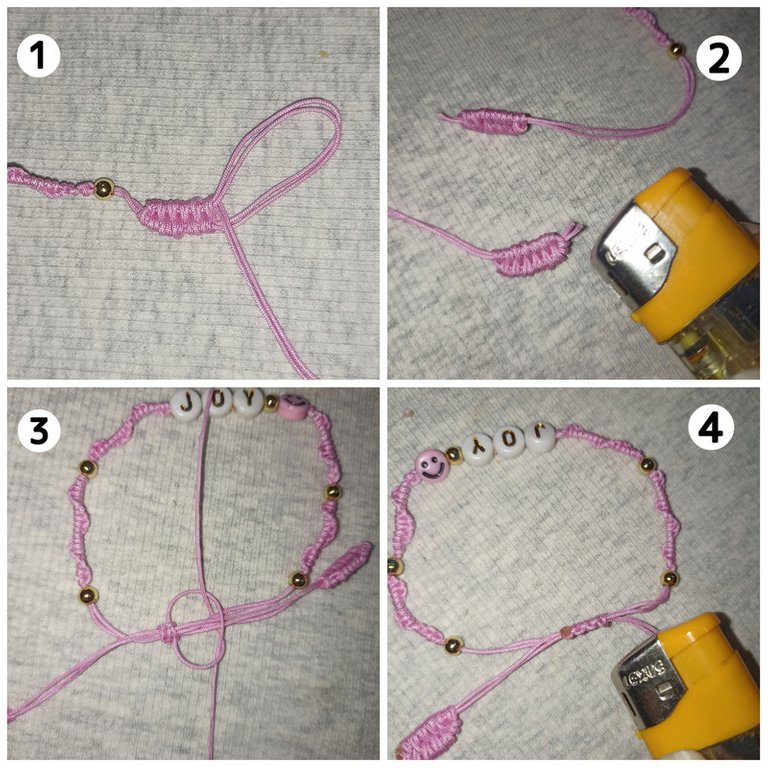
Para finalizar las pulseras me gusta mucho hacer la técnica de un pequeño tejido con lo que nos sobra de hilo para formar una especie de hoja, ya este paso se los he explicado más detallado en otro post, pero básicamente se trata de hacer un círculo doblando un hilo sobre otro y empezamos a envolver en forma de zig zag, halamos la hoja, cortamos y quemamos el hilo sobrante, y así nos quedarían ambas puntas, súper originales y llamativas. Cuando hayamos terminado este paso haremos el cierre uniendo ambas hebras con varios nudos planos, cortamos y quemamos siempre al terminar para asegurar.

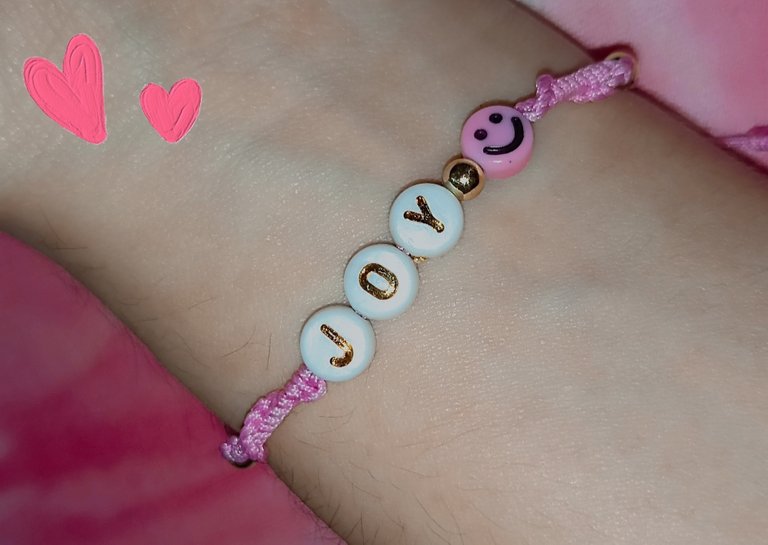
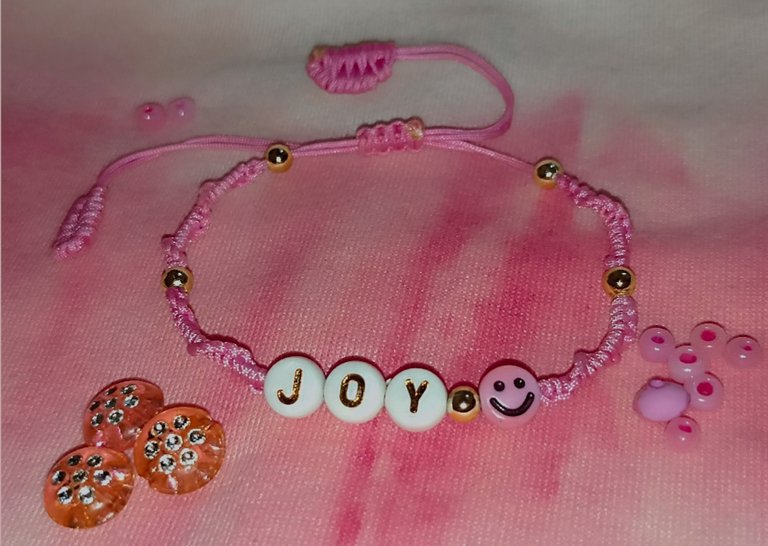
Y aquí les muestro la pulsera terminada!!. Siguiendo un poco con mis trabajos anteriores en macramé, compartiendoles nuevos nudos para sus aprendan a crear sus propios diseños unicos y a su gusto. Puedes seguir mi guía tutorial o puedes dejar volar tu imaginación y hacerlo combinando los colores, piedras, cristales y el diseño que quieras... La creatividad es tuya y por supuesto un toque secreto de amor para que el trabajo quede con el mejor acabado 🥰.!! si te gusto te animo a que lo intentes, me encantó mostrarles este pequeño tutorial, para tu uso personal o para regalar 😁...espero compartirles muy pronto nuevos trabajos, con mucho cariño me despido y será hasta la próxima !!💕


Hello friends of Hive ❤️ and accessories lovers 🥰💎 today I want to show you how to make a bracelet that since I made it is one of my favorites, a personalized bracelet with the English word "joy" which means joy, adding as an additional detail a stone in the shape of a happy face to symbolize good vibes and take it with us everywhere. The macramé technique we will be using is called spiral knot, it consists of only two threads with which we are going to weave our bracelet and with which we are going to introduce our stones. I chose a nice and delicate pink tone, but if you want to make it much more cheerful you can use a nuanced thread or your favorite color, if you want to use it for yourself, sell it or as a special gift. If you like it, I encourage you to join me and learn with me how to make it, and now, without further ado.... Let's get started!
- 1 strand of Chinese thread 120cm
- 1 strand of Chinese thread 30cm
- Letter stone (joy)
- Face stone
- Golden beads 3mm
- Scissors
- Lighter
- Board with clamp

First we will need a long strand of 120 cm that we will fold in half to weave our knot with them. We will also need another strand of the same color to make the clasp at the end of the bracelet. Once we have our threads cut, we will place the longest strand in half on the board, introduce all our stones in order and move on to the next step.
To make this knot we are going to fold one of the strands, as a kind of "4", we pass it under the other thread and we return through the space we left at the beginning, we tighten and adjust as we pull, and so we repeat 4 to 5 times more. We will notice that our knot is twisting, and it is normal, do not panic 😄, what we must do is to continue always in the same direction and with the same thread forming a "4", if we see that this strand is getting short, we can alternate with the other thread remembering to follow the same way so that the knot forms a spiral.
When we have repeated the knot about 5 times or when we notice that it has turned, we join both strands and introduce a pearl, and then we continue weaving following the pattern until we have the desired length or in my case 6 cm approximately. Finished this part we turn the bracelet and repeat the whole process, both knots and pearls so that we have the same on both sides.
To finish the bracelets I really like to do the technique of a small weave with what we have left over thread to form a kind of leaf, I have already explained this step in more detail in another post, but basically it is to make a circle by folding a thread over another and begin to wrap in a zig zag, pull the leaf, cut and burn the excess thread, and so we would be both ends, super original and striking. When we have finished this step we will make the closure joining both strands with several flat knots, we cut and burn always at the end to secure.
And here I show you the finished bracelet. Following a little bit with my previous works in macramé, sharing with you new knots so you can learn how to create your own unique designs and to your liking. You can follow my tutorial guide or you can let your imagination fly and do it combining colors, stones, crystals and the design you want.... The creativity is yours and of course a secret touch of love so that the work is with the best finish 🥰.!!! if you like I encourage you to try it, I loved to show you this little tutorial, for your personal use or to give away 😁...I hope to share very soon new works, with love I say goodbye and will be until next time!
Todo el contenido es de mi autoría y las imágenes son de mi propiedad
Cámara: Redmi note 10s
Uso un aro de luz LED como base para mi teléfono y tomarme las fotos
All content is my own and images are my property
Camera: Redmi note 10s
I use an LED light ring as a base for my phone to take pictures of myself

Edición y Separador|Editing and Separator
App PicMonkey - App Picsart - App Canva
Traductor|Translator
DeepL


https://twitter.com/1048398048240566273/status/1626752868148551682
The rewards earned on this comment will go directly to the people( @edwarlyn11 ) sharing the post on Twitter as long as they are registered with @poshtoken. Sign up at https://hiveposh.com.
Esta precioso tu trabajo amiga! 💗
Muchas gracias por tu apoyo y tu lindo comentario amiga 😊me alegra que te guste, un saludito para ti y feliz noche 🤗💕
Hola feliz día ❤️, muy linda pulsera me gustó mucho muy buena técnica no sabía hacer ese nudo gracias por tu explicación🌹🌹🌹🌹🌹🌹🌹🌹🌹🍓🍓🍓🍓🍓🍓🍓🍓🍓🍓🍓🍓🍓 nunca dejes de sonreír 😍😊😉💕💕💕🌹
Hoola amigo🤗 gracias!!! Me alegra mucho saber que te gustó y quizás te animes hacerla para tu colección de emprendimiento, estoy segura a tus clientas les encantará💕, y muchas gracias por tu lindo comentario 🥰🥰 eso me anima mucho para seguir compartiendo jaja, un saludito y feliz día para ti también ☺️💖🌻💜🧡🐱🌸🍓🌹
Thank you for sharing this post on HIVE!
Your content got selected by our fellow curator ashikstd & you just received a little thank you upvote from us for your great work! Your post will be featured in one of our recurring compilations which are aiming to offer you a stage to widen your audience within the DIY scene of Hive. Stay creative & HIVE ON!
Please vote for our hive witness <3
Eres parte de nuestras invitadas a la 1era Edición del Hive's Top Model 2023 ✨
En estos próximos 3 meses tendrás la oportunidad de mostrar todo tu estilo en distintas categorías como la pasarela, el makeup y las comunicaciones.
Lo más importante ser premiada por eso 🏆🏆
📍¡Valida tu inscripción!
Aquí podrás ver todos los detalles de este evento sin precedentes.
👉🏻 https://peakd.com/hive-172958/@hiveredcarpet/ojcwctdh
Nota: Si deseas puedes compartir tu invitación y etiquetar @Hivesredcarpet con los hashtag #HivesTopModel #HTM2023 #liketutopmodel @liketuofficial
PeakD (https://peakd.com/hive-172958/@hiveredcarpet/ojcwctdh)
HIVE´S TOP MODEL 2023 ¡LLegó tu momento de Brillar! | PeakD
▶️ Watch on 3Speak ![hive top model español.png](https://files.peakd.com/file/peakd-hive/hiveredcarpet/243MFPg4KrpjL3... by hiveredcarpet