DIY - Pulsera en macramé con técnica del nudo alondra alternado ✨ paso a paso || Macrame bracelet with alternating lark's knot technique ✨ step by step [ESP/ENG]
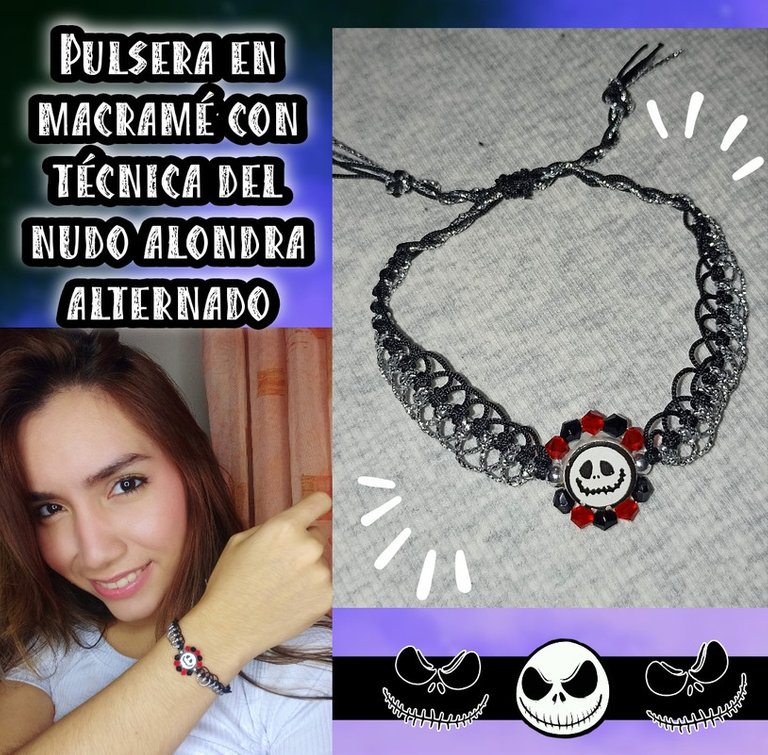


Hola mis queridos amigos de Hive ❤️ un gran saludo y feliz domingo para todos los que me visitan el día de hoy!! Para continuar con esta temática de Halloween, se me ocurrió compartirles en esta oportunidad una pulsera tejida con la técnica del Macramé realizando otro tipo de diseño con el nudo alondra. Con cada nudo puedes jugar y combinar tanto como quieras, en este caso, use dos colores de hilo y otra forma de hacer el nudo igual de sencilla que en la anterior que les expliqué. Esta idea nació luego de que encontrara entre mis cosas un dije que cuando lo ví me encantó porque soy fan de este personaje, y me refiero a "Jack" de la película "El extraño mundo de Jack". Primero les enseñaré hacer este dije y luego el nudo de la pulsera que les aseguro no es nada complicada, y si te gusta, te animo a que me acompañes y aprendas junto a mi a realizarlo, y ahora sí, sin más que agregar... Comencémos!!

Texto sin editar
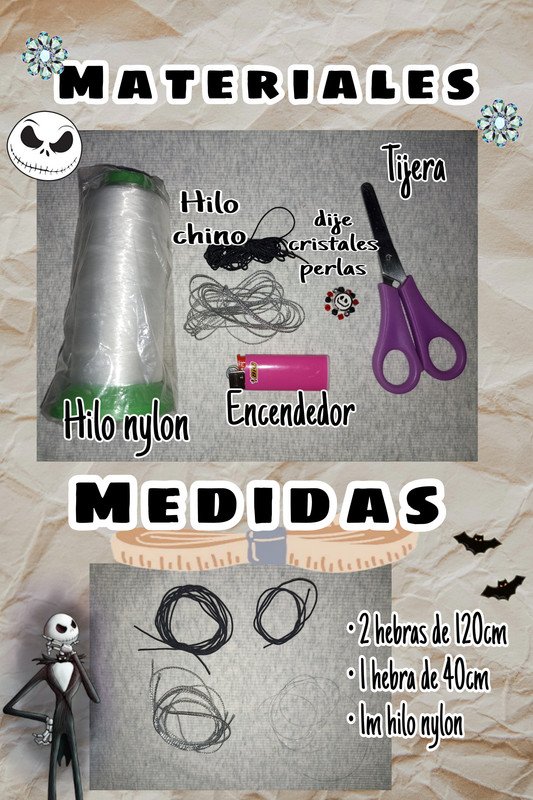
Materiales:
- Hilo chino
- Tijera
- Encendedor
- Dije
- Cristales
- Perlas
- Hilo nylon
Medidas:
- 2 hebras de 120cm
- 1 hebra de 40cm
- 1m hilo nylon de 0.25
- 10 cristales de 4mm
- 2 perlas plateadas
- 1 dije decorativo (Jack)

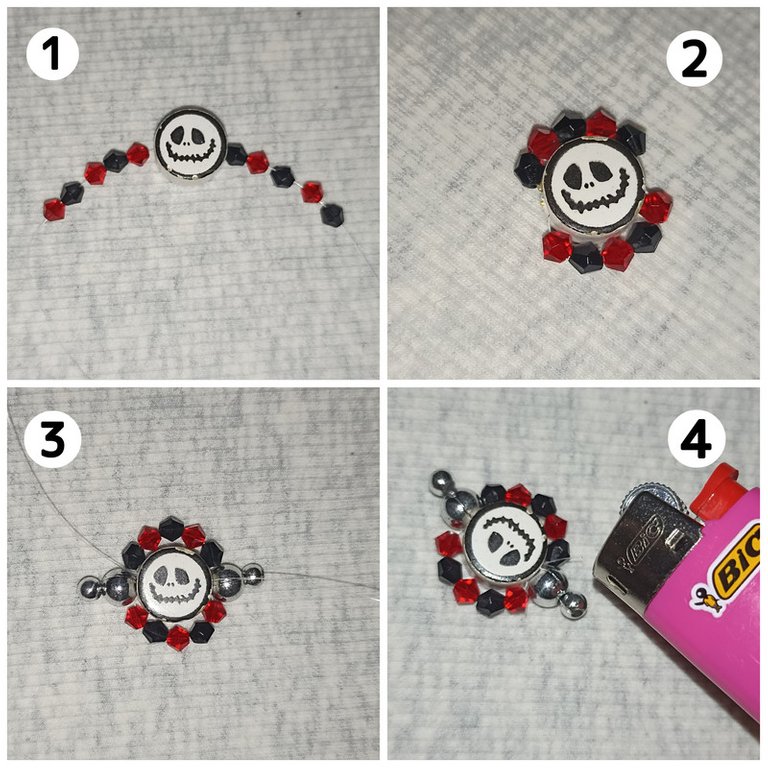
Para el dije:
Para realizar el dije es bien sencillo, solo vamos a introducir por nuestro hilo nylon el dije decorativo (Jack) y lo colocaremos a la mitad, luego por cada hebra insertamos una secuencia de 5 cristales, en este caso, negro y rojo. Cruzamos ambos hilos por el agujero contrario del dije y nuevamente por cada hebra insertamos las perlas y nos devolvemos por la primera, juntamos ambos hilos y realizamos un nudo bien ajustado, cortamos el sobrante y quemamos las puntas.
Ahora sí para empezar nuestra pulsera, vamos a introducir el hilo chino de 40 cm por el dije que realizamos anteriormente y lo ubicamos en el centro. Hecho esto, podemos sujetar el otro extremo con un gancho para mayor comodidad a la hora de tejer. En el otro lado, vamos a empezar a colocar cada hilo, primero el negro, para ello tomamos la hebra de hilo a la mitad y la pasamos por debajo del hilo central y pasamos el otro extremo donde están las puntas del hilo y lo pasamos por encima del hilo central y nos devolvemos por la abertura del inicio. Esto mismo lo vamos a repetir con el otro hilo y en la otra dirección, en este caso use diferentes colores para que resalte.
Siguiendo el orden de las fotos que les muestro abajo, vamos a continuar realizando el nudo alondra tomando primero los hilos suoerioresyy luego los inferiores

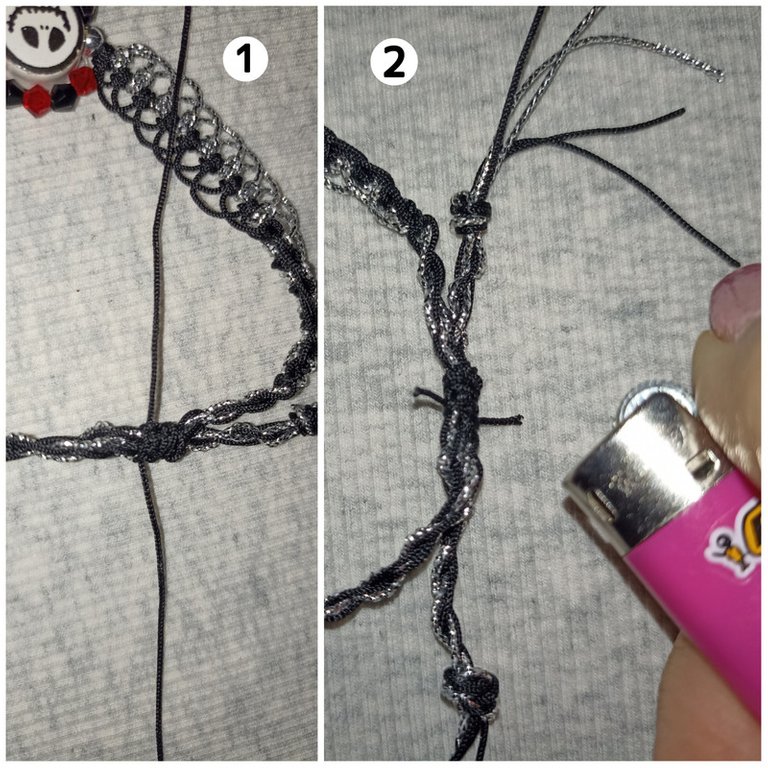
Una vez le hayas agarrado el truco, a partir de aquí es más sencillo, solo debes continuar la secuencia hasta obtener el largo deseado, esto puede variar según que cada mitad mida de 6,7 a 8cm. Para los hilos sobrantes hacemos dos nudos ajustados de cada color, los enroscamos y hacemos un pequeño nudo normal, cortamos el sobrante y quemamos las puntas.

Para cerrar nuestra pulsera lo haremos juntando ambos extremos cruzados, y realizamos sobre este de 4 a 5 nudos planos, cortamos el sobrante y quemamos las puntas.
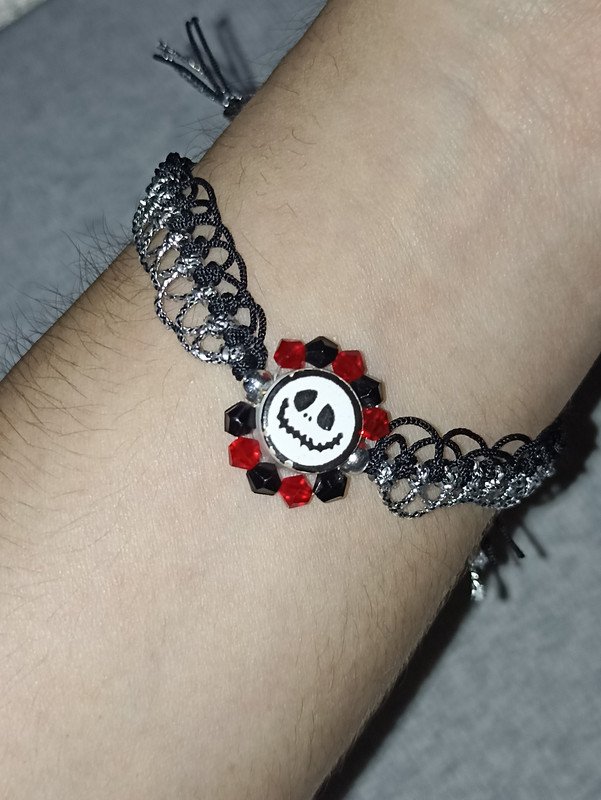
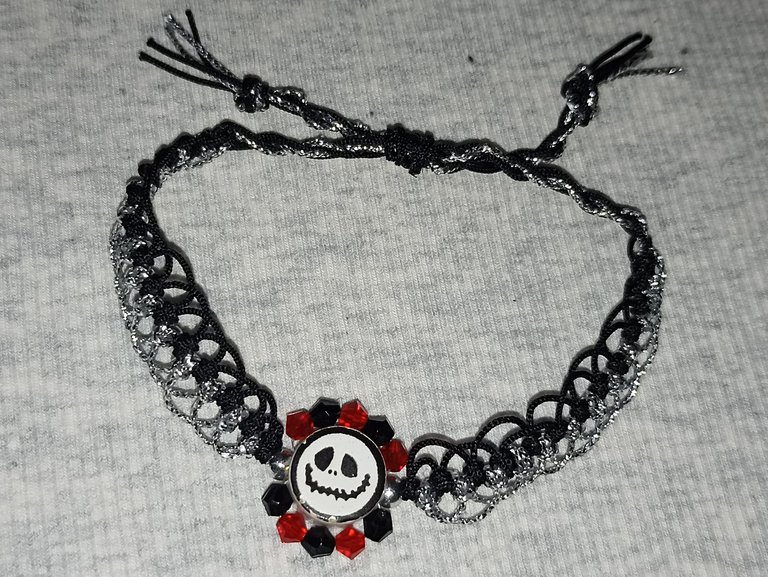
Y aquí les muestro la pulsera terminada, como ven aunque parecia complicada, realmente no lo es una vez le agarras el truco y la práctica, la verdad que como dije al principio, con este nudo de pueden crear diversos modelos y diseños, jugando con los hilos, colores y pedrería, combinando además con este dije central realizado por nosotros mismos me pareció que quedaba genial y original. No le temas a los nudos ! Es súper sencilla de hacer y si te gusto te animo a que lo intentes, solo es cuestión de práctica, mucha creatividad y por supuesto un toque secreto de amor para que el trabajo quede con el mejor acabado 🥰. Espero les haya gustado, me encantó mostrarles este pequeño tutorial con la técnica del Macramé realizando el mismo nudo alondra pero alternado, espero compartirles muy pronto nuevos trabajos, con mucho cariño me despido y será hasta la próxima !!💕


Hello my dear friends of Hive ❤️ a big greeting and happy Sunday to all who visit me today!!! To continue with this Halloween theme, it occurred to me to share with you this time a bracelet woven with the Macramé technique making another type of design with the lark knot. With each knot you can play and combine as much as you want, in this case, I used two colors of thread and another way to make the knot as simple as in the previous one I explained. This idea was born after I found among my things a charm that when I saw it I loved it because I am a fan of this character, and I mean "Jack " from the movie "Jack's Strange World". First I will show you how to make this charm and then the knot of the bracelet that I assure you is not complicated at all, and if you like it, I encourage you to join me and learn with me to make it, and now yes, without more to add .... Let's get started!

Unedited text
Materials:
- Chinese thread
- Scissors
- Lighter
- Pendant
- Crystals
- Pearls
- Nylon thread
Measures:
- 2 strands of 120cm
- 1 strand of 40cm
- 1m nylon thread of 0.25
- 10 crystals of 4mm
- 2 silver pearls
- 1 decorative pendant (Jack)

For the pendant:
To make the pendant is very simple, we are only going to introduce through our nylon thread the decorative pendant (Jack) and we will place it in the middle, then through each strand we insert a sequence of 5 crystals, in this case, black and red. We cross both threads through the opposite hole of the pendant and again through each strand we insert the pearls and we return through the first one, we join both threads and we make a tight knot, we cut the excess and we burn the ends.
Now to start our bracelet, we are going to introduce the 40 cm Chinese thread through the pendant that we made earlier and place it in the center. Once this is done, we can fasten the other end with a hook for more comfort when weaving. On the other side, we are going to start placing each thread, first the black one, to do this we take the thread strand in half and pass it under the central thread and pass the other end where the ends of the thread are and pass it over the central thread and return it through the opening at the beginning. We are going to repeat this with the other thread and in the other direction, in this case use different colors to make it stand out.
Following the order of the photos below, we will continue making the lark knot taking first the upper threads and then the lower ones.
Once you get the hang of it, from here on it is easier, just continue the sequence until you get the desired length, this may vary depending on whether each half measures 6.7 to 8cm. For the leftover threads we make two tight knots of each color, twist them and make a small normal knot, cut the excess and burn the ends.
To close our bracelet we will do it by joining both crossed ends, and we make 4 to 5 flat knots on it, cut the excess and burn the ends.
And here I show you the finished bracelet, as you can see although it seemed complicated, it really is not once you get the trick and practice, the truth is that as I said at the beginning, with this knot can create various models and designs, playing with the threads, colors and rhinestones, also combined with this central pendant made by ourselves I thought it looked great and original. Don't be afraid of knots ! It's super simple to make and if you like it I encourage you to try it, it's just a matter of practice, lots of creativity and of course a secret touch of love so that the work is with the best finish 🥰. I hope you liked it, I loved to show you this little tutorial with the Macramé technique using the same lark knot but alternated, I hope to share new works very soon, with much love I say goodbye and will be until next time !!!💕
Todo el contenido es de mi autoría y las imágenes son de mi propiedad
Cámara: Redmi note 10s
Uso un aro de luz LED como base para mi teléfono y tomarme las fotos
All content is my own and images are my property
Camera: Redmi note 10s
I use an LED light ring as a base for my phone to take pictures of myself

Edición y Separador|Editing and Separator
App PicMonkey - App Picsart
Traductor|Translator
DeepL


Has sido votado por
PROYECTO ENLACE
'Conectando Ideas y Comunidades'
PROYECTO ENLACE es un proyecto de curación de habla hispana enfocado en recompensar contenido de calidad y apoyar autores en su proceso de crecimiento en HIVE.
Creemos y apostamos por el futuro de esta gran plataforma, y estamos muy emocionados de poder hacerla crecer junto a esta comunidad. Así que te invitamos a usar nuestra etiqueta ENLACE y estar atento a todas las actividades que tenemos preparadas y que estaremos publicando en breve.
¿QUIERES AUTOMATIZAR TUS GANANCIAS DE CURACIÓN? SE PARTE DEL PROYECTO ENLACE APOYANDO A NUESTRO TRAIL EN HIVE.VOTE INGRESA AQUÍ PARA CONOCER LOS DETALLES.
¿QUIERES INVERTIR ENLACE? DESCUBRE COMO HACERLO Y GENERAR INGRESOS DE FORMA SEMANAL MEDIANTE TU DELEGACIÓN DE HP AQUÍ TE EXPLICAMOS COMO.
Te invitamos a participar en nuestro servidor de Discord: https://discord.gg/3S9y7BbWfS
Atentamente
EQUIPO ENLACE 2022
Te ha quedado espectacular el tejido amiga @edwarlyn11 un diseño maravilloso 👏 y los colores usados totalmente bien combinados.
Muchas gracias 🥰 de alguna manera me gusta crear mis propios dijes y combinarlo con diseños de nudos como éste que, al principio parecen complicados pero al final resultan bastante sencillos...muchas gracias por su apoyo lo aprecio mucho amigos !!!💕
https://twitter.com/1048398048240566273/status/1584259139223506944
The rewards earned on this comment will go directly to the people sharing the post on Twitter as long as they are registered with @poshtoken. Sign up at https://hiveposh.com.
Que hermosa esa cuenta con ese fantasma 👻. Me encantó esa pulsera creo que la voy a tomar prestada jajaja, eres muy creativa y aprendes así de rápido todo lo que te propones. Gracias por compartir 😌
Muchas gracias por tu bonito comentario 🥰😍🤗y cuando quieras la usas..esta y cualquier de mi colección 😄😁..muchas gracias por el apoyo y por animarme siempre mami❤️💕✨
Me encanta la bisutería y está en particular quedó bellísima... Te felicito, gracias por compartir.
Saludos @edwarlyn11
A mí también me encanta 😁🥰 muchas gracias por decirlo, por visítarme y dejarme tu apoyo...eso me anima mucho!!! Un gusto compartir😊...saluditos a ti también amiga!!💕
Me gusta mucho la combinación de colores y la creatividad para realizar esta hermosa pulcera ✨💖
Hoola @sylregne !! y muchas gracias por tu comentario 😊 lo aprecio mucho viniendo de ti, me alegra que te haya gustado 💕 un saludito!!