DIY- 2 diseños de pulseras con tejido macramé ✨ || 2 designs of bracelets with macramé weaving ✨ [ESP/ENG]


Hola mis queridos amigos de Hive ❤️ les doy la bienvenida a mi blog en especial a los lectores de comunidad de #jewelry que buscan aprender a realizar sus propios accesorio, hoy les quiero mostrar un sencillo tutorial de dos nuevos diseños de pulseras tejidas con la técnica macramé, realizando uno de los principales nudos y los más fáciles para empezar, si deseas aprender un poco más a profundidad con técnicas de nudos un poco más complejas. La verdad que no se necesitan un gran nudo para tener una linda pulsera, de hecho, las pulseras que hoy en día se llevan de moda están hechas básicamente con unos pocos nudos y muchos detalles de pedrería, un diseño muy parecido que les compartí hace poco de una Pulsera personalizada, y las que les mostraré a continuación. Si te gusta, te animo a que me acompañes y aprendas junto a mi a realizarlo, y ahora sí, sin más que agregar... Comencémos!!


Para pulsera roja:
- 2 hebra hilo chino 100cm
- 1 hebra hilo chino 40cm
- 1 hebra hilo chino 20cm
- Piedras de letras
- perla
- regla
- tijera
- encendedor
Para pulsera amarilla:
- 1 hebra hilo chino 80cm
- 2 hebras hilo chino 80cm
- 1 hebra hilo chino 20cm
- Piedras de letras
- piedra corazón
- perla
- tubo de chupeta
- regla
- tijera
- encendedor

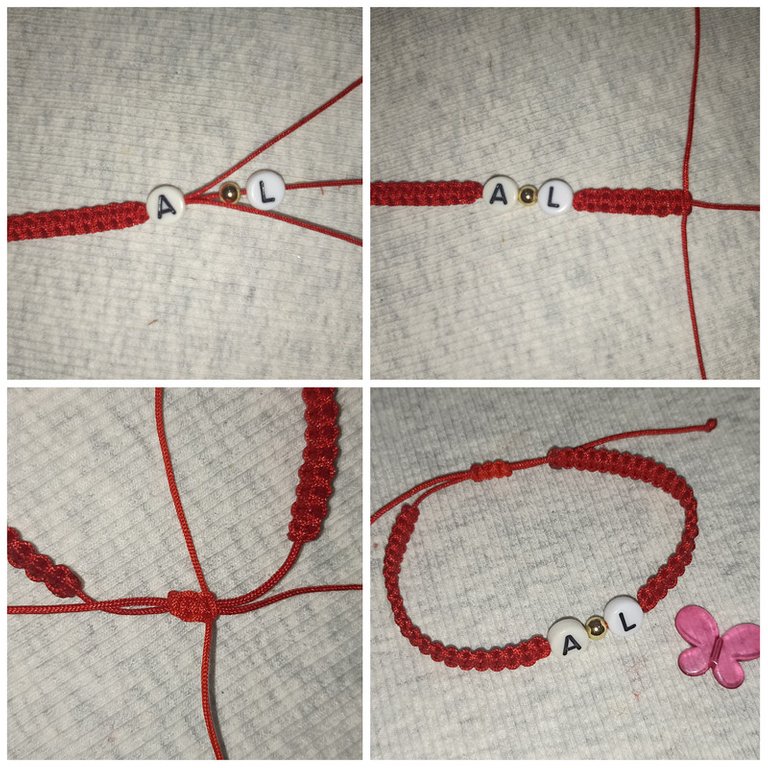
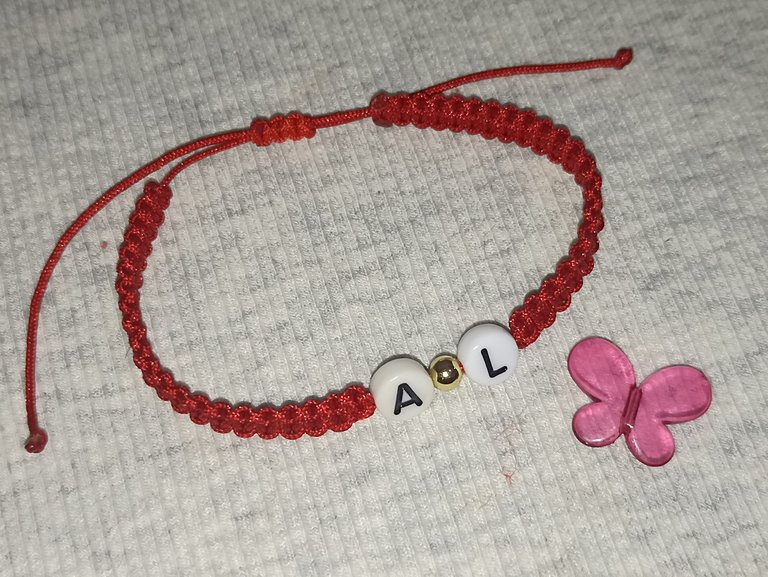
Para realizar la primera pulsera en color rojo, haré un clásico nudo plano. Este diseño me lo pidió mi prima, ella me dijo el color, las letras y un poco el diseño que más le gustaba. Así que primero usaré un hebra central de 40cm, dejo un espacio de separación de 6cm y hago un nudo simple. Luego la ubico en la tabla con gancho y la uno a ella con la otra hebra de 100 cm por doblez. Empezaré haciendo varios nudos planos hasta tener unos 6cm de largo aproximadamente.

Ahora introducire todas las hebras por las letras personalizadas incluyendo la perla de separación, hecho esto, repetimos el proceso del nudo plano hasta completar la otra mitad de 6 cm o del largo que tú desees. Ya para cerrar uno ambos extremos sobrantes de la pulsera y hago 4 nudos planos aproximadamente con la otra hebra de 20cm, cuando terminamos cortamos siempre el hilo sobrante y quemamos las puntas para asegurar. Si quieres también puedes agregarle más detalle introduciendo unas perlas al final de cada hebra y asegurando con un nudo simple.
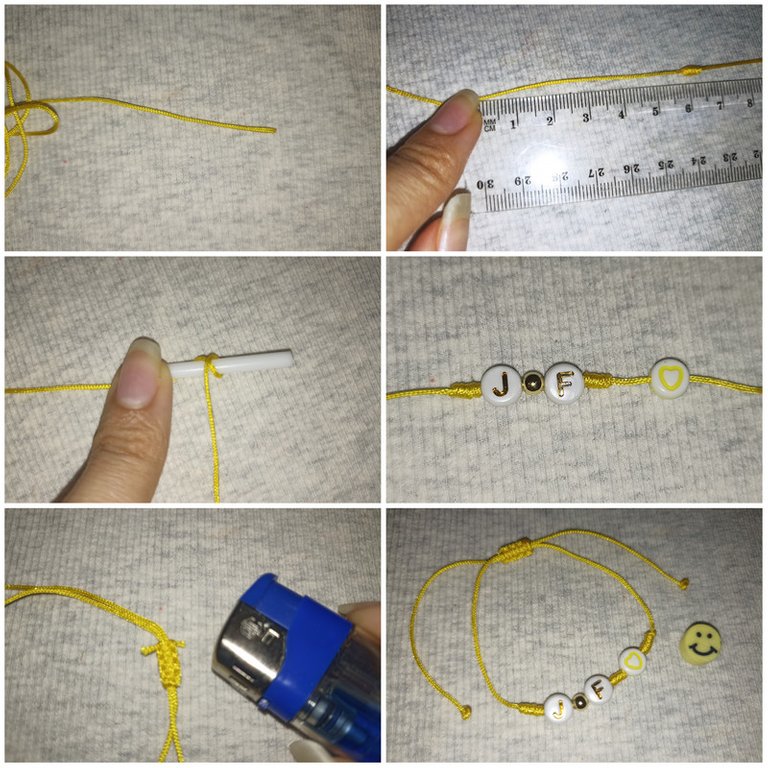
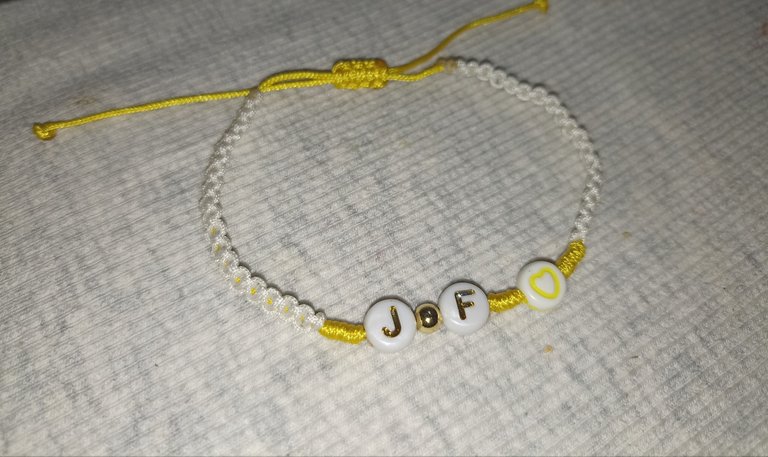
Lista la primera pulsera pasamos a la segunda, está también fue un encargo de mi prima que quería una pulsera con las iniciales de sus hijos, así que combine su color favorito con las piedras de letras y en este caso, combinando dos nudos, el plano y el franciscano o enroscado. Para ello primero ubicare el centro introduciendo todas las piedras en orden, luego comienzo haciendo el nudo franciscano con ayuda de un palo de chuleta o un cilindro pequeño que tengamos en casa. Voy a colocar el cilindro en el lugar donde quiero que esté el nudo, luego empezaré a enrollar con la misma hebra central de 80cm de izquierda a derecha y para cerrar el otro lado de derecha a izquierda, ya cuando tengamos asegurados las piedras con estos nudos colocare las otras hebras de 80 cm para empezar a tejer los nudos planos de cada lado. Esta idea a principio no estaba en los planes, sim embargo creo que le dió mucho más detalle y originalidad al acabado final. Ya casi para terminar uno ambos extremos para cerrar la pulsera haciendo varios nudos planos y termino cortando el hilo sobrante y quemando todas las puntas para asegurar sobre todo cuando nuestras creaciones son para regalar o para la venta.

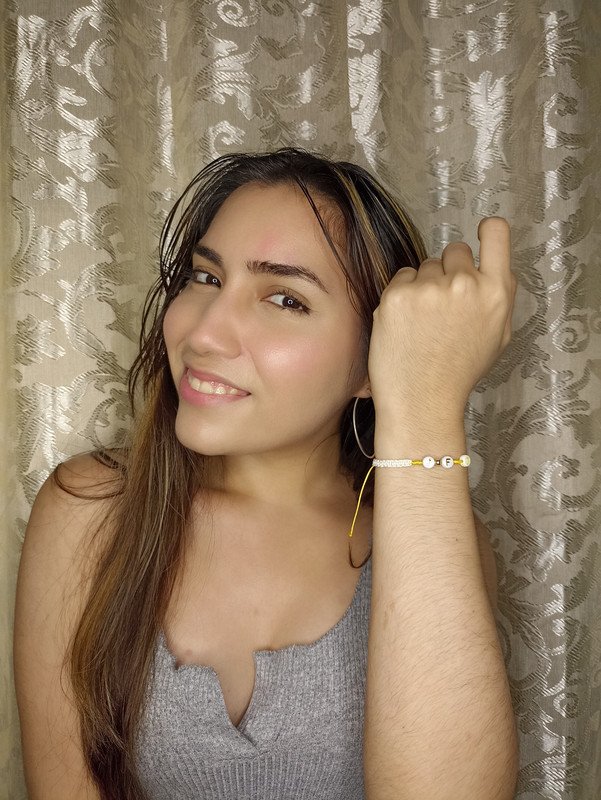
Y aquí les muestro este detalle terminado para mí primas con estas nuevas dos pulseras personalizadas!!. Un detalle con las iniciales de sus hijos grabados estoy segura que las amarán, unas pulseras que podrían aparentar ser compradas pero que la verdad son super fáciles de hacer, y tú misma lo puedes hacer, seguiendo mi guía tutorial o dejando volar tu imaginación y hacerlo combinando los colores, piedras, cristales y el diseño que quieras... La creatividad es tuya y por supuesto un toque secreto de amor para que el trabajo quede con el mejor acabado 🥰.!! si te gusto te animo a que lo intentes, me encantó mostrarles este pequeño tutorial de los clásicos nudos con la técnica macramé, para tu uso personal, emprender o para regalar 😁...espero compartirles muy pronto nuevos trabajos, con mucho cariño me despido y será hasta la próxima !!💕


Hello my dear friends of Hive ❤️ I welcome you to my blog especially to readers of #jewelry community looking to learn how to make their own accessory, today I want to show you a simple tutorial of two new designs of bracelets woven with macrame technique, making one of the main knots and the easiest to start, if you want to learn a little more in depth with knotting techniques a little more complex. The truth is that you don't need a big knot to have a nice bracelet, in fact, the bracelets that are fashionable today are basically made with a few knots and many rhinestone details, a very similar design that I shared with you recently of a personalized bracelet, and the ones I will show you next. If you like it, I encourage you to join me and learn with me how to make it, and now yes, without further ado.... Let's get started!
For red bracelet:
- 2 strands of Chinese thread 100cm
- 1 strand of Chinese thread 40cm
- 1 strand of Chinese thread 20cm
- Letter stones
- pearl
- ruler
- scissors
- lighter
For yellow bracelet:
- 1 strand Chinese thread 80cm
- 2 strands of Chinese thread 80cm
- 1 strand of Chinese thread 20cm
- Letter stones
- heart stone
- pearl
- lollipop tube
- ruler
- scissors
- lighter

To make the first bracelet in red, I will make a classic flat knot. This design was requested by my cousin, she told me the color, the letters and a little bit the design she liked the most. So first I will use a central strand of 40cm, leave a space of 6cm and make a simple knot. Then I place it on the hooked board and join it to it with the other 100cm strand per fold. I will start by making several flat knots until I have approximately 6cm long.
Now I will introduce all the strands by the personalized letters including the bead of separation, done this, we repeat the process of the flat knot to complete the other half of 6 cm or the length you want. Now to close both ends of the bracelet and make 4 flat knots approximately with the other strand of 20cm, when we finished we always cut the excess thread and burn the ends to secure. If you want you can also add more detail by inserting a few pearls at the end of each strand and securing with a simple knot.
This was also a request from my cousin who wanted a bracelet with the initials of her children, so I combined her favorite color with the letter stones and in this case, combining two knots, the flat one and the Franciscan or twisted knot. To do this I will first place the center by introducing all the stones in order, then I start making the Franciscan knot with the help of a chop stick or a small cylinder that we have at home. I will place the cylinder in the place where I want the knot to be, then I will begin to wind with the same central strand of 80cm from left to right and to close the other side from right to left, and when we have secured the stones with these knots I will place the other strands of 80 cm to begin to weave the flat knots on each side. This idea was not in the plans at the beginning, however I think it gave much more detail and originality to the final finish. Almost at the end I join both ends to close the bracelet making several flat knots and finish by cutting the excess thread and burning all the ends to secure especially when our creations are to be given as gifts or for sale.
And here I show you this finished detail for my cousins with these new two personalized bracelets!!!. A detail with the initials of their children engraved I'm sure they will love them, bracelets that might appear to be purchased but the truth is super easy to make, and you can do it yourself, following my tutorial guide or letting your imagination fly and do it combining colors, stones, crystals and the design you want..... The creativity is yours and of course a secret touch of love so that the work is with the best finish 🥰.!!! if you like I encourage you to try it, I loved to show you this little tutorial of the classic knots with the macrame technique, for your personal use, undertake or to give away 😁...I hope to share very soon new works, with much love I say goodbye and will be until next time !!!💕
Todo el contenido es de mi autoría y las imágenes son de mi propiedad
Cámara: Redmi note 10s
Uso un aro de luz LED como base para mi teléfono y tomarme las fotos
All content is my own and images are my property
Camera: Redmi note 10s
I use an LED light ring as a base for my phone to take pictures of myself

Edición y Separador|Editing and Separator
App PicMonkey - App Picsart - App Canva
Traductor|Translator
DeepL


Thank you for sharing this post on HIVE!
Your content got selected by our fellow curator ashikstd & you just received a little thank you upvote from us for your great work! Your post will be featured in one of our recurring compilations which are aiming to offer you a stage to widen your audience within the DIY scene of Hive. Stay creative & HIVE ON!
Please vote for our hive witness <3
Que post tan bonito. Bastante encantador y colorido, además de que los diseños que hizo son geniales!
Te ha quedado muy linda @edwarlyn11 excelente explicación.