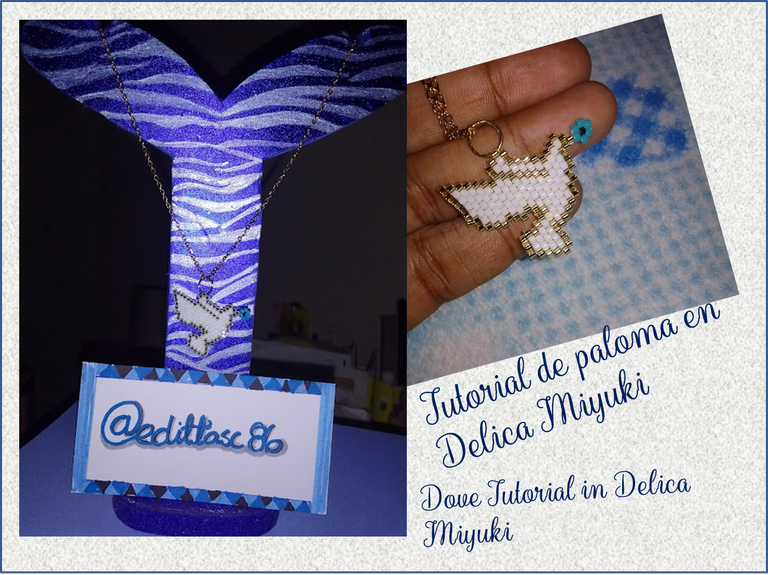
Dove tutorial with Delica Miyuki beads [EN/ES]
Saludos comunidad creativa, Soy Edioretza, Venezolana me gustan las manualidades y realizar accesorios, hace unos cuantos años atrás para mi era un sueño poder realizar accesorios, una de mis ambiciones era poder aprender y trabajar con unas mostacillas conocidas como Miyuki ( pero Miyuki es luna de las marcas mas conocidas de estas cuentas) con unas cuentas que pequeñas compactas calibradas y vienen en diferentes medidas la mas usada es la 11/0, estas cuentas tienen unos orificios un poco mas grandes en comparación con las mostacillas comunes, lo que hace que tu accesorio o el arte que estés realizando quede parejo, se llaman delica y para mi eran costosas adquirirlas, así que cuando tuve la oportunidad hace un año aproximadamente pude comprar mis primeros 3 gr de ese material en aquel momento compre 1 gr blanco, 1 gr negro y 1 gr rojo una aguja de mostacillas y un hilo para tapiceria que sirve para tejer aunque es un poco más gruesa que el hilo ideal para tejer hay muchas marcas yo tengo una que es marca nemo y pude comenzar a hacer realidad ese sueño..
Greetings creative community, I am Edioretza, Venezuelan I like crafts and making accessories, a few years ago it was a dream for me to be able to make accessories, one of my ambitions was to be able to learn and work with some beads known as Miyuki (but Miyuki is moon of the best-known brands of these beads) with small compact calibrated beads and they come in different sizes, the most used is 11/0, these beads have slightly larger holes compared to common beads, which makes your accessory or the art that you are making is even, they are called delica and for me they were expensive to acquire, so when I had the opportunity about a year ago I was able to buy my first 3 gr of that material at that time I bought 1 gr white, 1 gr black and 1 gr red a beaded needle and a tapestry thread that is used for weaving although it is a little thicker than the ideal thread for weaving there are many brands I I have one that is a nemo brand and I was able to start making that dream come true..
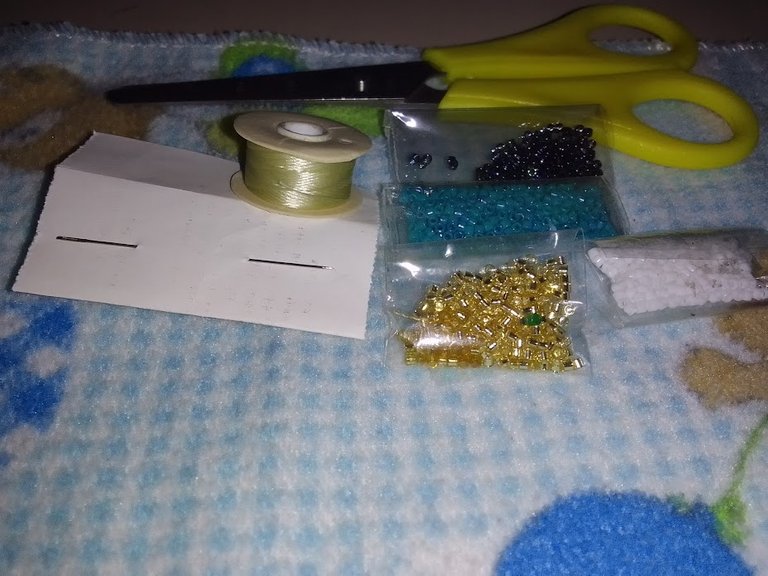
Los materiales que utilice para elaborar mi paloma son los siguientes:
Delicas número 11/0 color Blanco, dorado, azul oscura tornasol y turquesa, Hilo nemo para mostacillas miyuki color crema, aguja mostacillera, tijera.
The materials I use to make my pigeon are the following:
Delicas number 11/0 White, gold, dark blue iridescent and turquoise, Nemo thread for cream colored miyuki beads, beading needle, scissors.
Para realizar mi paloma primero realice un esquema utilizando la aplicación BeadTool4 esta app sirve para realizas nuestros patrones, trae una serie amplia de colores de delicas así como distintos estilos de tejidos como peyote, y sus variantes, brick, square, entre otros , yo tengo la version gratuita que me sirve básicamente para realizar el diseño pero no puedo usar algunas de sus opciones como guardar el diseño por ejemplo, debo hacer captura y guardar fuera de la aplicación.
To make my dove, first make a scheme using the BeadTool4 application, this app is used to make our patterns, it brings a wide range of delicas colors as well as different styles of fabrics such as peyote, and its variants, brick, square, among others, I have the free version that basically serves me to make the design but I cannot use some of its options such as saving the design for example, I must capture and save outside the application.
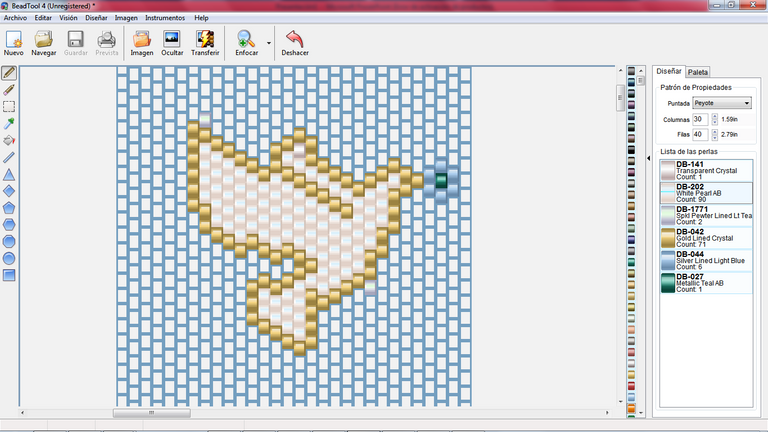
Pues bien luego de tener lista la imagen como la deseo utilizado la paleta de colores que me ofrece la aplicación ya estoy lista para iniciar con el tejido de la paloma: el esquema la hice utilizando el punto peyote pero para tejer utilice la técnica brick que para mi es mas facil o mejor dicho la manejo mejor.
Well, after having the image ready as I want it, using the color palette that the application offers me, I am ready to start weaving the dove: I made the scheme using the peyote stitch but to weave I used the brick technique that It's easier for me, or better said, I handle it better.
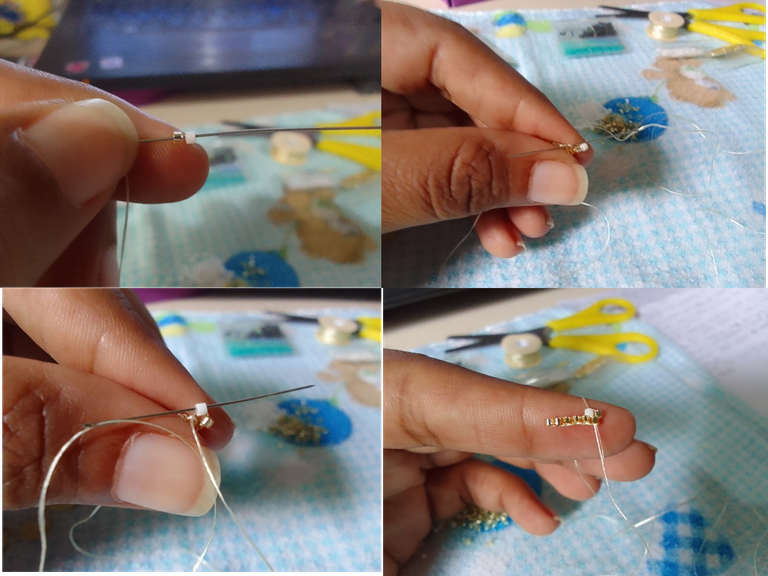
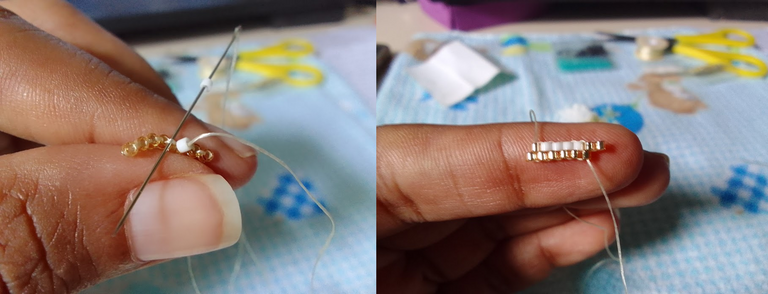
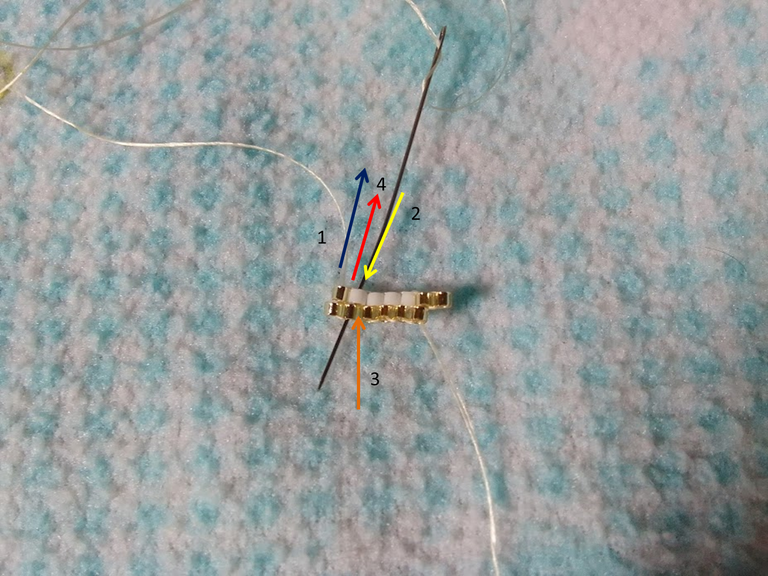
Para comenzar coloque en mi aguja aproximadamente medio metro de hilo, parece no ser suficiente pero este hilo suele enredarse así que coloco poco, en todo caso de necesitar mas debo colocar más hilo y sigo con el tejido. una vez eso listo enfilo en mi aguja 6 delicas doradas las llevo al final de mi hilo no tan final dejo como 10cm de hilo y presiono con mi mano, algunas colocan una mostacilla más grande para aguantar las delicas y que no se le salgan del hilo, luego dejó pasar una delica y en la siguiente paso la aguja de atrás hacia adelante como le muestro estas con el fin de colocar unas al lado de la otra pero con el orificio hacia arriba, hago eso con todas las delicas hasta tenerlas juntas de esta manera
To start, place approximately half a meter of thread on my needle, it seems not to be enough but this thread tends to get tangled so I place a little, in any case if I need more I must place more thread and continue with the fabric. Once that is ready, I thread 6 golden delicas onto my needle. I take them to the end of my not-so-final thread. I leave about 10cm of thread and press with my hand. Some place a larger bead to hold the delicas and prevent them from slipping out of the thread. , then he let a delica pass and in the next step the needle from back to front as I show you these in order to place one next to the other but with the hole facing up, I do that with all the delicas until I have them together like this way

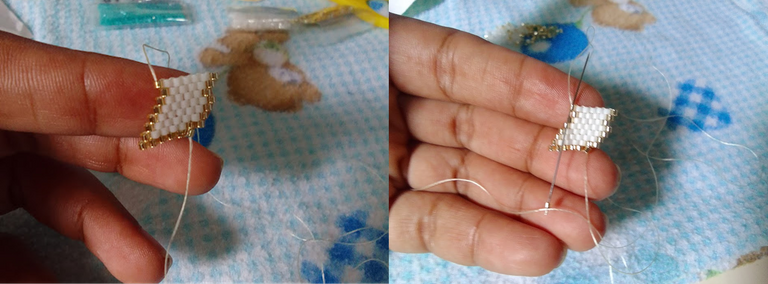
Una vez lista esta parte que sería la base para mi enfile dos delicas una blanca y una dorada para comenzar a realizar mi bloque y paso la aguja por el hilo de la delica de abajo para colocar las delicas, y luego paso la aguja por la delica blanca hacia arriba para fijarlas como les muestro aca:
Once this part is ready, which would be the base for my thread two delicas, one white and one gold, to start making my block and I pass the needle through the thread of the delica below to place the delicas, and then I pass the needle through the delica white upwards to fix them as I show you here:
luego sigo con el tejido en filo una blanca paso la aguja por el hilo siguiente para colocar la delica y luego paso la aguja por la delica blanca para fijarla así repito el procedimiento hasta completar esa hilera:
then I continue with the edge fabric, a white one, I pass the needle through the next thread to place the delica and then I pass the needle through the white delica to fix it, so I repeat the procedure until I complete that row:
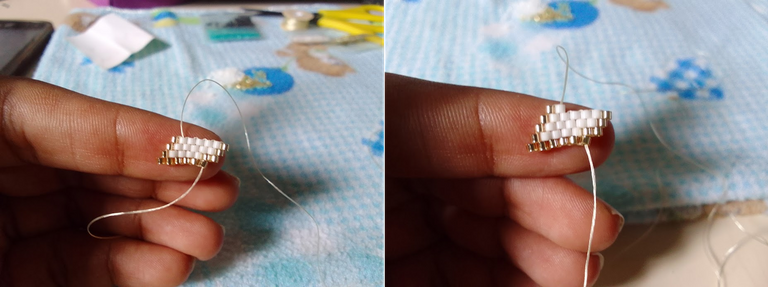
En los tejidos hay partes que constan de disminuciones y aumentos, es decir que una hilera no tendrá la misma cantidad de delica que la anterior y que va decreciendo el tejido y/o aumentando en los extremos; en esta hilera que se iniciara viene una disminución para realizarla nos devolvemos y pasamos la aguja por la delica blanca bajamos hacia la dorada, luego pasamos la aguja por la dorada de al lado y la volvemos a pasar por la delica blanca donde nos devolvimos inicialmente y así estaríamos haciendo una disminución en la hilera
In the fabrics there are parts that consist of decreases and increases, that is to say that a row will not have the same amount of delicacy as the previous one and that the fabric decreases and/or increases at the ends; In this row that will start, there is a decrease to make it, we go back and pass the needle through the white delica, we go down towards the gold one, then we pass the needle through the gold one next to it and we pass it again through the white delica where we initially returned and so we would be making a decrease in the row
al tener la aguja lista en la delica blanca coloco dos delicas una dorada y una blanca paso la aguja por el hilo que está delante para colocar las delicas y luego paso mi aguja por la delica blanca hacia arriba para fijar, es decir repetimos los pasos para formar la nueva hilera,
When I have the needle ready in the white delica I place two delicas, one golden and one white, I pass the needle through the thread that is in front to place the delicas and then I pass my needle through the white delica upwards to fix, that is, we repeat the steps to form the new row,

hacemos otra disminución, nos devolvemos por la delica blanca hacía la que está abajo vamos a la de al lado y nos regresamos por la misma delica donde nos devolvimos inicialmente, así que repetimos ese paso y también repetimos el paso anterior para completar esa hilera, y para la hilera siguiente hacemos ese mismo procedimiento.
we make another decrease, we go back through the white delica to the one below, we go to the next one and we return through the same delica where we initially returned, so we repeat that step and we also repeat the previous step to complete that row, and for the next row we do the same procedure.
repetimos el procedimiento para dos hileras mas y en este punto les comentare sobre los aumentos, son mas sencillos que las disminuciones y aquí lo que hacemos estando en el final de esa hilera colocamos en la aguja dos delicas una dorada y una blanca y pasamos la aguja por el hilo que esta delante y repetimos el proceso de colocar y fijar y quedaría de esta manera
we repeat the procedure for two more rows and at this point I will tell you about the increases, they are simpler than the decreases and here what we do being at the end of that row we place two delicate ones on the needle, one gold and one white and pass the needle by the thread that is in front and we repeat the process of placing and fixing and it would be this way
Y repetimos el proceso en esta hilera
And we repeat the process in this row
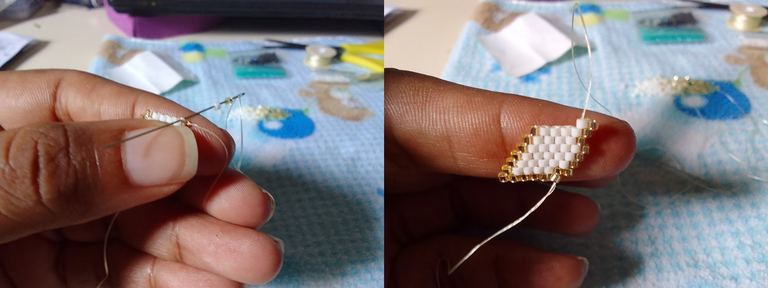
En la siguiente imagen muestro una parte de la paloma terminada, para realizar la otra parte que este dentro del cuadrado azul realice la unión de las cuentas una al lado de la otra pero esta vez en ves de colocarlas todas en la aguja las coloque una por una en file una cuenta blanca y pase la aguja por la dorada anterior a la blanca y luego la volví a pasar por la blanca para colocar la delica dorada siguiente, repetí este proceso con la siguiente hasta completar la hilera
In the following image I show a part of the finished dove, to make the other part that is inside the blue square, join the beads one next to the other but this time instead of placing them all on the needle, place them one by one. one in file a white bead and pass the needle through the golden one before the white one and then I passed it again through the white one to place the next golden delica, I repeated this process with the next one until the row was completed
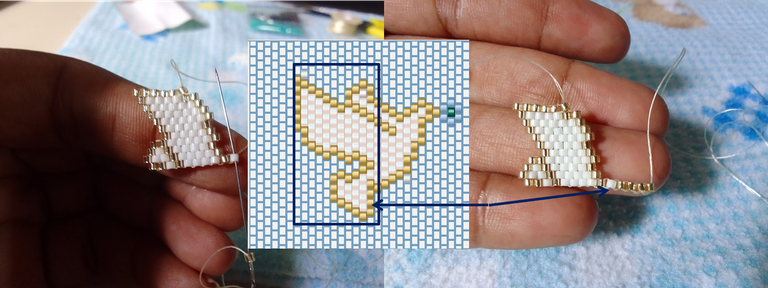
lista esa hilera continúe con las siguientes de la misma manera realizando un aumento y cuatro disminuciones hasta formar esa parte como muestro en la imagen
ready that row continue with the following in the same way making an increase and four decreases until forming that part as I show in the image
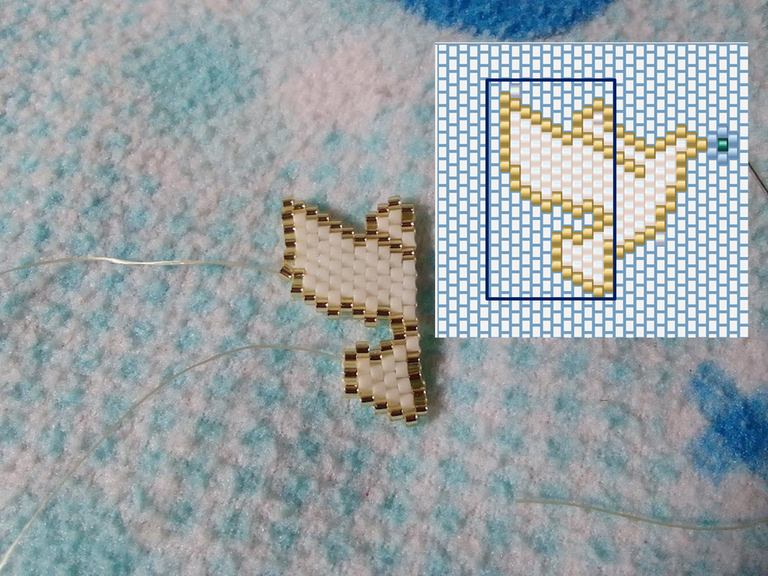
Continúe con las disminuciones para ir completando la paloma, en la siguiente imagen le muestro dos disminuciones , es posible querido lector que si no ha realizado un tejido antes lo vea difícil pero en realidad no lo es tanto
Continue with the decreases to complete the dove, in the following image I show you two decreases, it is possible, dear reader, that if you have not made a weave before you see it as difficult, but in reality it is not so much

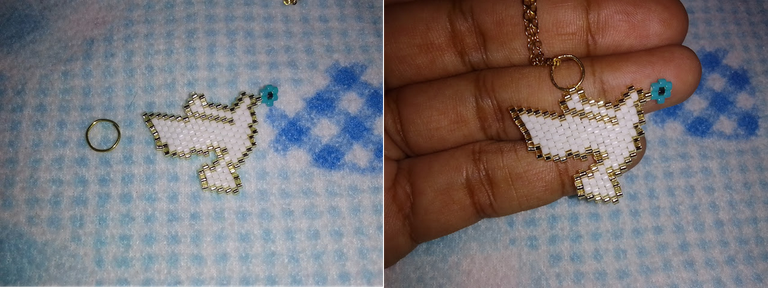
desde este punto realice 7 hileras en disminuciones hasta completar la ultima que seria el pico de la paloma posteriormente le coloque la florecita como les muestro
From this point, make 7 rows in decreases until completing the last one, which would be the dove's beak, then place the little flower on it as I show you
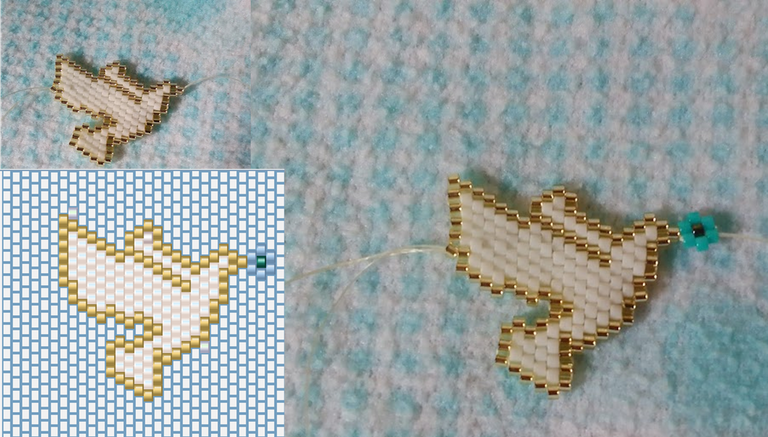
Como les dije al inicio esta paloma puede ser usada como colgante para cadena o para pulsera, le coloque un aro para mostrarlo en una cadena
As I told you at the beginning, this dove can be used as a pendant for a chain or for a bracelet, I put a ring on it to show it on a chain.
Espero les haya gustado mi paloma, Gracias a todos..
I hope you liked my pigeon, Thank you all..
Las imágenes son de mi propiedad, los colleges se realizaron en PowerPoint
The images are my property, the colleges were made in PowerPoint
Está hermoso amiga
Muchas gracias amiga..
Estupendo trabajo! Bienvenida.
Muchas gracias .. un fuerte abrazo..
Congratulations @edittasc86! You have completed the following achievement on the Hive blockchain and have been rewarded with new badge(s):
Your next target is to reach 500 upvotes.
You can view your badges on your board and compare yourself to others in the Ranking
If you no longer want to receive notifications, reply to this comment with the word
STOPCheck out the last post from @hivebuzz:
Support the HiveBuzz project. Vote for our proposal!
Muchas gracias..
De nada @edittasc86. 😊🌹
Por cierto, ¿podemos pedirle que apoye nuestra propuesta para que nuestro equipo pueda continuar con su trabajo?
Puedes hacerlo en peakd, ecency, Hive.blog o con HiveSigner.
https://peakd.com/me/proposals/199
¡Muchas gracias !
muy bonito amigo, admiro tu trabajo, te felicito, te quedo como siempre espectacular, un abrazo, saludos!!
Gracias amiga bella un fuerte abrazo..
Thank you for sharing this amazing post on HIVE!
Your content got selected by our fellow curator @stevenson7 & you just received a little thank you via an upvote from our non-profit curation initiative!
You will be featured in one of our recurring curation compilations and on our pinterest boards! Both are aiming to offer you a stage to widen your audience within and outside of the DIY scene of hive.
Join the official DIYHub community on HIVE and show us more of your amazing work and feel free to connect with us and other DIYers via our discord server: https://discord.gg/mY5uCfQ !
If you want to support our goal to motivate other DIY/art/music/homesteading/... creators just delegate to us and earn 100% of your curation rewards!
Stay creative & hive on!
Feliz tarde muchas gracias por su apoyo.. Saludos