[Eng/Esp] Spring Contest / Beautiful decorative painting of tropical flowers/ Concurso Primavera / Hermoso cuadro decorativo de flores tropicales.
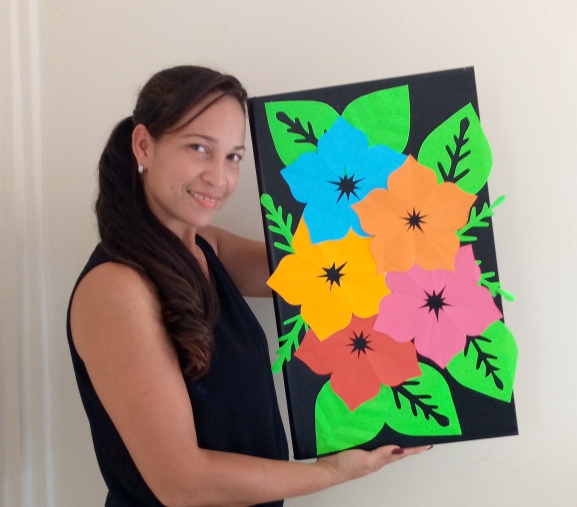
Happy Sunday hive friends, I am here to share my participation in this new spring contest moderated by our friend @equipodelta, a topic where flowers are the protagonists and I particularly love them, I will show you how to make a beautiful painting of tropical flowers , made with cardboard to fill that space of your home with colors and joy.
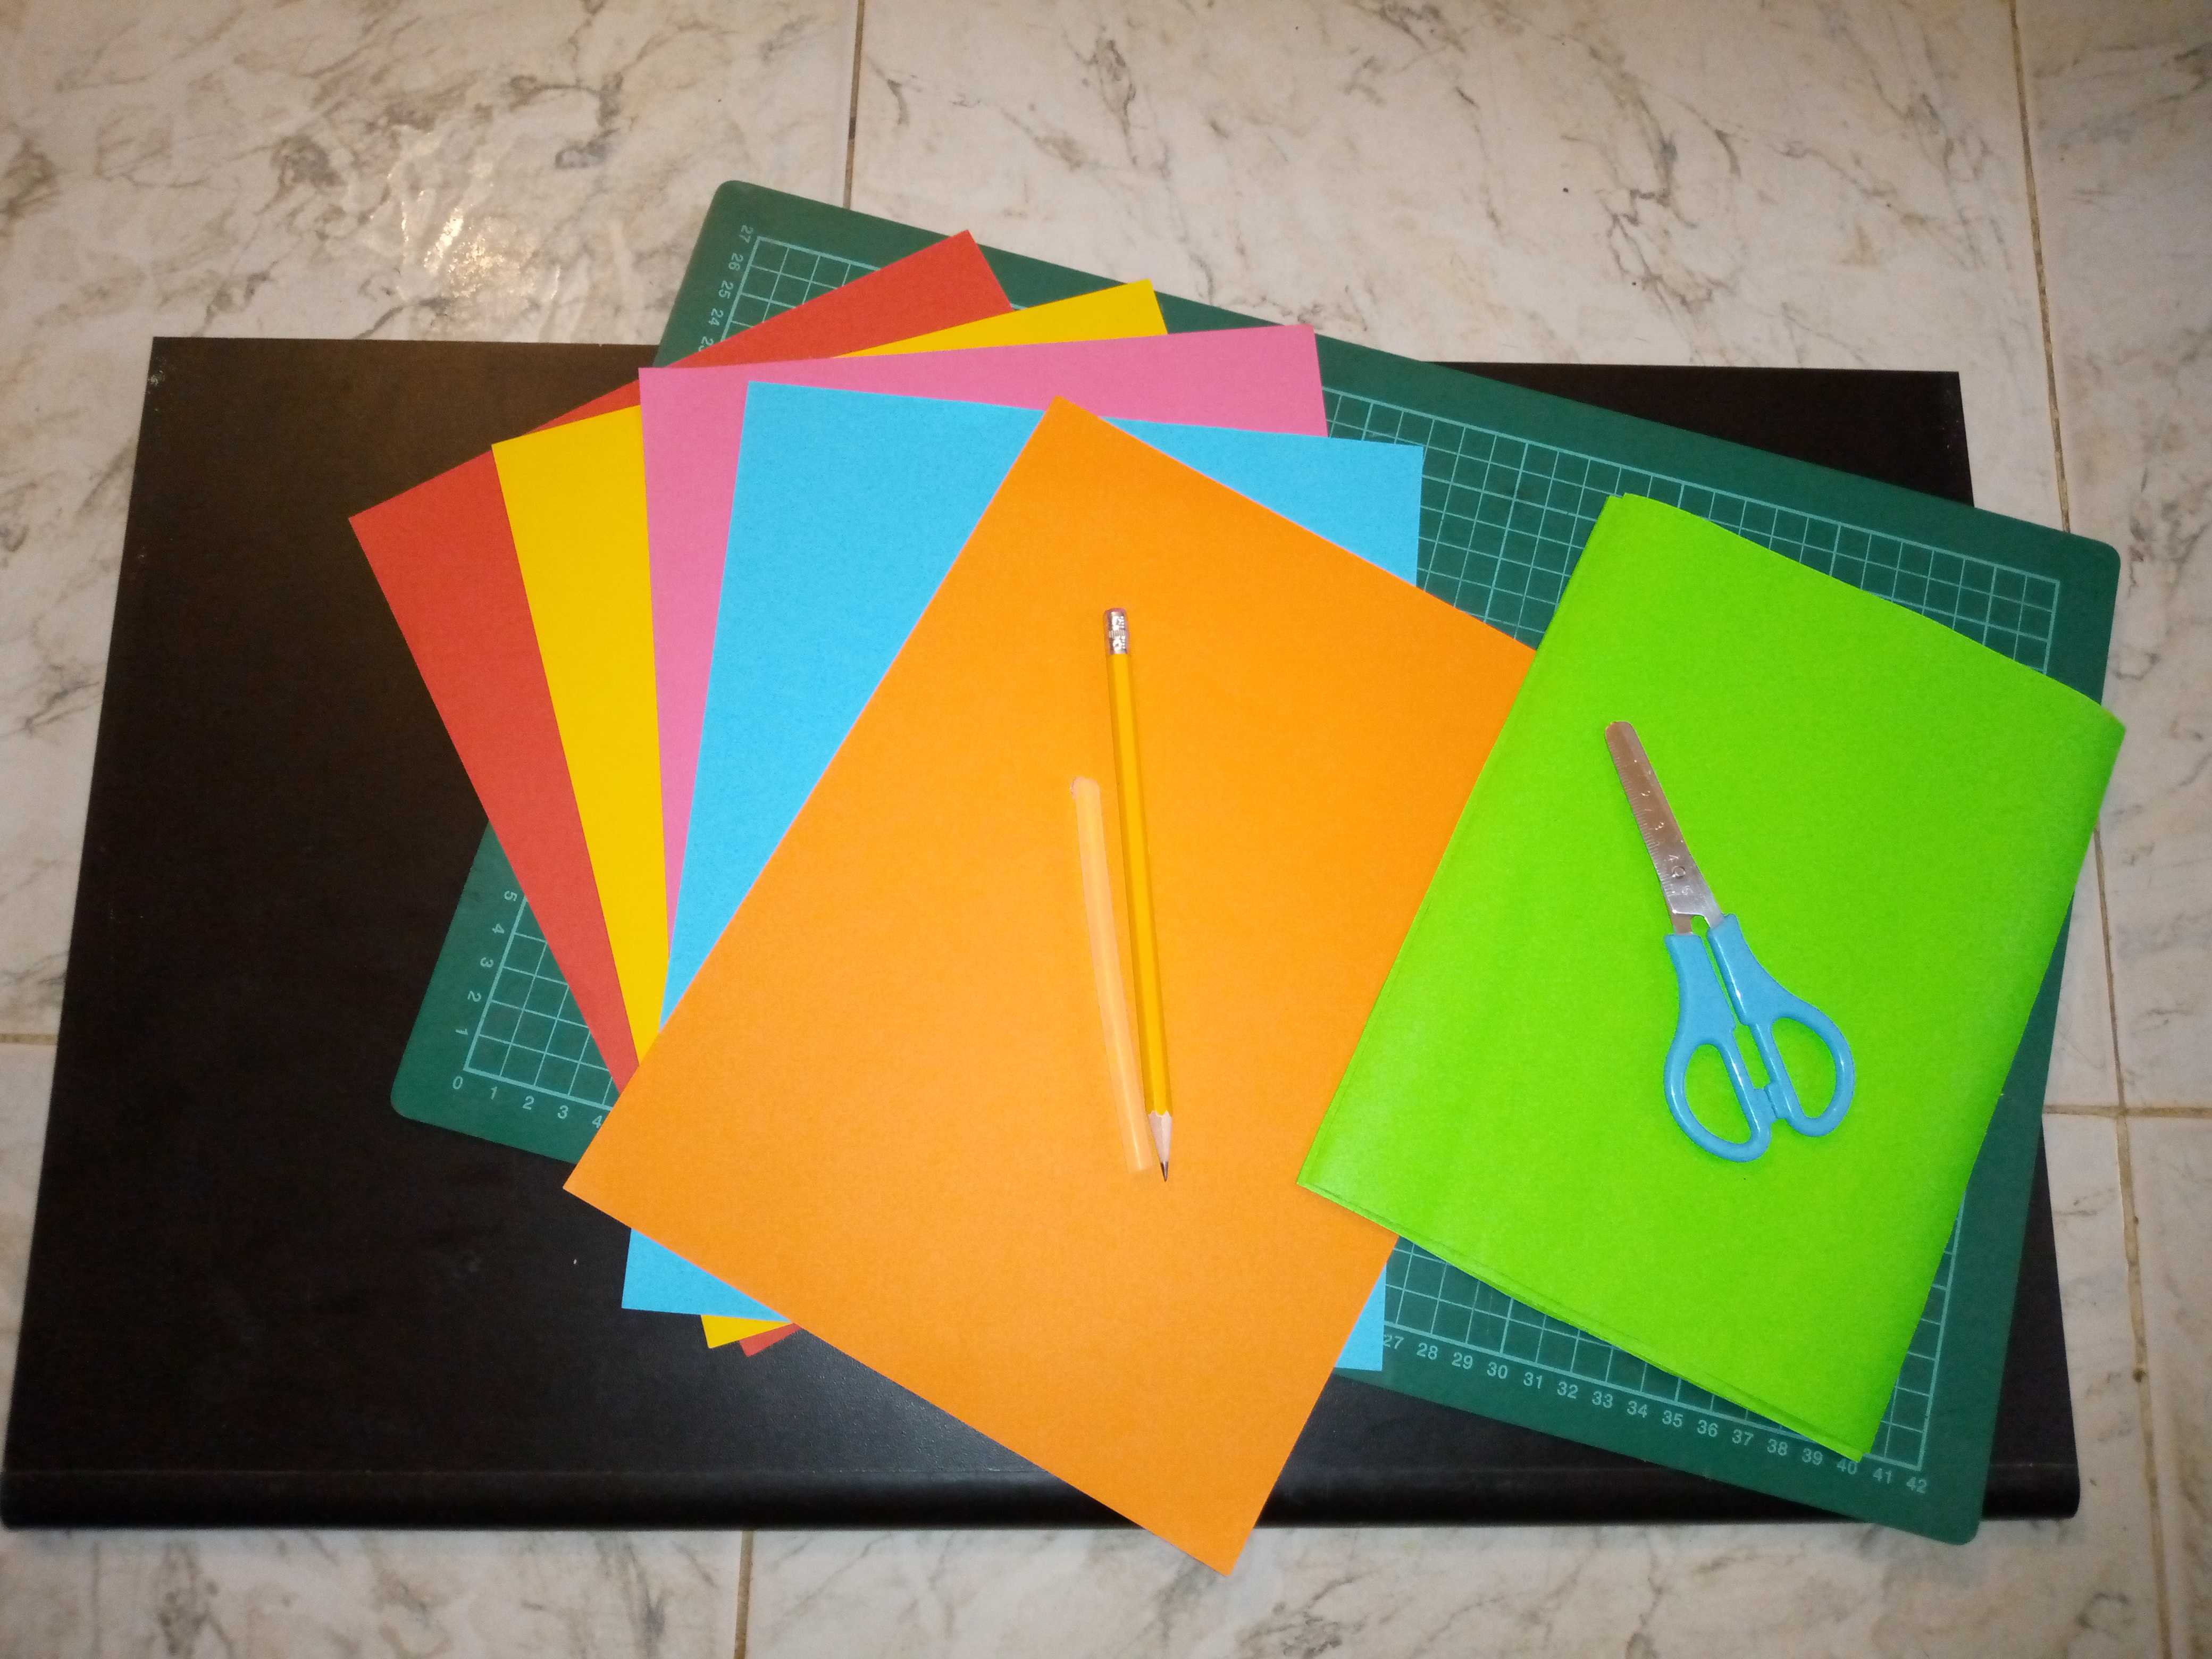
√ Cardboards of the colors of your preference but a green color cannot be missing.
√ Scissors
√ Silicone
√ Pencil
√ Table or any surface where you can place our flowers.
Feliz domingo amigos de hive, paso por acá a compartir mi participación en este nuevo concurso de primavera moderado por nuestra amiga @equipodelta, un tema donde las flores son las protagonistas y a mi particularmente me encantan, les mostrare como hacer un hermoso cuadro de flores tropicales, elaboradas con cartulina para llenar ese espacio de tu hogar de colores y alegría.
√ Cartulinas de los colores de tu preferencia pero no puede faltar una color verde.
√ Tijera
√ Silicón
√ Lápiz
√ Tabla o cualquier superficie dónde puedas colocar nuestras flores.
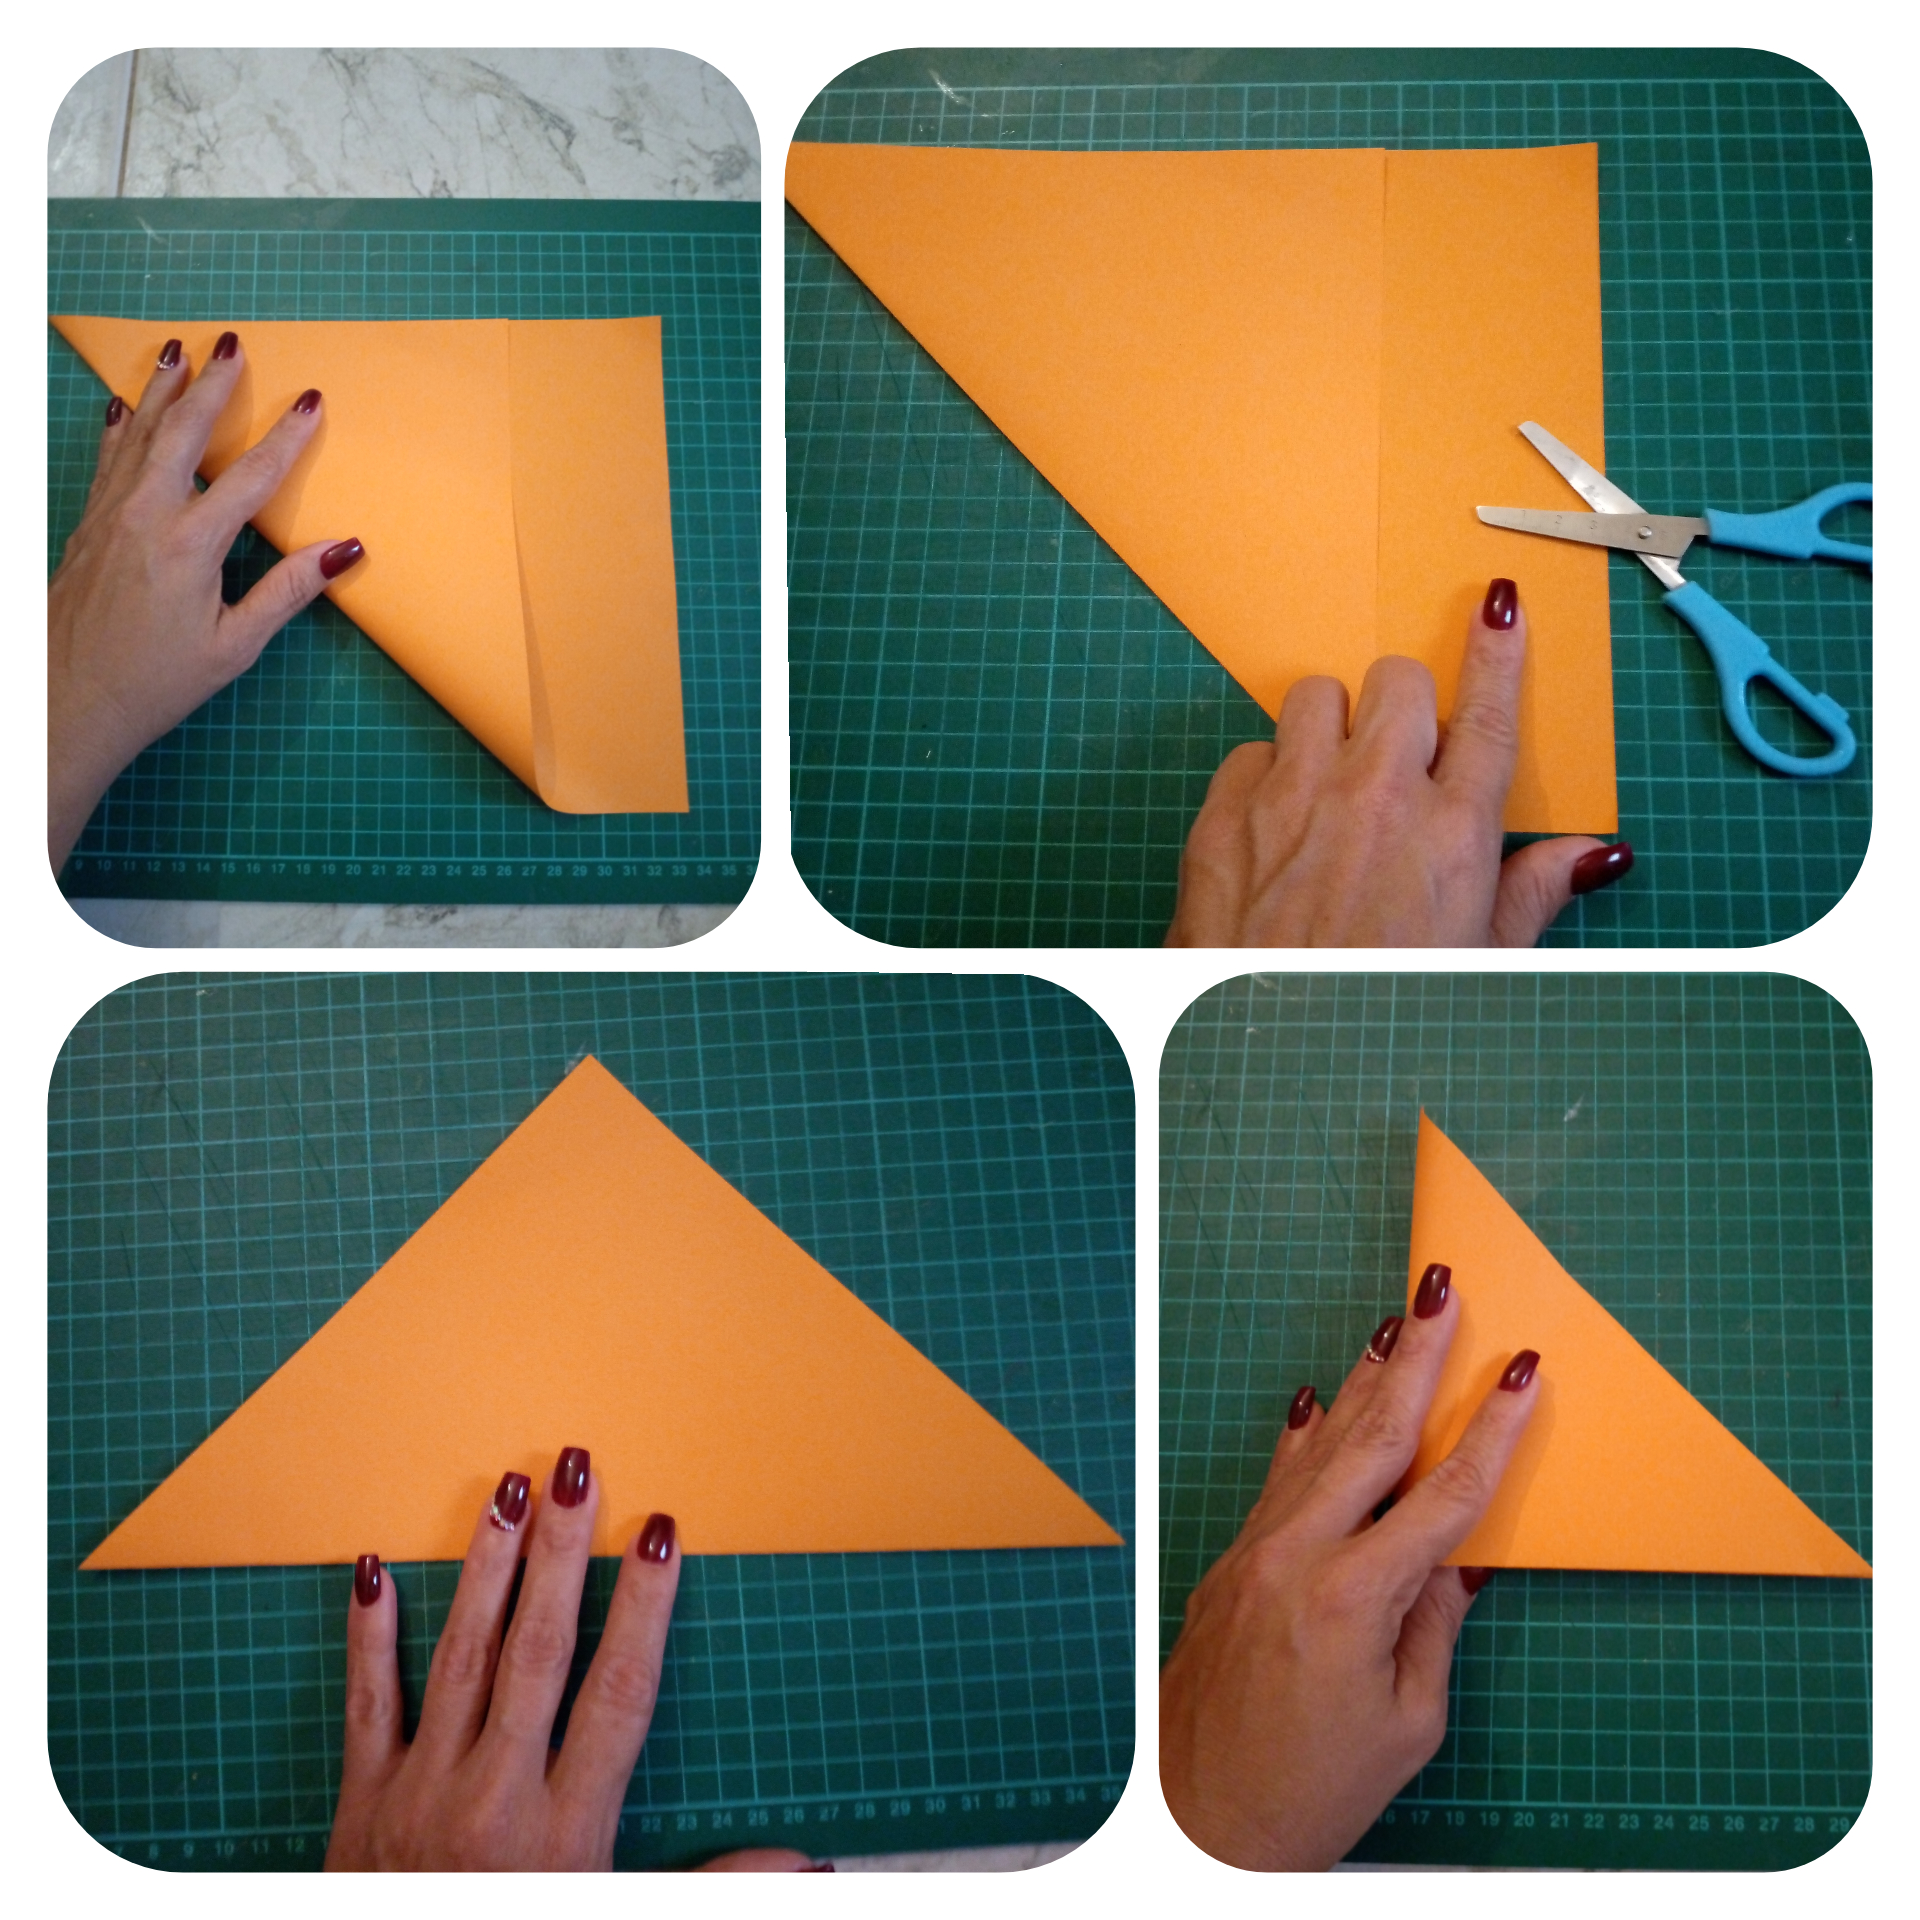
To make these beautiful flowers we just have to fold, cut and paste, there are many times that we will fold the cardboard to get our flowers, perhaps the first one will be a bit difficult but they are really very easy to do, let's start .
Para elaborar estás hermosas flores solo debemos doblar, cortar y pegar, son muchas veces las que doblaremos la cartulina para obtener nuestras flores, quizás la primera se les haga un poco difícil pero realmente son muy fáciles se hacer, comencemos
(For a better understanding, be guided by the images)
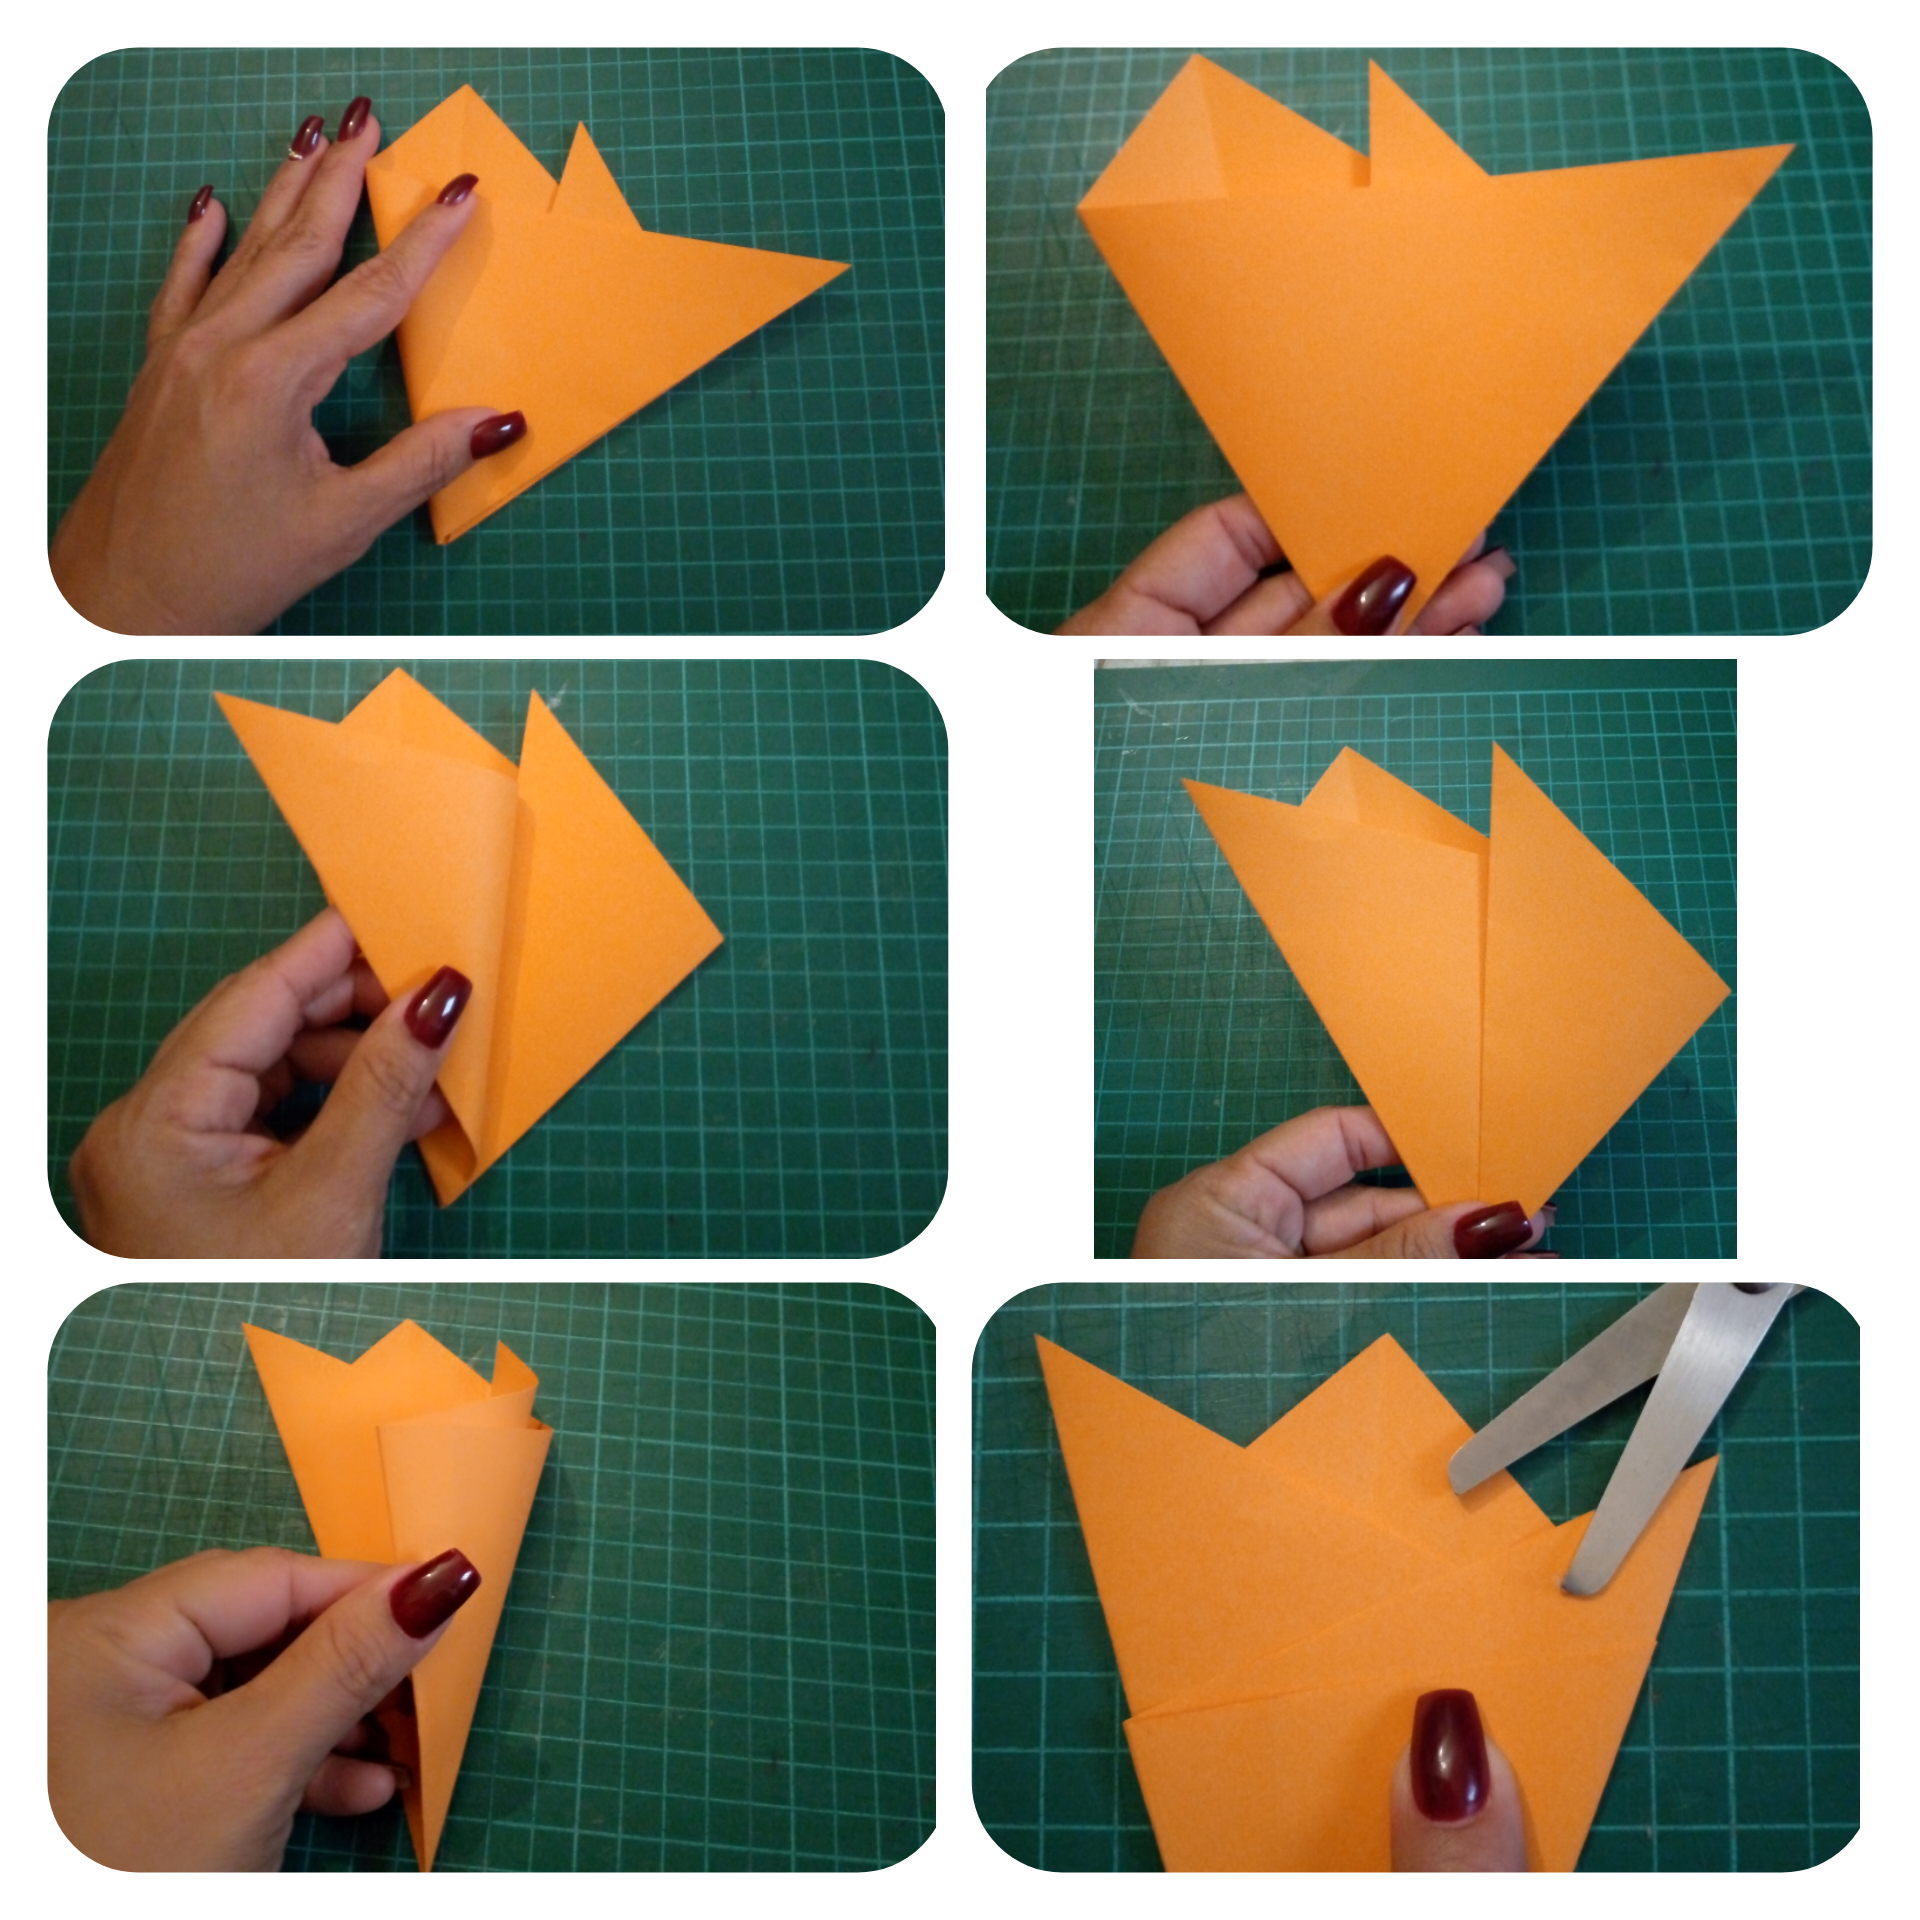
1.- We fold the cardboard to one side forming a triangle, aligning with the edge of the upper part, we cut the part that is left over and we fold again obtaining a smaller triangle.
( Para mayor comprensión guíate por las imágenes)
1.- Doblamos la cartulina hacia un lado formando un triángulo, alineando con el borde de la parte de arriba, recortamos la parte que nos sobra y volvemos a doblar obteniendo un triángulo más pequeño.
2.- The small triangle is unfolded and we have the large triangle again, we continue to bring the right side up without marking the doubling, only press the tip obtained from that side (we mark with a pencil) then we fold from above towards the mark made with the pencil, as we did previously, only the tip where the doubling is formed is pressed (we also marked) again we fold the right side towards the second mark made.
2.- Se desdobla el triángulo pequeño y nos queda de nuevo el triángulo grande, continuamos llevando el lado derecho hacia arriba sin marcar el doblaje solo se presiona la punta obtenida de ese lado (marcamos con un lápiz) luego doblamos desde arriba hacia la marca hecha con el lápiz, como hicimos anteriormente solo se presiona la punta donde se forma el doblaje ( también marcamos) otra vez doblamos el lado derecho hacia la segunda marca realizada.
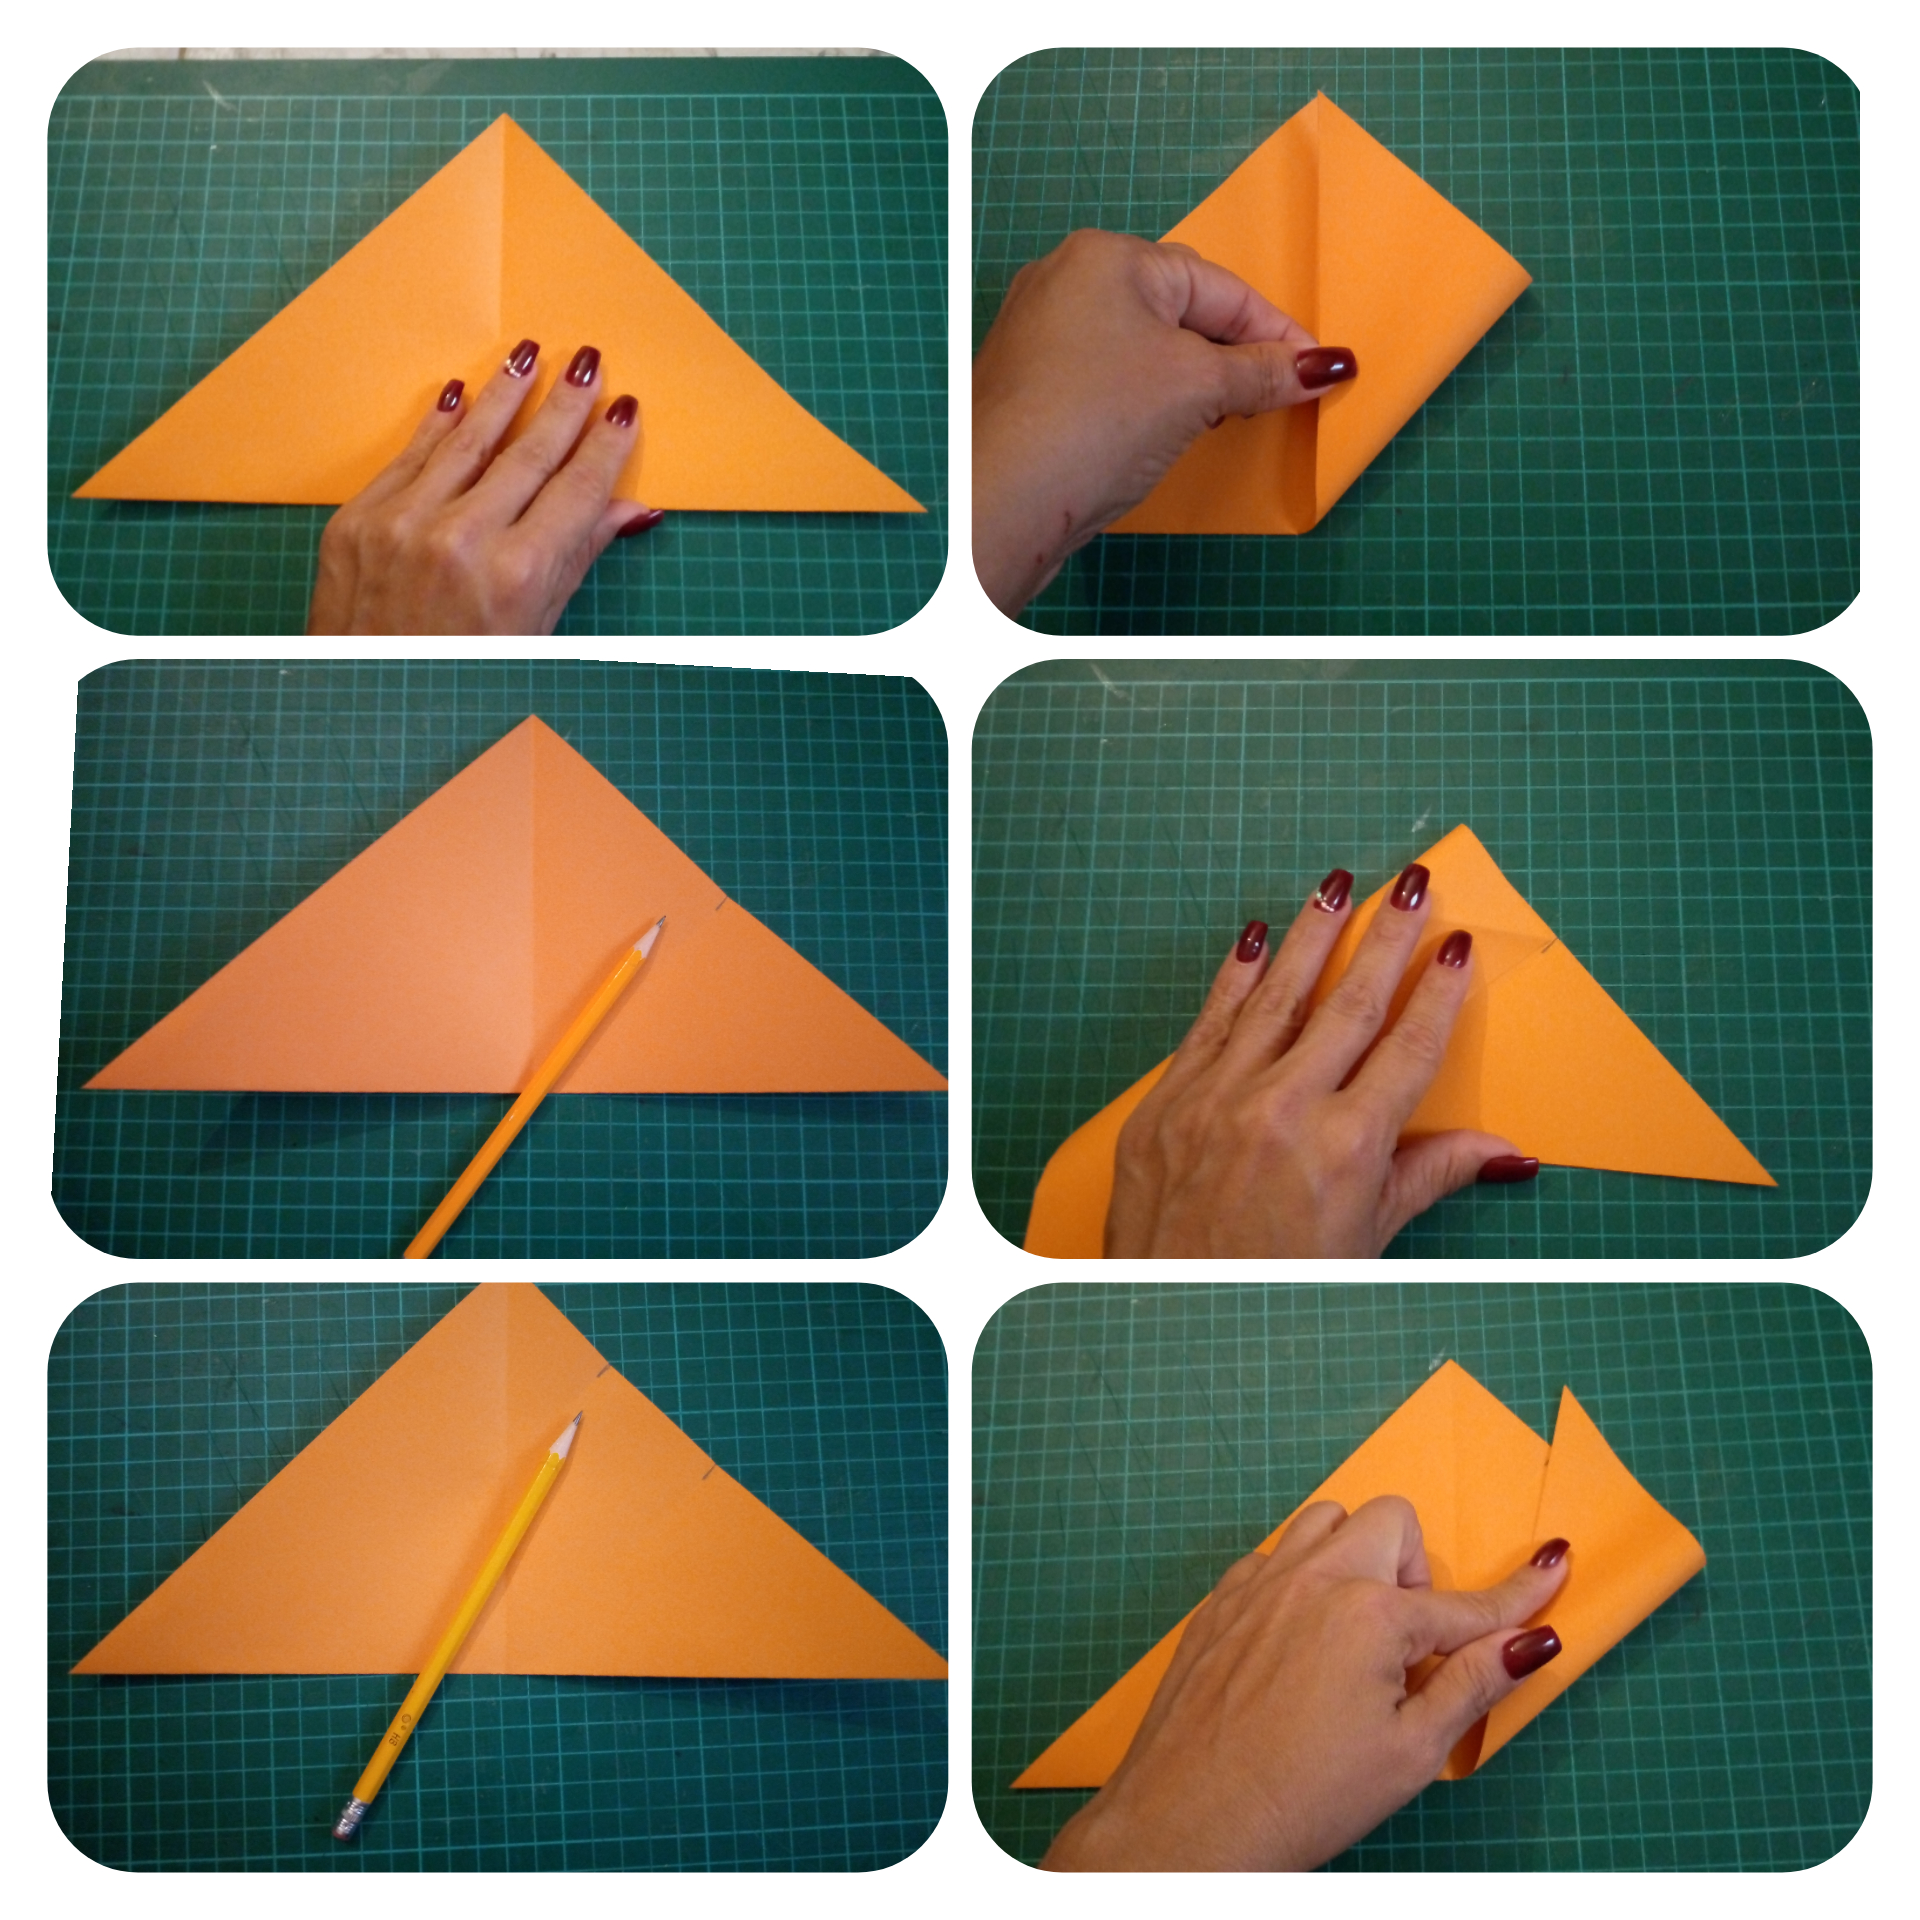
3.- Then we fold the left side to the right (always aligning to the side that is folded) then we fold again to the left side only half of the cardboard and finally we fold the right side to the left in half , we continue cutting diagonally at the top.
3.- Luego doblamos el lado izquierdo hacia el derecho (siempre alineando hacia al lado que se dobla) posteriormente doblamos de nuevo hacia el lado izquierdo solo la mitad de la cartulina y por último volvemos a doblar por la mitad el lado derecho hacia el izquierdo, continuamos recortando en diagonal en la parte de arriba.
4.-We draw half of a petal (the shape that you like the most) and at the bottom we draw two tips, one longer than the other, cut and open our beautiful flower.
4.-Dibujamos la mitad de un pétalo ( la forma que más te guste) y en la parte de abajo dibujamos dos puntas una más larga que la otra, recortamos y abrimos nuestra hermosa flor.
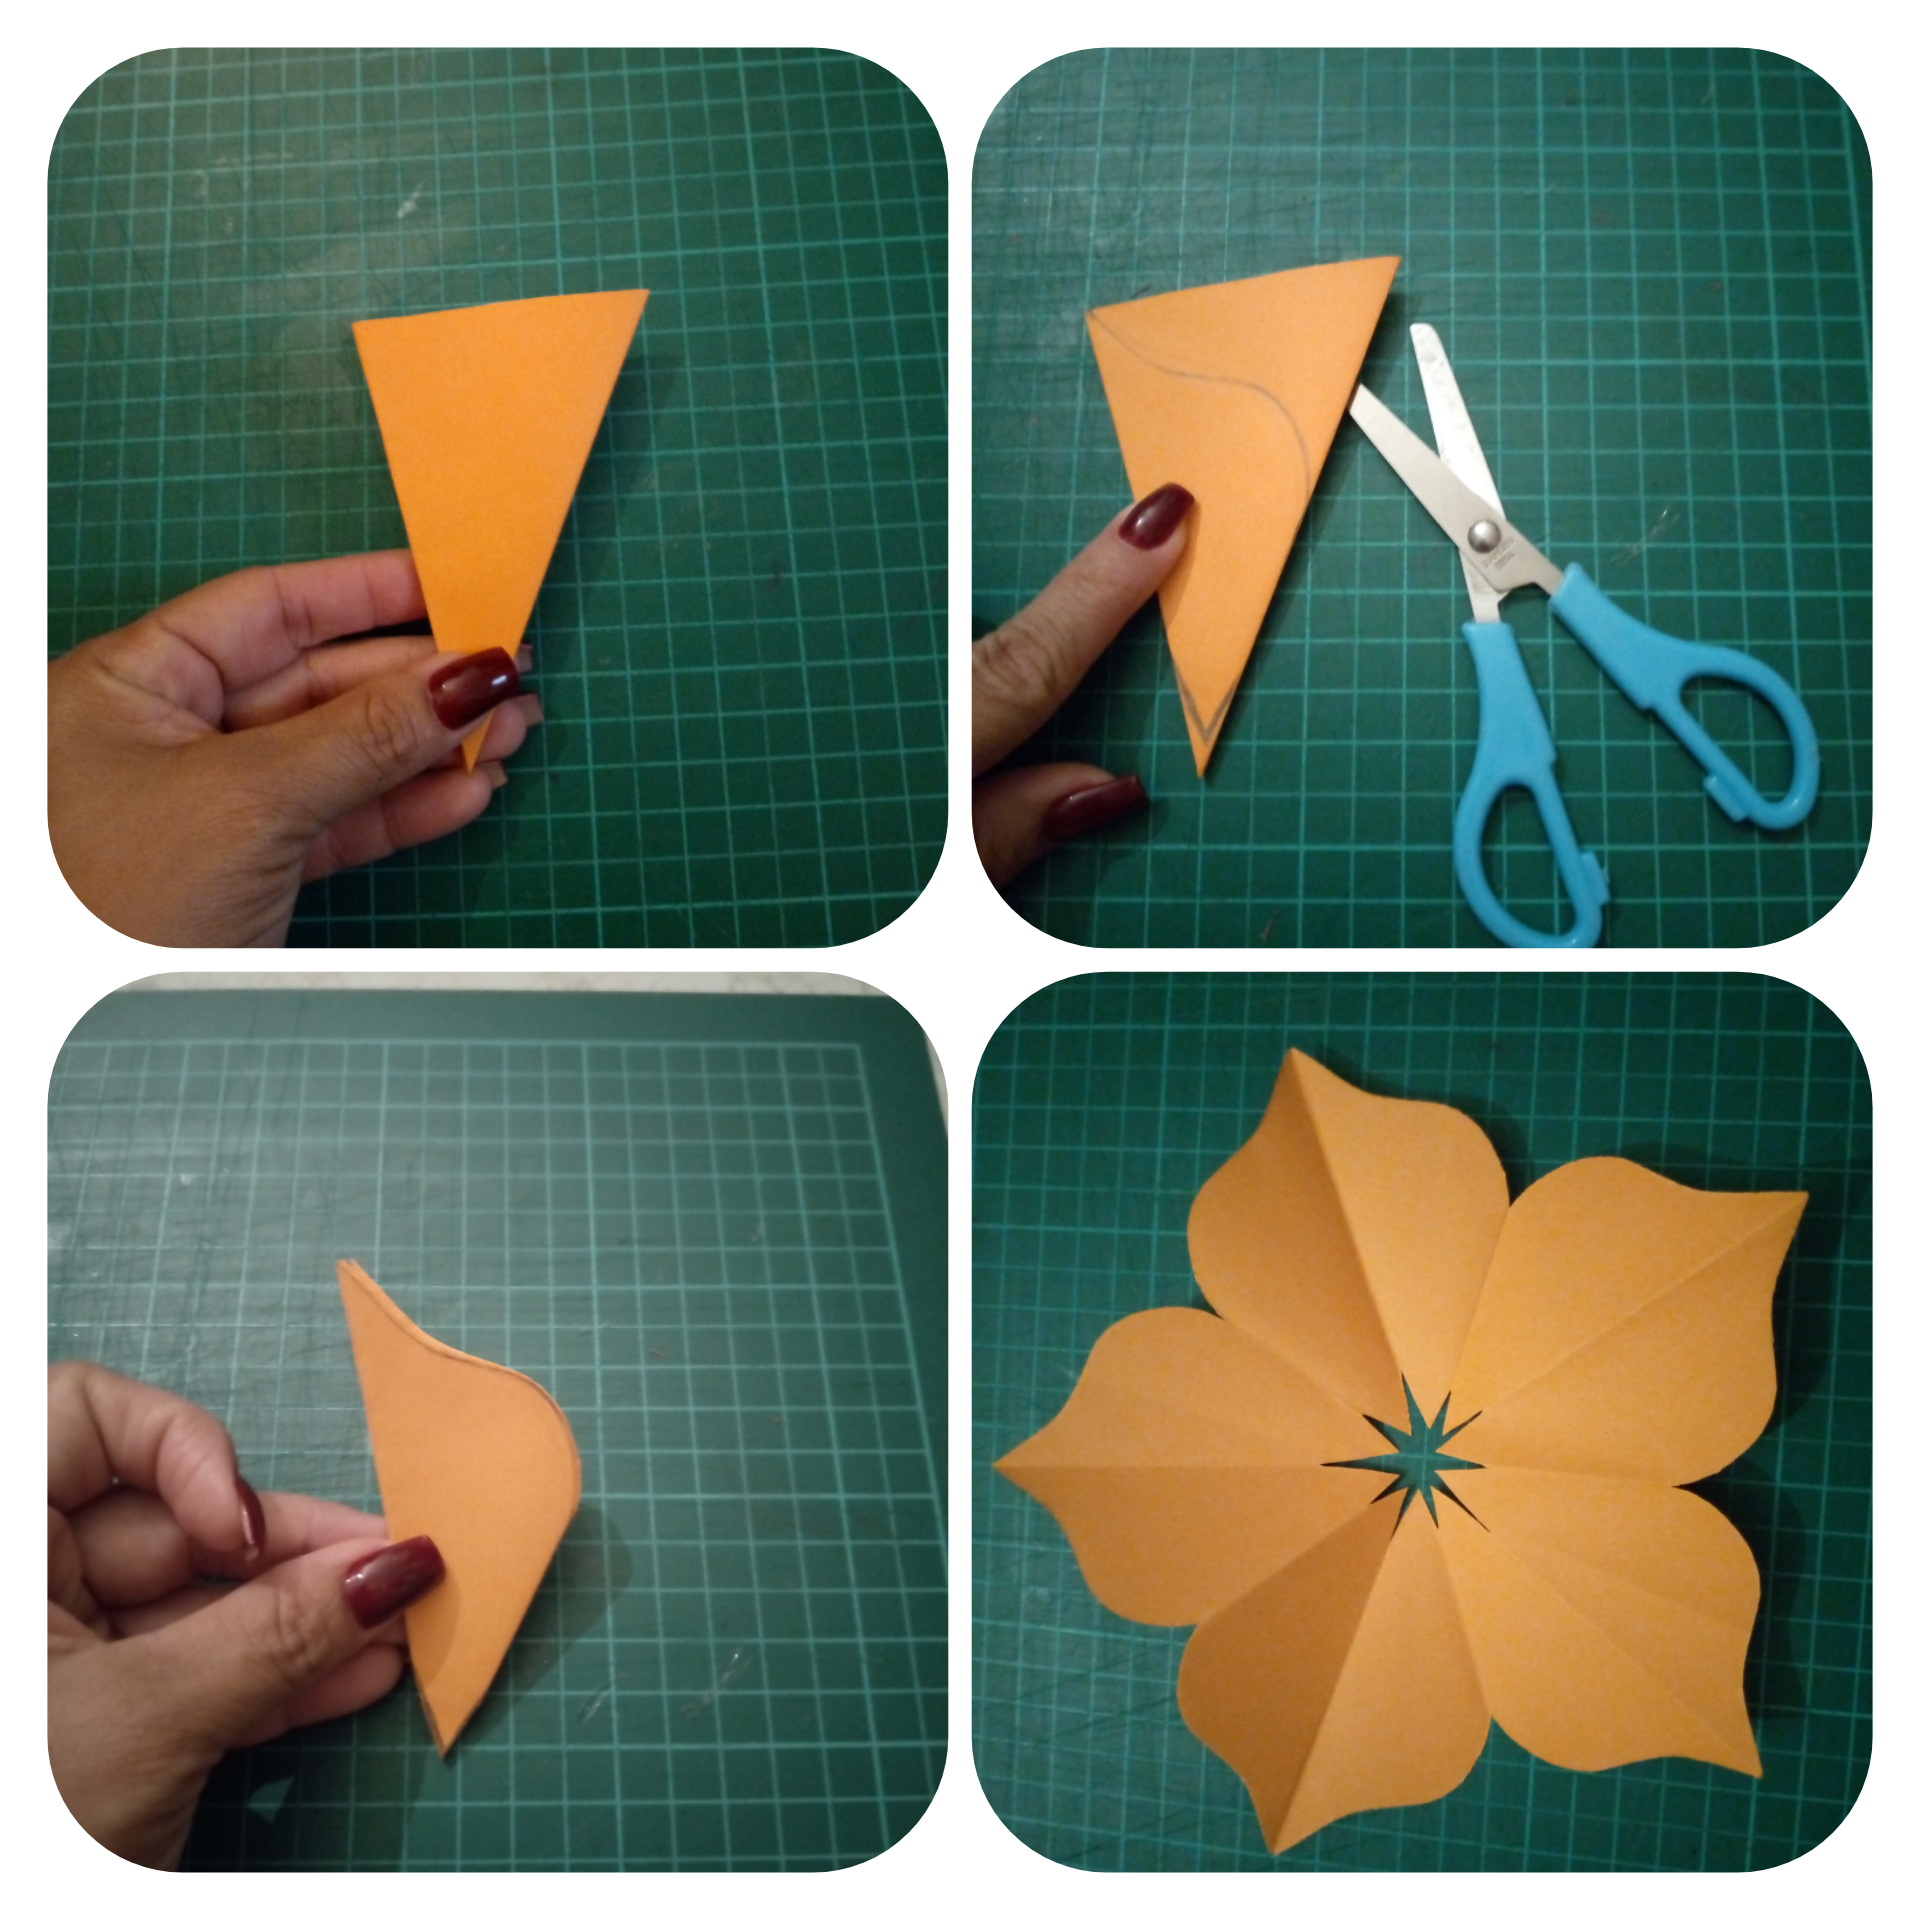
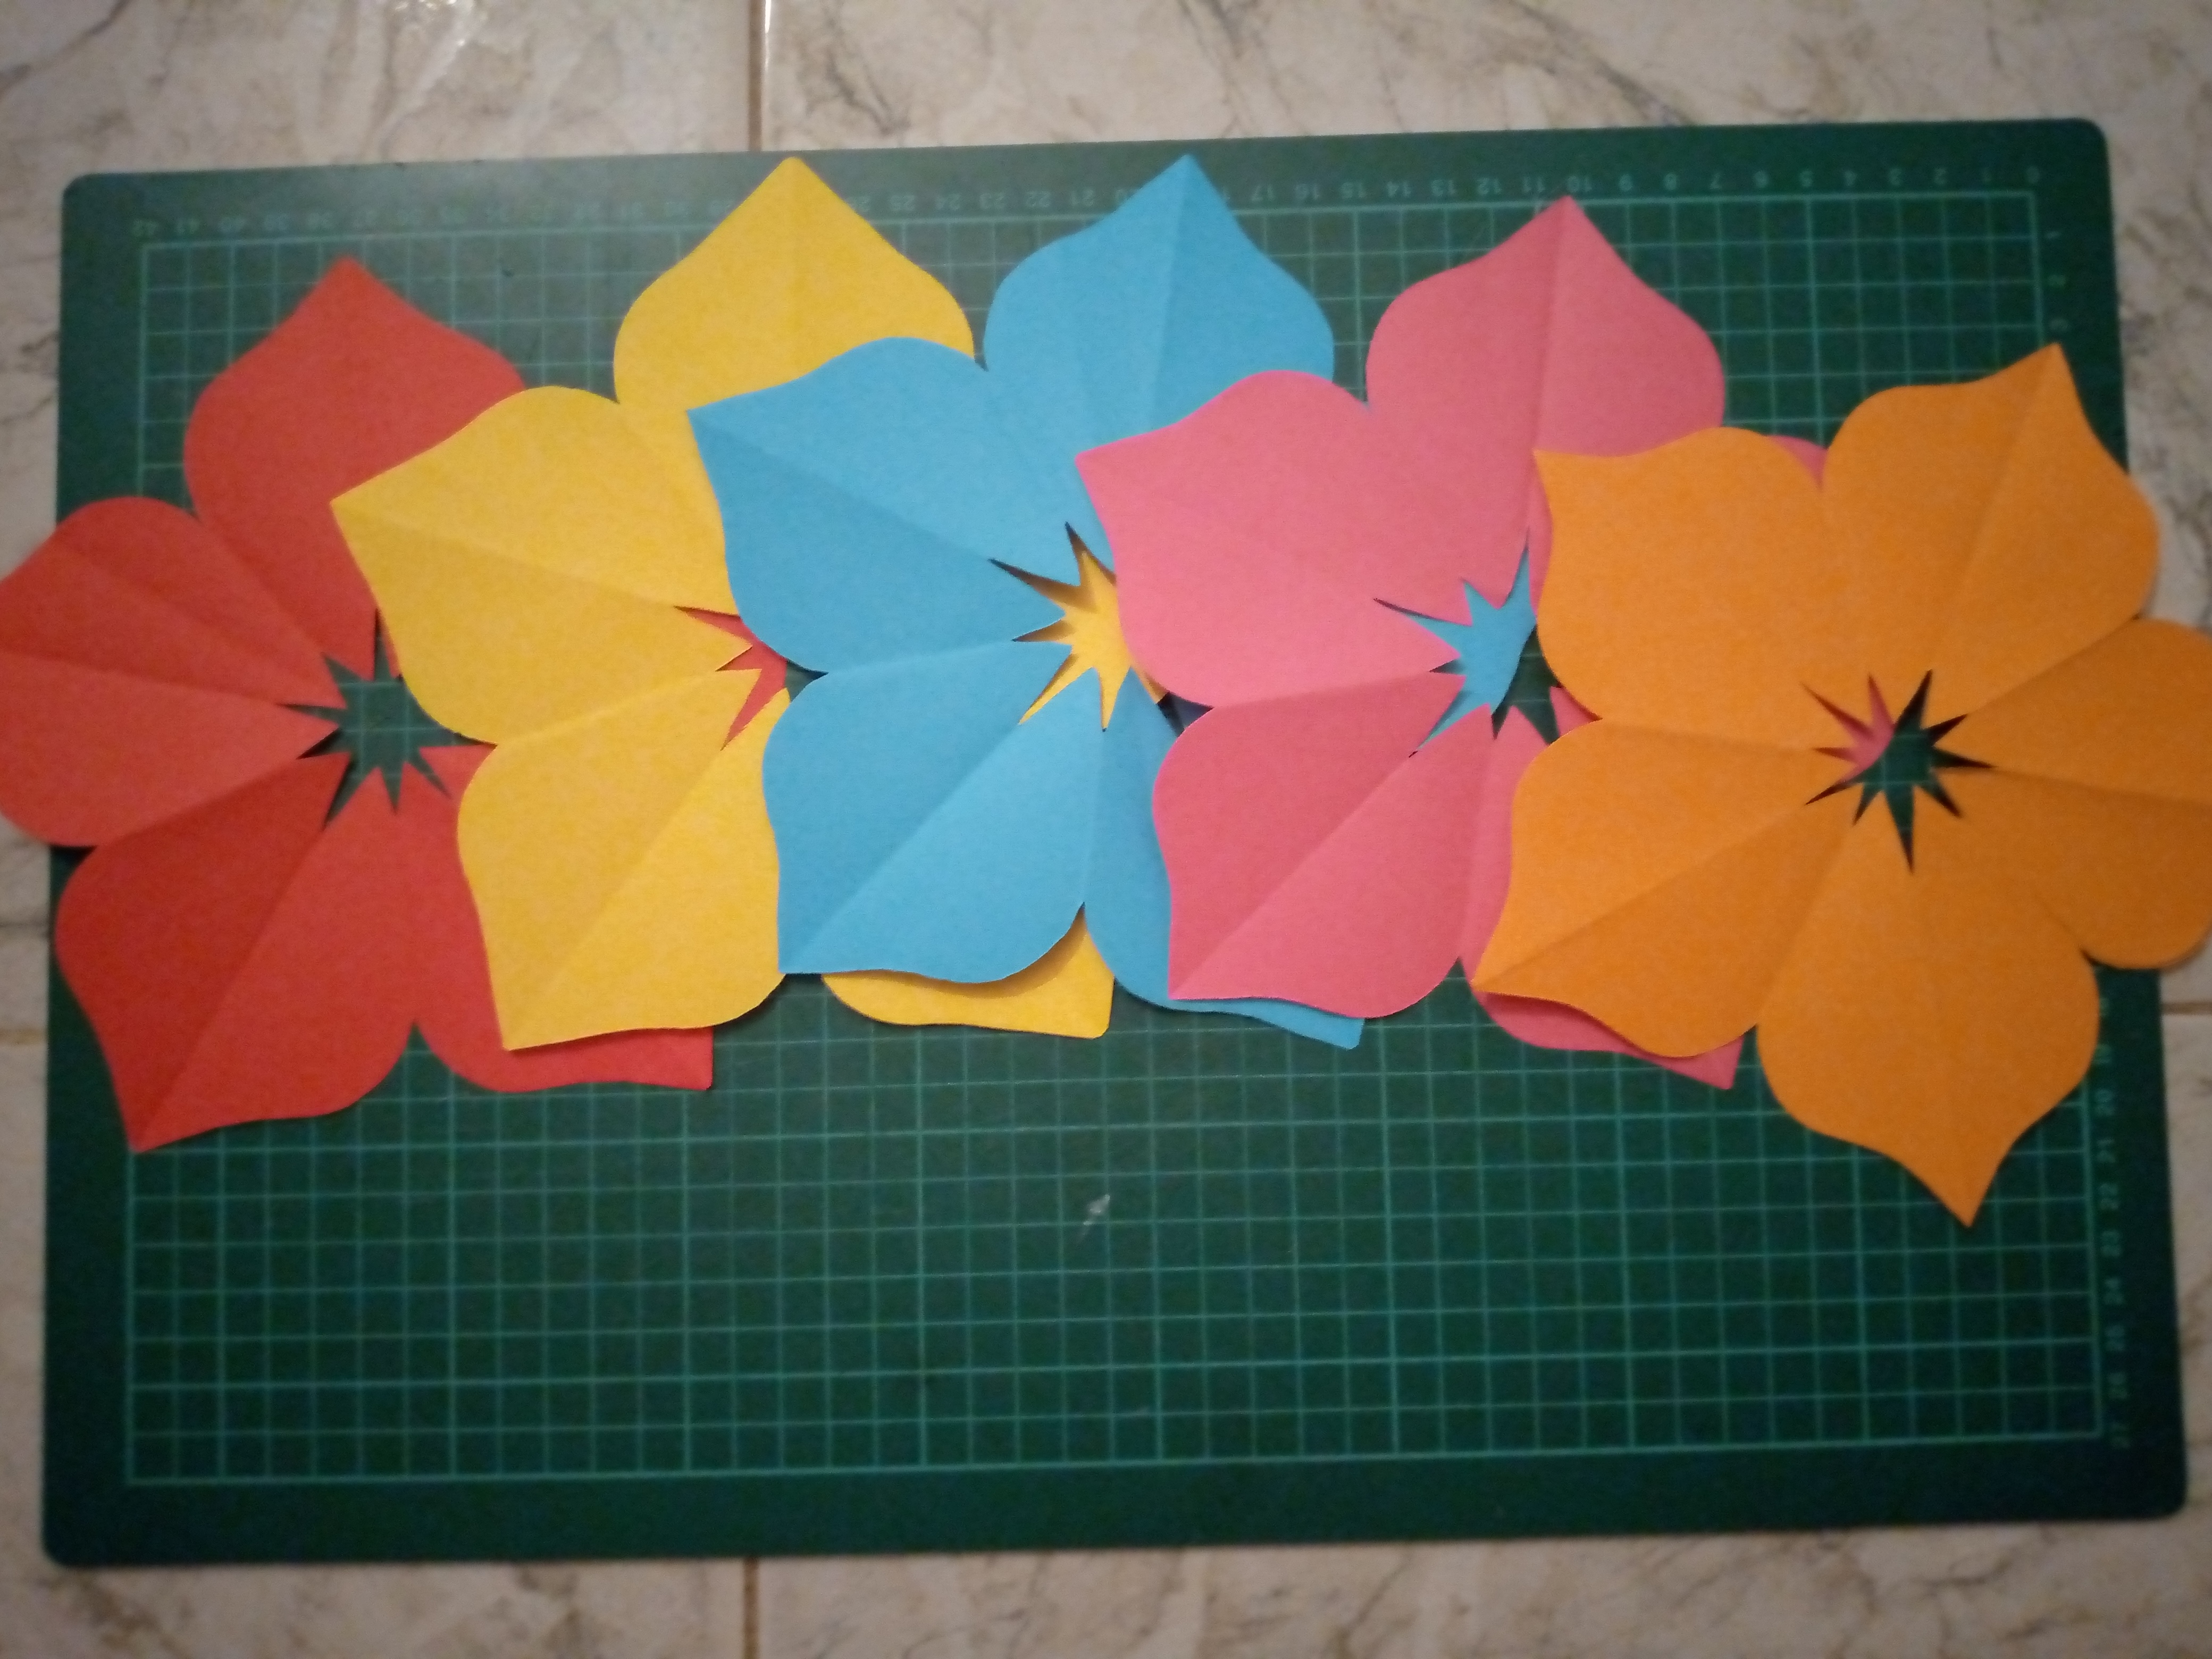
We will do the same procedure with the other cards, I recommend that you take the first flower made as a mold to draw the petal and the tips.
El mismo procedimiento haremos con las otras cartulinas, te recomiendo tomar como molde para dibujar el pétalo y las puntas la primera flor elaborada.
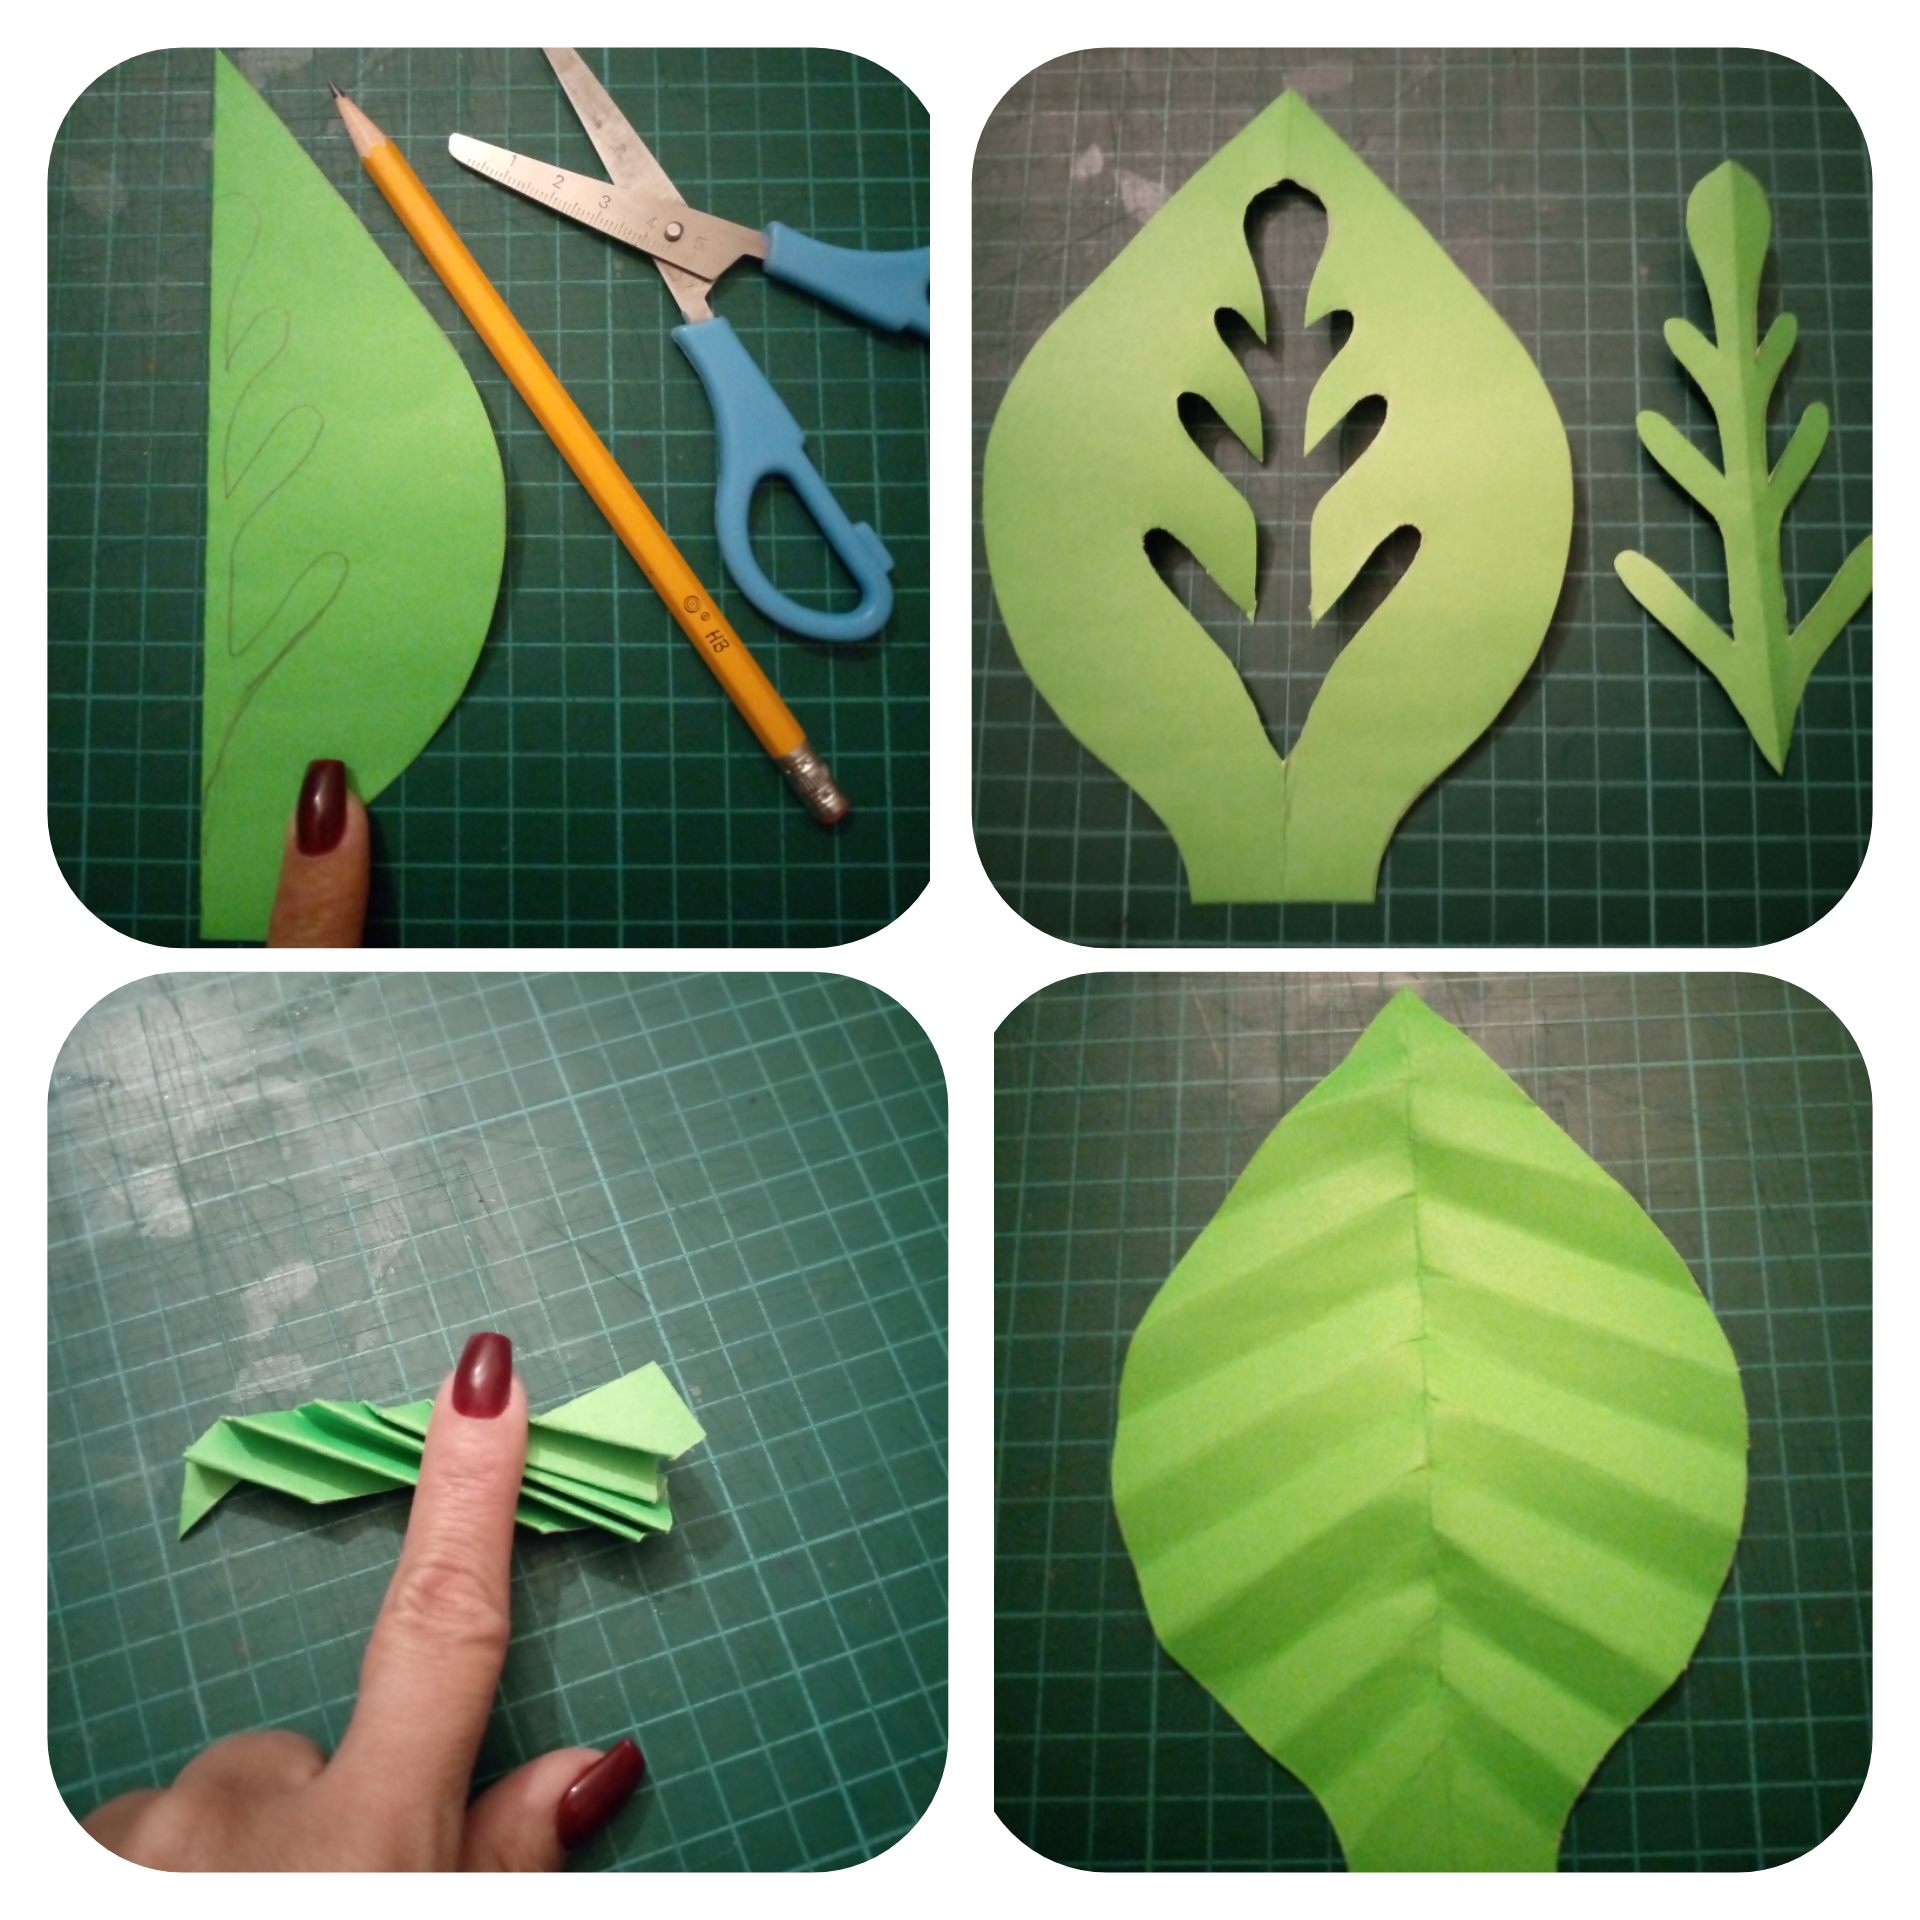
5.- I will make two types of leaves, we fold the green cardboard in half horizontally, cut and fold one of the parts again, draw a sheet that goes from top to bottom and cut.
5.- Realizaré dos tipos de hojas, doblamos la cartulina verde por la mitad en forma horizontal, recortamos y volvemos a doblar una de las partes nuevamente, dibujamos una hoja que abarque desde arriba hacia abajo y recortamos.
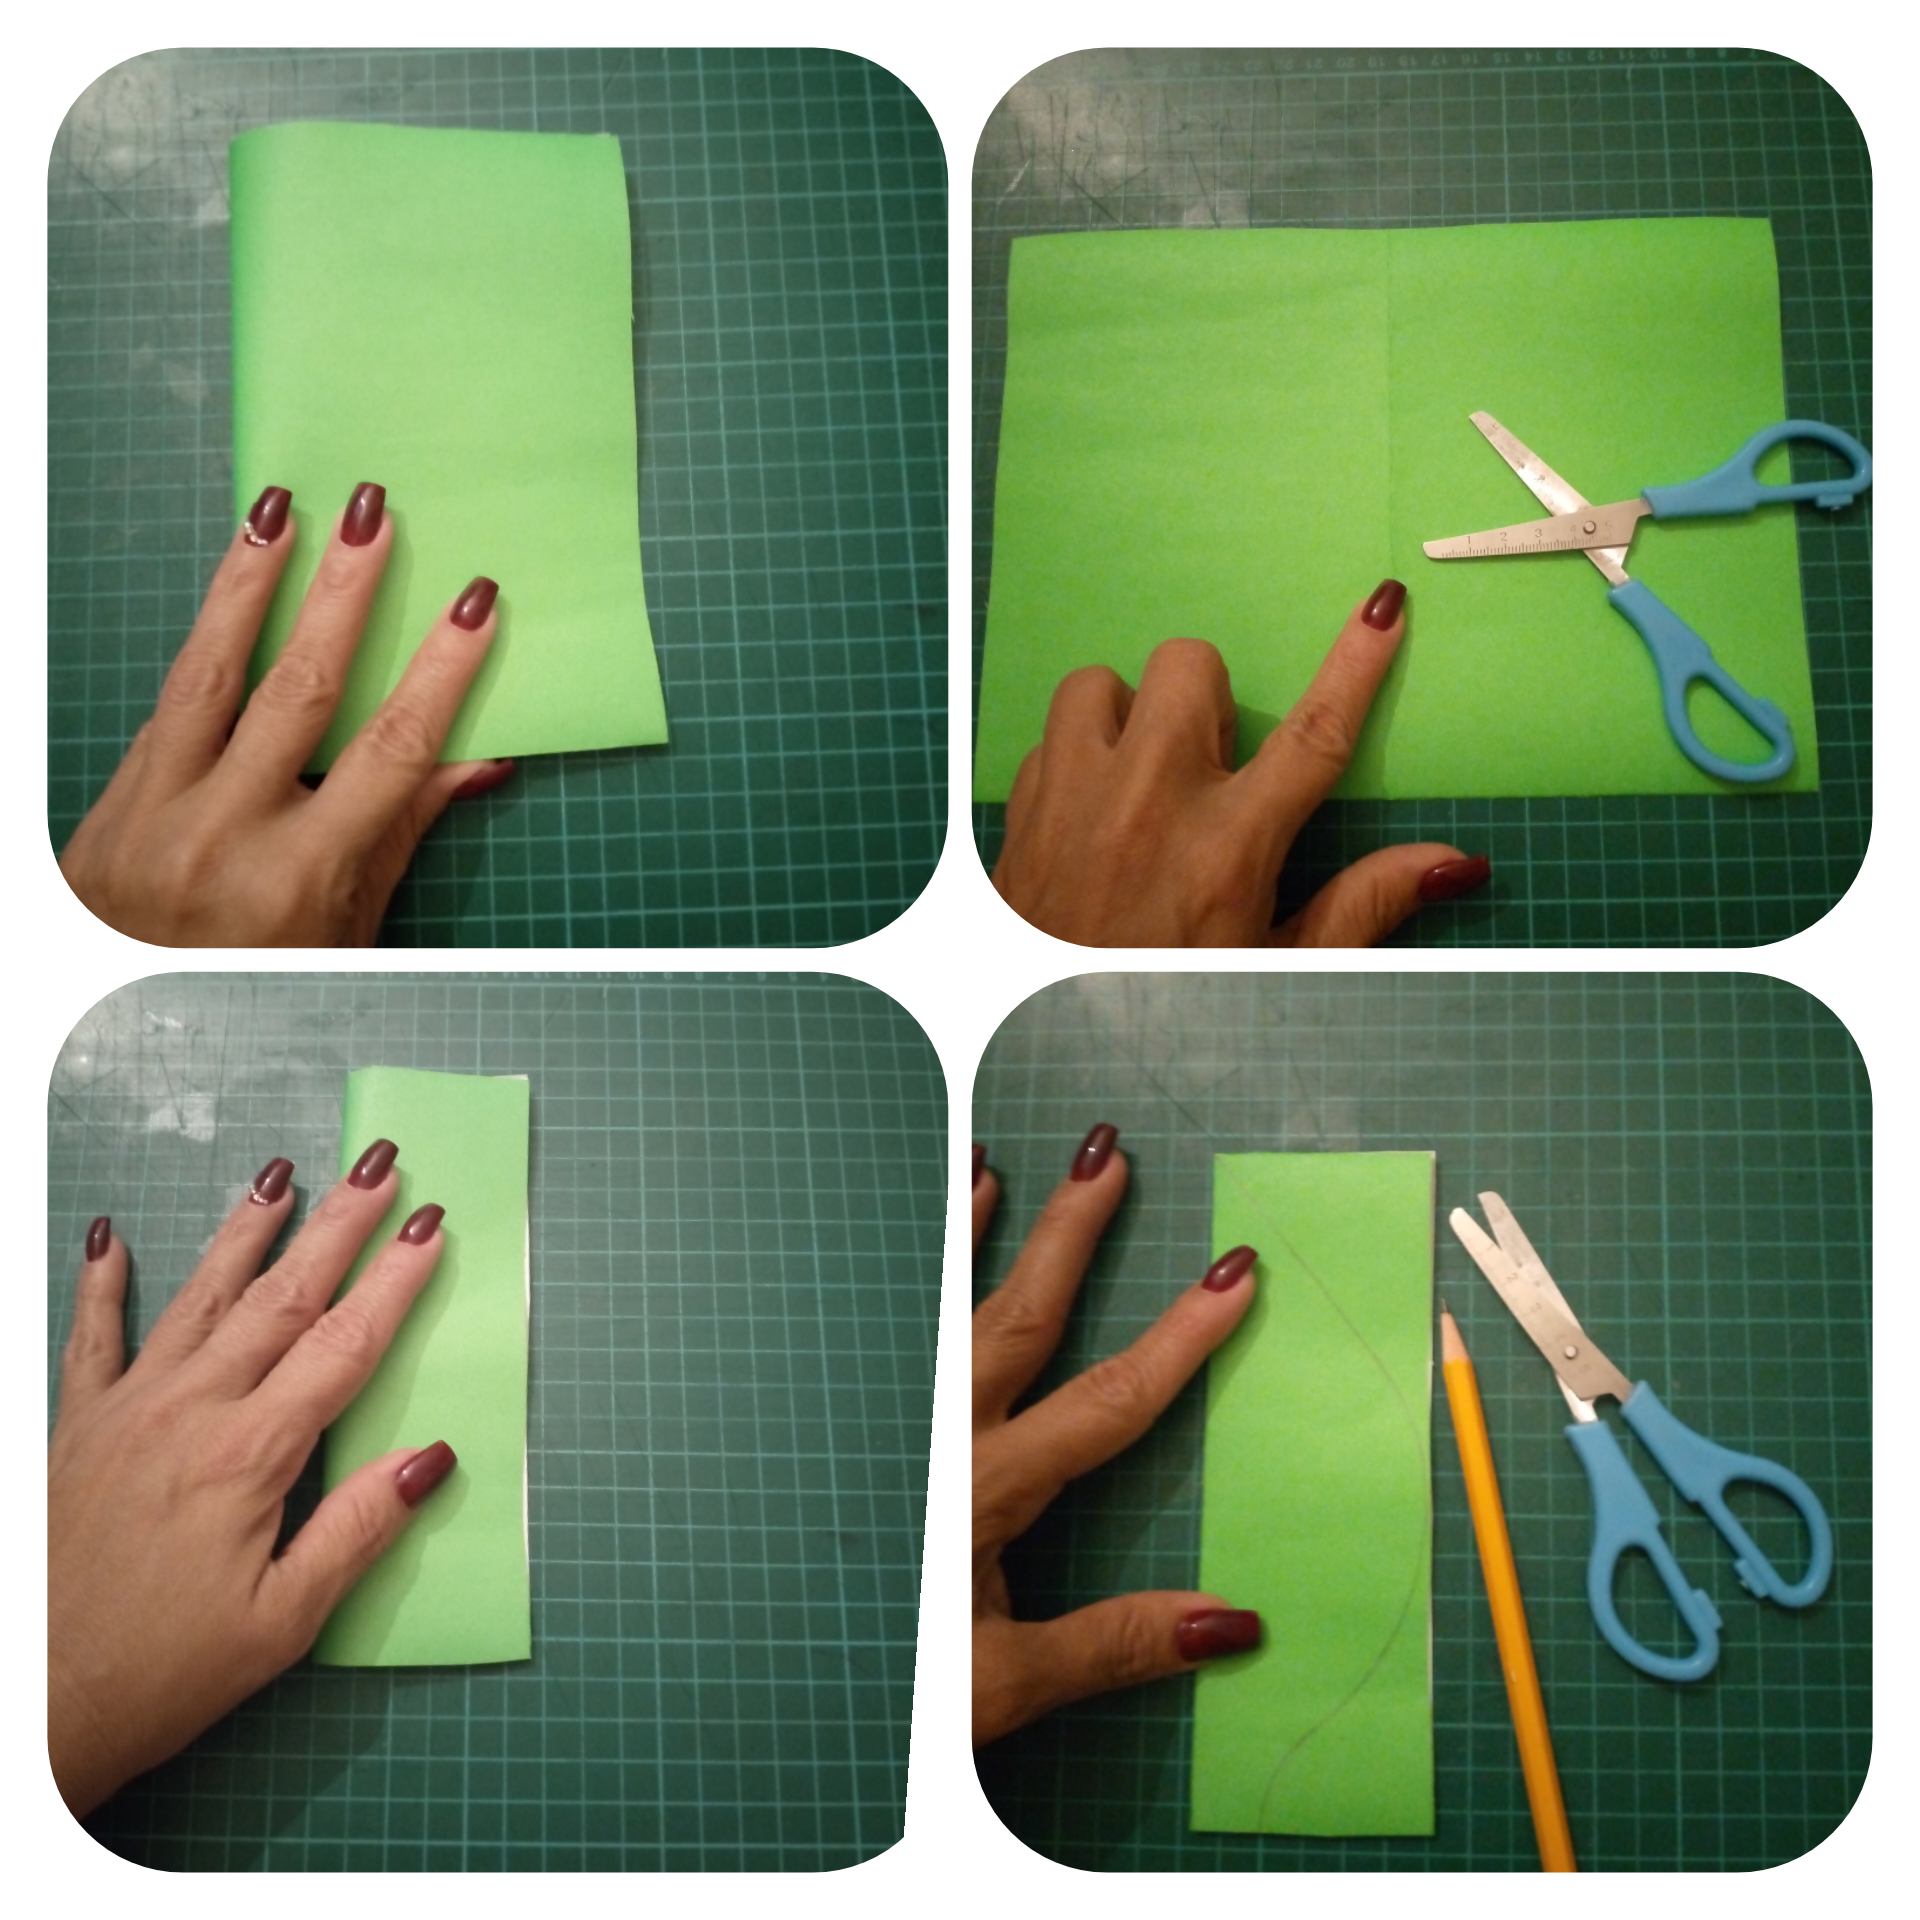
6.- Then we draw its lines in the middle of the sheet, cut it and we will have a nice spike, for the second sheet we fold like an accordion diagonally and open. (We will make the leaves that you consider necessary)
6.- Luego dibujamos en la mitad de la hoja sus rayitas, recortamos y nos quedará una linda espiga, para la segunda hoja doblamos como un acordeón en forma diagonal y abrimos.( Haremos las hojas que consideres necesarias)
7.- We assemble our flowers, leaves and spikes on the chosen surface as you prefer and then glue
7.- Armamos sobre la superficie escogida nuestras flores, hojas y espigas como mejor prefieras y posteriormente pegamos.
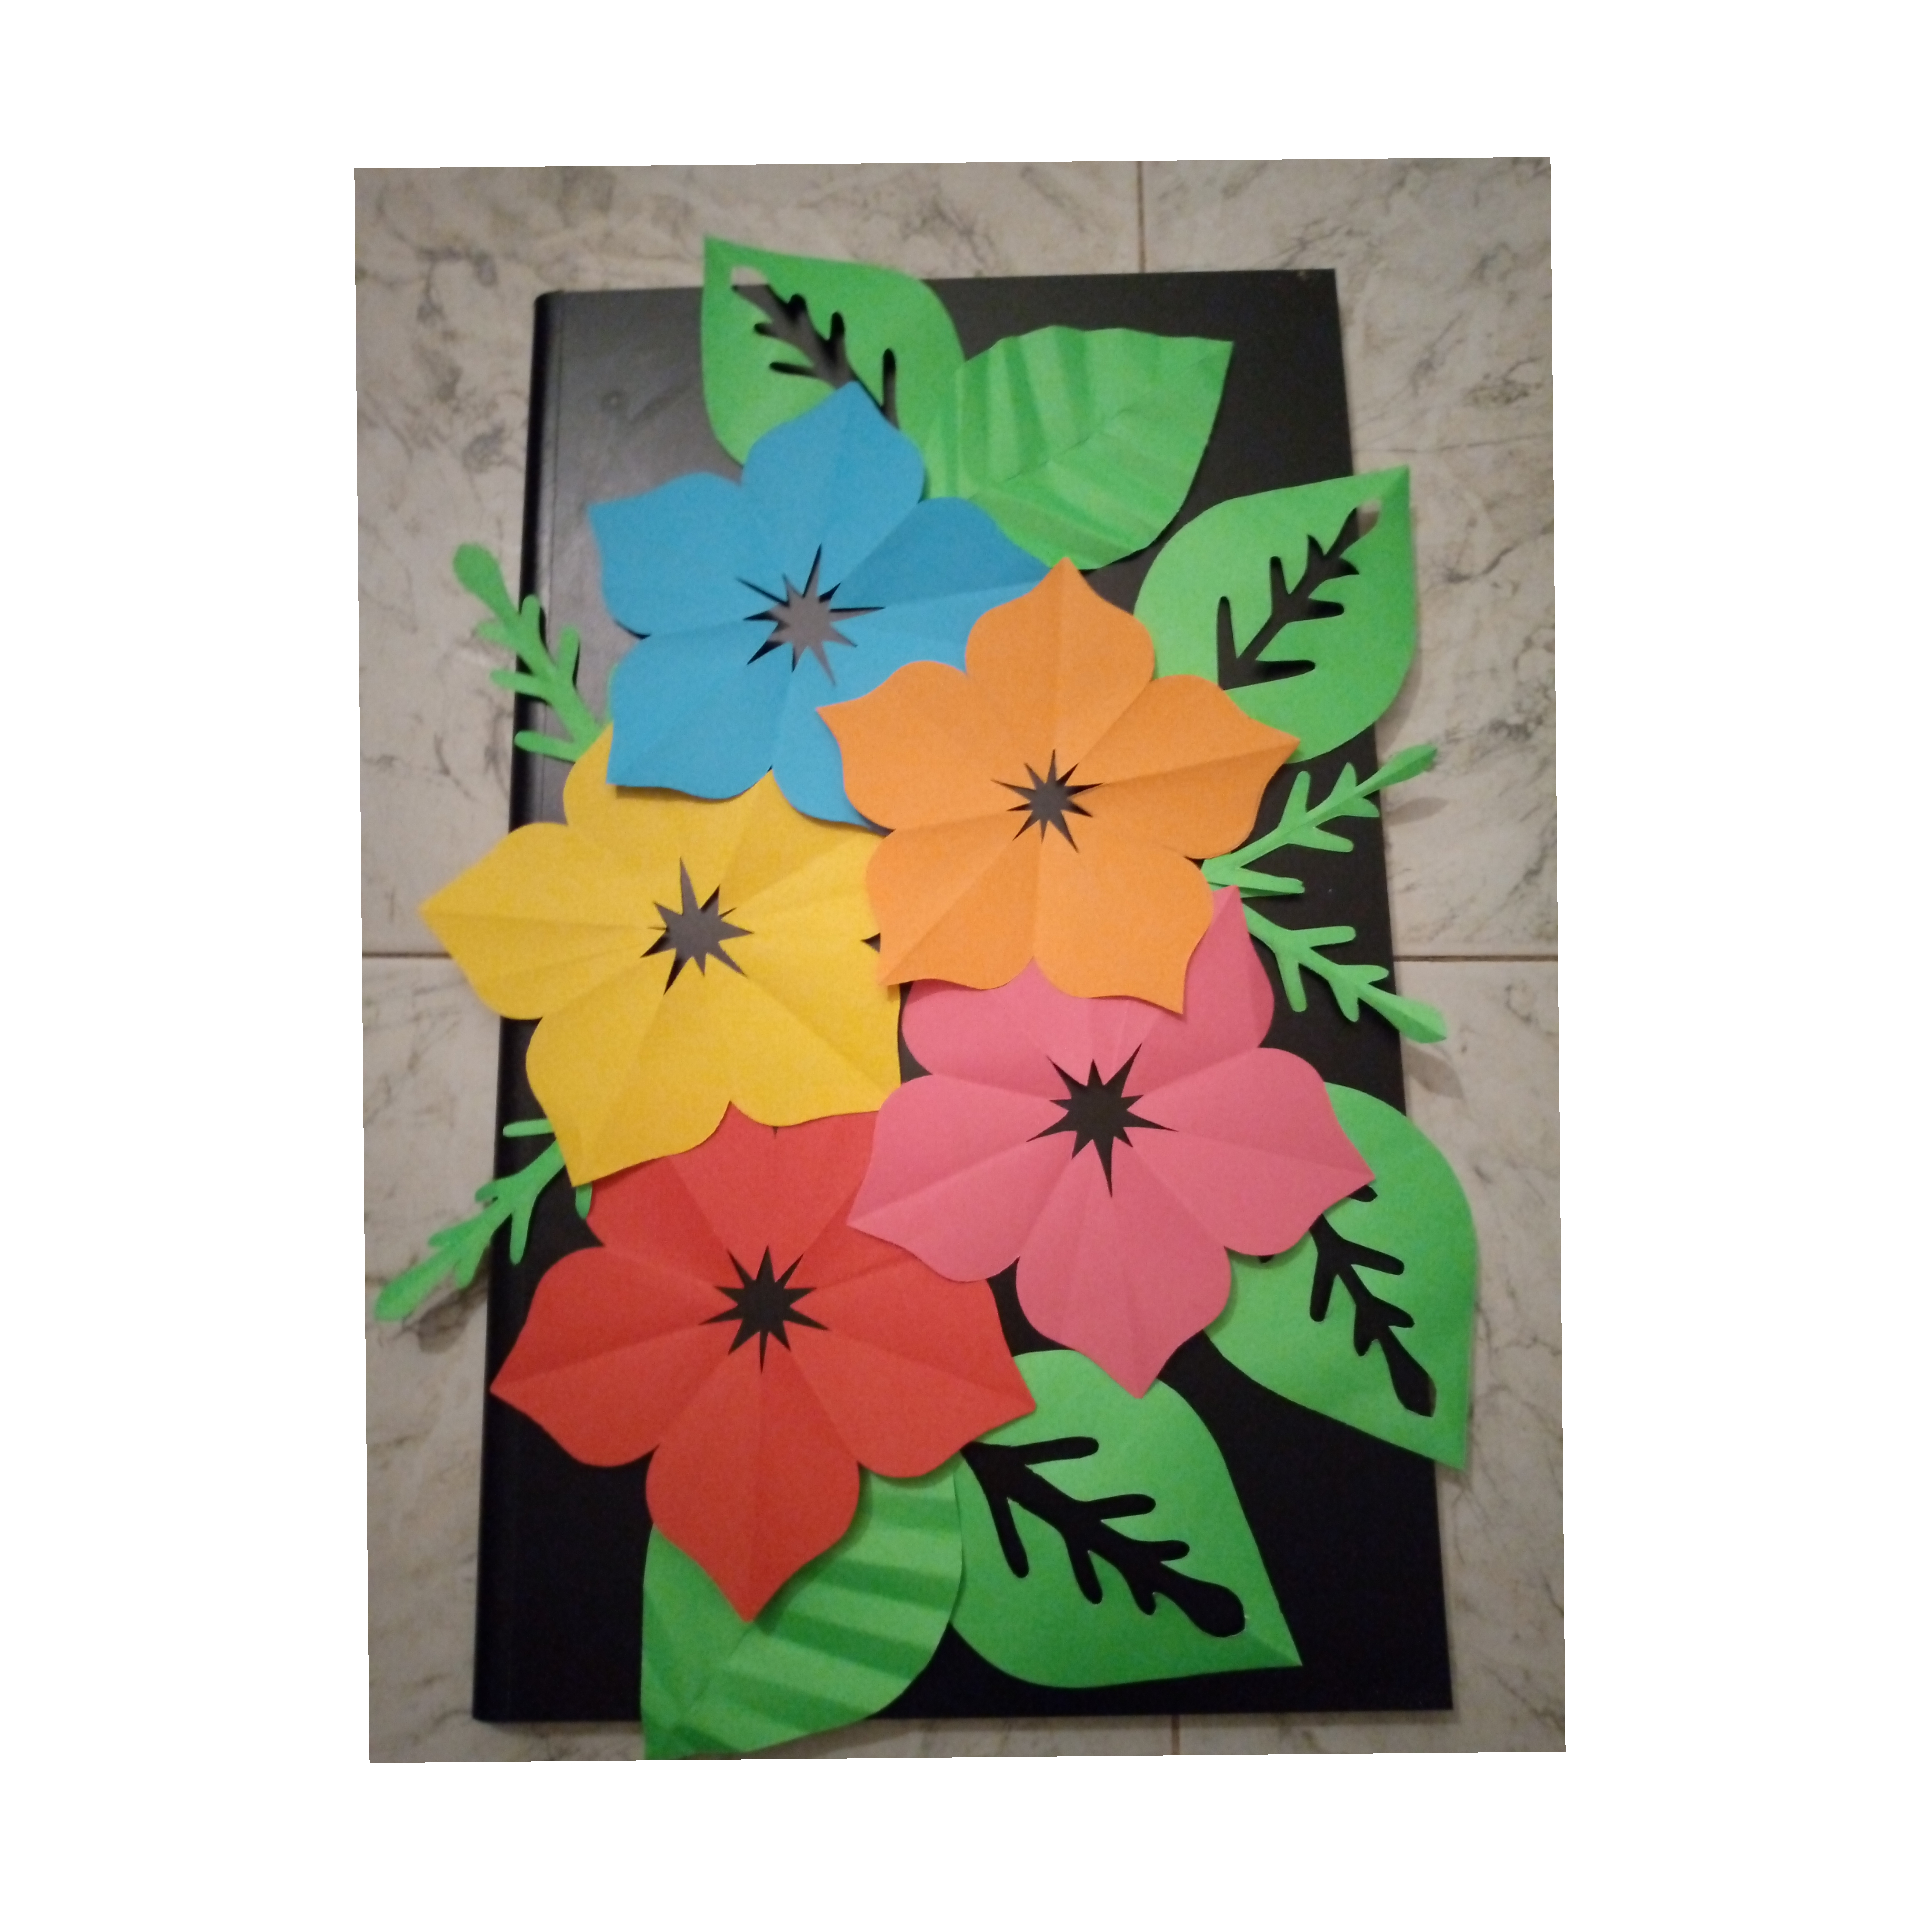
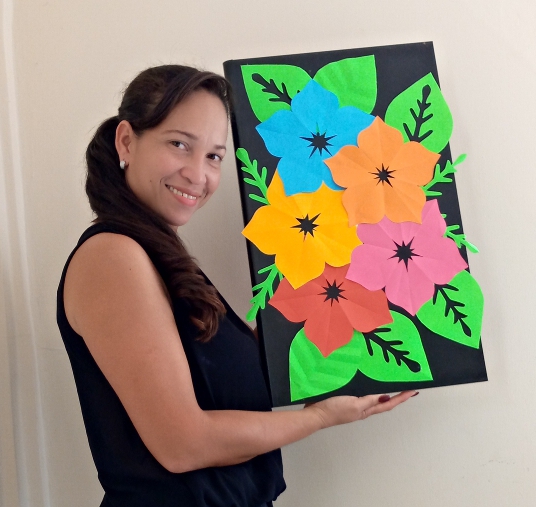
The end result is a beautiful and colorful decorative tropical flower painting that will adorn any space in your home.
El resultado final es un hermoso y colorido cuadro decorativo de flores tropicales que adornará cualquier espacio de tu hogar.
I invite @onixfemme27 to participate here the link of the contest
I hope you liked it friends, thanks for visiting my blog, see you soon!
@ dayanaromer
Invito a participar a @onixfemme27 aquí el enlace del concurso
Espero les haya gustado amigos, gracias por visitar mi blog nos vemos pronto!
@ dayanaromer
Wonderful diy u had made❤️
Thank you very much, I'm glad you liked it!
Hermoso cuadro, me gustó mucho, suerte en el concurso!❤️
Muchas gracias, saludos!
Congratulations @dayanaromer! You have completed the following achievement on the Hive blockchain and have been rewarded with new badge(s) :
Your next payout target is 500 HP.
The unit is Hive Power equivalent because your rewards can be split into HP and HBD
You can view your badges on your board and compare yourself to others in the Ranking
If you no longer want to receive notifications, reply to this comment with the word
STOPTo support your work, I also upvoted your post!
Check out the last post from @hivebuzz: