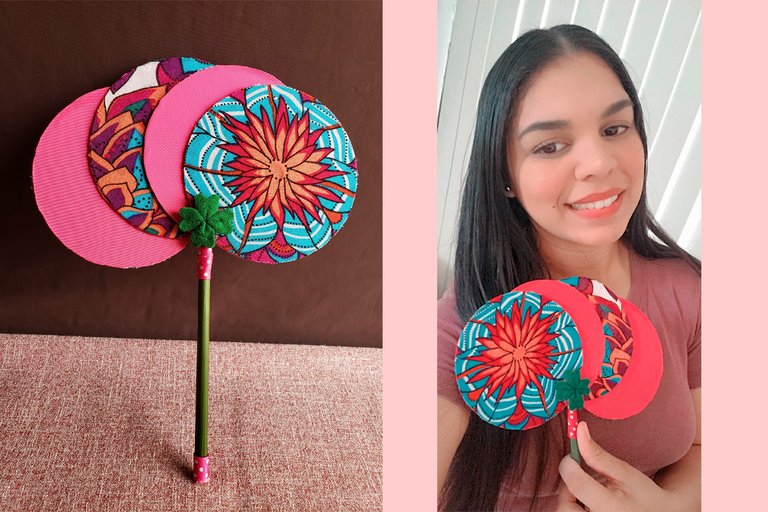
[ES-EN] Comparte con tus amados, creando este hermoso abanico multicolor. // Share with your loved ones, creating this beautiful multicolored fan.
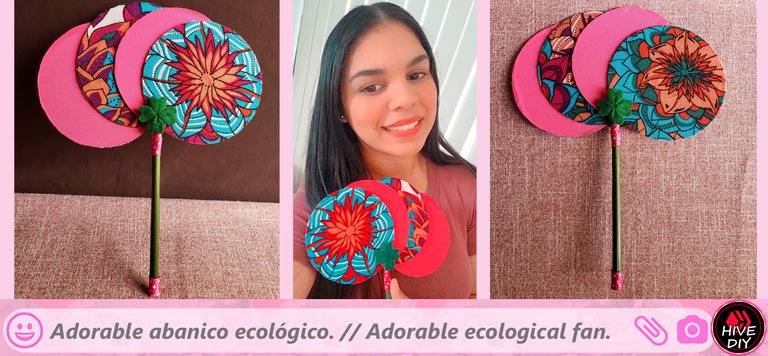


Te muestro como ser amigable con el medio ambiente, de una manera divertida, donde podemos contribuir con nuestro planeta y a la vez compartir nuestras creaciones con nuestros seres queridos.
I show you how to be friendly with the environment, in a fun way, where we can contribute to our planet and at the same time share our creations with our loved ones.
Hola gente guapa y encantadora, ¿Cómo la están pasando hoy? Espero de todo corazón que la estén pasando genial, les envió las mejores de las vibras.
Amigos hoy quiero compartirles una idea muy bonita y útil, para contribuir con nuestro planeta, ¿A quién no le gustaría contribuir con nuestro medio ambiente? Estoy segura de que a todos, así que se me ocurrió hacer un lindo abanico con materiales superfácil de conseguir, como lo son los viejos Cds, donde en su momento fue el boom que revolucionó la manera de almacenar la información como películas y músicas entre otros, en fin éstos elementos de plásticos se fueron quedando almacenados en casa sin darnos cuenta se fue convirtiendo en material de provecho.
Me di cuenta que al separar la mitad del CD podía crear dos discos con un solo disco compacto y uniéndolos uno al lado del otro podía crear este hermoso abanico funcional para nuestras casas evitando convertir estos plásticos en contaminantes, y buscando lo que sería la vara que sujetaría las hojas de los discos encargadas de impulsar el aire con el movimiento de la mano de mi abanico, me acorde que mi familia y yo tenemos siembras de bambú en mi patio y quise utilizar una ramita que por su dureza me vino de manera ideal para mi creación, ya que esta planta es una fuente de madera renovable por lo rápido que crecen.
investigando en la web me sorprendió muchísimo lo beneficiosa que es esta planta, nos aporta muchísimo en el aprovechamiento de su madera y sus propiedades medicinales, los invito a investigar sobre esta magnífica planta y también nos da una gran lección de vida con su significado e historia según lo leído por mi persona, por el hecho de que el bambú es considerada una planta de perseverancia por su larga duración para germinar y salir a la luz, esta planta o hierva dura 7 años después de sembrar su semilla en salir a la superficie, pero luego que ella sale, se desarrolla y no para de crecer, en 2 meses hasta llegar a su altura máxima de alrededor de los 30 metros de altura, ¿Loco no? Cualquiera que no sepa esto del bambú al sembrar una semilla pensaría que es infértil y no seguiría regándola, y esta a su vez moriría, así que esto también es algo que debemos aplicar los seres humanos cuando tratamos con el tema de nuestros sueños y metas, por eso el dicho que siempre escuchaba de pequeña y ahora lo comprendo; ser como el bambú, ser paciente y jamás de dejar de alimentar y creer en nuestros sueños, ya que algún día florecerá y no parara de creer.
Así que amigos ayudemos a nuestro planeta con estos materiales de provecho y renovables, porque contribuimos mucho y aparte innovamos estos materiales que alguna vez estuvieron arrumados en nuestro hogar como lo son los discos compactos ya que podemos sacarle mucho provecho y las plantaciones de bambú, verlas como una oportunidad de sacarle provecho como material renovable para artesanías decorativas, resiembra de esta hermosa y aleccionadora planta que nos deja mucho que reflexionar.
Hello beautiful and lovely people, how are you doing today? I hope with all my heart that you are having a great time, she sent you the best of vibes.
Friends, today I want to share with you a very nice and useful idea, to contribute to our planet, who would not like to contribute to our environment? I'm sure everyone does, so it occurred to me to make a nice fan with materials that are super easy to get, such as old CDs, where at the time it was the boom that revolutionized the way of storing information such as movies and music, among others. , in short, these plastic elements were being stored at home without realizing it was becoming useful material.
I realized that by separating the middle of the CD I could create two discs with a single compact disc and joining them side by side I could create this beautiful functional fan for our houses avoiding turning these plastics into contaminants, and looking for what would be the stick that I would hold the leaves of the disks in charge of driving the air with the movement of my fan hand, I remembered that my family and I have bamboo plantations in my patio and I wanted to use a twig that, due to its hardness, came in ideal for my creation, since this plant is a renewable source of wood because of how fast they grow.
researching on the web I was very surprised how beneficial this plant is, it gives us a lot in the use of its wood and its medicinal properties, I invite you to investigate this magnificent plant and it also gives us a great life lesson with its meaning and history According to what I read, due to the fact that bamboo is considered a plant of perseverance due to its long duration to germinate and come to light, this plant or herb lasts 7 years after sowing its seed to come to the surface, but after she comes out, she develops and does not stop growing, in 2 months until she reaches her maximum height of around 30 meters tall, crazy right? Anyone who does not know this about bamboo when planting a seed would think that it is infertile and would not continue watering it, and this in turn would die, so this is also something that we human beings must apply when dealing with the subject of our dreams and goals. , that's why the saying that I always heard when I was little and now I understand it; be like bamboo, be patient and never stop nurturing and believing in our dreams, because one day it will flourish and we won't stop believing.
So, friends, let's help our planet with these useful and renewable materials, because we contribute a lot and besides, we innovate these materials that were once stored in our homes, such as compact discs, since we can get a lot of use out of them and bamboo plantations, see them as an opportunity to take advantage of it as a renewable material for decorative crafts, replanting of this beautiful and sobering plant that leaves us much to reflect on.
Este abanico lo hice muy colorido y vistoso con la finalidad de ser útil y decorativo para nuestros hogares, poderlo usar en temporadas de calor o simplemente para dejarlo sobre una repisa decorando con nuestro arte, obsequiarlo a nuestros familiares o cualquiera sea su destino. Para realizar este abanico utilicé, material reciclado como les mencione arriba, cd, bambú y retazos de telas, así que acompáñenme en este lindo paso a paso y anímense hacer uno para ustedes y lo más importante disfruten creando cosas maravillosas, acompañados con los que más quieren y pasen un rato ameno y entretenido, bueno, guapuras manos a la obra.
Materiales:
• Para lo que será nuestro abanico utilice; 2 Cds.
• Un palito de bambú.
• Retazos de tela de diversos colores, para decorar y forrar los Cds.
• Cinta decorativa.
• Fieltro.
• Una navaja o cuchillo, para abrir nuestros Cds.
• Pega blanca.
• Silicona.
• Hoja, lápiz.
• Tijera.
• Hilo y aguja.
I made this fan very colorful, showy with the purpose of being both useful and decorative for our homes, in the hot season or simply to leave it on a shelf decorating with its art, give it to our relatives or whatever its destination. To make this fan I used recycled material as I mentioned above, cd, bamboo and scraps of fabric, so join me in this beautiful step by step and be encouraged to make one for you and most importantly enjoy creating wonderful things, accompanied by those who love you the most. want and have a fun and entertaining time, well, handsome hands to work.
Materials:
• What our fan will be used for; 2 CDs.
• A bamboo stick.
• Scraps of cloth of different colors, to decorate and cover the CDs.
• Decorative tape.
• Felt.
• A razor or knife, to open our CDs.
• White glue.
• Silicone.
• Sheet, pencil.
• Scissors.
• Thread and needle.
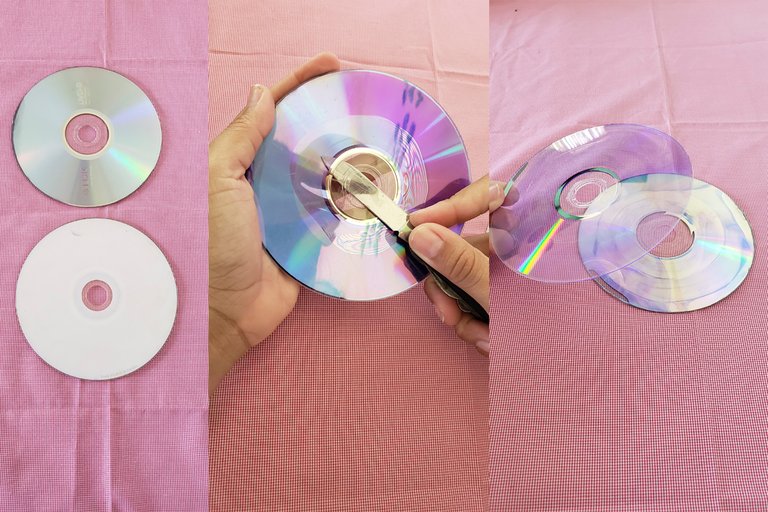
Paso 1
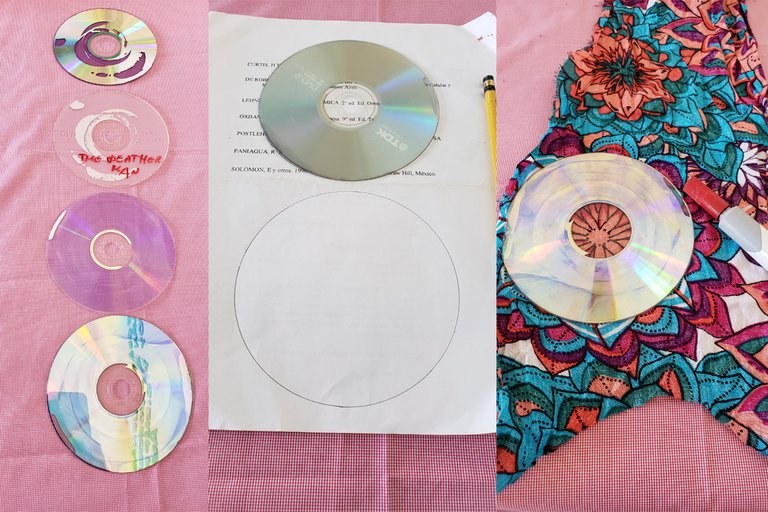
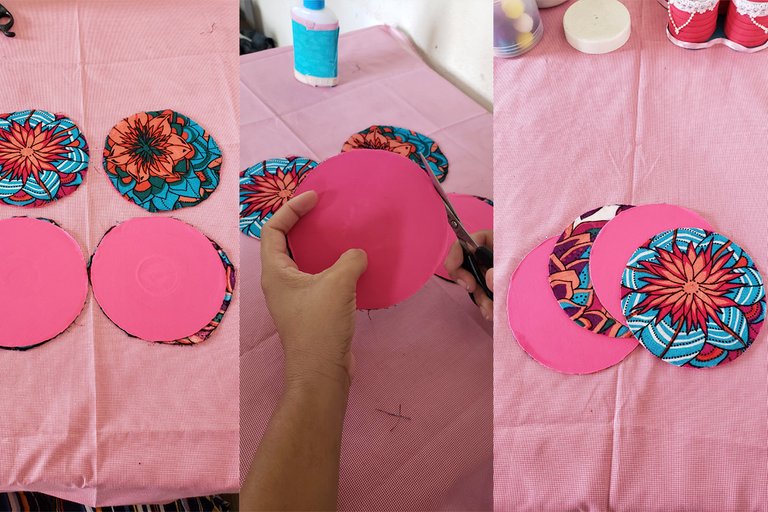
• Lo primero que vamos a hacer es abrir en dos partes nuestros Cds, con la ayuda de una navaja o un cuchillo, ¿porque lo hice de esta manera y no utilicé 4cds en vez de 2? Muy fácil, con dos Cds es más liviano pero igual de fuerte para propulsar el aire.
• Sacado las dos partes de ambos Cds, procedemos a marcar en las telas seleccionadas.
• Sacamos los círculos para ambas cara de cada Cd, esto sería 8 círculos de tela.
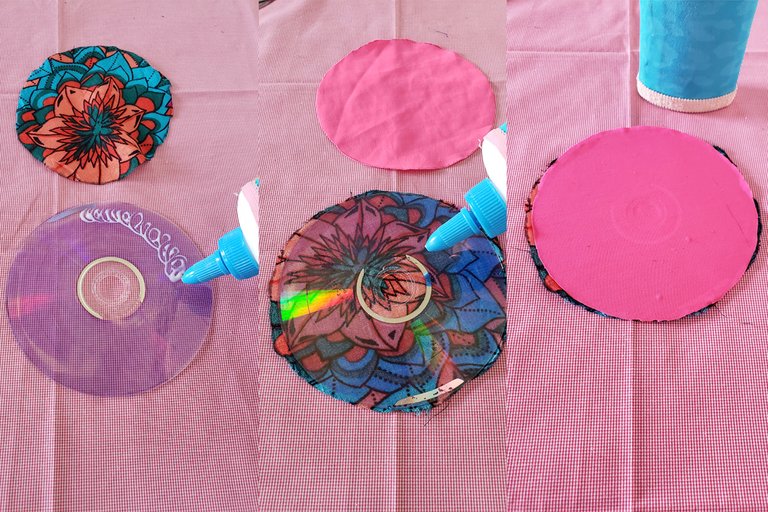
• Luego pegamos con pega blanca los círculos de la tela en nuestros Cds, combinándolos como queramos.
Step 1
• The first thing we are going to do is open our CDs in two parts, with the help of a razor or knife. Why did I do it this way and didn't use 4 CDs instead of 2? Very easy, with two CDs it is lighter but just as strong to propel the air.
• Removed the two parts of both CDs, we proceed to mark the selected fabrics.
• We take the circles for both sides of each Cd, this would be 8 fabric circles.
• Then we stick the fabric circles on our CDs with white glue, combining them as we want.

Paso 2
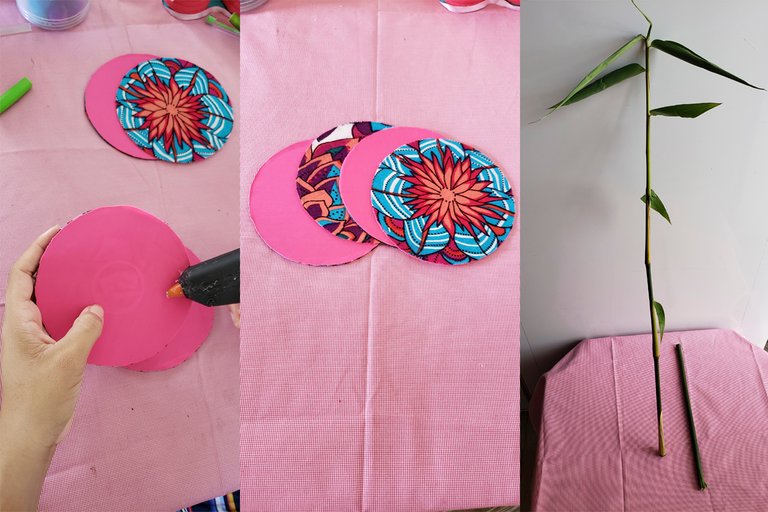
• Forrados ya todos nuestros Cds, cortamos todos los bordes para dejarle un acabado perfecto.
• Luego ubicamos nuestros Cds, dándole la forma de un abanico, y pegamos con silicona, uno encima de otro, para crear la forma típica de un abanico.
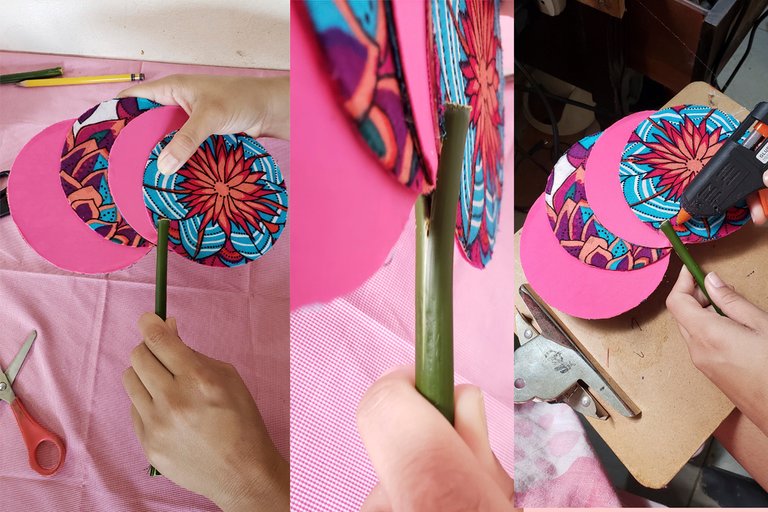
• Luego seleccionamos el bambú, en mi caso lo agarre de la que está en mi patio, lo ideal es dejar secar este palito para que quede como madera, pero yo quise hacerlo verde para darle este toque natural y que combinara con los colores seleccionados (nota para tener en cuenta; es que trataremos de conseguir una ramita lo suficiente mente gruesa ya que esta ramita al secarse reducirá su tamaño a la mitad de su diámetro pero eso sí con una dureza increíble para esta finalidad del abanico).
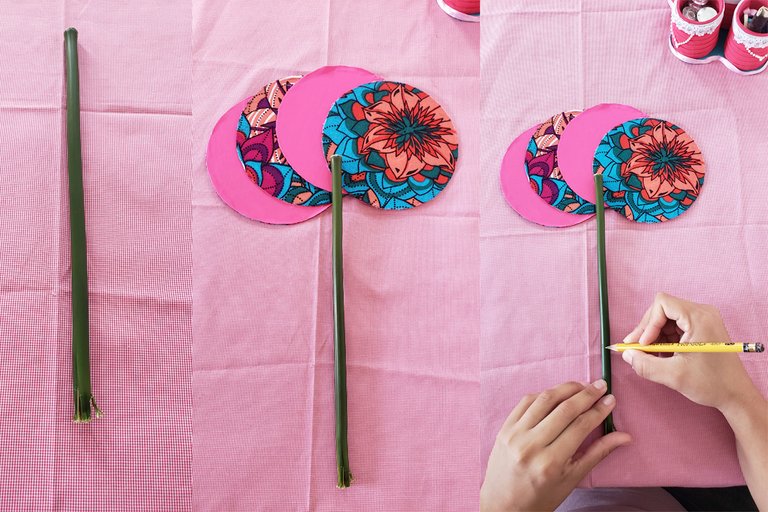
• Medimos el palito de bambú seleccionado, dándole el tamaño ideal para nuestro abanico.
• Marcamos y cortamos con la ayuda de un cuchillo.
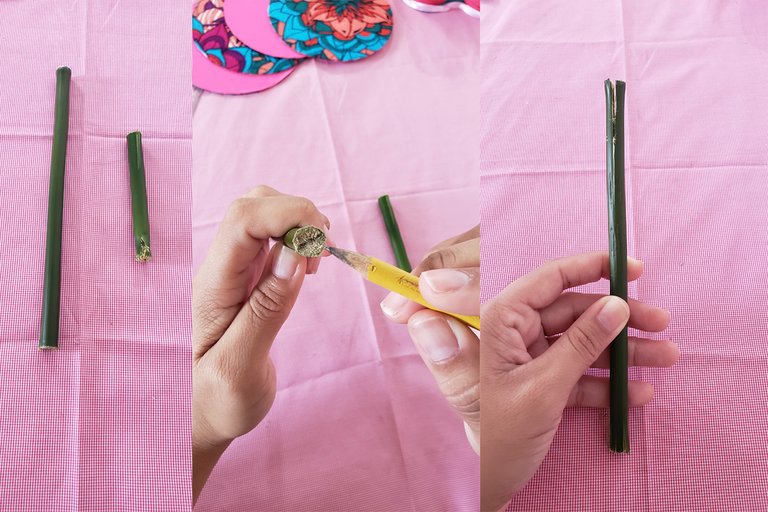
• Una vez cortado nuestro bambú, vamos a hacerle en la punta una abertura donde engancharemos nuestro abanico creados con las hojas de Cds.
Step 2
• Once all our CDs are covered, we cut all the edges to leave a perfect finish.
• Then we place our CDs, giving them the shape of a fan, and glue them with silicone, one on top of the other, to create the typical shape of a fan.
• Then we select the bamboo, in my case I took it from the one in my patio, the ideal is to let this stick dry so that it looks like wood, but I wanted to make it green to give it this natural touch and to combine it with the selected colors ( note to take into account; is that we will try to get a thick enough twig since this twig when it dries will reduce its size to half its diameter but with an incredible hardness for this purpose of the fan).
• We measure the selected bamboo stick, giving it the ideal size for our fan.
• We mark and cut with the help of a knife.
• Once our bamboo is cut, we are going to make an opening at the tip where we will hook our fan created with the CD sheets.
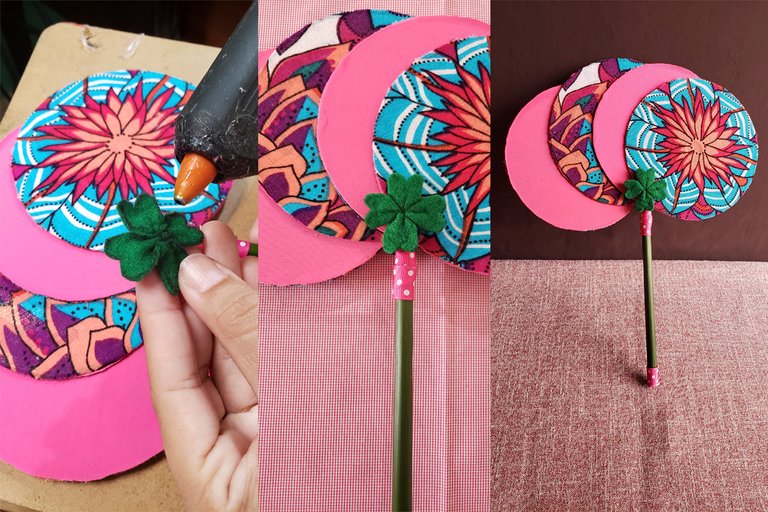
Paso 3
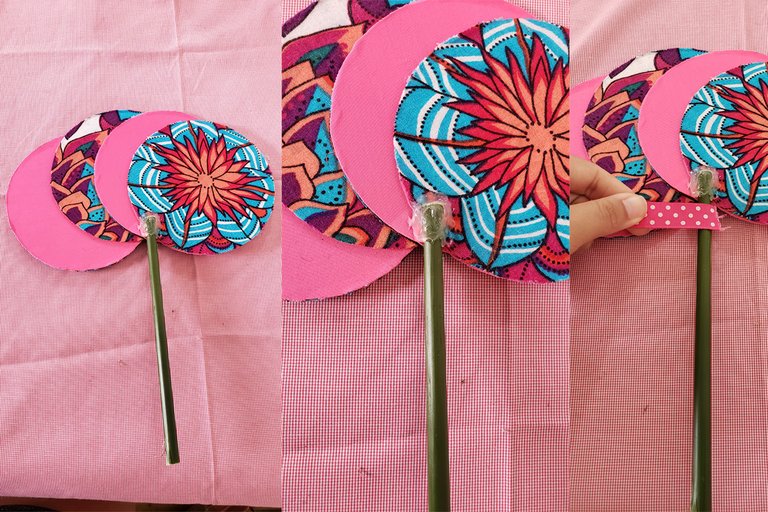
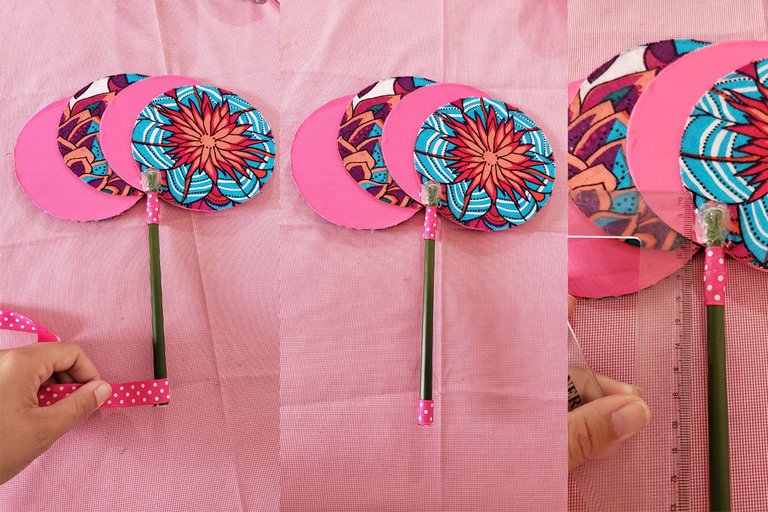
• Para enganchar y asegurar nuestro abanico al palito de bambú, precedemos apegar con silicona, le echamos suficiente pega a todo el borde del palo de bambú.
• Luego vamos a decorar nuestro palito de bambú con cinta, yo quise solo colocar la cinta en los extremos del palito para dejarle su diseño natural del bambú, ya que le aporta mucha frescura a nuestro abanico.
• Luego para decorar el borde donde pegamos el palito, puesto que dejamos la pega expuesta, vamos a tapar con una decoración, yo le quise hacer una hoja de trébol de la suerte para darle energía y combinara con el tema de nuestro abanico flores y ramita verde.
Step 3
• To hook and secure our fan to the bamboo stick, we stick it with silicone first, we put enough glue on the entire edge of the bamboo stick.
• Then we are going to decorate our bamboo stick with ribbon, I only wanted to place the ribbon on the ends of the stick to leave its natural bamboo design, since it brings a lot of freshness to our fan.
• Then to decorate the edge where we glued the stick, since we left the glue exposed, we are going to cover it with a decoration, I wanted to make a lucky clover leaf to give it energy and combine it with the theme of our flower and twig fan green.
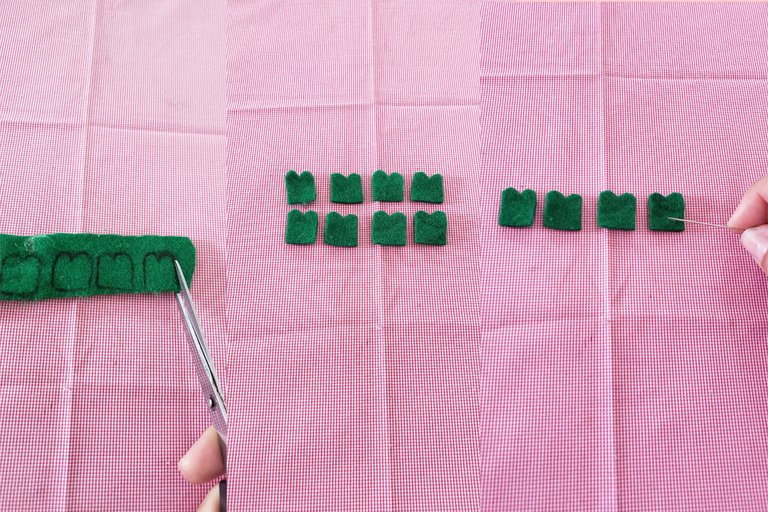
Paso 4
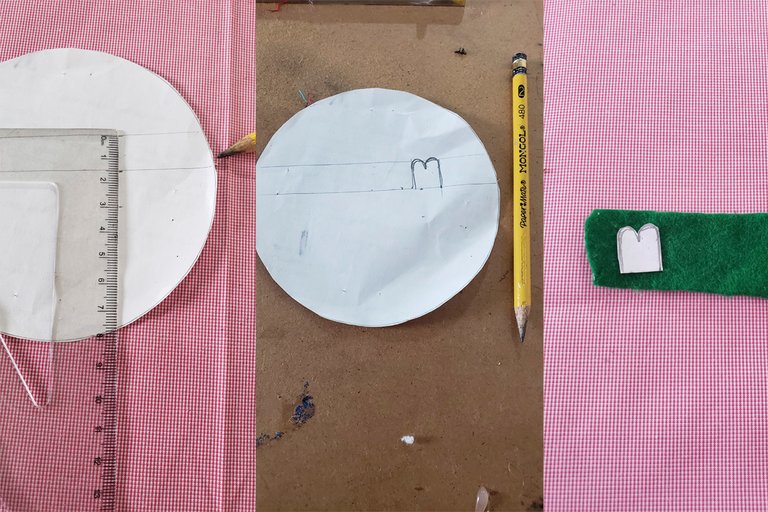
• Sacamos el patrón para hacer nuestro trébol en papel.
• Luego marcamos en el fieltro y cortamos lo que serán las hojitas de nuestro trébol, yo quise hacerlo de cuatro hojas, ya que se dice que es el de la buena suerte, y queda muy lindo.
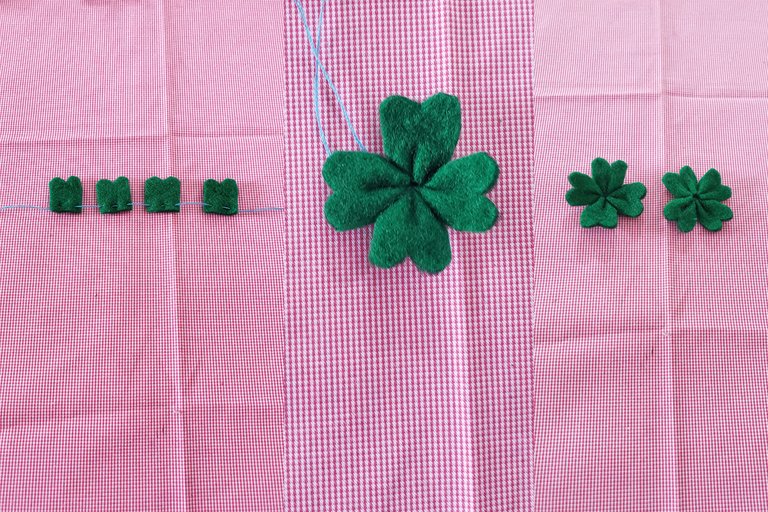
• Luego con aguja e hilo, la pasamos por cada hojita y unimos hasta hacer la forma del trébol tal cual como muestro en mis fotos a continuación.
• Pegamos nuestro trébol, en el abanico tapando toda la pega y dejando una linda decoración.
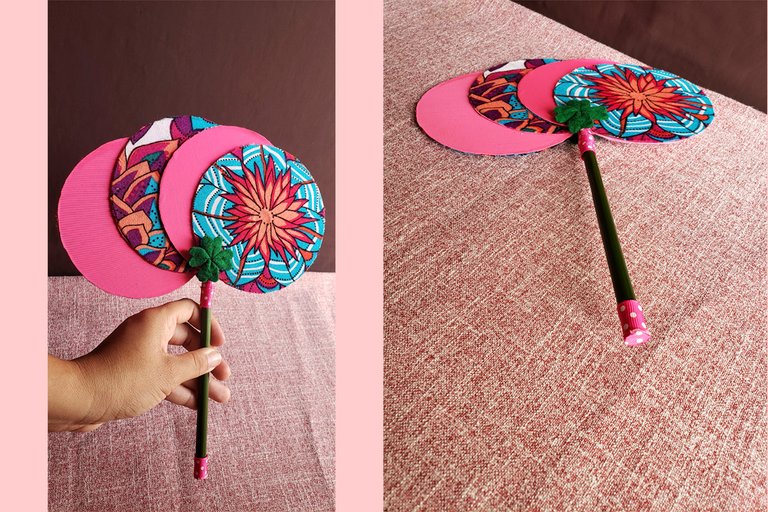
• Y listo así queda nuestro lindo y adorable abanico espero que lo disfruten.
Step 4
• We draw the pattern to make our paper clover.
• Then we mark on the felt and cut what will be the leaves of our clover, I wanted to make it four leaves, since it is said to be the one for good luck, and it looks very nice.
• Then with a needle and thread, we pass it through each little leaf and join until we make the shape of the clover as shown in my photos below.
• We paste our clover, in the fan covering all the glue and leaving a nice decoration.
• And that's it, our cute and adorable fan looks like this, I hope you enjoy it.
Amigos hermosos de esta gran comunidad, hemos llegado al final de mi post, muchísimas gracias por haberme acompañado, espero que les haya gustado este paso a paso, siempre es un gusto estar aquí y crear contenido para ustedes, jamás me imagine tener un blog en mi vida hasta que llegue a ustedes, y ver lo gratificante que puede ser llegar a compartir lo que sabes y a la vez aprender de sus experiencias, mi cariño y admiración para todos, nos vemos, chao chao.
Beautiful friends of this great community, we have reached the end of my post, thank you very much for joining me, I hope you liked this step by step, it is always a pleasure to be here and create content for you, I never imagined having a blog in my life until I get to you, and see how rewarding it can be to share what you know and at the same time learn from your experiences, my love and admiration for all, see you, bye bye.
Recursos:
Todas las imágenes son de mi propiedad.
Fueron editadas por psp 6
Imágenes tomadas por Samsun A20
Traducido por traductor de google.
Means:
All images are my property.
They were edited by psp 6
Pictures taken by Samsun A20
Translated by google translator.
![]()
Hola, hay un bonito trabajo con esta manualidad. Recuerdo que cuando estaba en la universidad solía usar componentes de computadoras para hacer distintos tipos de decoraciones prácticas que se podían usar en el hogar. Este uso que le diste a los cd está genial.
Ahora bien, hay un par de recomendaciones. La primera es que podrías dar un salto de línea a los párrafos para que no se vean tan juntos uno del otro.
Otra recomendación es que podrias usar mas fotografías del proceso entre párrafos, en lugar de colocar una fotografía tras otra. Así no se ven tantos párrafos juntos ni tantas fotografías juntas.
Muchas gracias por compartir este trabajo con nosotros. Saludos.
Hola @gaboamc2339, muchísimas gracias, me alegra mucho que te haya gustado está manualidad, hay tantas cosas que podemos hacer con estos elementos y sacarle el provecho necesario. 😀
Gracias por sus recomendaciones, las voy a tomar en cuenta en mis próximos post, y gracias a ustedes por leerme y ayudarme. ❤️🤗
Congratulations @cutiepink26! You have completed the following achievement on the Hive blockchain and have been rewarded with new badge(s):
Your next target is to reach 800 upvotes.
You can view your badges on your board and compare yourself to others in the Ranking
If you no longer want to receive notifications, reply to this comment with the word
STOPCheck out the last post from @hivebuzz:
Support the HiveBuzz project. Vote for our proposal!
Hola amiga!
Tu proyecto de hoy esta genial!
Realmente creativo y útil en esta temporada de calor!
Saludos!
Hola amiga @hetyg, muchísimas gracias, encantada de que te haya gustado y claro que sí es muy práctico en época de mucho calor y también podemos usarlo como parte decoración para nuestro hogar, 😀 feliz día, saludos. ❤️🤗