RANITAS travestias for earrings. [Esp-Eng]
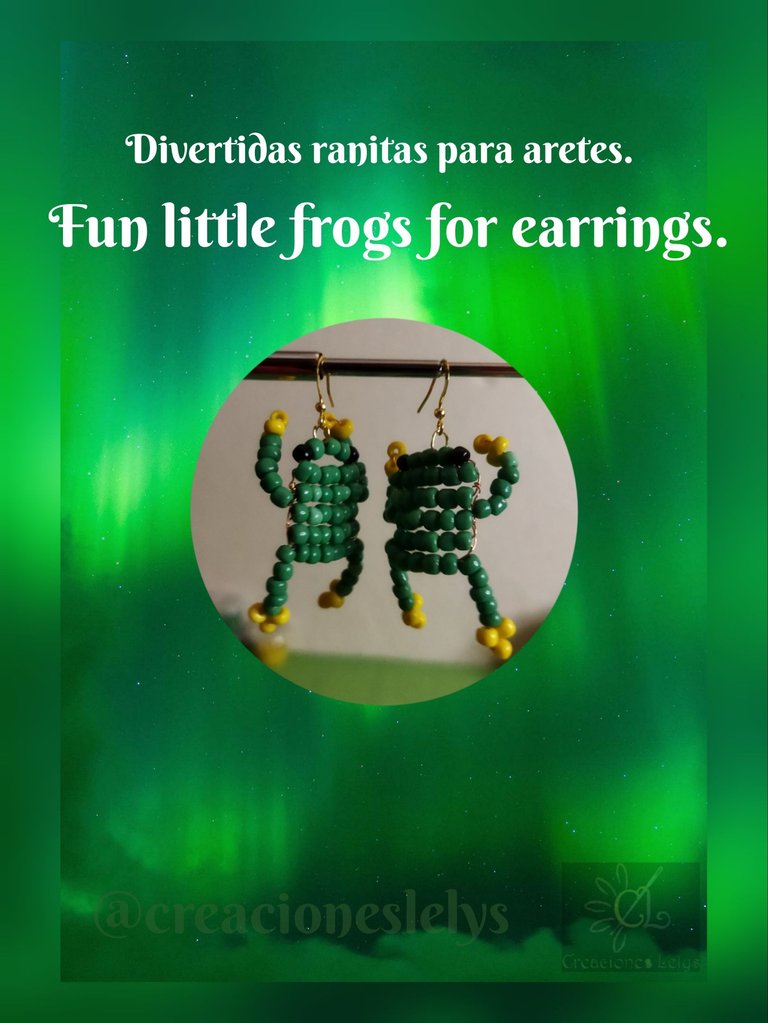
Hola amigos. Deseo que estén muy bien hoy y siempre. El día de hoy paso a mostrarles mi más reciente creación, se trata de unas RANITAS muy divertidas que elaboré con alambre y MOSTACILLAS. Estas ranitas se elaboran muy fácilmente y el resultado es estupendo. Te invito a que leas todo el contenido de este post porque sé que te va a gustar. Te animo a que elabores tu mismo los accesorios que necesites, es entretenido, resultan ser más económicos y exclusivos, todo lo que hacemos nosotros mismos tienen un toque de particularidad que lo hace único.
Hello friends. I wish you all well today and always. Today I am going to show you my most recent creation, it is a very funny FROGS that I made with wire and MOSTACILLAS. These little frogs are very easy to make and the result is great. I invite you to read the whole content of this post because I know you will like it. I encourage you to make the accessories you need yourself, it's fun, they are more economical and exclusive, everything we do ourselves have a touch of uniqueness that makes it unique.
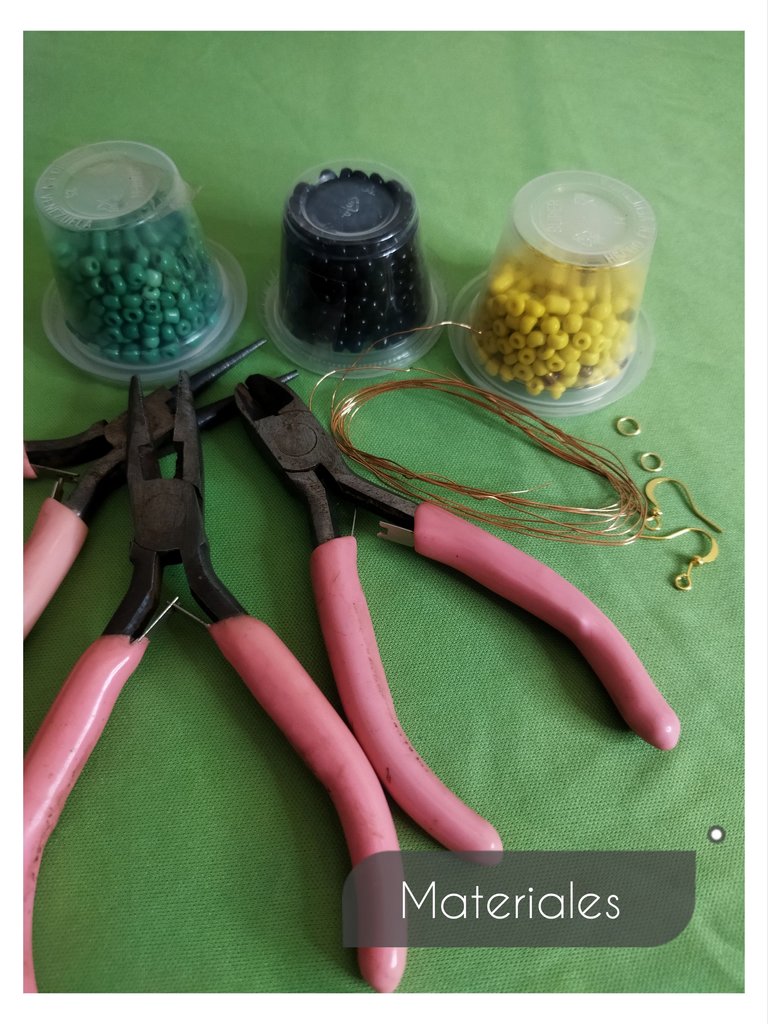
MATERIALES:
- Mostacillas amarillas, verdes y negras.
- Alambre de cobre del número 26
- Pinzas para bisutería.
- Anzuelos para zarcillos.
- Aros de alambre para bisutería.
MATERIALS:
- Yellow, green and black beads.
- Copper wire number 26
- Copper wire number 26.
- Hooks for tendrils.
- Wire rings for costume jewelry.
PROCEDIMIENTO:
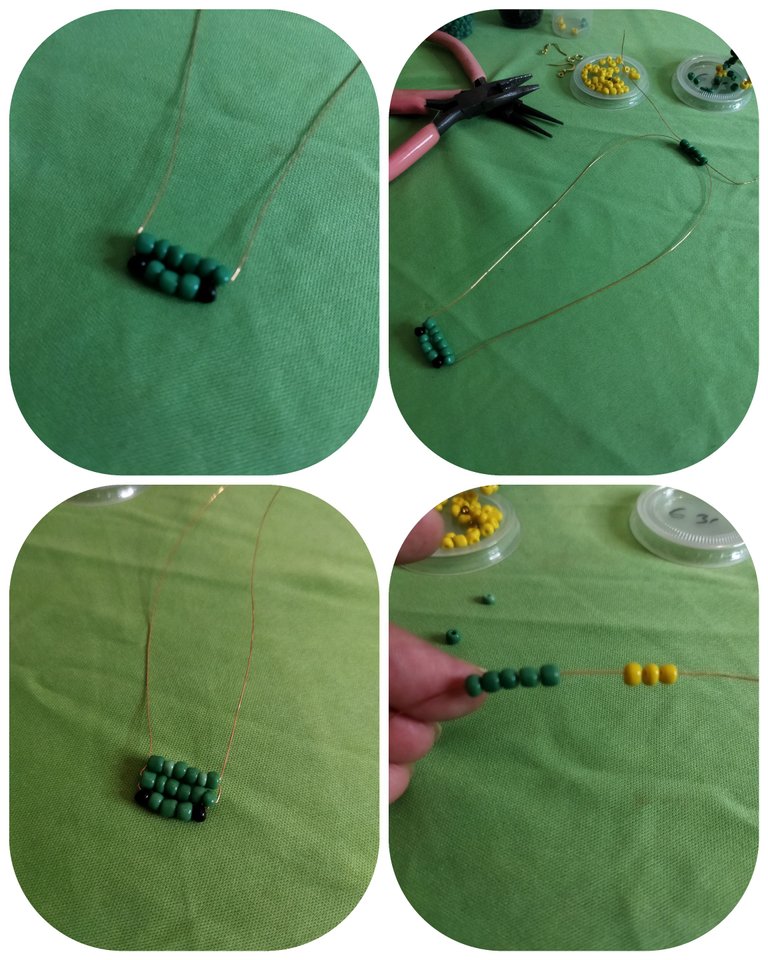
- Empezamos midiendo y cortando 50 cm de alambre. Este lo vamos a doblar a la mitad. Enseguida vamos a pasar por una de las puntas del alambre 1mostacilla negra, 2 verdes y 1 una negra. Las colocamos en el medio o doblés del alambre. Ahora pasamos 6 MOSTACILLAS verdes. Con uno de los extremos hacemos el cruce por dentro de estas 6 mostacillas, acomodamos hasta abajo o centro del alambre y hacemos un poco de presión para que queden cerca de las primeras mostacillas que pasamos.
PROCEDURE:
- We start by measuring and cutting 50 cm of wire. We are going to fold it in half. Then we are going to pass through one of the ends of the wire 1 black, 2 green and 1 black beads. We place them in the middle of the wire. Now we pass 6 green MOSTACILLAS. With one of the ends we make the crossing inside of these 6 beads, we place them to the bottom or center of the wire and we make a little pressure so that they are close to the first beads that we pass.
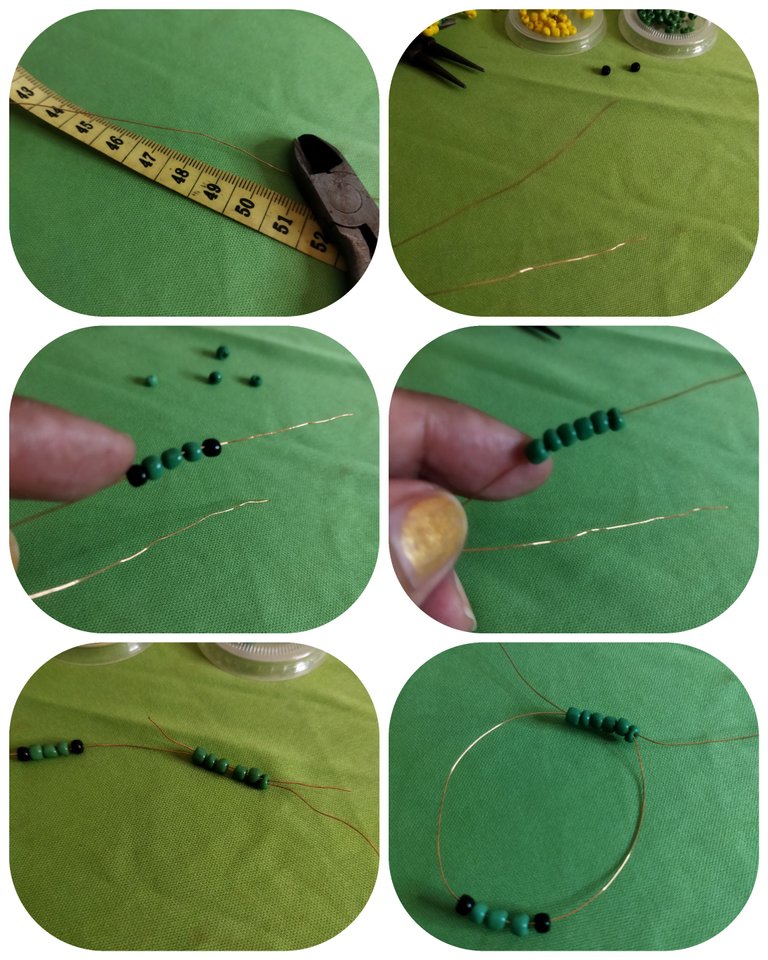
- Sobre estas mostacillas vamos a colocar 6 mostacillas nuevamente y volvemos a cruzar los alambres. Juntamos estas nuevas mostacillas con las 6 anteriores. Ahora vamos a pasar 5 mostacillas verdes y 3 mostacillas amarillas. Esta vez usando el mismo alambre lo vamos pasar por las 5 mostacillas verdes, halamos el alambre para de esta forma formar la primera pata de la rana. Corresponde hacer el mismo procedimiento con el otro extremo del alambre para formar la otra pata.
- On these beads we are going to place 6 beads again and we cross the wires again. We join these new beads with the 6 previous ones. Now we are going to pass 5 green beads and 3 yellow beads. This time using the same wire we are going to pass it through the 5 green beads, we pull the wire to form the first leg of the frog. Do the same procedure with the other end of the wire to form the other leg.
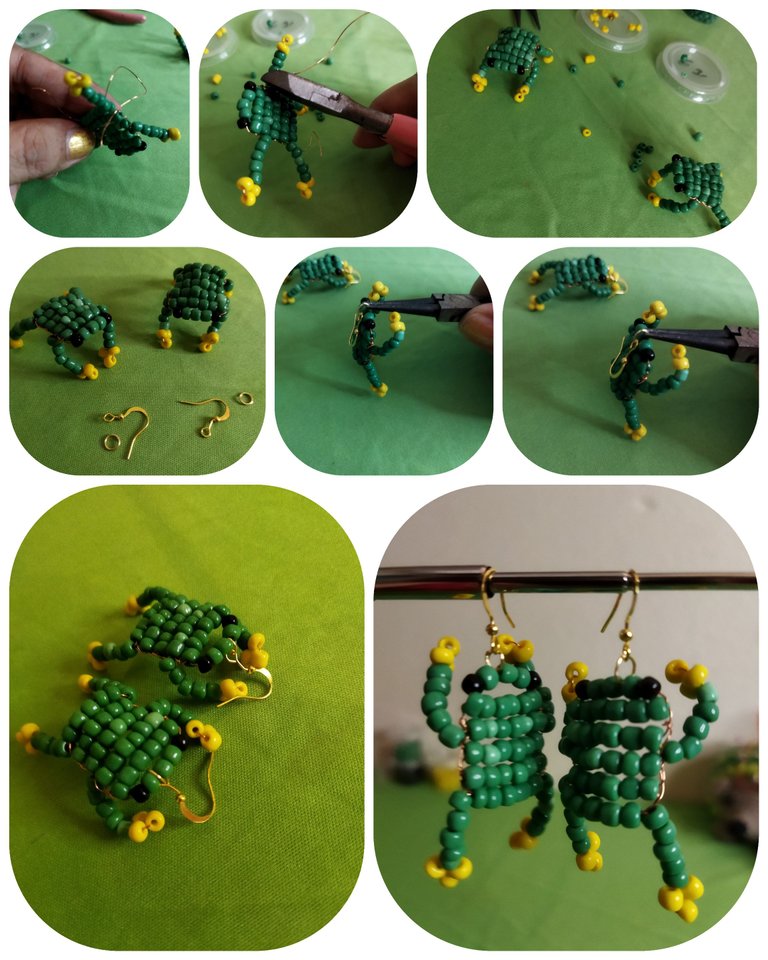
- Una vez que tenemos listas las dos patas continuamos tejiendo el cuerpo de la ranita. Pasamos ahora 6 mostacillas verdes y cruzamos los alambres. Nuevamente pasamos 6 mostacillas más y luego repetiremos el paso antes realizado para hacer las patas: con cada extremo de alambre haremos una patita metiendo 5 mostacillas verdes y 3 amarillas, pasamos este mismo alambre por las 5 mostacillas verdes, halamos el alambre y así se forma la pata. Haremos la otra.
- Once we have the two legs ready, we continue weaving the body of the frog. Now we pass 6 green beads and cross the wires. Again we pass 6 more beads and then we will repeat the step done before to make the legs: with each end of the wire we will make a leg putting 5 green and 3 yellow beads, we pass this same wire through the 5 green beads, we pull the wire and this way the leg is formed. We will make the other one.

- Para terminar de tejer el cuerpo pasamos por el alambre 5 mostacillas verdes y cruzamos los alambres. Cada extremo de alambre lo iremos escondiendo por entre el mismo alambre por los lados, haremos una entorchada hasta llevarlo a la primera vuelta del alambre. Allí lo cortamos y escondemos la punta.
- To finish weaving the body we pass through the wire 5 green beads and cross the wires. Each end of the wire we will hide it through the same wire by the sides, we will make a twist until we take it to the first turn of the wire. There we cut it and hide the tip.
- Colocamos un aro de alambre en medio de las primeras 3 MOSTACILLAS verdes que pasamos por el alambre, después ponemos el anzuelo y allí ya quedó armado nuestro zarcillo de ranita divertida y traviesa.
- We place a wire ring in the middle of the first 3 green MOSTACILLAS that we pass through the wire, then we put the hook and there we have our funny and mischievous frog tendril.
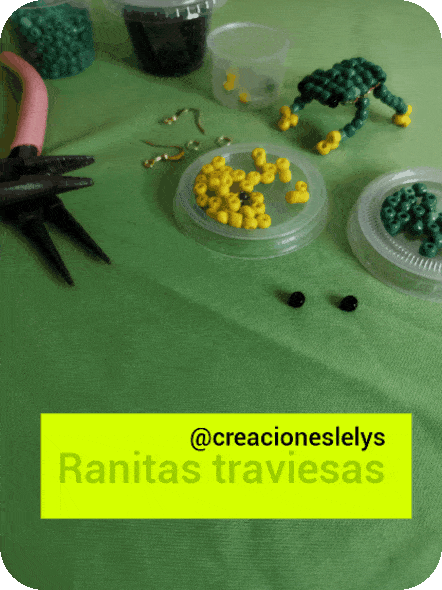
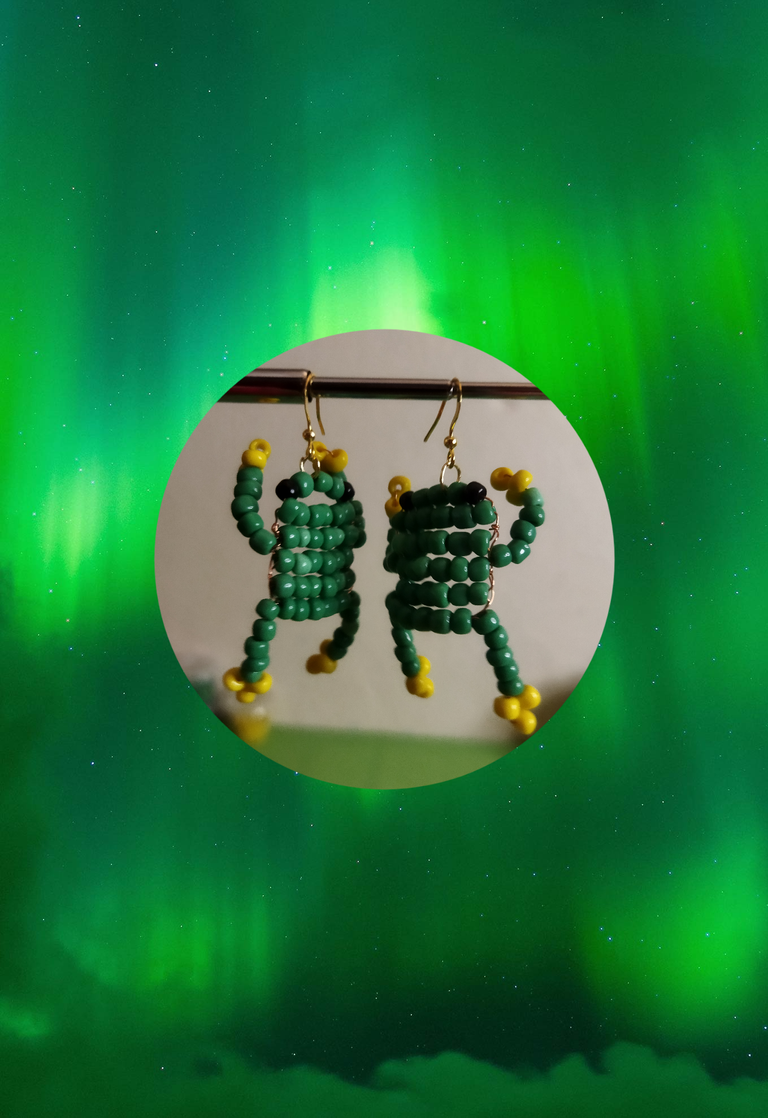
Estas son unas RANITAS muy traviesas y divertidas. Les cuento que las realicé mientras jugaba con una de ellas. Lo mejor de hacer estas manualidades es que me entretengo un rato. Además de ir aprendiendo y obteniendo destrezas en mis manos. A veces suelo ser muy torpe y me cuesta tener precisión. Siempre disfruto de lo que hago y más cuando el resultado es el que esperaba. Estas ranitas se las llevé de regalo a mi cuñada y le encantaron, a sus hijos también.
These are very naughty and funny little frogs. I made them while I was playing with one of them. The best thing about doing these crafts is that I have fun for a while. Besides learning and getting skills in my hands. Sometimes I tend to be very clumsy and it's hard for me to be precise. I always enjoy what I do and even more when the result is what I expected. I took these little frogs as a gift to my sister-in-law and she loved them, and so did her children.
Muchas gracias por tu visita. Todas las fotos son de mi propiedad. Edité con Polish. Usé el traductor de Deepl. Hasta pronto.
Thank you very much for your visit. All photos are my property. I edited with Polish. I used Deepl translator. See you soon.
Ohhh, que lindas y diveridas amiga. Exito en tu post.
Hola. Muchas gracias. Feliz amanecer.
Te quedaron encantadoras Lelys! Super divertidas, mucha imaginación y manos muy habilidosas.
Muy buenos días Lelys!❤️
Hola. Feliz día amiga. Ya debes estar almorzando. Yo buscando calle. Gracias por tu apoyo constante. Lo aprecio. 🙋🤗✍️🙂
Ya casi almorzando primero la tarea jajaja acá estamos para ayudarnos. A vos Lelys!
Están muy originales. Felicidades gran trabajo. Tremenda técnica, muy buena imaginación. Me encamto leerte e inspirarme en tí.
Hola amigo. Me da gusto saber que fue de tu agrado esta creación. Nada que ver con las bellezas que haces...eres un gran artista.
Para nada solo pongo tanto amor a mis creaciones como tú. Aplaudo tu imaginación, me encanta tener personas que me motiven a crear. Eres una de ellas para mí.
Gracias 😊
😍😍😍😍
Muchas gracias 😌
@creacioneslelys Encantadoras Ranitas, aunque tengo ranafobia😅, estas me encantan, Saludos 🤗
A mí me encantan. Los sapos son más feitos, pero también me gustan. Son animales graciosos. Gracias por pasar. 🙋
aha beautiful piece of jewelry thanks a lot for sharing.
Thank you 😃🫂👋
Una ternurita, son preciosos estos aretes. Son coloridos, divertidos, muy vistosos. seguro quien los use tendrá muchos halagos para el creador.
Bendiciones.
Los primero halagos los recibo de mis sobrinos. Les parecieron muy divertidos. La mamá se los prestó para que jugaran 😂
Una cuchura que lindas ranitas amiga. Buen trabajo 👍
Hola. Muchas gracias 🫂
Oooooh! Están demasiado geniales 😍 Creo que es lo más cuchi que he visto hoy jeje... Por cierto, el gif con la ranita saltando quedó graciosísimo, me encanta ver cómo tu edición va subiendo de nivel ✨
Hola amiga. Que bueno que te gustaron. Y gracias por el cumplido. Ahí sigo poco a poco. Yo siempre aprendiendo sola jajaja. Saludos 👋😂🙋🫂