Anillo tejido para tus servilletas de tela. // Woven ring for your cloth napkins.
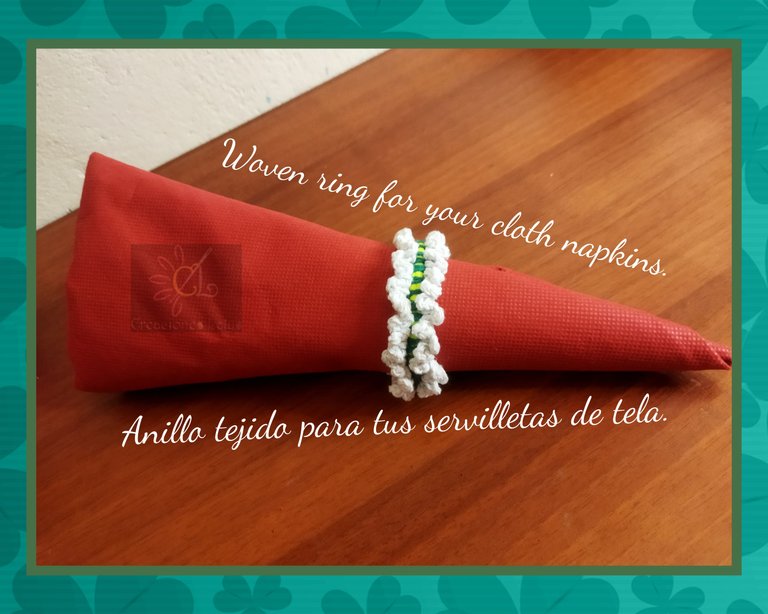
Hola amigos creadores. Deseando que estén muy bien. Hoy les voy a mostrar el paso a paso para elaborar un lindo anillo tejido que podremos usar para decorar nuestra mesa, en este caso para sujetar las servilletas de tela. Estoy segura que te gustará y querrás tener unos. ¡Acompáñame!
Hello fellow creators. Wishing you all the best. Today I am going to show you the step by step to make a cute woven ring that we can use to decorate our table, in this case to hold the cloth napkins. I'm sure you will like it and want to have some. join me!
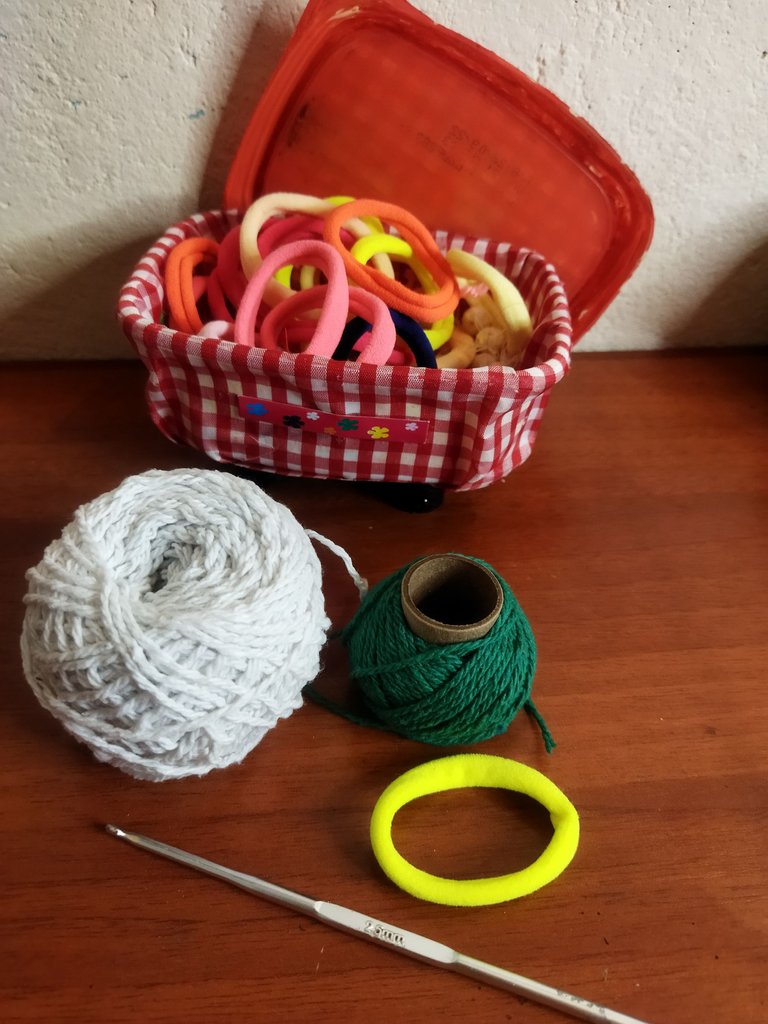
MATERIALES.
✅ Los materiales que vamos a utilizar para elaborar este lindo anillo son los siguientes:
- Hilo pabilo.
- Banda elástica.
- Aguja de crochet de 2,25mm.
- Tijeras.
- Aguja lanera.
MATERIALS.
✅ The materials we are going to use to make this cute ring are as follows:
- Pabilo thread.
- Elastic band.
- Crochet needle of 2.25mm.
- Scissors.
- Wool needle.
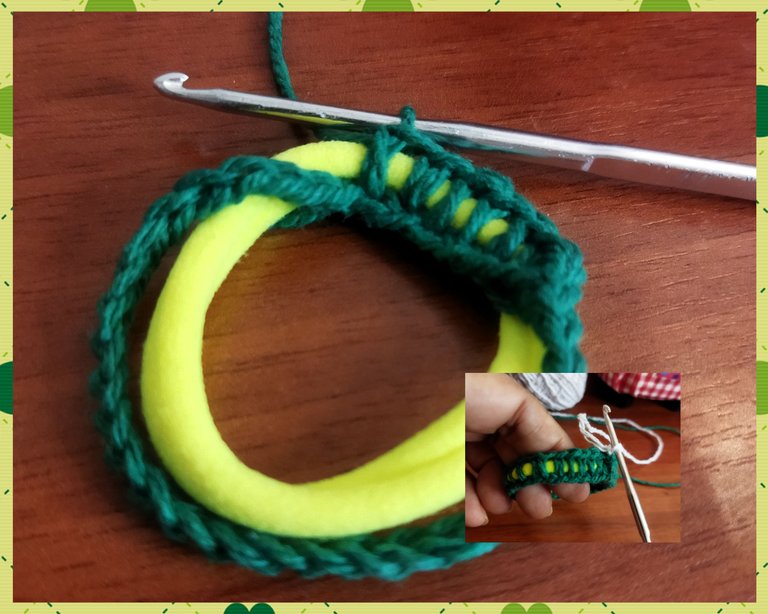
PROCEDIMIENTO:
✅ El procedimiento para hacer este bello anillo sujetador de servilletas es muy sencillo, es un proyecto ideal para los principiantes en el crochet.
- Lo primero que haremos es elegir el color base de nuestro anillo, yo elegí el color verde. Luego tejeremos una cadena lo suficientemente larga o del tamaño de la banda elástica que tenemos.
PROCEDURE:
✅ The procedure to make this beautiful napkin holder ring is very simple, it is an ideal project for crochet beginners.
- The first thing we will do is choose the base color for our ring, I chose green. Then we will knit a chain long enough or the size of the elastic band we have.

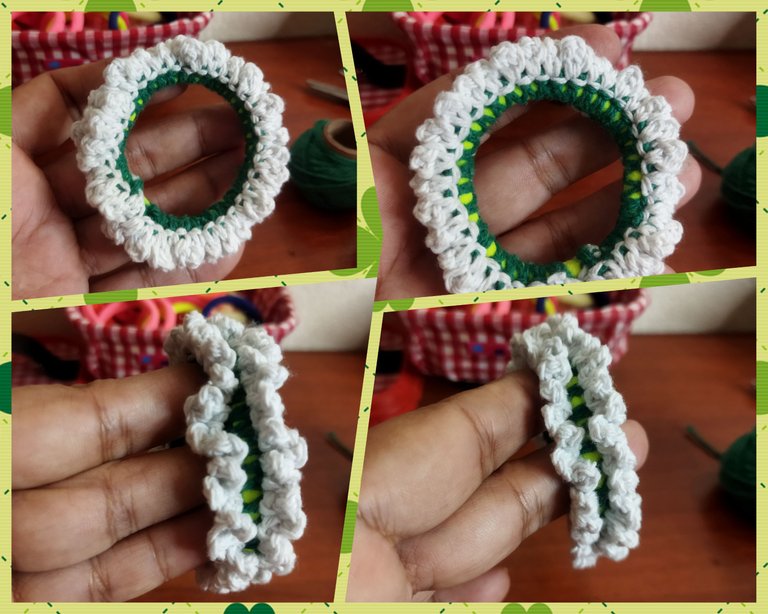
- Después colocamos esta cadena larga sobre la banda elástica, vamos a tejer pb (puntos bajos) sosteniendo la banda para que quede atrapada entre los puntos. No es necesario que el punto quede muy apretado.
- Then we place this long chain over the elastic band, we are going to knit bp (low stitches) holding the band so that it is trapped between the stitches. The stitch does not need to be very tight.
- Una vez que hayamos terminado de tejer los puntos bajos cerramos con pd (punto deslizado), cortamos la hebra y la escondemos con la ayuda de la aguja lanera.
- Tomamos el hilo del segundo color, yo elegí el color blanco, pasamos la hebra por alguno de los puntos que ya tejimos en la banda elástica. Desde allí levantamos 5cadenas, hacemos 1pd en ese mismo punto, pasamos al punto siguiente con pd y repetimos la secuencia:
5c-1pd-1pd otro punto base- repetimos.
- Repetiremos esta secuencia hasta rellenar toda la banda de pequeños pétalos de 5cadenas cada uno.
- Once we have finished knitting the low stitches we close with pd (slipped stitch), we cut the yarn and hide it with the help of the wool needle.
- We take the thread of the second color, I chose the white color, we pass the thread through some of the stitches that we already knitted in the elastic band. From there we pick up 5 chains, make 1pd in that same stitch, pass to the next stitch with pd and repeat the sequence:
5c-1pd-1pd another base stitch- we repeat.
- We repeat this sequence until we fill the whole band with small petals of 5 chains each.
each.
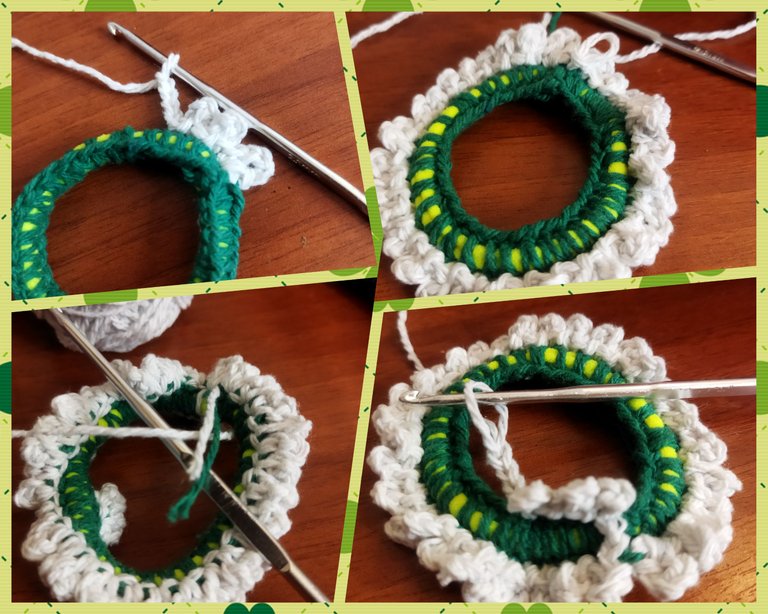
- Al completar toda la vuelta pasaremos el hilo desde el último punto hasta el punto de enfrente de la segunda cadeneta que tejimos al cubrir toda la bandita. Si miras bien deben haberte quedado dos líneas de cadenas, ya tejimos una, ahora vamos a realizar los pétalos del otro lado de la cadena.
- When we complete the whole row we will pass the yarn from the last stitch to the stitch in front of the second chain that we knitted when we covered the whole bandita. If you look closely you should have two rows of chains left, we have already knitted one, now we are going to knit the petals on the other side of the chain.
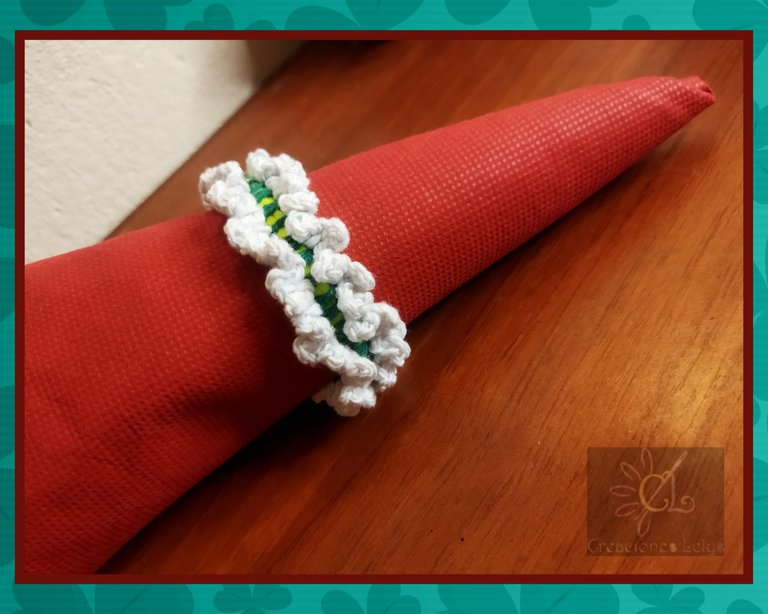
Este diseño de anillo es muy bonito y llamativo. Ahora que se acerca la época de 🎄 navidad podemos tejer muchos para decorar nuestra mesa en noche buena y fin de año. Espero que te animes a tejerlos.
- Tomamos la servilleta, la doblamos según el gusto y luego la pasamos por el anillo para mantener su forma. Lo bueno de usar la banda elástica es que se puede apretar o aflojar según la necesidad. La elástica pierde un poco su elasticidad con el tejido, pero sí puedes usarla para este fin sin ninguna preocupación.
This ring design is very pretty and eye-catching. Now that 🎄 Christmas time is approaching we can weave many of them to decorate our table on Christmas Eve and New Year's Eve. I hope you are encouraged to have them.
- We take the napkin, fold it according to taste and then pass it through the ring to keep its shape. The nice thing about using the elastic band is that it can be tightened or loosened as needed. The elastic loses a bit of its elasticity with the fabric, but you can use it for this purpose without any concern.
Muchas gracias por tu visita. Siempre es un gusto pasar por aquí, compartir y leer lo que ustedes publican. Estamos para aprender y enseñar lo que al paso de la vida vamos conociendo. Todas las fotos son de mi propiedad. Edité con Polish. Usé el traductor de Deepl. Hasta pronto.
Thank you very much for your visit. It is always a pleasure to stop by, share and read what you publish. We are here to learn and teach what we learn as we go through life. All photos are my property. I edited with Polish. I used Deepl translator. See you soon.

Tenes unas ideas increíbles Lelys, te quedó genial, vistoso, práctico y elegante. Me encanta!!😍
Hola. Buen día. Muchas gracias. Siempre buscando opciones sencillas para los que deseen hacer sus propias creaciones. Estoy a punto de darle el primer sorbo a mi café ☕
Que tengas un hermoso día Lelys!
Igualmente.
Es una grandiosa idea querida @creacioneslelys, gracias por compartir.
Feliz día amiga.
So nicely, I love it, good work thanks for sharing
@pekkymos
Amiga gran trabajo 👍saludos
Muchas gracias por tu apoyo. Bendiciones.