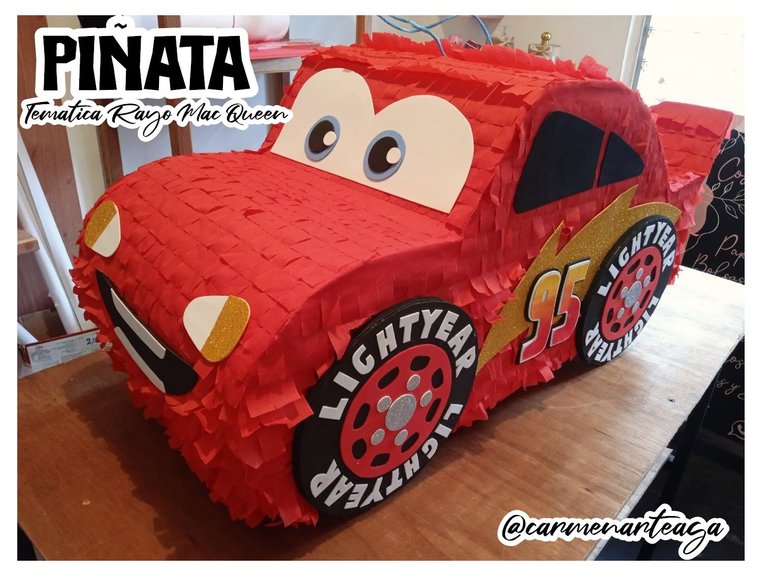
PIÑATA Temática Rayo Mac Queen / Rayo Mac Queen Themed PIÑATA
Hola Amigos de hive, como han estado hoy vuelvo por este medio después de haber estado ausente por un tiempo...😊
Pues hoy quiero mostrarles como elabore una piñata con temática de Rayo Mac Queen a pedido de una clienta.
Les Muestro como lo Hice...
Hello hive friends, how have you been today I'm back on this site after being absent for a while...😊Well today I want to show you how I made a Mac Queen Lightning themed piñata at the request of a client.
I show you how I did it...

- 🚗 Cartón (Caja Reciclada).
- 🚗 Tirro.
- 🚗 Silicón Barra.
- 🚗 Papel Creepe de color Rojo.
- 🚗 Foami color negro.
- 🚗 Foami Dorado Escarchado.
- 🚗 Foami Blanco.
- 🚗 Foami Rojo.
- 🚗 Foami color Azul.
- 🚗 Foami Plateado Escarchado.
- 🚗 Cartulina blanca.
- 🚗 Catulina Negra.
- 🚗 Pistola de Silicon.
- 🚗 Tijera.
- 🚗 Cardboard (Recycled Box).
- 🚗 Shot.
- 🚗 Silicone Bar.
- 🚗 Red Creepe Paper.
- 🚗 Black foam.
- 🚗 Frosted Gold Foami.
- 🚗 White Foam.
- 🚗 Red Foam.
- 🚗 Blue foami.
- 🚗 Frosted Silver Foami.
- 🚗 White cardboard.
- 🚗 Black Catulina.
- 🚗 Silicon gun.
- 🚗 Scissors.

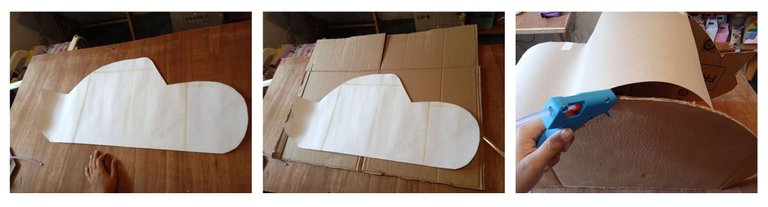
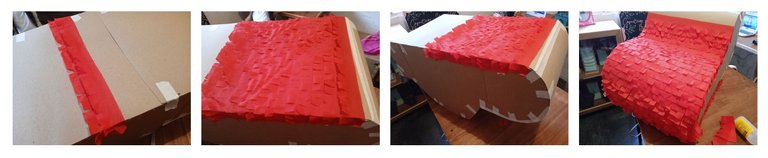
🚗 PASO 1: Con mi patrón ya elaborado utilice la caja reciclada y dibuje y corte ambas piezas laterales de lo que seria el carro, así como también corte del cartón la pieza grande que armaría la piñata la fui pegando con silicón caliente y a su vez le fui colocando tirro para asegurarla.
🚗 STEP 1: With my pattern already made, I used the recycled box and drew and cut both side pieces of what would be the car, as well as cut the large piece of cardboard that would assemble the piñata, I glued it with hot silicone and at the same time I was placing straps to secure it.
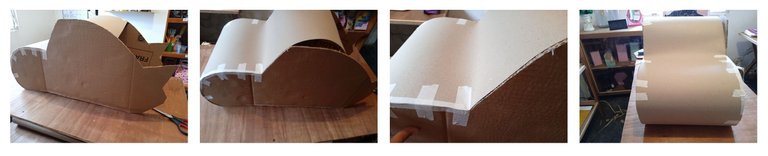
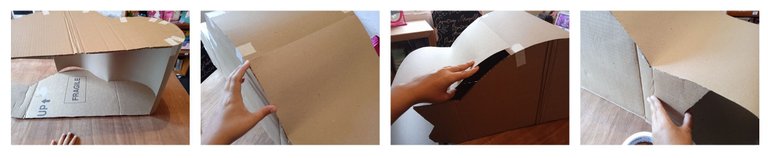
🚗 PASO 2: Corte dos piezas rectangulares las pegue con silicón frio y las asegure con tirro, estas las use para darle la forma de la aleta que va en la parte trasera del carro.
🚗 STEP 2: Cut two rectangular pieces, glue them with cold silicone and secure them with a strap, these I used to give the shape of the fin that goes on the back of the car.

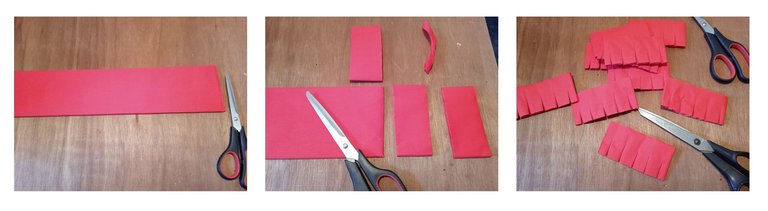
🚗 PASO 3: Una vez que tuve la estructura de la piñata ya armada, corte tiras de 4 centímetros de papel crepe y le fui haciendo pequeños cortes.
🚗 STEP 3: Once I had the piñata structure already assembled, I cut 4-centimeter strips of crepe paper and made small cuts.
🚗 PASO 4: Comence a pegar las tiras de papel crepe con el silicón liquido tratando de que estos quedaran los mas juntos posible para así lograr obtener una mejor cobertura para la piñata.
🚗 STEP 4: I started gluing the strips of crepe paper with the liquid silicone trying to get them as close together as possible to get a better coverage for the piñata.
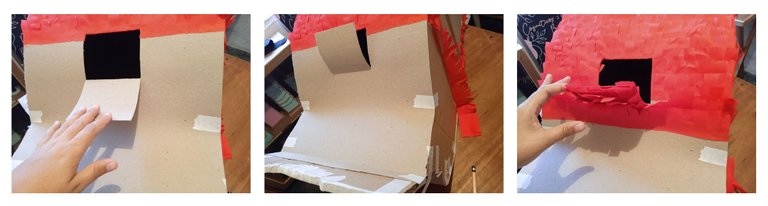
🚗 PASO 5: En la parte trasera de la piñata le hice un corte cuadrado con el exacto, esto para poder introducir lo que seria el relleno de la piñata, también lo fui cubriendo con el papel crepe.
🚗 STEP 5: In the back of the piñata I made a square cut with the exact one, this to be able to introduce what would be the filling of the piñata, I also covered it with the crepe paper.
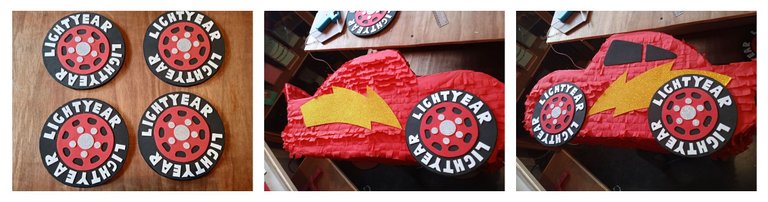
🚗 PASO 6: Una vez que cubrí toda la piñata con el papel crepe fui armando los detalles de esta, en este caso corte unos circulo de cartón lo que serian los cauchos del carro, corte también cuatro circulo de foami de color negro y rojo, así como también corte las letras que irían en el borde de cada caucho.
🚗 STEP 6: Once I covered the whole piñata with the crepe paper, I started to assemble the details of it, in this case I cut some cardboard circles that would be the car tires, I also cut four circles of black and red foami, as well as cut the letters that would go on the edge of each rubber.


Corte también 4 circulos de foami plateado y 20 pequeños del mismo foami los cuales serian las tuercas de los rines de cada caucho. Una vez que tuve todas las piezas cortadas comencé a pegar y ensamblar quedando de esta manera....
I also cut 4 circles of silver foami and 20 small ones of the same foami which would be the nuts for the rims of each rubber. Once I had all the pieces cut I started to glue and assemble them like this....

🚗 PASO 7: A su vez tome el foami dorado escarchado y corte 2 formas de un Rayo y los pegue en ambos laterales de la piñatas antes de pegar los cauchos.
🚗 STEP 7: In turn take the frosted gold foami and cut out 2 shapes of a Lightning Bolt and glue them on both sides of the piñatas before gluing the rubbers.
🚗 PASO 9: Con ayuda de mi patrón corte los ojos en cartulina escolar blanca. así como también corte 2 circulos del foami de color azul y 2 circulos mas pequeños de color negro y 2 circulos mas pequeños de color blanco, una vez que los corte los pegue, quedando de esta manera.
🚗 STEP 9: With the help of my pattern I cut the eyes in white school cardboard, as well as cut 2 circles of blue foami and 2 smaller circles of black and 2 smaller circles of white, once I cut them I glued them, looking like this.

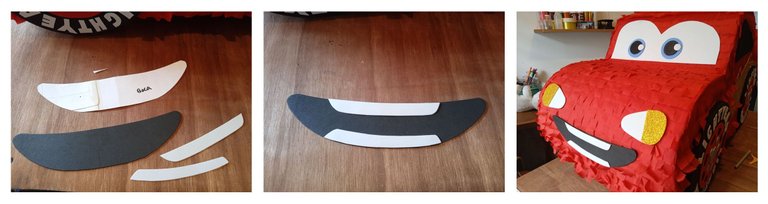
🚗 PASO 10: Tome el foami de color negro y con ayuda de un patrón corte lo que seria la boca y con el foami blanco corte y pegue los dientes.
🚗 STEP 10: Take the black foami and with the help of a stencil cut out what would be the mouth and with the white foami cut and glue the teeth.
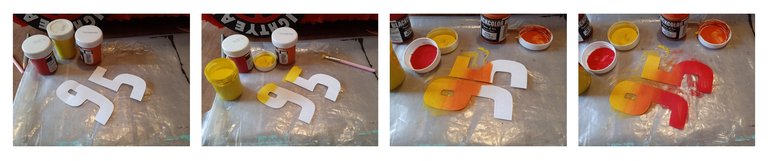
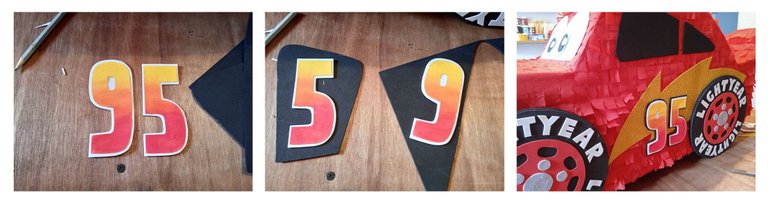
🚗 PASO 11: para ir finalizando corte en cartulina blanca el numero 95 y con pinturas al frio de color: Rojo, Naranja y Amarillo los pinte tratando de hacer un degradado, una vez seco lo pegue al foami color blanco y le hice un corte por su alrededor del mismo modo lo pegue pero en el foami de color negro y le hice el mismo corte dejando un borde esto para darle mejor vistosidad y relieve.
🚗 STEP 11: to finish, cut in white cardboard the number 95 and with cold paints of colors: Red, Orange and Yellow I painted them trying to make a gradient, once dry I glued it to the white foami and I made a cut around it in the same way I glued it but in the black foami and I made the same cut leaving a border to give it better showiness and relief.
🚗 PASO 12: Una vez teniendo la piñata casi lista corte y pegue lo que serian los faros de luz.
🚗 STEP 12: Once the piñata is almost ready, cut and glue what would be the light beacons.

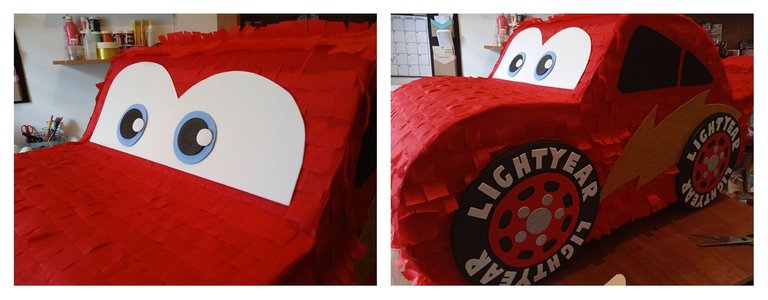
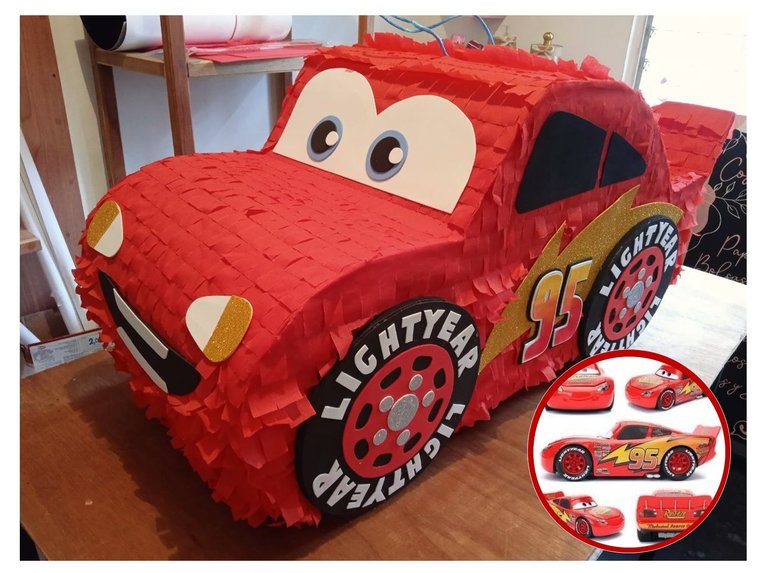
y pues así quedo esta piñata con temática de Rayo Mac Queen.
And so this is how this Mac Queen Lightning themed piñata turned out.
Gracias por Leerme
Espero les Guste
las Fotos son de Mi Autoría.
Un Gran Abrazo...
Thanks for reading me I hope you like it I am the author of the photos. A Big Hug...

Simplemente hermosa,me encanta lo fácil que la haces ver, muy buen contenido
hola @yolimarag muchas gracias me alegra que te guste... un gran abrazo...😊
From Venezuela, our witness drives decentralization and the adoption of Web3 technology, creating opportunities for the local community and contributing to the global ecosystem. // Desde Venezuela, nuestro testigo impulsa la descentralización y la adopción de la tecnología Web3, generando oportunidades para la comunidad local y contribuyendo al ecosistema global.
Sigue, contacta y se parte del testigo en: // Follow, contact and be part of the witness in:
@tipu curate 2
Upvoted 👌 (Mana: 28/68) Liquid rewards.
Congratulations @carmenarteaga! You have completed the following achievement on the Hive blockchain And have been rewarded with New badge(s)
Your next target is to reach 3750 upvotes.
You can view your badges on your board and compare yourself to others in the Ranking
If you no longer want to receive notifications, reply to this comment with the word
STOPCheck out our last posts:
thank you very much...😊
That's great @carmenarteaga! We're excited to see your accomplishments on Hive! We'll continue to support you to achieve your next goals!
BTW, help us to continue bringing fun and badges to the Hive community. HiveBuzz can't do it alone so check out our funding proposal and consider supporting it.
All you need to do is to click on the "support" button on this page: https://peakd.com/proposals/248.
Thank you!