[EN-ES] Make your toothbrush holder. // Elabora tu porta cepillo dental.
Greetings friends as you are today, I hope you have a happy weekend!
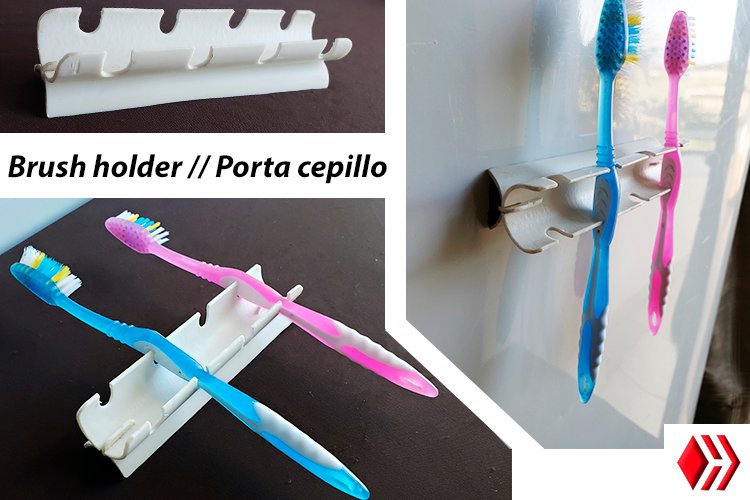
Today I bring you how to make a toothbrush holder, very practical and useful; I made this personal care accessory thinking about using only recycled plastic.
It has a very clean and simple design; We can modify the number of openings for brushes according to our needs, in my case I decided to place only 4 to show you as an example.
It is a pleasure to share with you the step by step I hope you like it, let's get started.
Materials:
• 13 cm of electrical PVC pipe; easy to cut.
Tools:
• Pencil, eraser and square.
• Metal scissors.
• Hacksaw blade.
• Coarse and fine sandpaper.
• Silicone and lighter.
¡Saludos amigos como se encuentran hoy, espero tengan un feliz fin de semana!
Hoy les traigo como hacer un porta cepillo dental, muy práctico y útil; este accesorio de cuidado personal lo realice pensando en utilizar solo plástico reciclado.
Tiene un diseño muy limpio y simple; podemos modificar el número de aberturas para cepillos según sean nuestras necesidades, en mi caso decidí colocarle solo 4 para mostrarle de modo a ejemplo.
Es gusto compartir con ustedes el paso a paso espero les gustes empecemos.
Materiales:
• 13 cm de tubo PVC eléctrico; fácil de cortar.
Herramientas:
• Lápiz, borrador y escuadra.
• Tijera de metal.
• Hoja de segueta.
• Lija gruesa y fina.
• Silicón y encendedor.

Step 1
• The length of the chosen element is at the discretion depending on the openings to be made, I used 13cm of scrap that I had saved and from there I started to make the measurements.
• We mark, cut and sand the edges taking care of finishing details.
Paso 1
• La longitud del elemento escogido es a criterio según considere las aberturas a realizar, yo utilice 13cm de retazo que tenía guardado y de allí partí a realizar las medidas.
• Marcamos, cortamos y lijamos los bordes cuidando detalles de acabado.


Step 2
• We section a piece of plastic element that serves as a bar to join the elements.
• We mark the halves at 1cm, and we make sure to open the locks tight enough for them to fit under pressure.
• We cut the excess of the locks.
Paso 2
• Seccionamos un pedazo de elemento plástico que nos sirva de tranca para unir los elementos.
• Marcamos las mitades a 1cm, y nos aseguramos de aperturar las trabas lo suficientemente ajustadas para que entren a presión.
• Cortamos el sobrante de las trabas.


Step 3
• We locate where the openings for the brushes will be.
• We outline all the elements and sand.
Paso 3
• Ubicamos donde serán las aperturas para los cepillos.
• Contorneamos todos los elementos y lijamos.


Step 4
• For our base use a thin but strong plastic. This element will have the function of joining the brush holder with the surface that you want to adhere.
• That is why we must sand for both loads so that the glue fulfills its function correctly.
• We join all the parts and that's it.
Paso 4
• Para nuestra base utilice un plástico delgado pero fuerte. Este elemento tendrá como función unir el porta cepillo con la superficie que desee adherir.
• Por eso debemos lijar por ambas cargas para que el pegamento cumpla correctamente su función.
• Unimos todas las partes y listo.


TWell friends I hope you liked it, see you in a next post, grateful to the entire HIVE community
Bueno amigos espero les haya gustado, nos vemos en un siguiente post, ¡agradecido con toda la comunidad de HIVE!
Resource // Recursos
Teléfono Samsung A10
Edition // Edición
Photoshop S6
Translator // Traductor;
https://translate.google.com/?hl=es&sl=auto&tl=en&op=translate

Gracias por compartir con nosotros ideas tan geniales!
Es un placer para mí compartir con todos ustedes, saludos 👍
Congratulations @carlossteele! You have completed the following achievement on the Hive blockchain and have been rewarded with new badge(s):
Your next target is to reach 3500 upvotes.
You can view your badges on your board and compare yourself to others in the Ranking
If you no longer want to receive notifications, reply to this comment with the word
STOPCheck out the last post from @hivebuzz:
Support the HiveBuzz project. Vote for our proposal!