Tim Burton's Alice in Wonderland Cat Makeup [ENG/ESP]
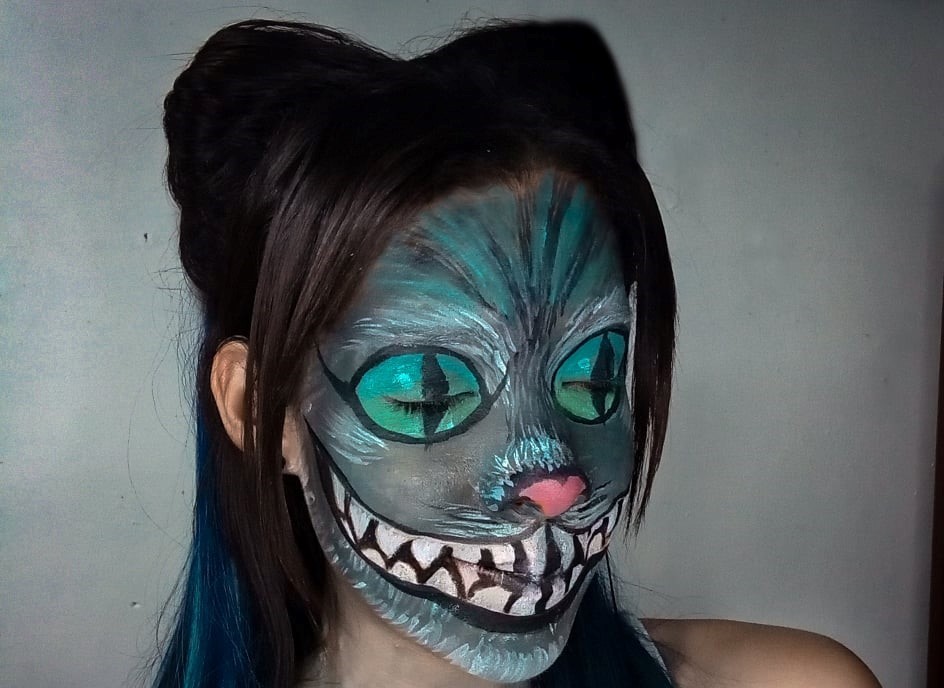
Hola amigos, hoy les quiero compartir este lindo maquillaje inspirado en el gato de Alicia en el País de las Maravillas de la película de Tim Burton.
Hi friends, today I want to share with you this cute makeup inspired by Alice in Wonderland's cat from Tim Burton's movie.
.jpg)
Primero que nada les quería comentar que me encuentro realizando la tesis de mi universidad para poder graduarme y que ese es el principal motivo de mi ausencia por estas semanas en Hive. Pero aquí estoy de vuelta y sin más que agregar les explicaré el paso a paso de este maquillaje a continuación.
First of all I wanted to tell you that I am doing my university thesis to graduate and that is the main reason for my absence for these weeks in Hive. But here I am back and without more to add I will explain the step by step of this makeup below.

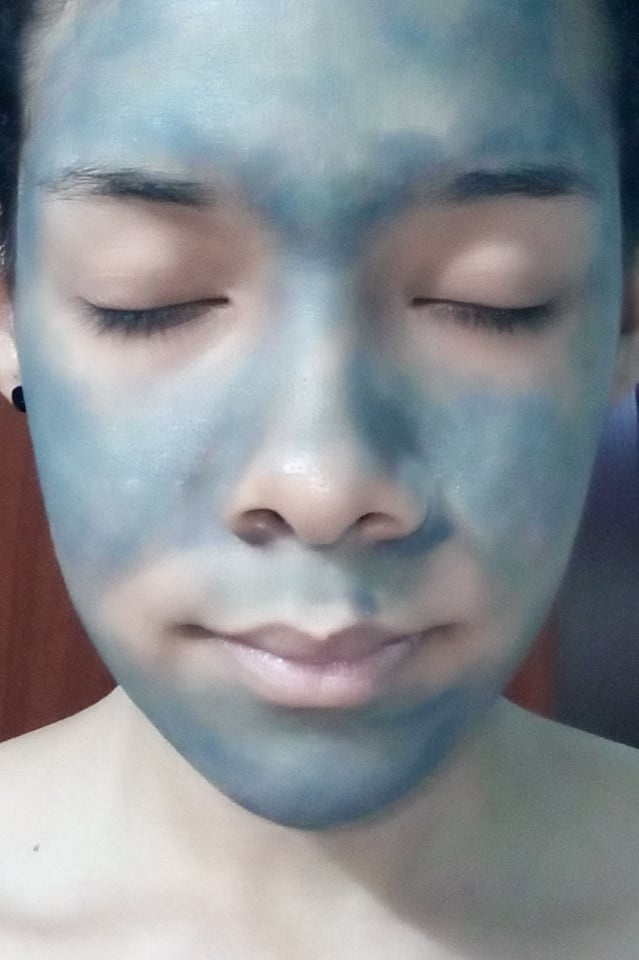
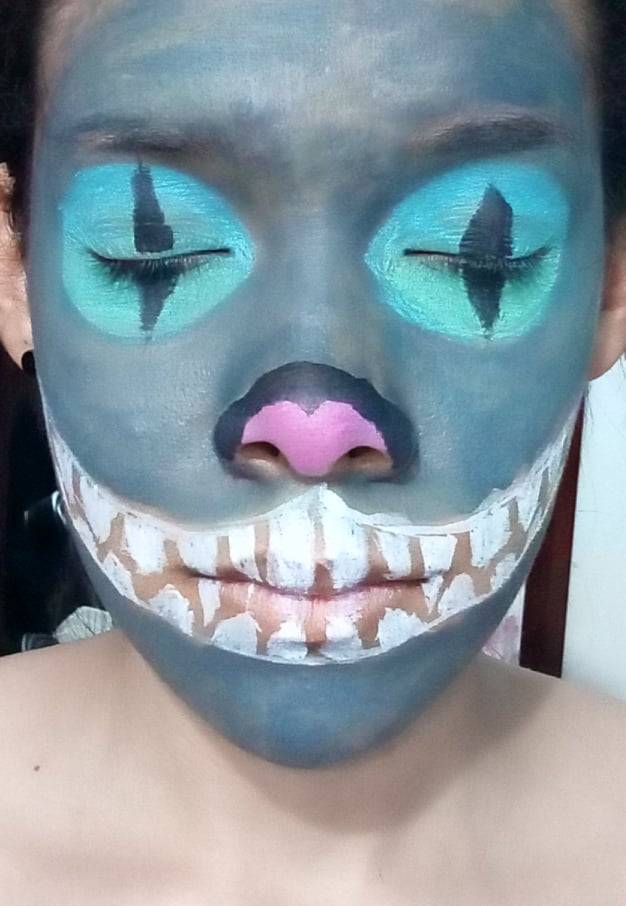
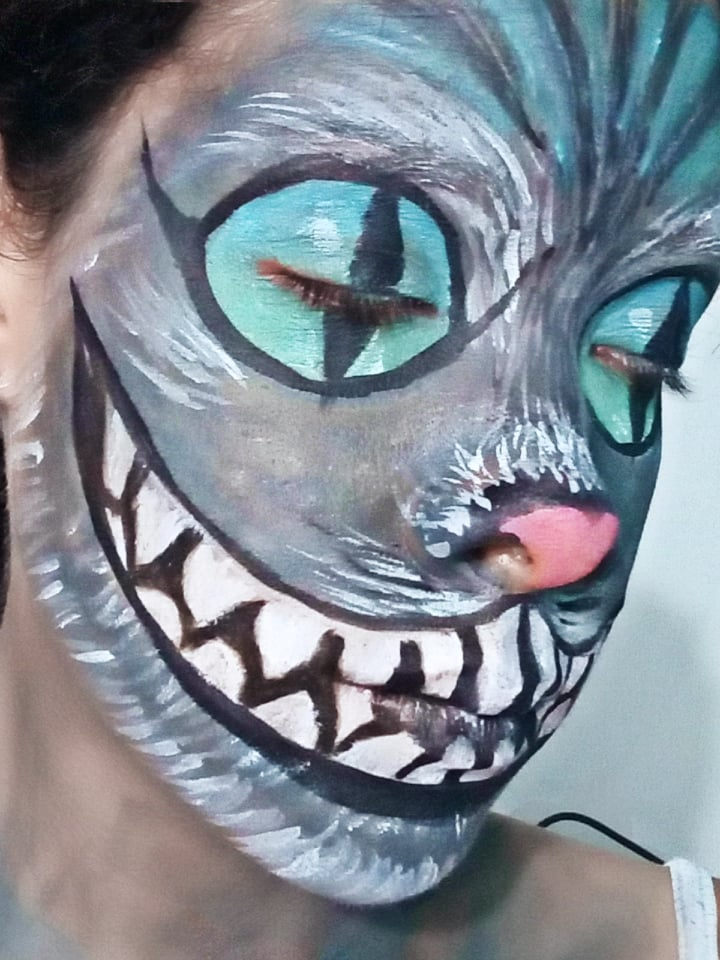
En primer lugar, comencé aplicando pintura corporal color gris pero sólo un poco y la esparcí por todo mi rostro con una esponjita de maquillar. Esto solamente no servirá de guía o boceto mientras empezamos a realizar los detalles del rostro del gato.
First I started by applying gray body paint but only a little bit and spread it all over my face with a makeup sponge. This will only serve as a guide or sketch while we start to make the details of the cat's face.
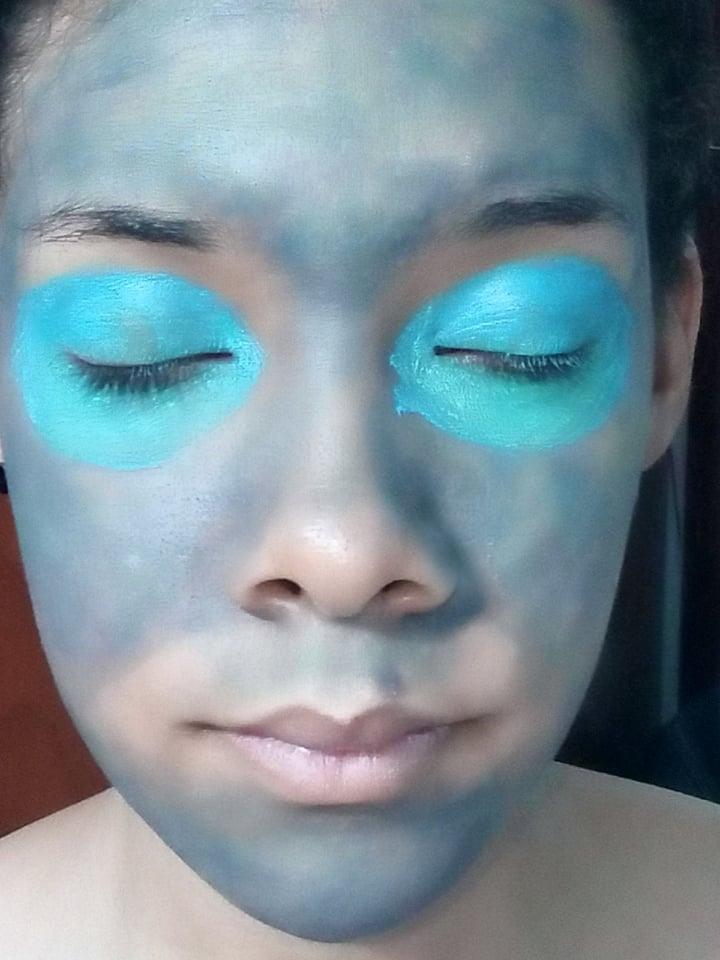
Con una brocha pequeña y plana dibujaremos los ojos del gato, aplicando pintura corporal color azul. Los ojos serán un poco ovalados de manera horizontal tomando en cuenta el tamaño de la cuenca de nuestros ojos. Y a partir de la mitad de estos colocaremos pintura color verde mezclándola un poco con la de color azul para conseguir un pequeño degradado de azul a verde.
With a small flat brush we will draw the eyes of the cat, applying blue body paint. The eyes will be a little oval horizontally taking into account the size of our eye socket. And from the middle of these we will place green paint mixing it a little with the blue one to get a small gradient from blue to green.
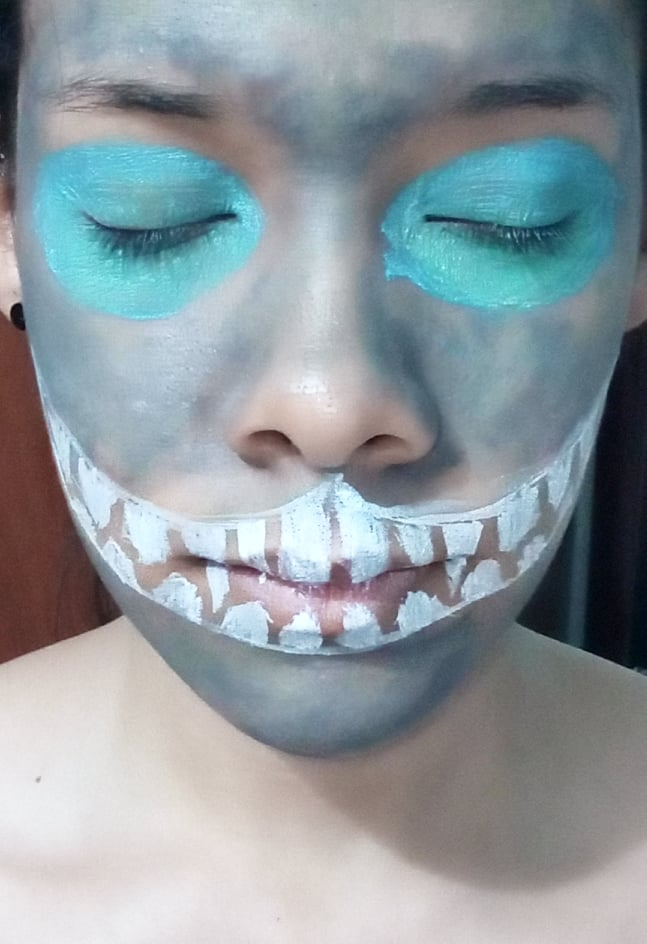
Luego, dibujé la sonrisa del gato; partiendo desde el centro de dónde finaliza nuestra nariz realizaremos una línea curveada en dirección a la oreja, esto lo haremos de cada lado y luego uniremos cada esquina mediante una línea honda que será el labio inferior del gato.
Then, I drew the cat's smile; starting from the center of where our nose ends we will make a curved line in the direction of the ear, we will do this on each side and then we will join each corner with a deep line that will be the cat's lower lip.

Con un pincel muy fino dibujaremos los dientes del gato un poco afilados, en total dibuje 12 arriba y abajo es decir 6 de cada lado.
With a very fine brush we will draw the teeth of the cat a little bit sharpened, in total draw 12 up and down that is to say 6 on each side.
Y ahora que tenemos los ojos y la boca dibujada volveremos a aplicar pintura color gris y corregiremos cualquier error en la parte de los ojos.
Después, haremos una línea en la mitad de cada ojo, siendo está más gruesa en el centro y más fina en las puntas. Y en la nariz colocaremos pintura rosada de manera ovalada y en el borde colocaremos pintura color negro para delinearla. No importa si nos queda imperfecto luego lo podemos corregir.
And now that we have the eyes and the mouth drawn we will reapply gray paint and correct any mistakes in the part of the eyes.
Then, we will make a line in the middle of each eye, being thicker in the center and thinner at the ends. And on the nose we will place pink paint in an oval shape and on the edge we will place black paint to outline it. It doesn't matter if it is imperfect then we can correct it.
Lo siguiente será realizar los pelos blancos del gato y esto lo podemos lograr realizando pequeños trazos con un pincel fino arriba de la nariz y alrededor de los ojos hacia arriba como si estos fueran las cejas del gato, también encima y debajo de la boca y en la mandíbula.
The next step was to make the white hairs of the cat and this can be achieved by making small strokes with a fine brush above the nose and around the eyes upwards as if they were the cat's eyebrows, also above and below the mouth and on the jaw.
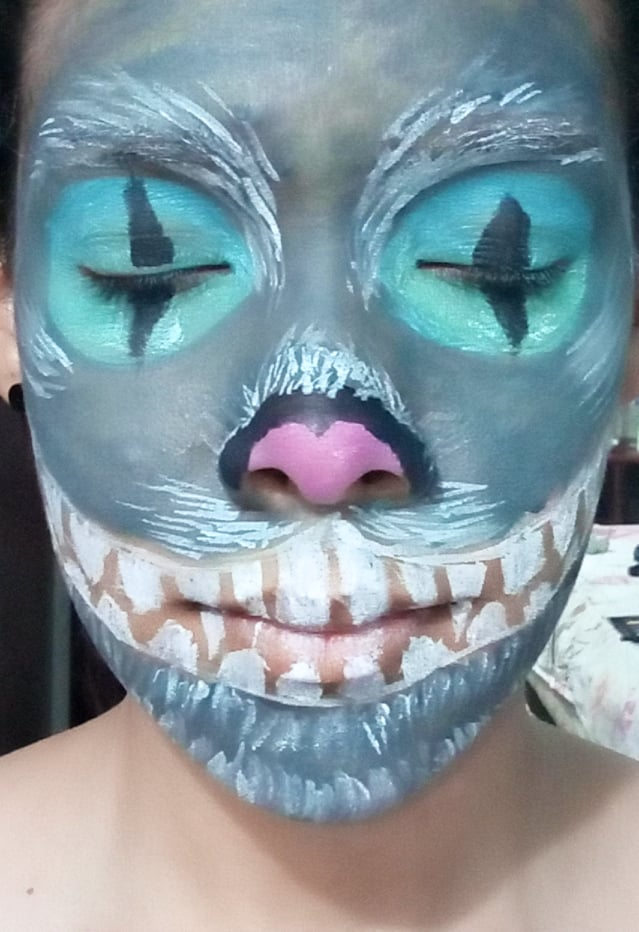
Además, dibujaremos los pelos negros que partirán desde el centro de la nariz hacia el final de la frente y hacia los laterales de esta.
In addition, we will draw the black hairs starting from the center of the nose towards the end of the forehead and towards the sides of the forehead.
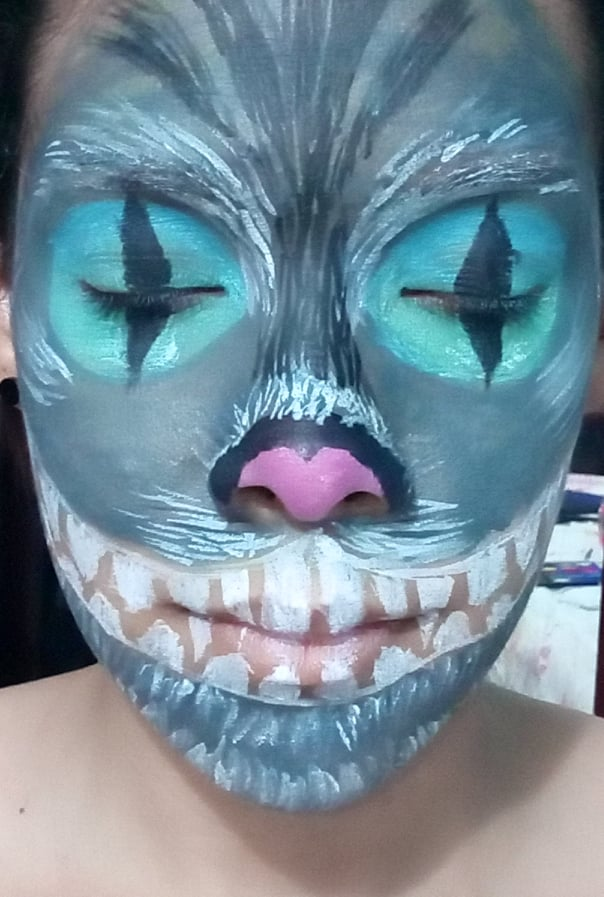
Ahora delinearemos los dientes con pintura color negro y también de línearemos los ojos y en el medio de estos dibujaremos una línea alargada hacia el exterior y otra más corta hacia el interior de la nariz.
Now we will outline the teeth with black paint and we will also outline the eyes and in the middle of them we will draw an elongated line towards the outside and a shorter one towards the inside of the nose.
Aplicaremos pintura color azul en la frente, y realizaremos pequeñas líneas entre lo que serían los pelos negros del gato, de esta manera. Después remarcaremos con pintura color negro la sonrisa del gato siendo la línea inferior más gruesa.
We will apply blue paint on the forehead, and we will make small lines between what would be the black hairs of the cat, in this way. Then we will highlight with black paint the cat's smile, being the bottom line thicker.
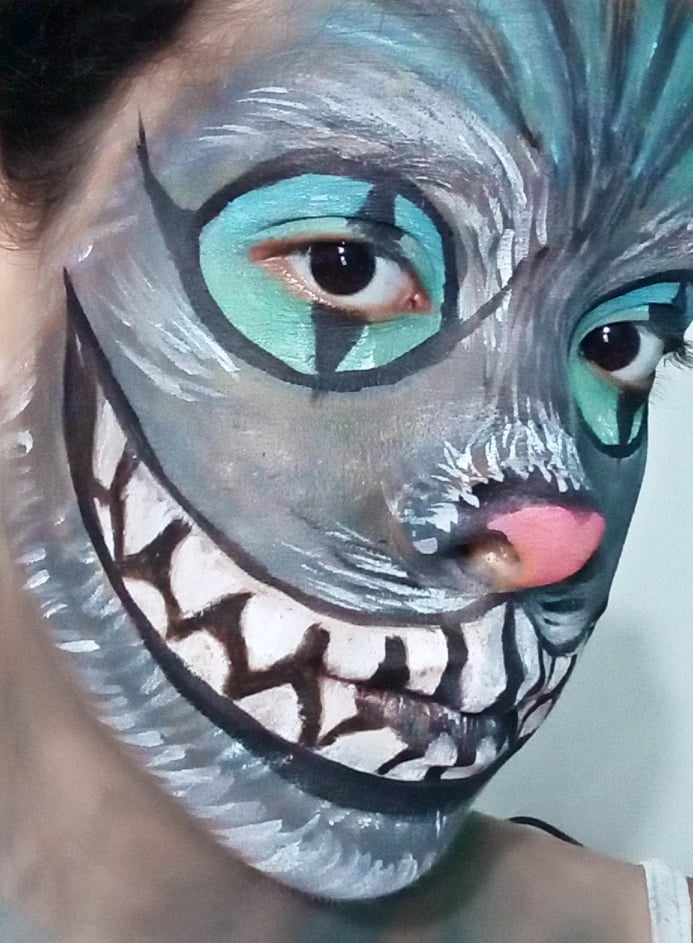
También agregaremos un poco de pintura color blanco en la parte de inferior de los ojos y dibujaremos un círculo pequeñito al lado de las pupilas negras, para dar luz a la mirada de este.
We will also add some white paint on the lower part of the eyes and draw a small circle next to the black pupils, to give light to the eyes.
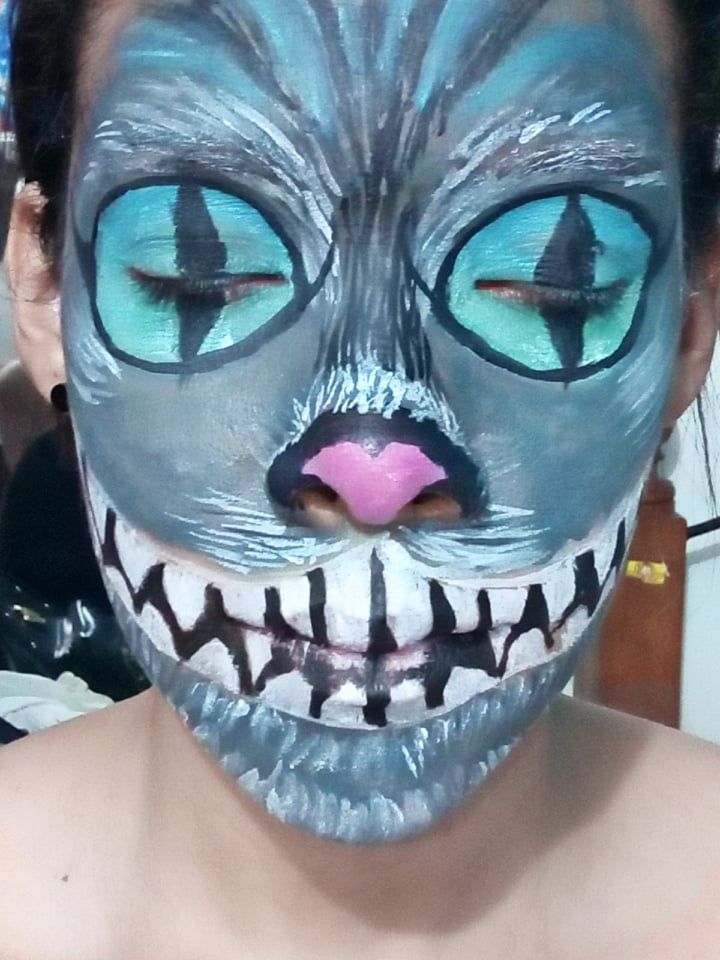
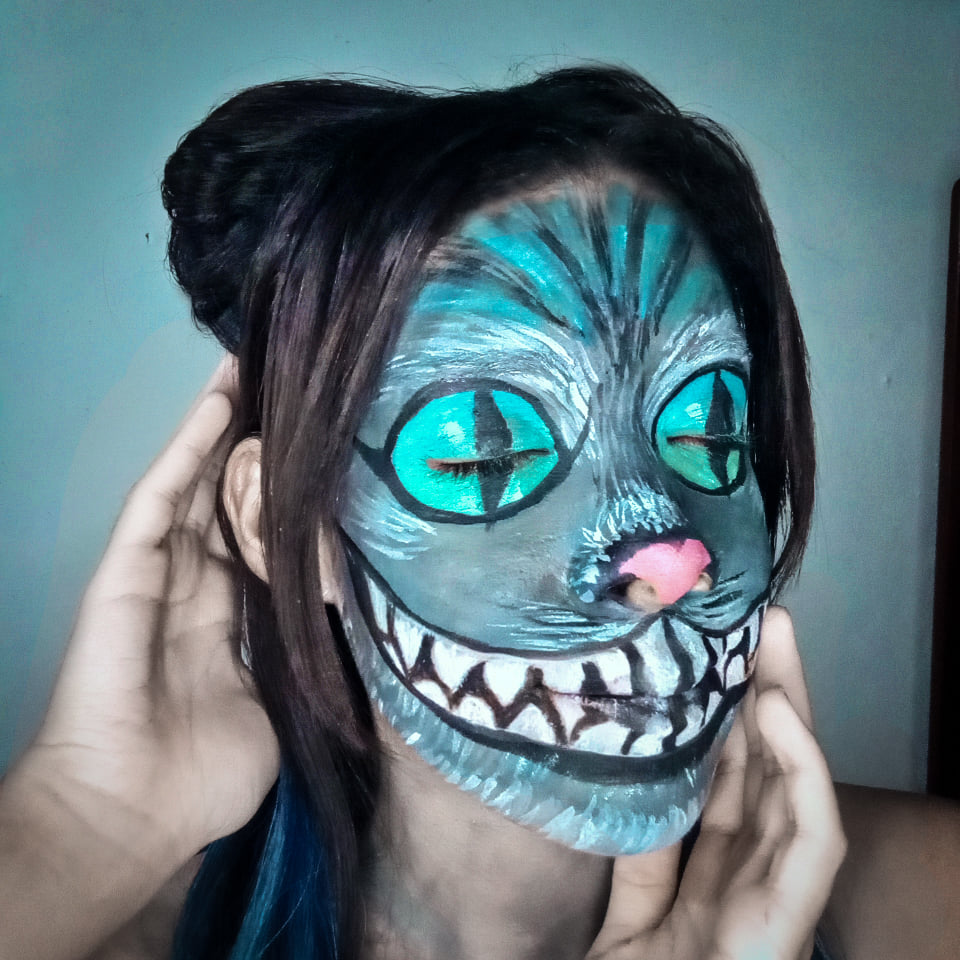
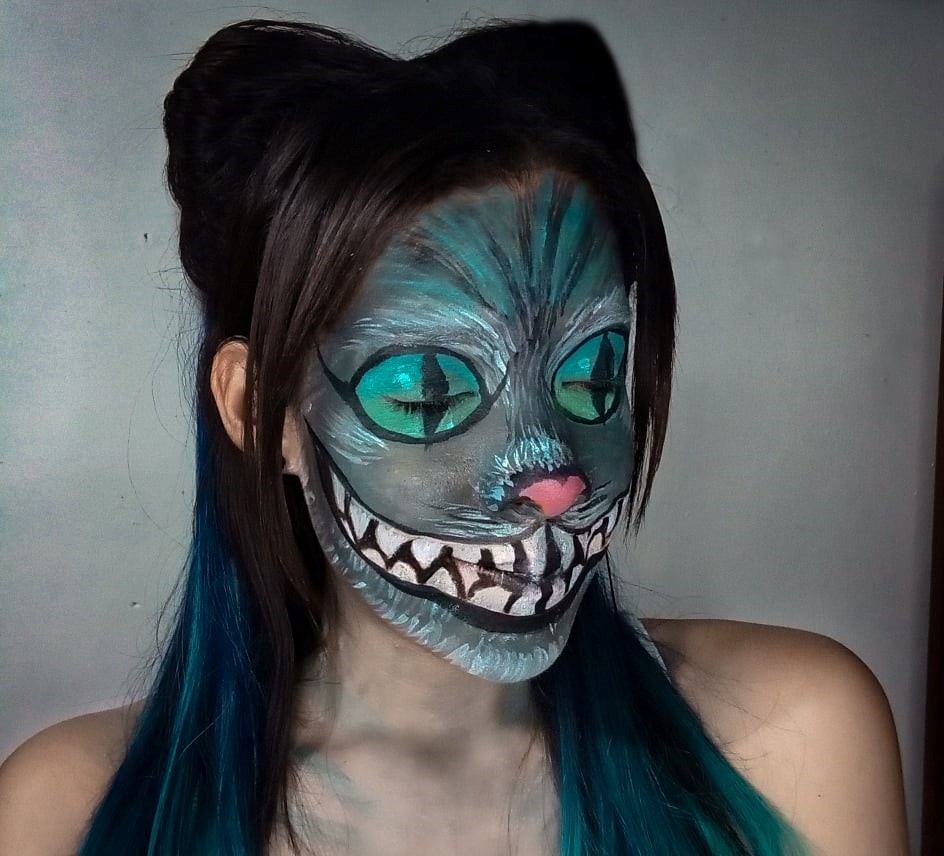
Finalmente para completar el maquillaje me hice un peinado para simular las orejas del gato. Y este es el resultado final amigos:
Finally to complete the makeup I did a hairstyle to simulate the cat's ears. And this is the final result my friends:
Espero les haya gustado este pequeño tutorial y gracias por leerme un saludo y abrazos a todos los amantes del arte de esta gran comunidad.
I hope you liked this little tutorial and thank you for reading me, greetings and hugs to all the art lovers of this great community.
Imágenes editadas en PicsArt. Traducido con www.DeepL.com
Images edited in PicsArt. Translated with www.DeepL.com
.jpg)
Wow, te quedó demasiado genial 😍 te felicito. Me gustó mucho este makeup Art.
@mariannysleon Gracias amiga ❤️❤️❤️ Me alegra que te haya gustado 🤗
Realmente esto es un excelente trabajo amiga felicidades muy bien logrado, excelente 💯🌹.
@mayifiestas Gracias amiga, he mejorado mucho trato de hacerlo lo mejor que puedo 🤗 muchas gracias ❤️❤️
Congratulations @blackarer! You have completed the following achievement on the Hive blockchain and have been rewarded with new badge(s):
Your next target is to reach 60 posts.
You can view your badges on your board and compare yourself to others in the Ranking
If you no longer want to receive notifications, reply to this comment with the word
STOPTo support your work, I also upvoted your post!
Check out the last post from @hivebuzz:
Support the HiveBuzz project. Vote for our proposal!
Muy buen trabajo artístico, @blackarer . Gran resultado ✨👏
@amma21 Muchas gracias amiga ☺️