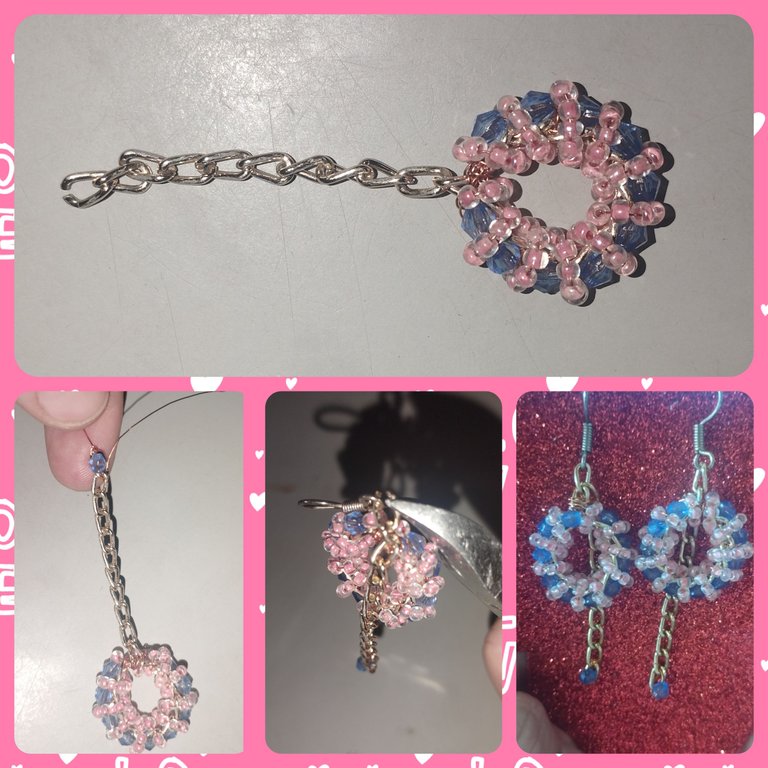
Hermosos zarcillos de Sharosky y mostacillas en Alambrismo. / Beautiful Sharosky tendrils and beads in Alambrismo.

Feliz tarde amigos de las creaciones más hermosa de @jewelry, para mí en estos días han Sido muy controversiales, pero bueno aquí estoy con la mejor actitud creando para ustedes lo mejores contenidos que he podido hacer para está hermosa comunidad y para todos los integrantes de @hive que se que siempre están ahí también aprendiendo día a día. En esta oportunidad les traigo unos hermosos zarcillos de Sharosky y mostacilla en Alambrismo. Cómo ya saben desee que conocí este mundo del Alambrismo me enamore de el y cada día esforzándome para crear accesorios lindo e originales.
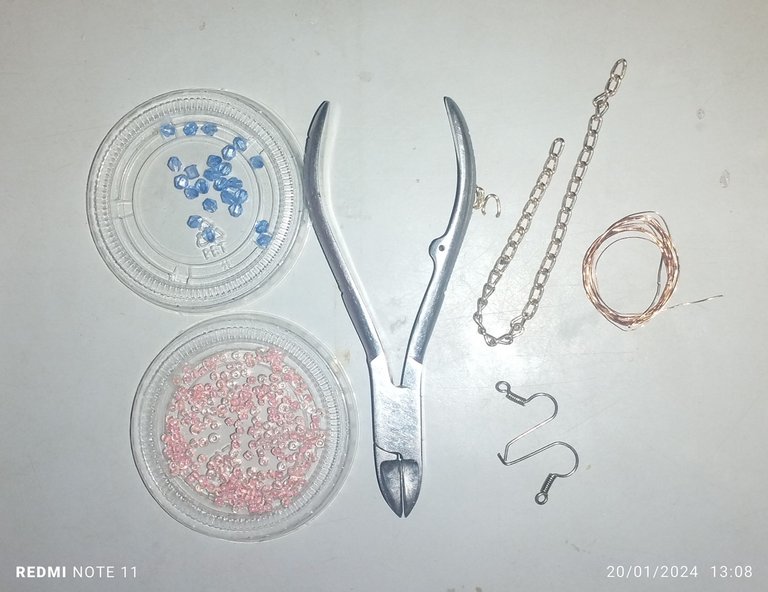
Para la creación de estos hermosos zarcillos utilice los siguientes Materiales.
Materiales:
✓ Alambre número 26 color bronce.
✓ Cadena dorada.
✓ Sharosky color azul.
✓ Mostacillas color guayaba.
✓ Pinza.
✓ Pin de Zarcillos.
Papa a paso:
Paso 1:
En la cadena vamos a introducir el alambre número 26 ajustándolo a una de las argollas de la cadena y con el alambre vamos a fijar las piedras de Sharosky en cada argolla fijandolo con el alambre número 26. En cada argolla es decir en cada circulo ya ajustados, ahí colocamos las piedra de Sharosky, un total de 10 piedras utilice yo en cada zarcillo.
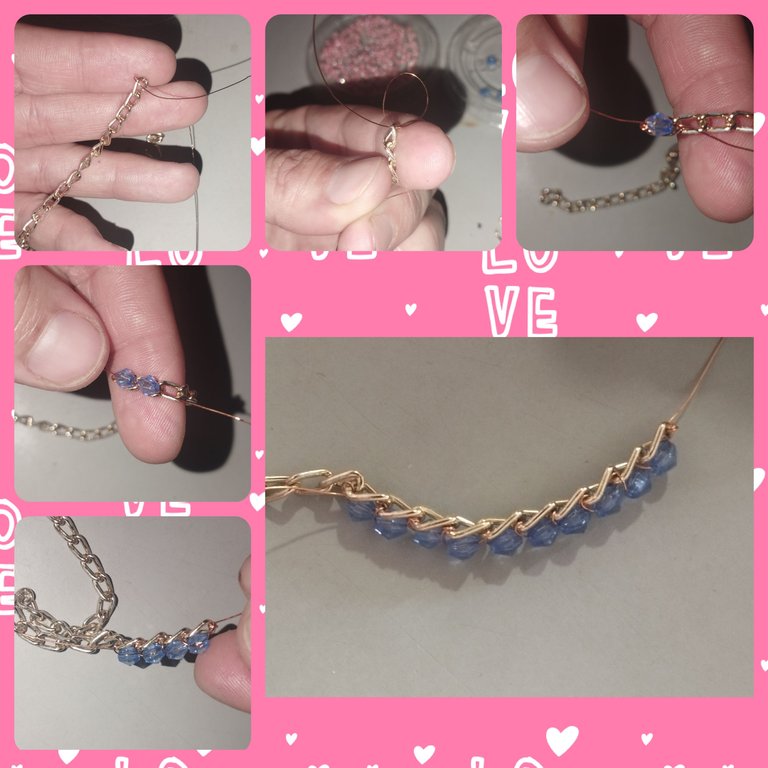
Paso 2:
Una vez que hallamos terminado todas las piedras, vamos hacer un círculo con la cadena. Vamos ajustar los extremos con el alambre número 26 para que no se mueva y ni quede flojo ajustamos bien los lados.este es el cuerpo de nuestro zarcillo, si se desea más grande el circulo se le agregan más podrás a la cadena y ahí no habrá ningún problema porque será siempre ajustable a nuestros gustos.
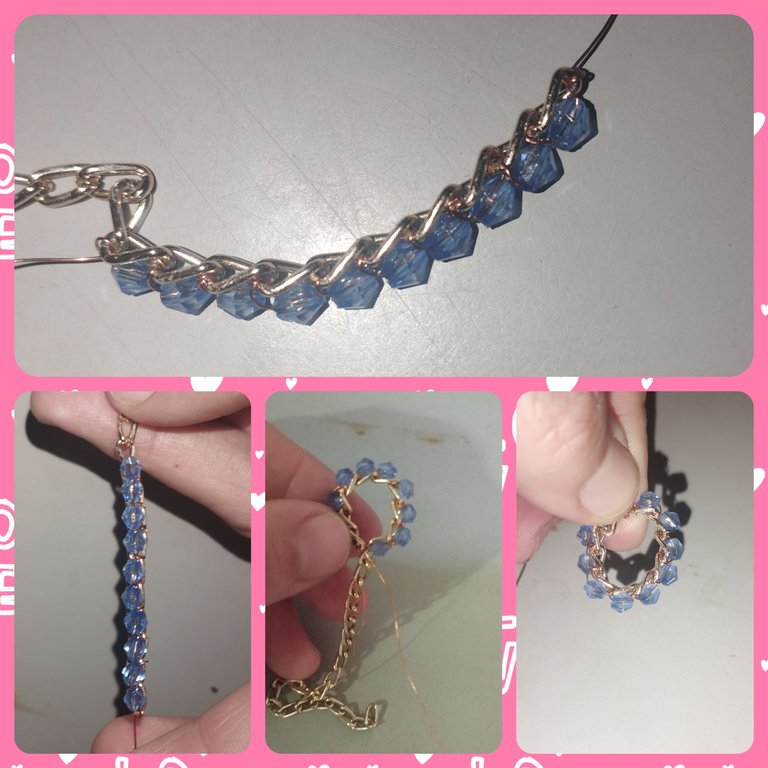
Paso 3:
Ahora bien, con el sobrante del alambre vamos a introducir las Mostacillas color guayaba colocamos muchas de está y así podemos ir enrolladolas entre medio de cada Sharosky quedará entre medio de cada piedra dándole un toque de espiral, lo hacemos hasta llegar al otro extremo. damos vueltas al alambre para que nuestras mostacillas no se suelen.
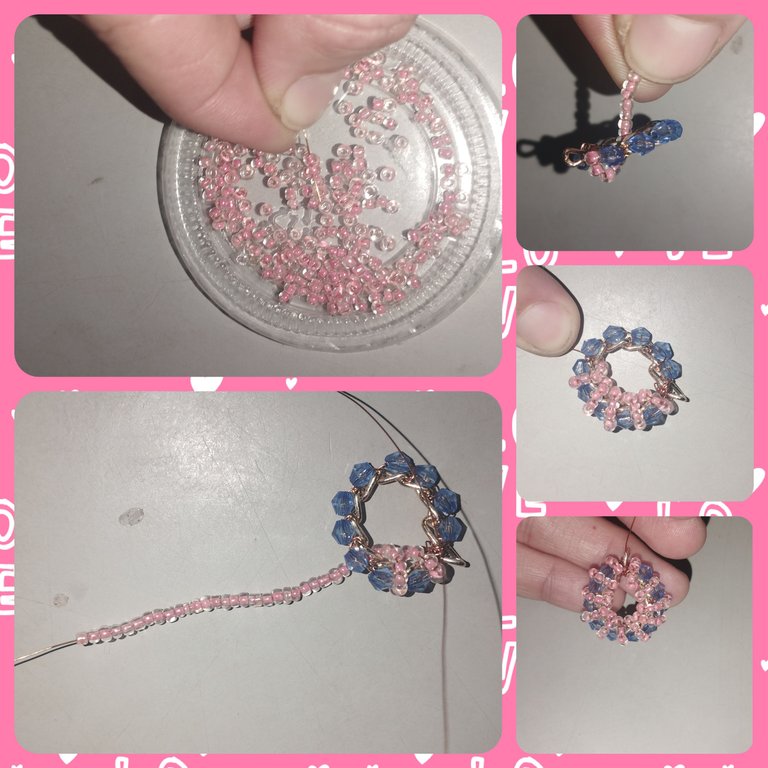
Paso 4:
Colocamos un extra de cadena de aproximadamente 5 centímetros,una argolla donde colocamos el pico de loro, es decir el pin del zarcillo y cerramos la argolla. Al final de la argolla ajustamos una piedra para darle otro giro al zarcillo, Esto le dará elegancia y delicadeza. Si desea hacerlos asi perfecto pero sino. No importa la cadenita extra es algo opcional pero a mí me encanta así.
De esta manera tenemos nuestros hermosos zarcillos en Alambrismo de Sharosky y mostacilla, otra forma de crear nuestros propios accesorios es algo increíble. No sabemos de qué somos capaces hasta que lo intentamos Ahora mi lema es ese.

Espero les guste, gracias por sus apoyo. Hasta una nueva oportunidad y que Dios y el universo siga bendiciendo a cada uno de nosotros. Y nuestras manos para seguir compartiendo con todos los Hivers.
¡Saludos!
Las imagenes me pertenecen, fueron tomadas de mi teléfono Redmi Note 11.
Las imágenes fueron editadas por programa de editor de fotos Polish.
traductor: Deepl Traslator.
English
Happy afternoon friends of the most beautiful creations of @jewelry, for me these days have Been very controversial, but well here I am with the best attitude creating for you the best content I could do for this beautiful community and for all the members of @hive that I know you are always there also learning day by day. In this opportunity I bring you some beautiful tendrils of Sharosky and Alambrismo clay in Alambrismo. As you know I wish I knew this world of wire wrap I fell in love with it and every day striving to create cute and original accessories.
For the creation of these beautiful tendrils I used the following materials.
Materials:
✓ Wire number 26 bronze color.
Golden chain.
Sharosky blue color.
Guava colored beads.
✓ Clip.
✓ Pin of tendrils.
Step-by-step:
step 1:
In the chain we are going to introduce the wire number 26 adjusting it to one of the rings of the chain and with the wire we are going to fix the stones of Sharosky in each ring fixing it with the wire number 26. In each ring that is to say in each circle already adjusted, there we place the stones of Sharosky, a total of 10 stones I use in each tendril.
Step 2:
Once we have finished all the stones, we will make a circle with the chain. We are going to adjust the ends with the wire number 26 so that it does not move and is not loose, we adjust the sides well. This is the body of our tendril, if you want the circle to be bigger, you can add more stones to the chain and there will be no problem because it will always be adjustable to our tastes.
Step 3:
Now, with the excess wire we are going to introduce the guava colored beads we place many of them and so we can go rolling them between the middle of each Sharosky will be between the middle of each stone giving a touch of spiral, we do it until we reach the other end. we turn the wire so that our beads are not usually.
Step 4:
We place an extra chain of approximately 5 centimeters, a ring where we place the parrot beak, ie the pin of the tendril and close the ring. At the end of the ring we adjust a stone to give another twist to the tendril. This will give it elegance and delicacy. If you want to make them like this, it is perfect, but if not. The extra chain is optional but I love it like this.
This way we have our beautiful earrings in Sharosky wire and beads, another way to create our own accessories is something incredible. We don't know what we are capable of until we try. Now my motto is that.
I hope you like it, thank you for your support. Until a new opportunity and may God and the universe continue to bless each of us. And our hands to continue sharing with all the Hivers.
Greetings!
The images belong to me, they were taken from my Redmi Note 11 phone.
Images were edited by Polish photo editor program.
translator: Deepl Traslator.
Que bello mil bendiciones 😍
Hola .. gracias, amén amén .. gracias por comentar y por el apoyo saludos
Que hermoso amiga, unas lindas argollas, admiro a las personas que realizan este hermoso diseño con este material, debe ser todo un proceso, mucha paciencia jii, saludos.
Saludos, oye si tiene su proceso pero vale la pena amiga.jejeje, gracias por el apoyo 🤗🤗🤗
Te han quedado muy bonitos, me gustó mucho está técnica, bendiciones,🤗
Holaaa. Gracias, que bueno que te halla gustado.. saludos bendiciones para ti y tu hermosa familia
Muchas gracias, igualmente para ti familia bendiciones
Congratulations @bayondalways1! You have completed the following achievement on the Hive blockchain And have been rewarded with New badge(s)
Your next target is to reach 90 posts.
You can view your badges on your board and compare yourself to others in the Ranking
If you no longer want to receive notifications, reply to this comment with the word
STOPTo support your work, I also upvoted your post!
Thank You.. ❤️❤️❤️❤️
All good @bayondalways1! You're amazing on Hive! Don't stop now, achieve that new goal!
muchas gracias 🤗🤗🤗
Son una belleza. La combinación de colores es perfecta. Siempre me ha gustado en azul con rosa, en tonos pasteles. Queda muy tierno.
Tu técnica de combinar la cadena con el alambre es muy linda. Todo es perfecto en estos aretes.
Bueno mi color favorito es el azul .. y de verdad que me encantaron. Me agrada que te gustaron amiga, gracias por tus lindas palabras.. saludos y bendiciones 🤗❤️
WOW! It looks so beautiful and attractive. It can grab anyone's attention. Great job!
Thank you very much, I'm glad you liked it, greetings.
Anything we add to whatever we put together especially if that's to be jewelry, it must show what makes it creative. Chains usually be okay when putting together jewelry but they're usually very expensive.
Thank you friend ... if it is something expensive, thanks for commenting greetings .
@bayondalways1 Hermoso diseño, gracias por compartir tu creación, excelente trabajo, Saludos 😊
Gracias amiga.que bueno que te gustaron , gracias por el apoyo.. saludos 🤗❤️