2do Tutorial: cómo hacer un zorro con estilo arte geométrico. - 2th Tutorial: how to make a fox in geometric art style.


Hola a todos!
En este post, continuo explicando como realizar una imagen de un zorro con arte geométrico.
Pero antes de comenzar, quisiera contarles algunos datos curiosos de este hermoso animal salvaje, para empezar es uno de mis caninos favoritos, así es, proviene de la familia de lobos y hay muchos tipos de zorros dependiendo de la zona geográfica en la que se encuentren tendrán rasgos distintos.
Entre otras características se encuentran que son animales solitarios a la hora de moverse y cazar sus presas, son animales pequeños casi del tamaño de un perro mediano y utilizan distintos sonidos para comunicarse.
Pero lo que más me sorprende, es que estos animales saben guiarse por el campo magnético de la tierra para encontrar a las presas, saber en donde están y medir distancias.
Una vez dada esta breve introducción les dejo con el paso a paso de este dibujo geométrico.
Hello everyone!
In this post, I continue explaining how to make an image of a fox with geometric art.
But before I start, I would like to tell you some curious facts about this beautiful wild animal, for starters it is one of my favorite canines, that's right, it comes from the wolf family and there are many types of foxes depending on the geographical area in which they are located they will have different features.
Among other characteristics are that they are solitary animals when moving and hunting their prey, they are small animals almost the size of a medium dog and use different sounds to communicate.
But what surprises me the most is that these animals know how to be guided by the earth's magnetic field to find their prey, know where they are and measure distances.
After this brief introduction I leave you with the step by step of this geometric drawing.
Como acostumbro, los pasos previos a iniciar un dibujo son colocar las medidas de mi preferencia al formato de la hoja y el fondo el gris, esto es opcional y a gusto del dibujante.
Luego de tener esta base, pasamos a bloquear el fondo para evitar trabajar en ella por error y con esto correr el riesgo de perder nuestro trabajo.
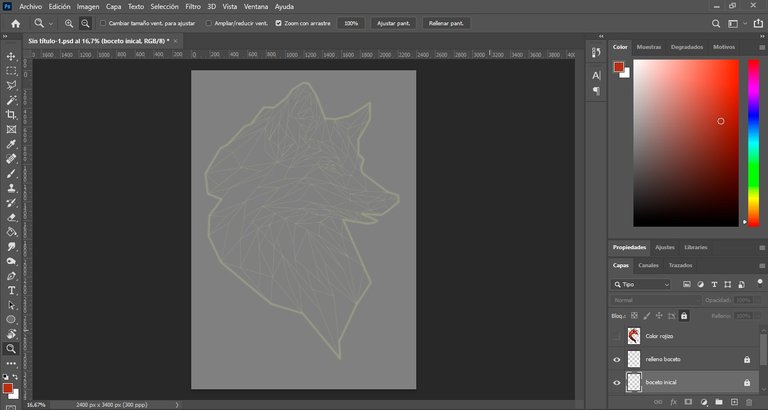
El segundo paso sería crear una capa para el boceto, en mi caso siempre hago un boceto inicial para delimitar las zonas de la hoja que utilizaré para reproducir el dibujo, recordando que todo el boceto lo realizo con la herramienta pluma.
As I usually do, the previous steps to start a drawing are to place the measures of my preference to the format of the sheet and the gray background, this is optional and to the draftsman's taste.
After having this base, we move on to block the background to avoid working on it by mistake and thus run the risk of losing our work.
The second step would be to create a layer for the sketch, in my case I always make an initial sketch to delimit the areas of the sheet that I will use to reproduce the drawing, remembering that all the sketch is made with the pen tool.

Una vez listo el boceto inicial, creare otra capa en donde terminare el boceto rellenando por dentro de las líneas guía que dibuje con anterioridad.
Once the initial sketch is ready, I will create another layer where I will finish the sketch by filling inside the guide lines I drew previously.
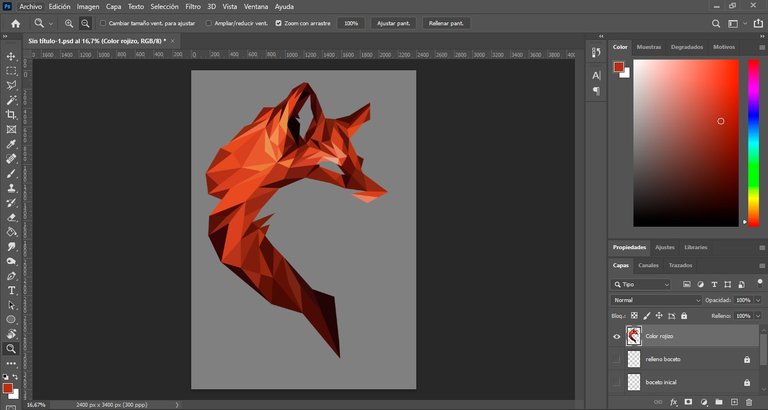
Terminado el boceto, bloqueamos esas capas y creamos otras en donde se colocaran los colores pertinentes del dibujo, al igual que en las publicaciones anteriores nos ayudaremos con las líneas guías de nuestro boceto, con la herramienta de lazo poligonal y con la herramienta de cuentagotas.
Once the sketch is finished, we lock those layers and create others where the relevant colors of the drawing will be placed, as in the previous publications we will help ourselves with the guide lines of our sketch, with the polygonal lasso tool and with the eyedropper tool.
Nos enfocamos en el color rojizo de nuestro zorro.
We focus on the reddish color of our fox.
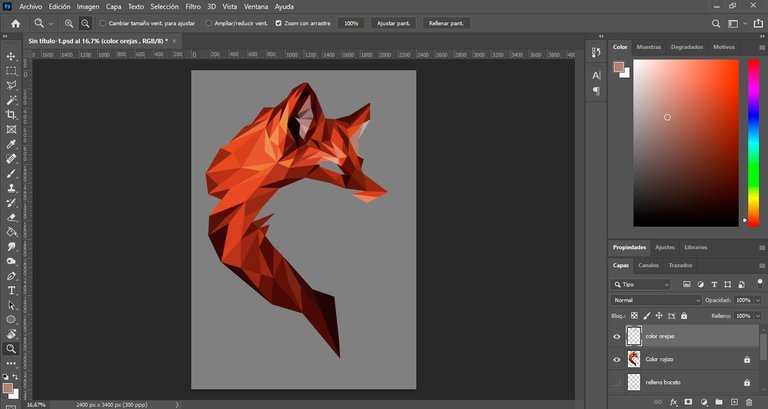
Luego, nos enfocamos en los colores de las orejas.
Next, we focused on ear colors.
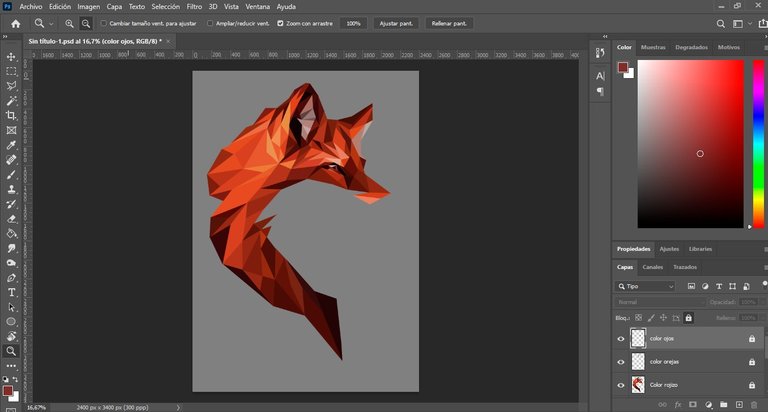
En esta imagen haremos los colores del ojo.
In this image we will make the colors of the eye.
Comenzamos con los colores grises del hocico.
We start with the gray colors of the muzzle.

Finalizamos terminando los colores grises del pelaje.
We finish by finishing the gray colors of the coat.

Al terminar de colocar los colores, bloqueamos la capa y nos preocupamos por crear algunos detalles en el fondo, siendo este el resultado final:
When we finish placing the colors, we lock the layer and we worry about creating some details in the background, being this the final result:
Para este final, se opto por usar un fondo con colores naranjas en degradado y hacer este paso lo más simple posible para que se detallen mejor las figuras dentro del zorro.
For this final step, we chose to use a background with orange gradient colors and make this step as simple as possible to better detail the figures inside the fox.
Espero les sea de utilidad este paso a paso sobre como hacer este tipo de dibujo, a modo de resumen nuestras herramientas para trabajar dentro de la aplicación son: pluma, lazo poligonal, el cuentagotas y en esta oportunidad se hizo uso de los colores degradados para el fondo.
Vale acotar que la creación de capas es opcional, esto lo hago porque si al final del dibujo quisiera cambiar algo que se encuentra en el principio lo puedo cambiar fácilmente sin regresar todos los pasos.
Estuve aproximadamente 1 día realizando este dibujo, claramente no en su totalidad porque tenía mis momentos de descanso ante el computador recordando que cada obra amerita tiempo, paciencia y mucho detalle.
Espero les guste, muchas gracias por su apoyo y hasta la próxima!
I hope this step by step guide on how to make this type of drawing is useful, as a summary our tools to work within the application are: pen, polygonal lasso, the eyedropper and in this opportunity we made use of the gradient colors for the background.
It is worth mentioning that the creation of layers is optional, I do this because if at the end of the drawing I want to change something that is in the beginning I can easily change it without going back through all the steps.
I was approximately 1 day making this drawing, clearly not in its totality because I had my moments of rest in front of the computer remembering that each work deserves time, patience and a lot of detail.
I hope you like it, thank you very much for your support and see you next time!

- Laptop hp I3
- Mouse
- Programa Adobe Photoshop 2021
- Las imágenes aquí publicadas son contenido original.
- La referencia utilizada, se tomo de https://www.pinterest.es
- Mi lengua materna es el español, el traductor utilizado para la versión en ingles es: https://www.deepl.com
- Los banners de bienvenida y despedida son de mi creación con la ayuda de la página web https://www.canva.com
- La estructuración del post se realizo con el Tutorial de Markdown: https://peakd.com/hive-174578/@victoriabsb/tutorial-de-markdown-completo-or-traduccion-autorizada?fbclid=IwAR1K4xyC4hIjZeRCVsXDFOjPWEdxioDKZcrDO5PQ-U9WqFrXnh8QbcGzxkQ
- Laptop hp I3
- Mouse
- Programa Adobe Photoshop 2021
- The images published here are original content.
- The reference used was taken from https://www.pinterest.es.
- My native language is Spanish, the translator used for the English version is: https://www.deepl.com
- The welcome and farewell banners were created by me with the help of the website https://www.canva.com.
- The structuring of the post was done with the Markdown Tutorial: https://peakd.com/hive-174578/@victoriabsb/tutorial-de-markdown-completo-or-traduccion-autorizada?fbclid=IwAR1K4xyC4hIjZeRCVsXDFOjPWEdxioDKZcrDO5PQ-U9WqFrXnh8QbcGzxkQ
Genial! bellísimo tu zorro!
Maravilloso trabajo amiga @andreany a mí me encantó el acabado final. Me gustó la información adicional acerca de los zorros, son unos animales muy interesantes.
bastante genial! E interesante, este arte geométrico!
me encantan!
Me encanta, siempre he querido aprender a hacer estas cosas... no me quedo claro como haces las lineas de adentro que luego coloreas.. pero te quedo muy bonito.. saludos
Congratulations @andreany! You have completed the following achievement on the Hive blockchain and have been rewarded with new badge(s):
Your next target is to reach 1000 upvotes.
You can view your badges on your board and compare yourself to others in the Ranking
If you no longer want to receive notifications, reply to this comment with the word
STOPCheck out the last post from @hivebuzz:
Support the HiveBuzz project. Vote for our proposal!