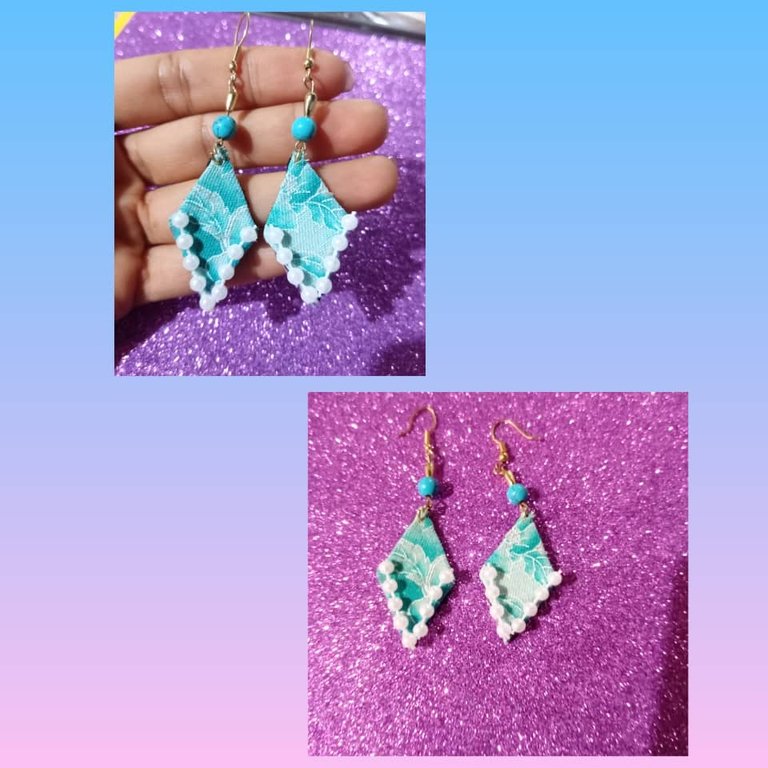
(ESP/ENG) Lindo arete de forma de rombo hechos con telas para lucir con estilo y elegancia// Cute diamond-shaped earrings made with fabrics to look stylish and elegant.
Mi versión español.
¡Bienvenido a mi blog!
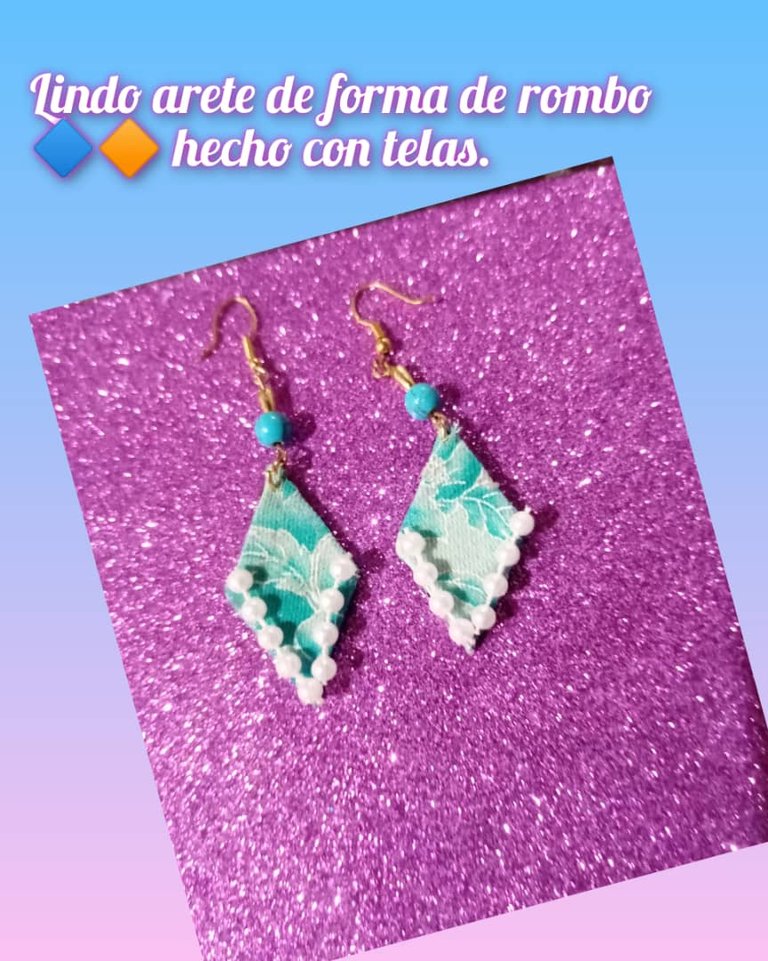
Hola a toda mi gente de esta comunidad, @jewelry, es un placer y un gusto de esta de nuevo con ustedes compartiendo mi creatividades, esta ocasión le traigo, unos lindo aretes de forma de rombo hecho con tela para usar en cualquier ocasión, para elaborar esto lindo arete utilice, dos pedazo de tela de 15 centímetro cada una de color verde con flores y negra, una horma de forma de rombo anzuelo, argolla, tijera, silicona, mostacilla de color verde, dos lagrimal dorada, pedazo de cartulina, pinza, lápiz, aguja grande. Esto lindo arete son ideales para llevarlo en cualquier ocasión que se te presente, son muy sencillo y fácil de hacer, también sirve para un detalle para una amiga que le guste anda muy coqueta y muy elegante o simplemente en día a día, te invito a reciclar y hacer bisutería con tus propia manos.
Empecemos a mostrarle los materiales y el paso a paso de este lindo accesorios.
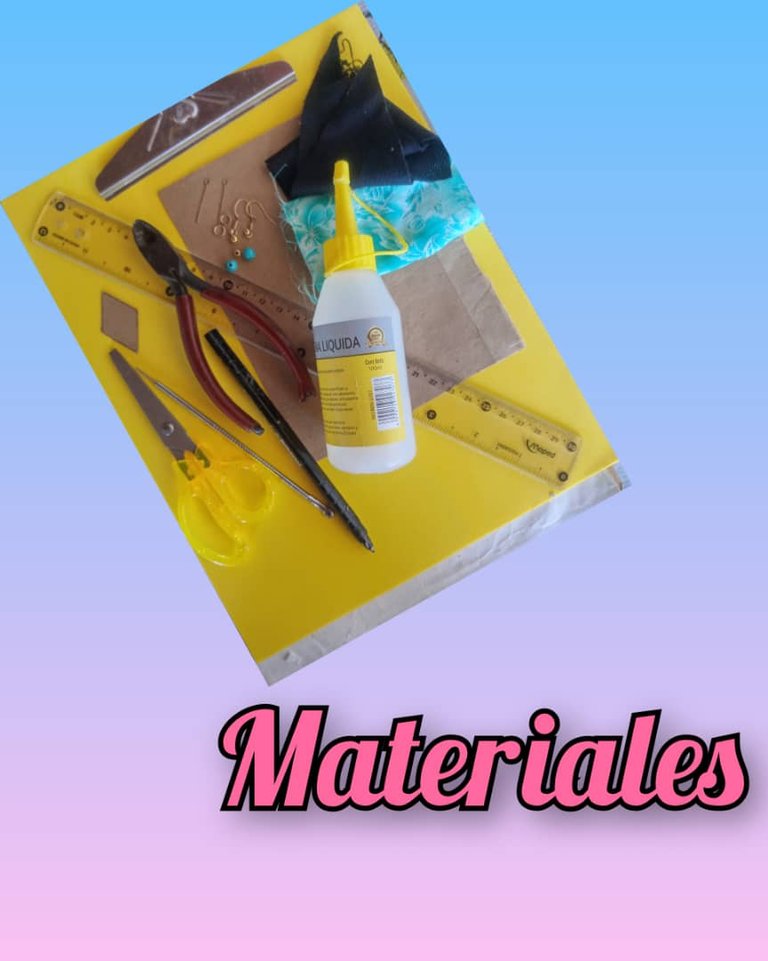
Materiales.
- 2 Retazos de tela.
- 1 horma tipo rombo.
- 2 mostacillas de color verde.
- 2 lagrimas dorada.
- 1 pedazo de cartulina marrón.
- 2 argollas.
- 2 bastoncillos.
- 2 anzuelos para zarcillos.
- 1 tijera.
- 1 silicona.
- 1 pinza.
- 1 bolígrafo.
- 1 aguja grande.
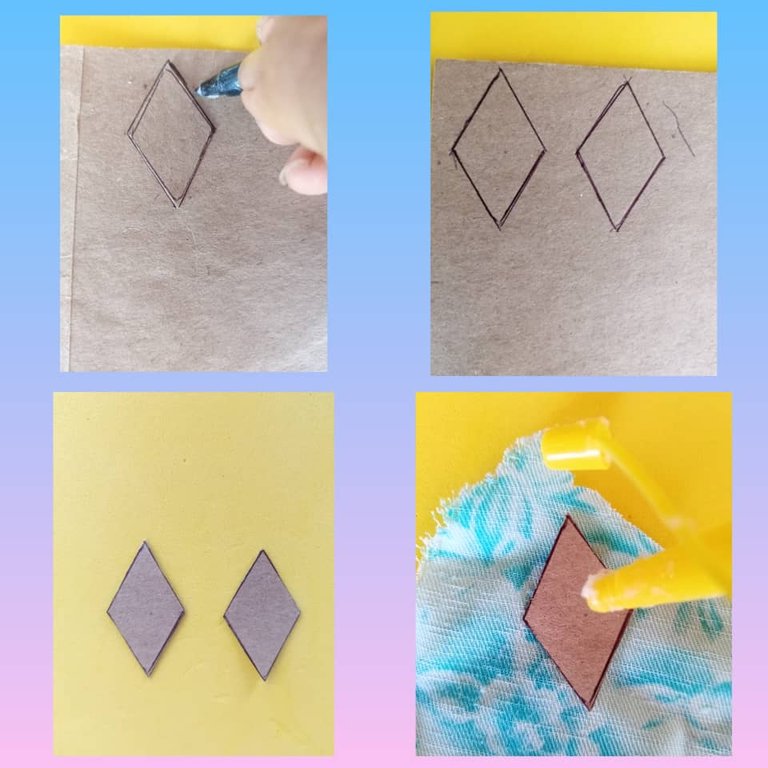
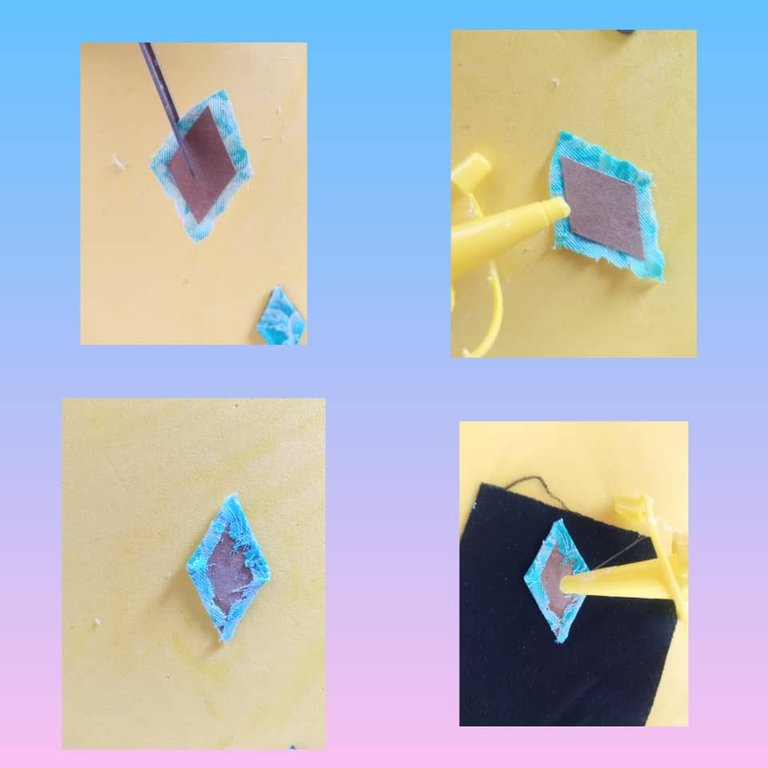
Paso 1.
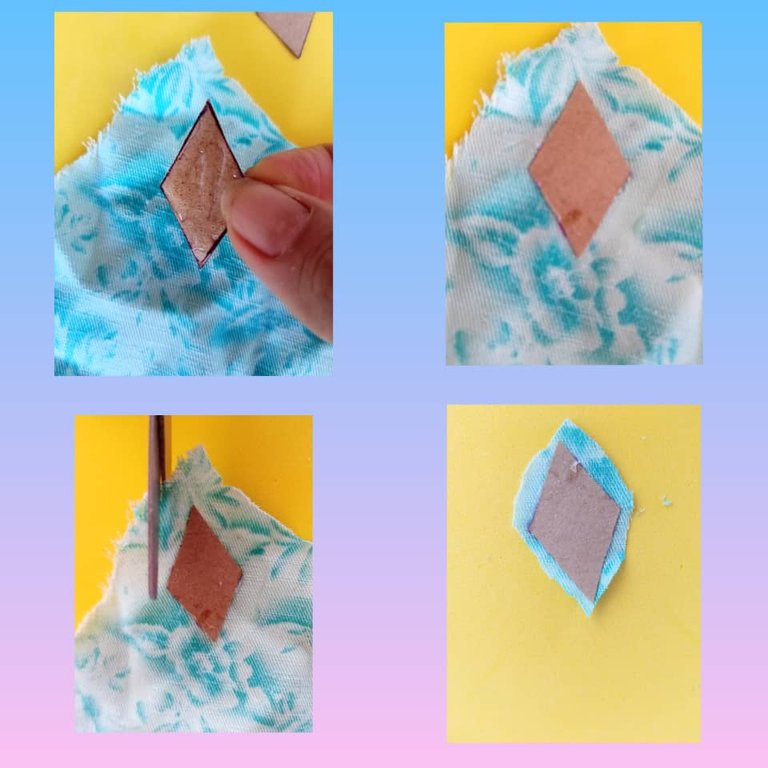
Tomo la figura de forma de rombo y la marcamos en la cartulina, marcamos el par de zarcillos, lo recortamos con la tijera.
Agarro la figura y la pego en la tela que selecciones para hacer los aretes la verde, recortar dejando aproximadamente 5 milímetros de distancias.
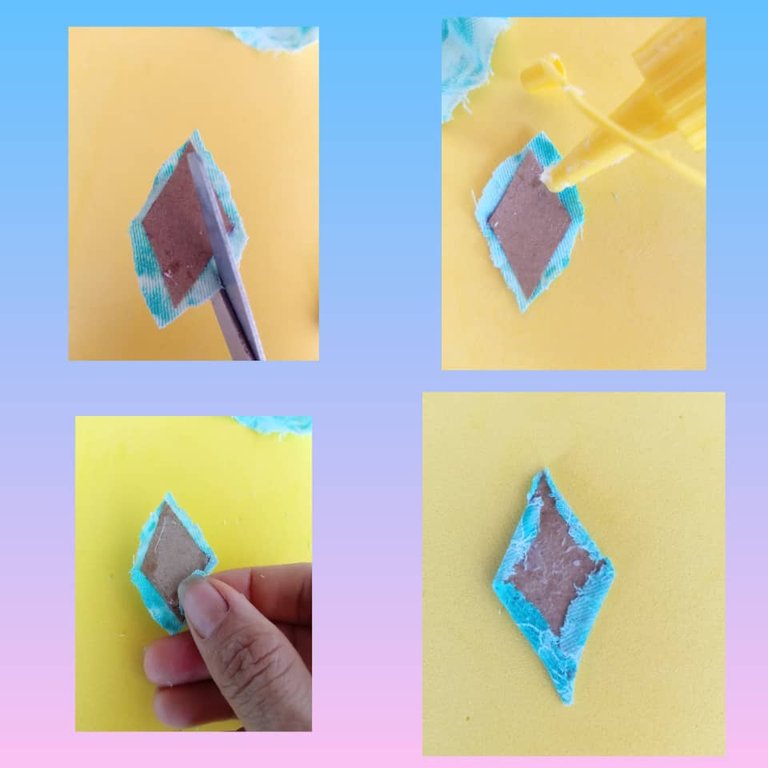
Paso 2.
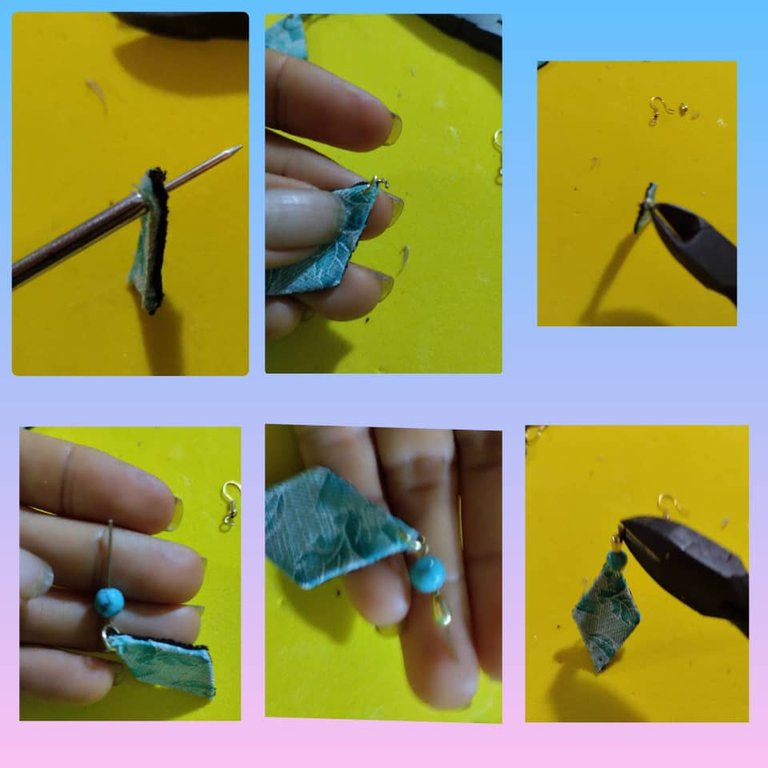
En la tela sobrante recortamos, varios picos alrededor de la pieza, colocar silicón y pegar la parte trasera del zarcillo.
Ahora tomo el pedazo de tela de color negro y marco la figura le añado silicón y pegamos y tapamos la parte trasera del zarcillos vea como va agarrando forma.
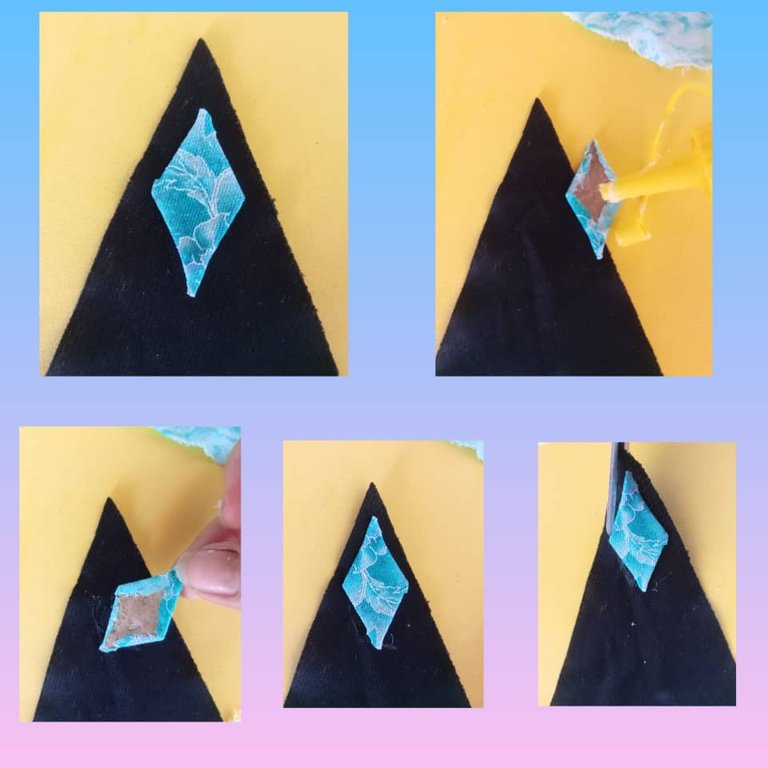
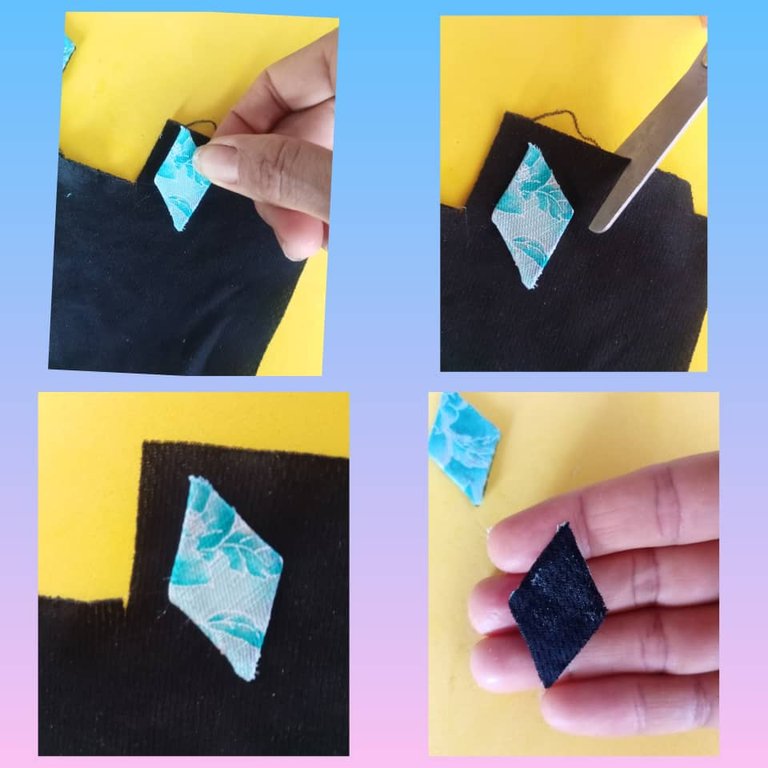
Paso 3.
Empezamos hacer el segundo arete, hacemos el mismo procedimiento agarramos la figura de rombo y la pego con el silicón en la tela, luego la recortamos con la tijera, dejamos 5 milímetro le recortamos varios pico alrededor, se le añade silicón y lo pegamos en la parte de atrás del zarcillo.
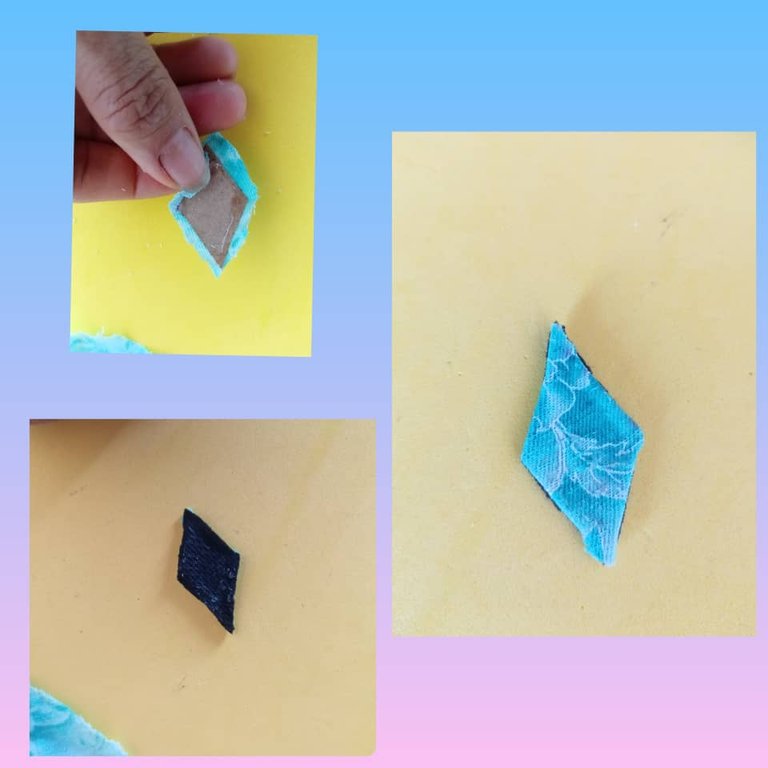
Ahora tomo la tela de color negro le agrego silicón al zarcillo lo pego en la tela negra y lo recortamos con la tijera tapamos la parte trasera del zarcillo. Vea que tengo mi segundo zarcillo listo.
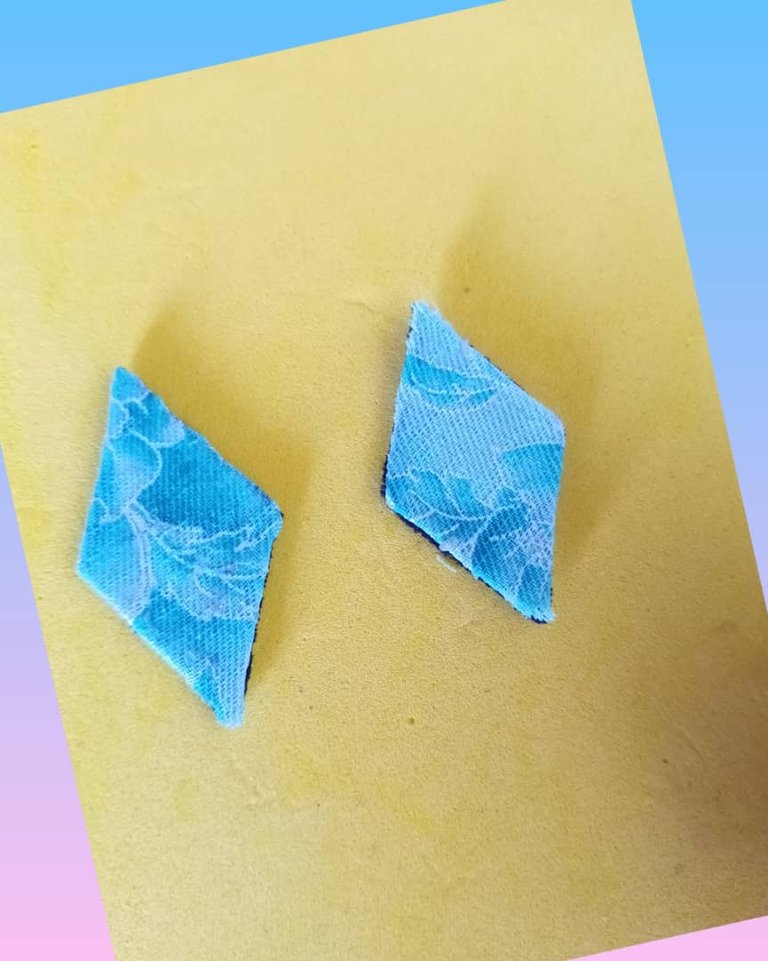
Tengo el par de arete listo para empezar arma los aretes.

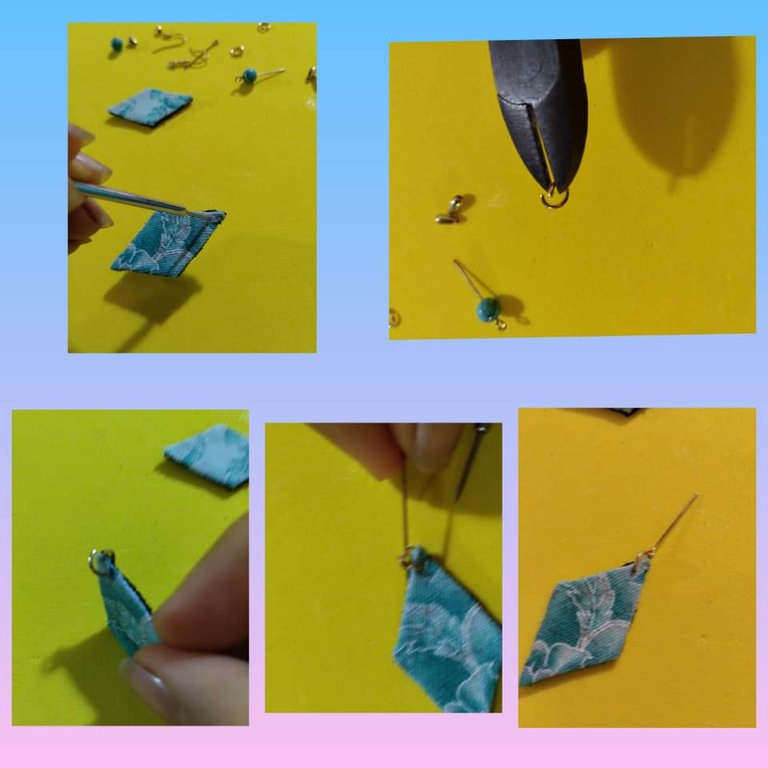
Paso 4.
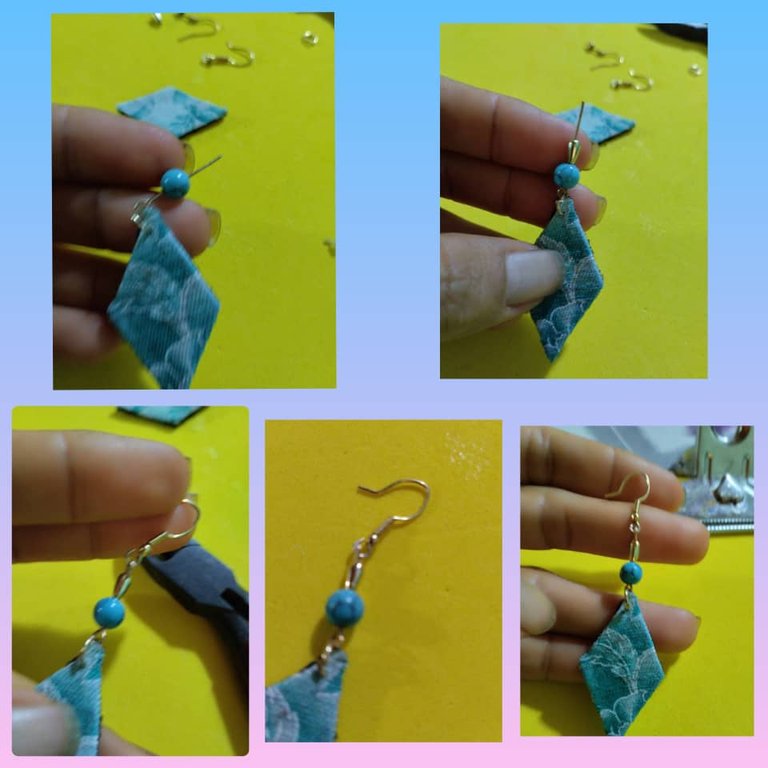
Con una aguja grande perforar la parte de arriba del zarcillo para colocar el aro y el bastoncillo, con la ayuda de la piza abrimos el aro introducimos el bastoncillo cerramos el aro con la pinza.
Introducimos la cuenca en el bastoncillo y la lagrima dorada con la ayuda de una pinza doblamos el bastoncillo hacemos un aro, introducimos en anzuelo y cerramos con la pinza y tengo mi primer zarcillos listo.
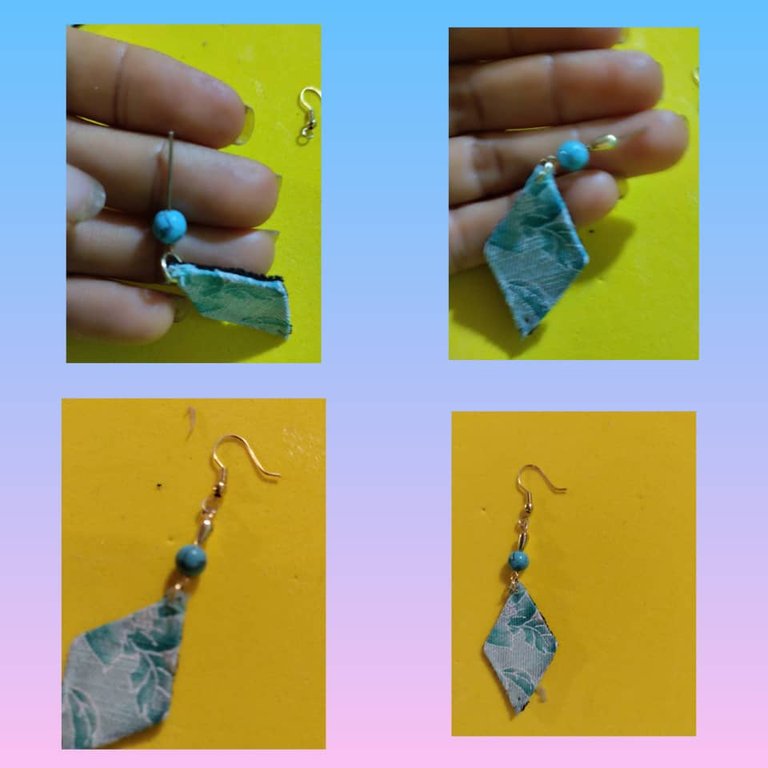
Para hacer el segundo zarcillos hacemos el mismo procedimiento. Tengo mi par de zarcillos listo.
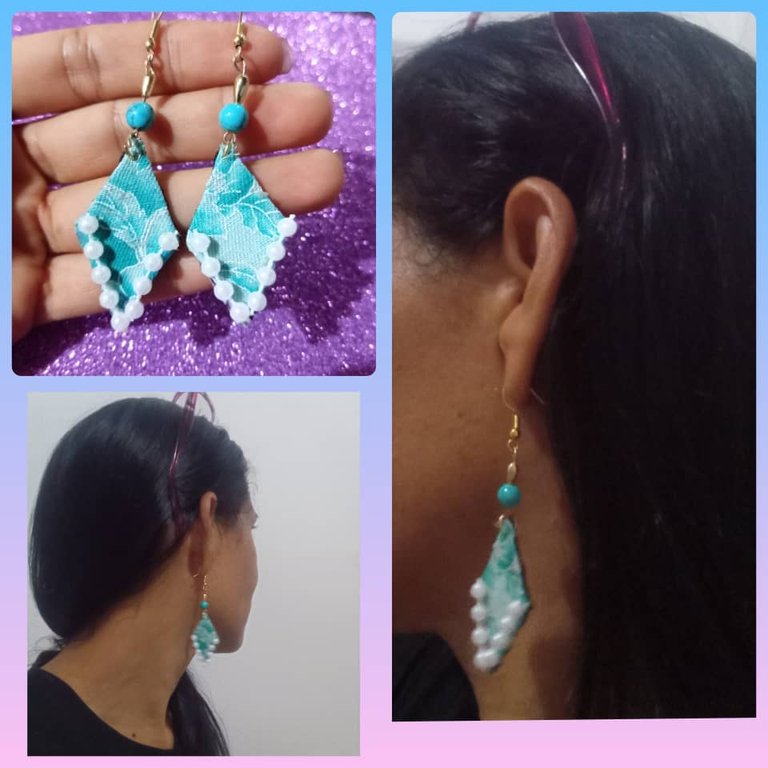
Lo decoro con perla corrida por la parte de abajo del zarcillo para darle un toque de elegancia. Vea como quedaron bellos y elegante
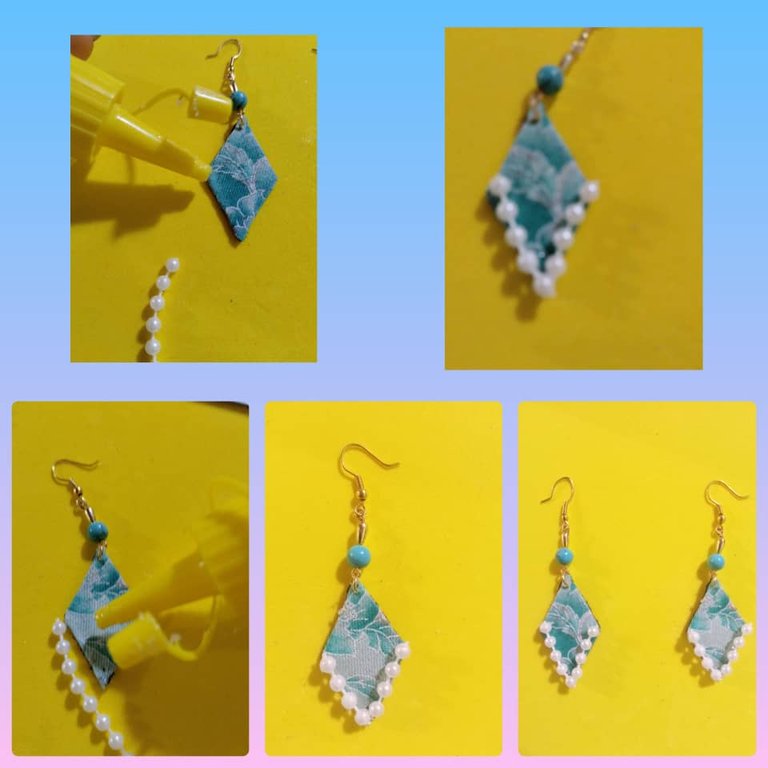
- Vea el proceso final mi lindo arete de forma de rombo hecho con tela para llevarlo en cualquier ocasión con elegancia y estilo.
Tenga un feliz días y bendecidos para todos muchas gracias por leer mi post.

Las fotos son mías, tomadas con teléfono alcatel , editadas con incollage y traducidas con Deepl.
Mi versión ingles.
¡Bienvenido a mi blog!
Hello to all my people of this community, @jewelry, it is a pleasure and a pleasure of this again with you sharing my creativities, this occasion I bring you, some cute diamond shaped earrings made with fabric to use in any occasion, to make this cute earring I used two pieces of fabric of 15 centimeters each, green with flowers and black, a rhombus shaped last, hook, ring, scissors, silicone, green clay, two golden tear drop, piece of cardboard, tweezers, pencil, large needle. This cute earrings are ideal to wear on any occasion that comes your way, they are very simple and easy to make, also serves as a detail for a friend who likes to walk very flirty and very elegant or simply in day to day, I invite you to recycle and make jewelry with your own hands.
Let's start showing you the materials and step by step of this cute accessory.
Materials.
- 2 Fabric scraps.
- 1 diamond shape last.
- 2 green beads.
- 2 golden teardrops.
- 1 piece of brown cardboard.
- 2 rings.
- 2 sticks.
- 2 hooks for earrings.
- 1 scissors.
- 1 silicone.
- 1 tweezers.
- 1 ballpoint pen.
- 1 large needle.
Step 1.
I take the diamond shaped figure and mark it on the cardstock, mark the pair of tendrils, cut it out with the scissors.
I grab the figure and glue it on the fabric you select to make the earrings the green one, cut out leaving approximately 5 millimeters of distances.
Step 2.
On the leftover fabric we cut out, several peaks around the piece, place silicone and glue the back of the tendril.
Now I take the piece of black fabric and mark the figure I add silicone and glue and cover the back of the tendril see how it is taking shape.
Step 3.
We start making the second earring, we do the same procedure we take the rhombus figure and paste it with the silicone on the fabric, then we cut it with the scissors, we leave 5 millimeter we cut several beaks around it, we add silicone and paste it on the back of the tendril.
Now I take the black fabric, add silicone to the tendril, glue it to the black fabric and cut it with the scissors, cover the back of the tendril. See I have my second tendril ready.
I have the earring pair ready to start assembling the earrings.
Step 4.
With a large needle pierce the top of the tendril to place the hoop and the cotton swab, with the help of the pin we open the hoop we introduce the cotton swab we close the hoop with the tweezers.
We introduce the basin in the cotton swab and the golden tear with the help of a tweezers we fold the cotton swab we make a ring, we introduce the hook and we close it with the tweezers and I have my first tendrils ready.
To make the second tendrils we do the same procedure. I have my pair of tendrils ready.
I decorate it with a pearl running along the bottom of the tendril to give it a touch of elegance. See how beautiful and elegant they are
- See the final process my cute diamond shaped earring made with fabric to wear on any occasion with elegance and style.
Have a happy day and blessed to all thank you very much for reading my post.
The photos are mine, taken with alcatel phone , edited with incollage and translated with Deepl.
Que hermosos aretes es impresionante como con unos trozos de tela se pueden lograr accesorios únicos.
Gracias amiga por tu comentario, si con trozos de telas se hace lindo arete. Saludos
Hola, amiga @anacarolina2022 , que bellos aretes , me gustaron mucho. Bendiciones.
Gracias amiga me alegra que te guste mucho. Saludos
Saluditos @anacarolina, se ven muy Sport los aretes y luces muy bien con ellos, feliz día 🤗
Gracias amiga me alegra que te guste, si quedaron muy lindo. Saludos.
The fabrics and the white color pearl beads gave the earrings a good look. That's my cousin's favorite.
si, amigo eso son detalle que hace que la bisuteria sea mas elegante.. Gracias por comentar. Saludos
¡Felicitaciones!
Estás participando para optar a la mención especial que se efectuará el domingo 3 de septiembre del 2023 a las 8:00 pm (hora de Venezuela), gracias a la cual el autor del artículo seleccionado recibirá la cantidad de 1 HIVE transferida a su cuenta.
¡También has recibido 1 ENTROKEN! El token del PROYECTO ENTROPÍA impulsado por la plataforma Steem-Engine.
1. Invierte en el PROYECTO ENTROPÍA y recibe ganancias semanalmente. Entra aquí para más información.
2. Contáctanos en Discord: https://discord.gg/hkCjFeb
3. Suscríbete a nuestra COMUNIDAD y apoya al trail de @Entropia y así podrás ganar recompensas de curación de forma automática. Entra aquí para más información sobre nuestro trail.
4. Visita nuestro canal de Youtube.
Atentamente
El equipo de curación del PROYECTO ENTROPÍA
Gracias por su selecion lo valoro mucho.