(ESP/ENG) Hoy le traigo unas preciosas argollas de mariquita para lucir elegante en cualquier ocasión/Today I bring you some beautiful ladybug earrings to look elegant in any occasion.
Mi versión español.
¡Bienvenido a mi blog!
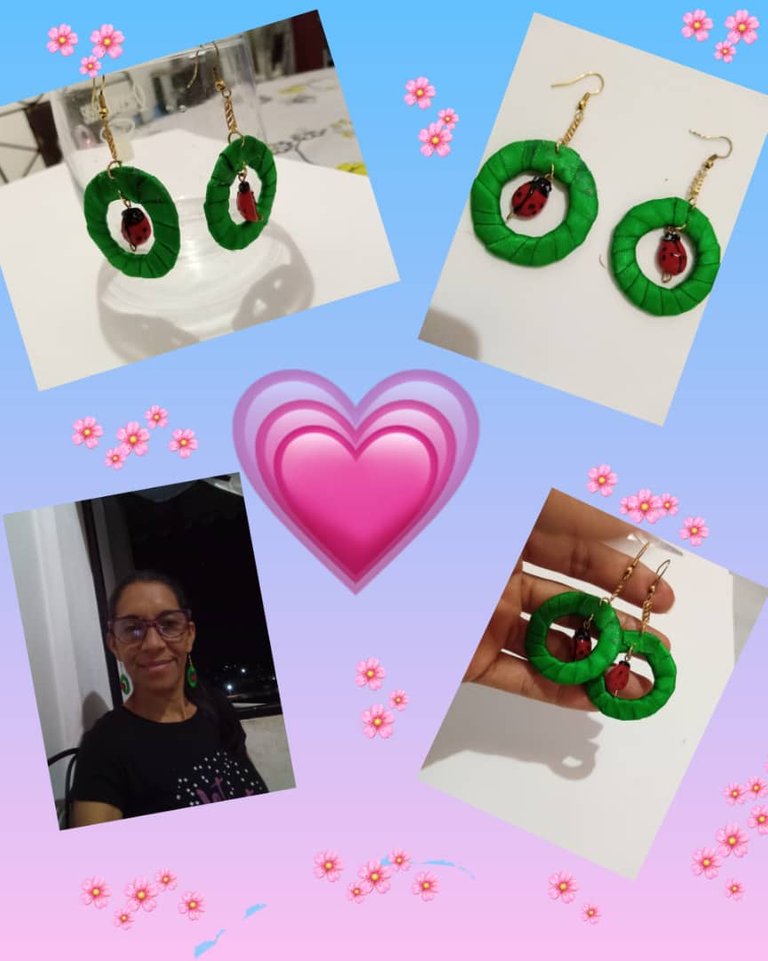
Hola a toda mi gente de esta comunidad, @jewelry, es un placer y un gusto de esta de nuevo con ustedes compartiendo mi creatividades, esta ocasión le diseñe unas preciosas argollas de mariquita para lucir elegante en cualquier ocasión, para elaborar estas lindas argollas utilice, cartulina para sacar la horma en forma de aro, cinta de color verde, dos dijes de mariquita de color rojo, anzuelo de zarcillos, aro, este accesorios son ideales para lucir en cualquier ocasión elegante a la hora de una salida o una fiesta, también un detalle para una amiga o hermana esta ocasión lo diseñe para mi tía, para cuando viaje a Puerto Ordaz a ver a mi familia pasar unos días de vacaciones que me hace bastante falta, espero que le guste yo sé que ella le encanta anda todo el día muy coqueta.
Empecemos a mostrarle los materiales y el paso a paso de este lindo accesorios.
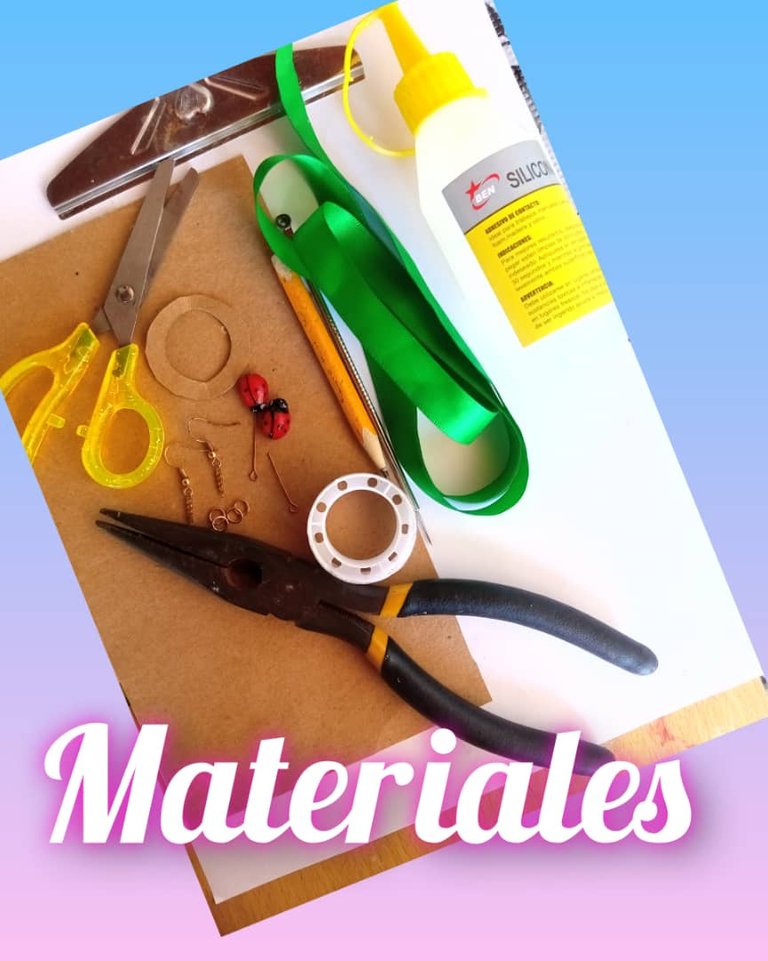
Materiales.
- 1 metro de cinta de raso color verde.
- 1 horma redonda doble.
- 2 anzuelos de zarcillos.
- 4 aros.
- 2 dijes de mariquitas.
- 1 pinza.
- 1 silicón.
- 1 lápiz.
- 1 pedazo de cartulina color marrón.
- 1 tijera.
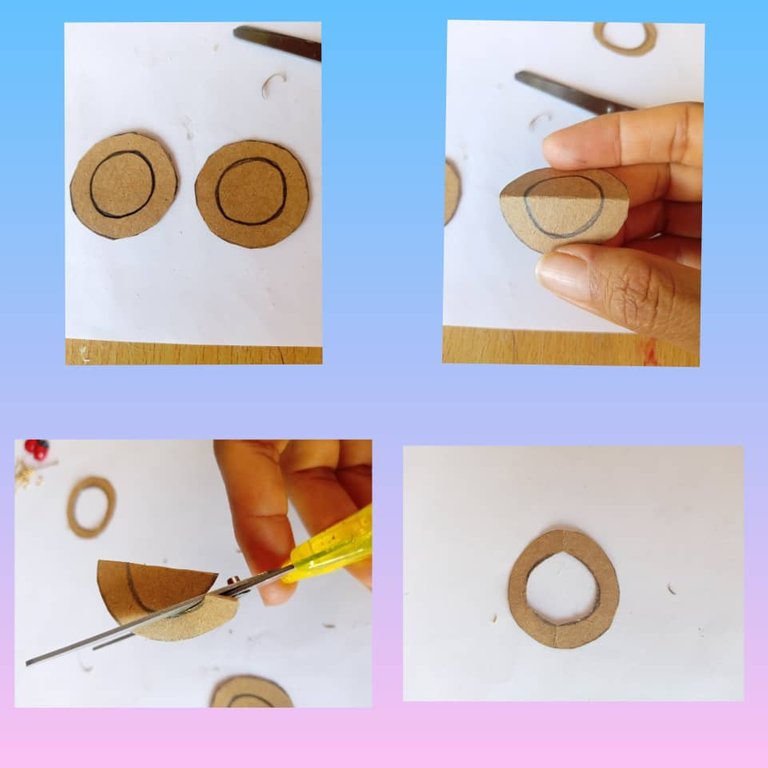
Paso.
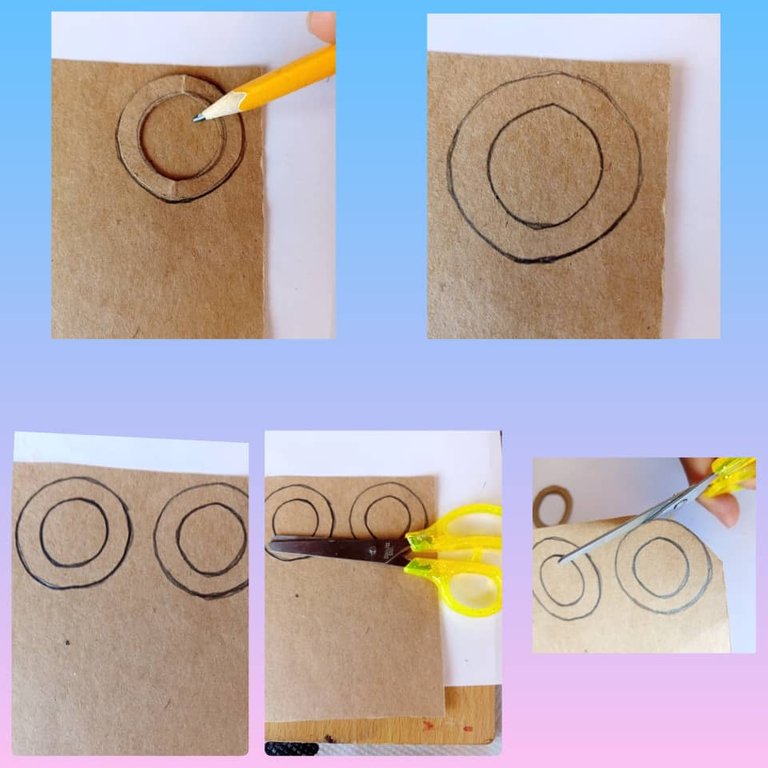
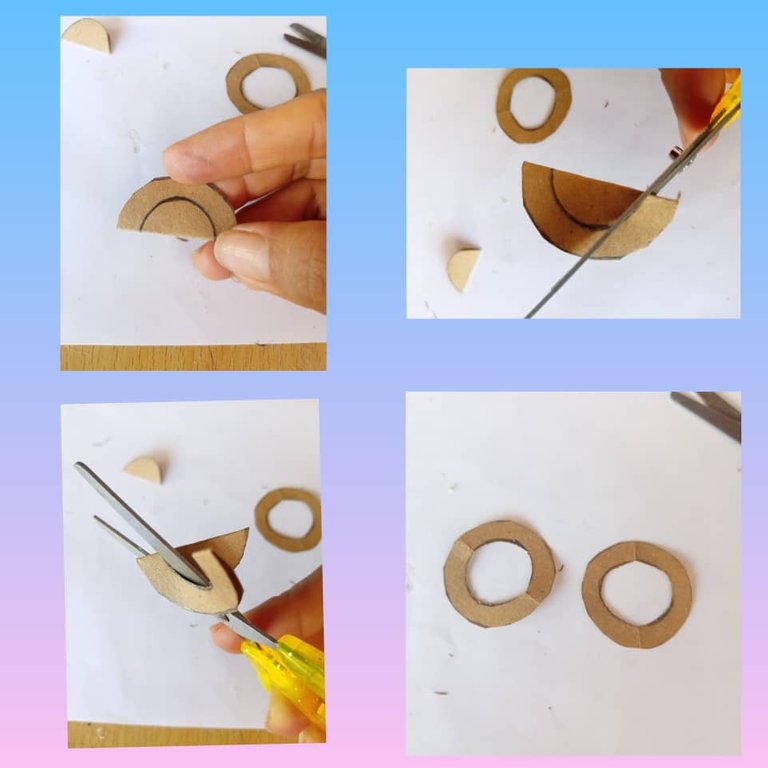
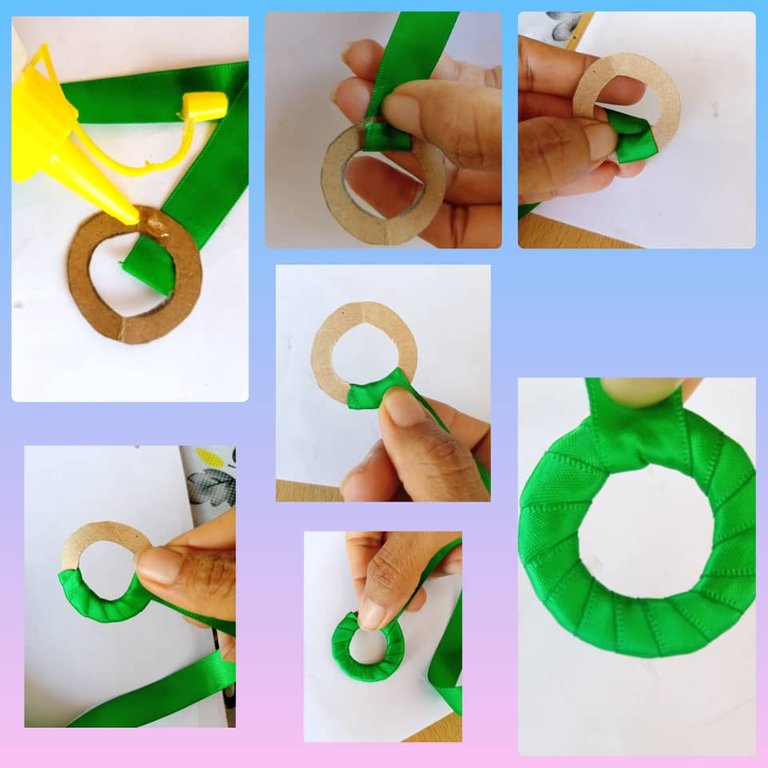
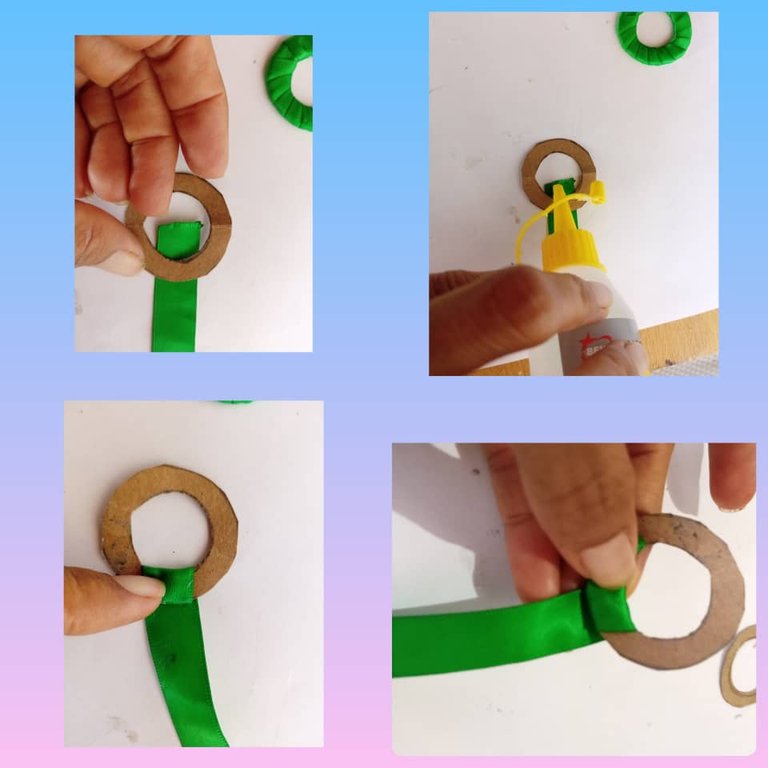
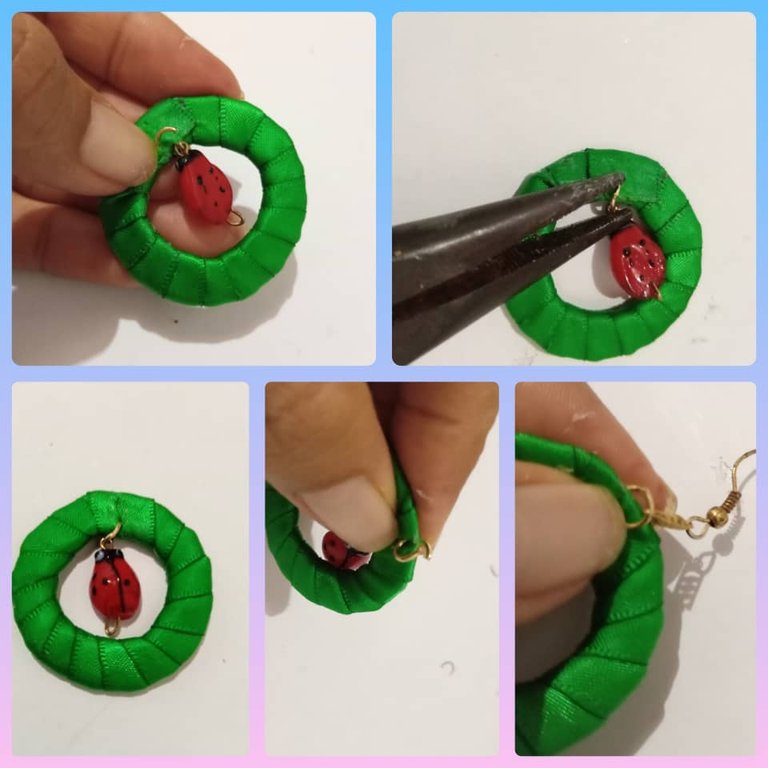
- Empezamos marcando el círculo en la cartulina y lo marcamos doble, hacemos un círculo grande y el medio hacemos otro pequeño, luego lo recortamos, después doblamos la cartulina doble y lo recortamos el círculo del medio quedando un aro.
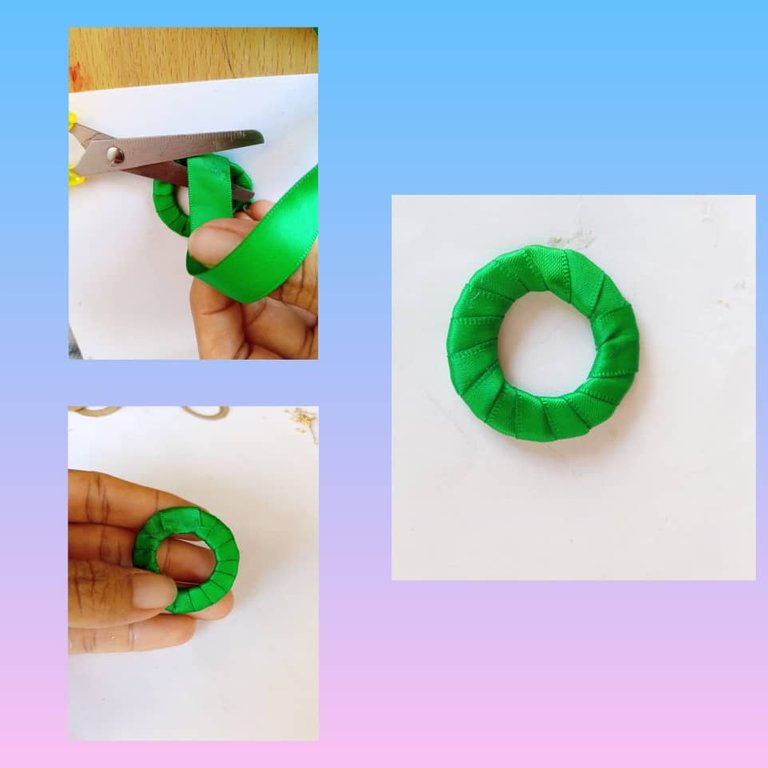
Empezamos a forrar las argollas con la cinta de raso color verde.
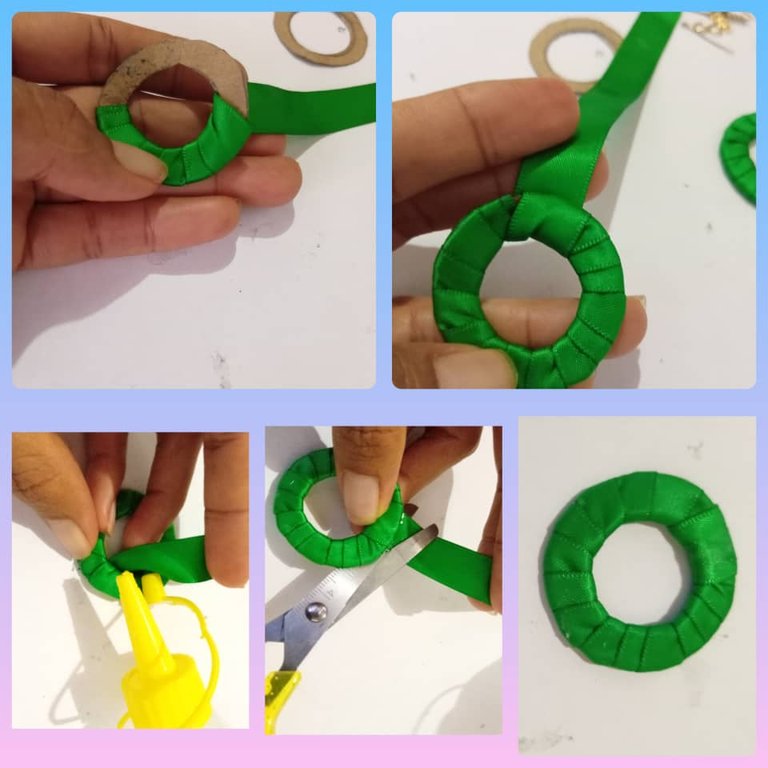
Tomo una argolla y le agrego silicón la punta de la cinta y vamos dando vuelta al círculo con la cinta y ajustamos hasta forrar todo alrededor a llegar al final pegamos la punta de la cinta de raso, para que no se desasga la cinta y recortamos el sobrante.
Tengo mi primera argolla forrada vea como va agarrando forma.
Ahora forramos la segunda argolla, hacemos el mismo procedimientos del primera argolla, le añadimos silicón en la punta de la cinta dejamos que se pegue en el círculo comienzo a darle vuelta con la cinta de raso por todo el alrededor al llegar al final pegamos la cinta para que no se desasga, recortamos la cinta sobrantes.
Tengo mi segunda argolla.
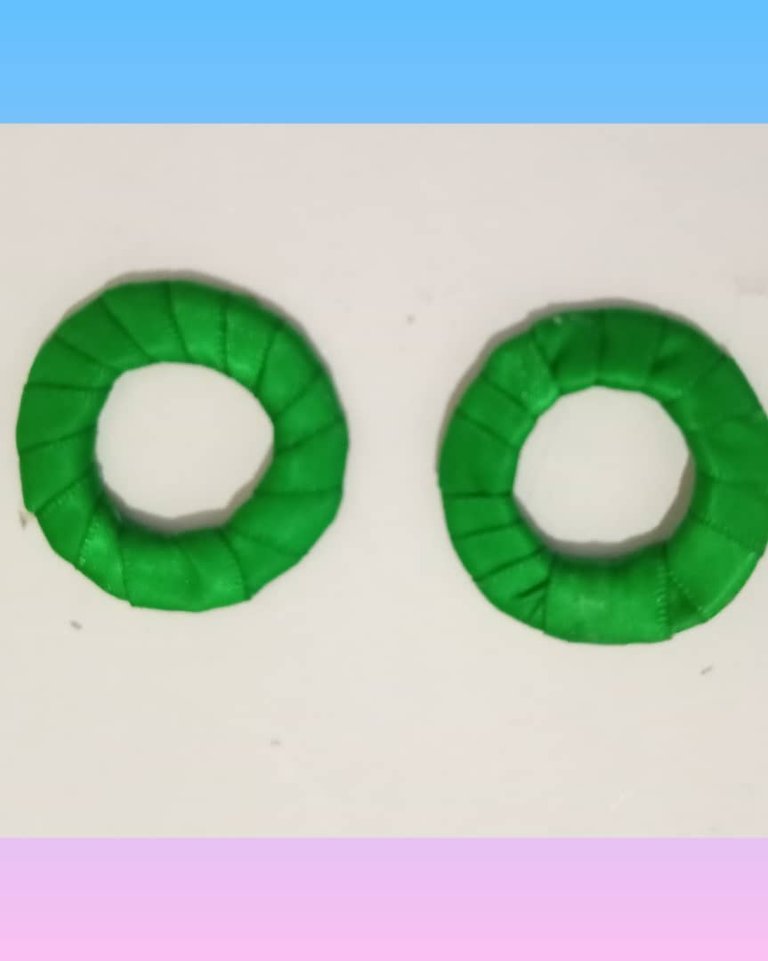
Vea que tengo el par de argollas lista.
Comienzo arma las argollas.
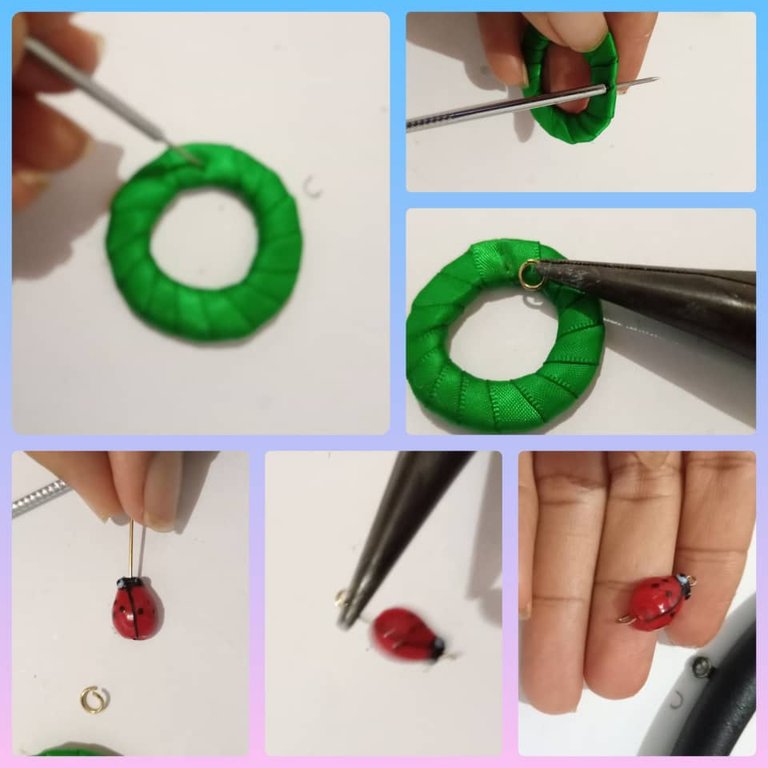
Tomo una argolla y le hacemos dos huequitos con la ayuda de una aguja grande, después introducimos el aro con la ayuda de la pinza, donde va ir el dije de mariquita que es en el centro de la argolla, después tomo el dije de mariquita le introducimos el palito le doblamos la punta con la ayuda de la pinza, por ultimo lo introduzco en el aro lo cerramos con la pinza.
Vea como va agarrando forma.
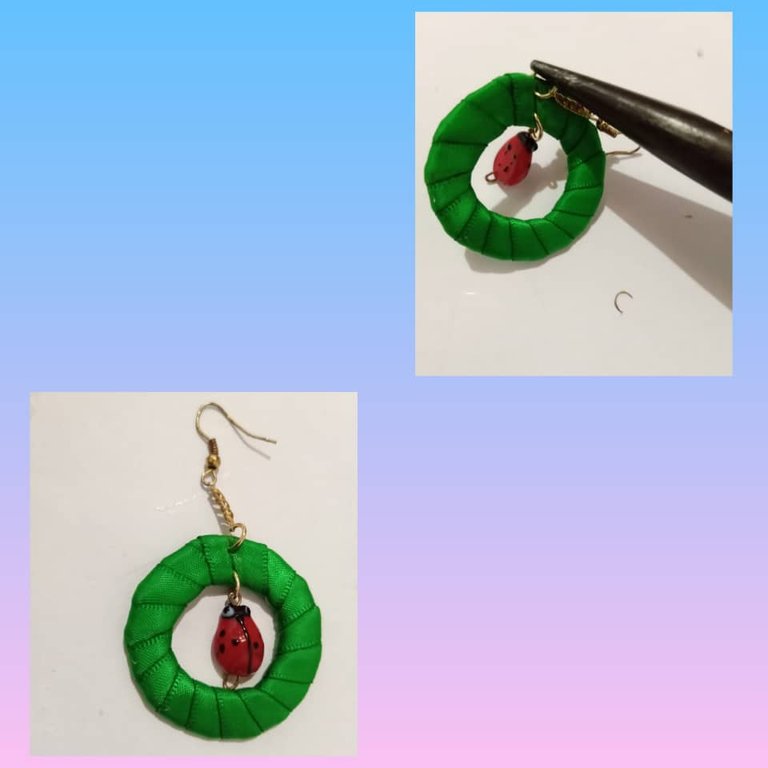
Ahora tomo el segundo aro y lo introduzco en la punta de la argolla, introducimos el anzuelo apretamos y tengo mi primera argolla de mariquita lista.
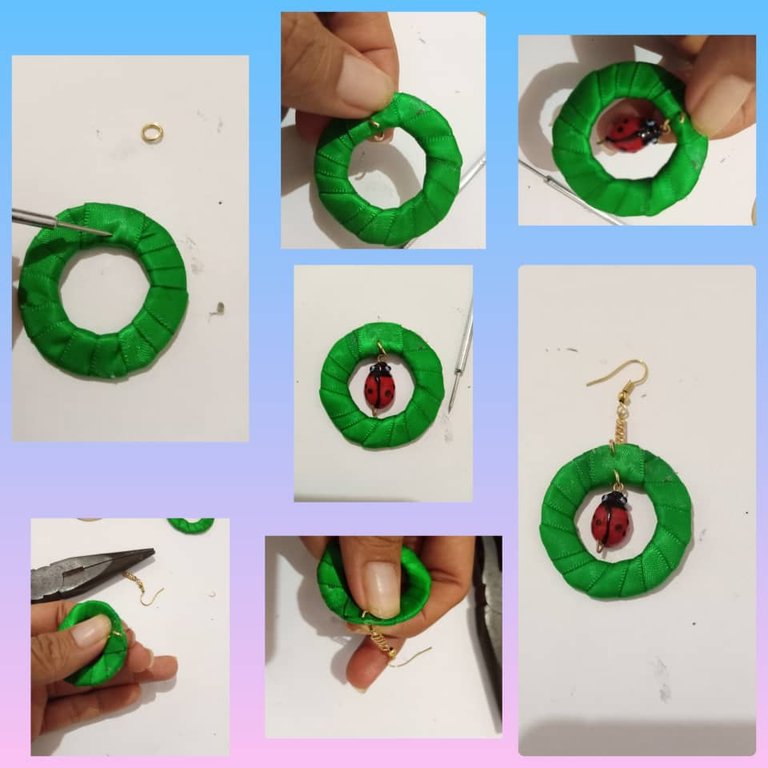
Empezamos hacer la segunda argolla.
- Agarro la argolla y le hago dos huequitos con la ayuda de una aguja gruesa, introducimos el aro, luego el dije de mariquita cerramos el aro con la ayuda de la pinza, después introduzco el segundo el aro en la punta de la argolla introducimos el anzuelo del zarcillo cerramos con la pinza el aro, vea que lindo me quedo mi segunda argolla. Y tengo mi par de argolla lista.
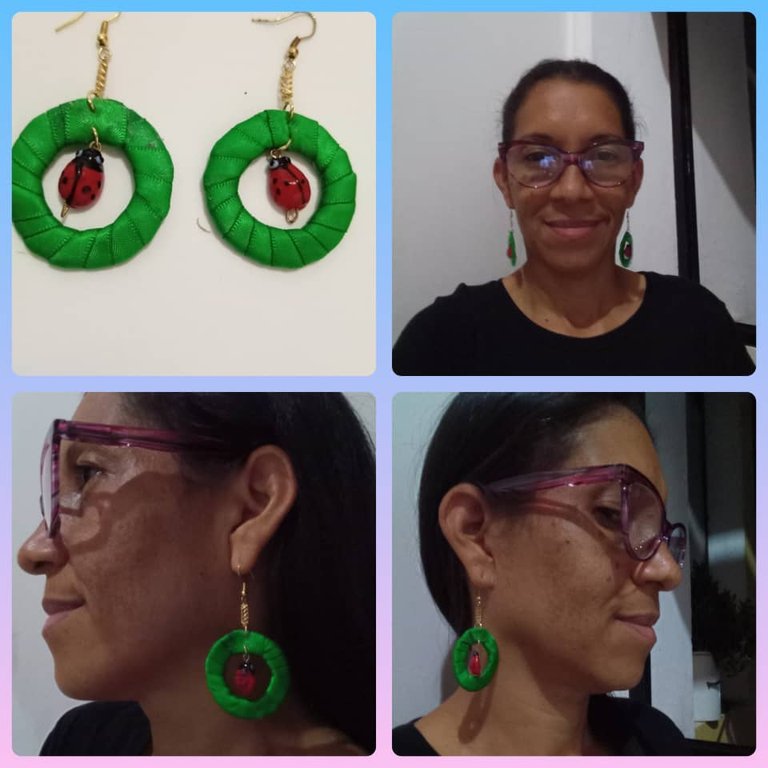
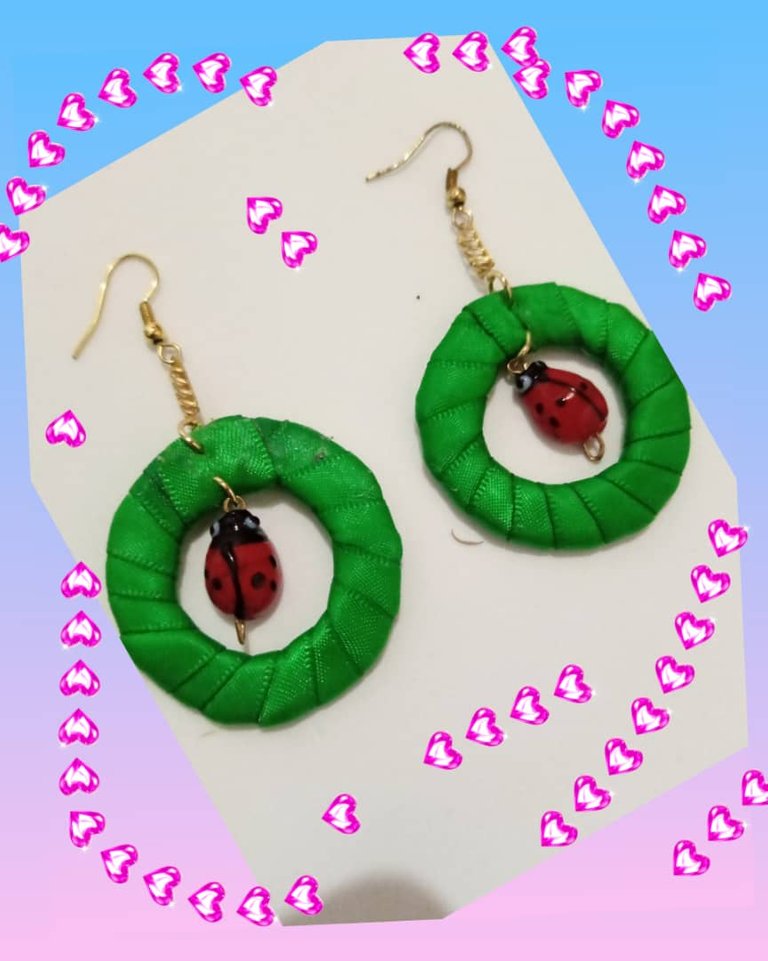
- Vea que linda quedaron mi par de argolla de mariquita para lucir en cualquier ocasión.
Tenga un feliz días y bendecidos para todos muchas gracias por leer mi post.

Las fotos son mías, tomadas con teléfono alcatel , editadas con incollage y traducidas con Deepl.
Mi versión ingles.
¡Bienvenido a mi blog!
Hello to all my people of this community, @jewelry, it is a pleasure and a pleasure to be again with you sharing my creativities, this time I design you some beautiful ladybug earrings to look elegant in any occasion, to elaborate these pretty earrings I use, cardboard to take out the last in the form of a ring, green ribbon, two red ladybug charms, This accessories are ideal to wear in any elegant occasion at the time of an outing or a party, also a detail for a friend or sister this time I design it for my aunt, for when I travel to Puerto Ordaz to see my family spend a few days of vacation that I need, I hope she likes it I know she loves it she walks all day very flirty.
Let's start showing you the materials and step by step of this cute accessory.
Materials.
- 1 meter of green satin ribbon.
- 1 double round last.
- 2 tendrils hooks.
- 4 earrings.
- 2 ladybug charms.
- 1 clothespin.
- 1 silicone.
- 1 pencil.
- 1 piece of brown cardboard.
- 1 scissors.
Step.
- We start by marking the circle on the cardboard and mark it double, we make a big circle and the middle we make a small one, then we cut it out, then we fold the double cardboard and cut out the middle circle leaving a ring.
We start lining the rings with the green satin ribbon.
I take a ring and I add silicone to the tip of the ribbon and we go around the circle with the ribbon and we adjust it until we get to the end we glue the tip of the satin ribbon, so that the ribbon does not come off and we cut the excess.
I have my first ring lined, see how it is taking shape.
Now we cover the second ring, we do the same procedure of the first ring, we add silicone on the tip of the ribbon, we let it stick in the circle, I begin to turn it with the satin ribbon all around, when we reach the end we glue the ribbon so that it does not come undone, we cut the excess ribbon.
I have my second ring.
See that I have the pair of rings ready.
I begin to assemble the rings.
I take a ring and we make two holes with the help of a large needle, then we introduce the ring with the help of the tweezers, where the ladybug charm will go which is in the center of the ring, then I take the ladybug charm we introduce the stick we bend the tip with the help of the tweezers, finally I introduce it in the ring we close it with the tweezers.
See how it takes shape.
Now I take the second ring and I introduce it in the tip of the ring, we introduce the hook, we tighten it and I have my first ladybug ring ready.
Let's start making the second ring.
- I take the ring and I make two holes with the help of a thick needle, we introduce the ring, then the ladybug charm, we close the ring with the help of the pliers, then I introduce the second ring in the tip of the ring, we introduce the hook of the tendril, we close the ring with the pliers, see how beautiful my second ring is. And I have my pair of rings ready.
- See how cute my pair of ladybug hoop earrings turned out to wear for any occasion.
Have a happy day and blessed to all thank you very much for reading my post.
The photos are mine, taken with alcatel phone , edited with incollage and translated with Deepl.
Que argollas tan preciosa. Me gustaron mucho. Gracias amiga @anacarolina2022 por compartir este lindo proyecto. Bendiciones.
Gracias amiga me alegra que te guste. Saludos
Las mariquitas son mis insectos favoritos me encantan, en una ocasio capture una dorada y negra toda un bellaza. Muy lindos zarcillos.
Gracias amiga, me alegra que te guste, si la mariquita son muy linda. Saludos.
Que increíble que lo hayas elaborado con cartulina, y el toque de la mariquita 🐞 me encantó.
Felicidades.
Gracias amiga me alegra que te guste. Saludos
Hola, @anacarolina2022, me gustó mucho la temática de tu manualidad, pues he tenido que elaborarlas de varias formas, pues mi hija de pequeña las usaba de mascotas 😃😃 y todavía le gustan, te quedaron lindos los aretes, saluditos.
Hola buenos días, me alegra qué te guste, a mi hija también le gusta, gracias por leer mi Post. Saludos
Hola @anacarolina2022, es un gusto ver tu trabajo, siempre me han simpatizado las mariquitas, y para ustedes las chicas deben lucir espectacular en esas argollas.
hola @emiliocabrera me alegra que te guste mi trabajo es un placer, gracias por leer mi post. Saludos.