[ENG- ESP] ️ Elegant earrings made with wire and crystals 🌹🌹🍓☺️😉👍💕💖👑 ️ / Elegantes argollas echas con alambre y cristales 🌹🌹🍓☺️😉👍💕💖👑 /@alexanderflx
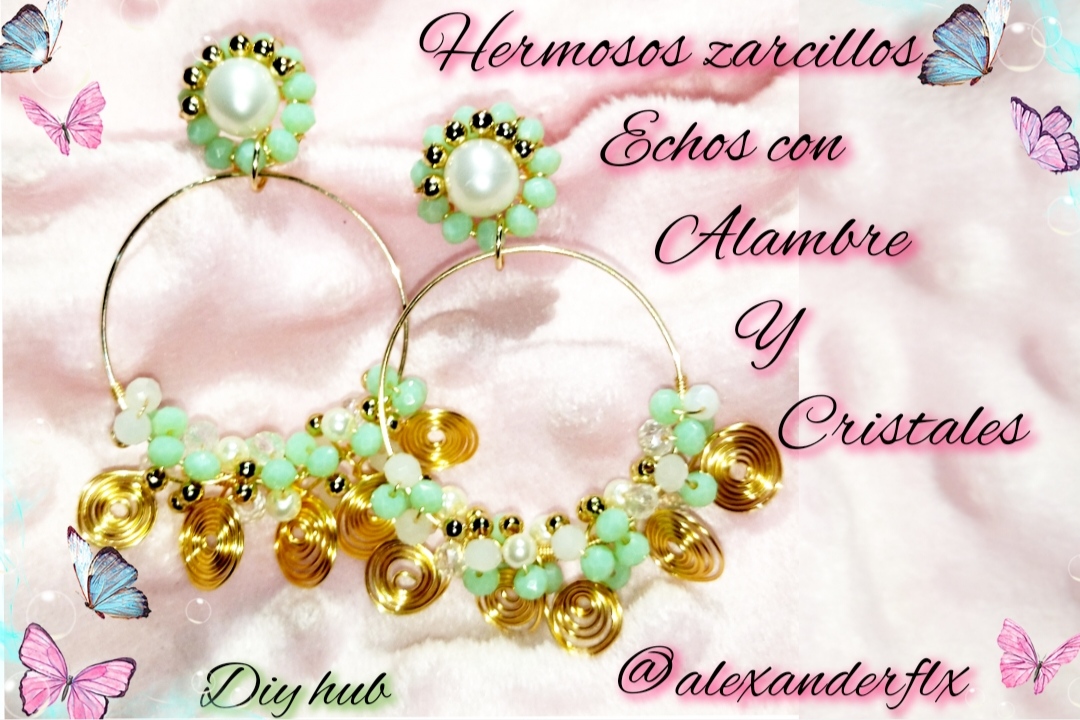
Hello good night dear friends of this beautiful community I hope you are very well, on this beautiful night I want to share with you the elaboration of some beautiful rings made with wire, crystals, pearls, pellets and a lot of love, you know that it will be a very special date and these earrings are made to give away this February fourteenth day of love and friendship 💕💕💖 these earrings would be a very nice gift I didn't want to make them red because I wanted to do something fresher with calmer colors but just as elegant I hope you encourage them to make their own so that they give it to that person they love or also that friend who is always with you, well, without further ado, we will go step by step.
Hola buena noches queridos amigos de esta hermosa comunidad espero se encuentren muy bien, en esta hermosa noche quiero compartir con ustedes la elaboración de unas hermosas argollas echas con alambre, cristales, perlas, balines y muchísimo amor saben que se hacerla una fecha muy especial y estos pendientes están echo para regalar este catorce febrero día del amor y la amistad 💕💕💖 estos pendientes serían un muy lindo regalo no los quise hacer de color rojo porque quería hacer algo mas fresco con colores más tranquilo pero de igual de elegantes espero se animen hacer los suyos para que se lo regalen aquella persona que aman o también aquel amig@ que siempre están con ustedes, bueno sin más que decir pasaremos al paso a paso.💕💖👑👍😉🍓🌹❤️♥️🍓👌🤗
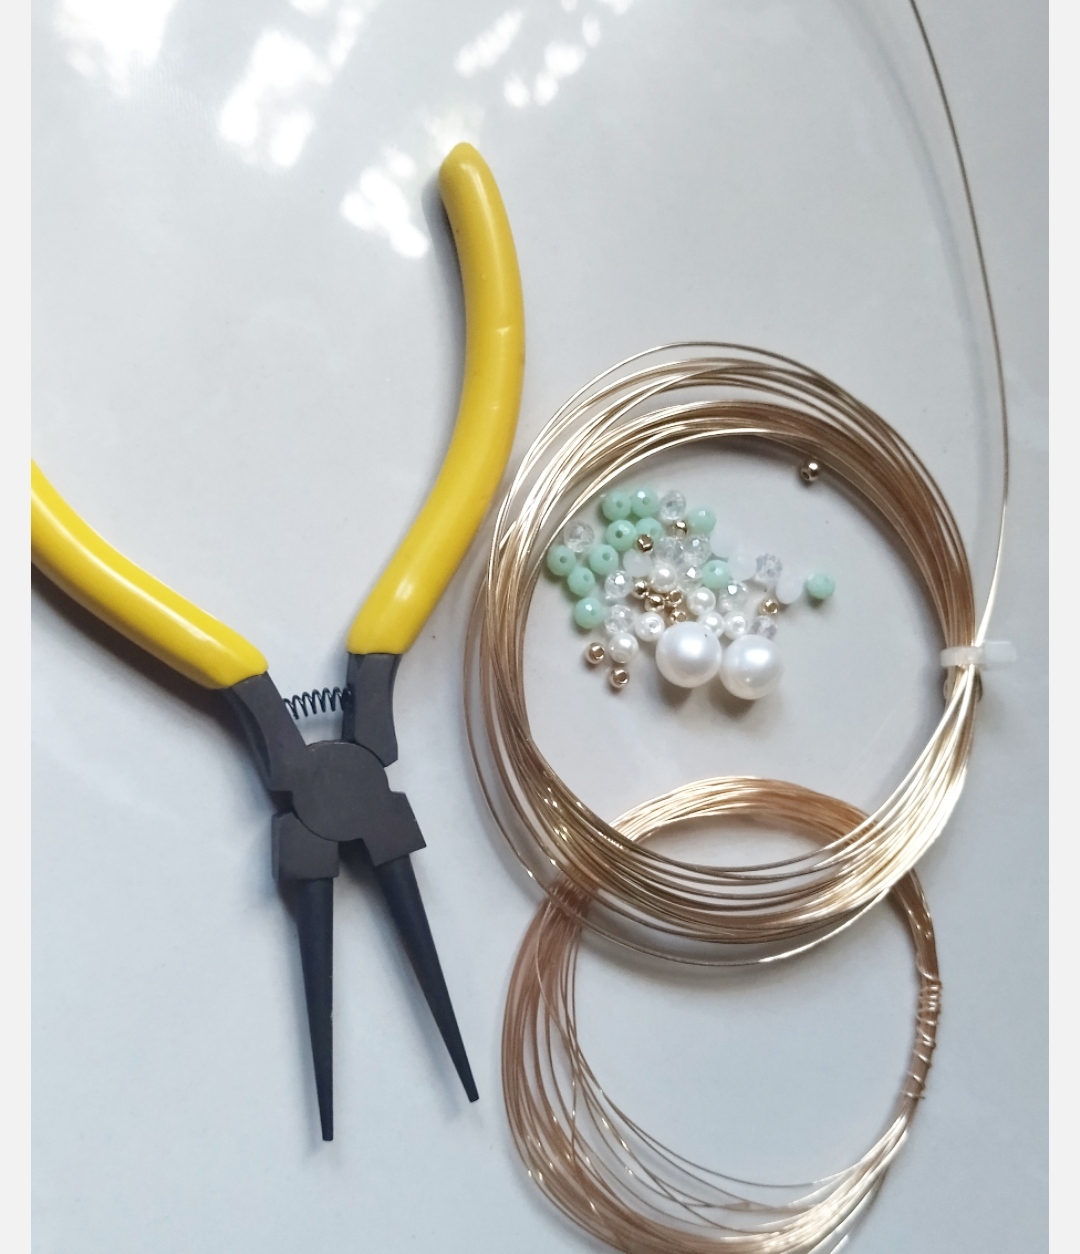
- 26 and 20 gauge wire
- Crystals
- Tweezers
Que necesitamos .
Alambre calibre 26 y 20
Cristales
Pinzas
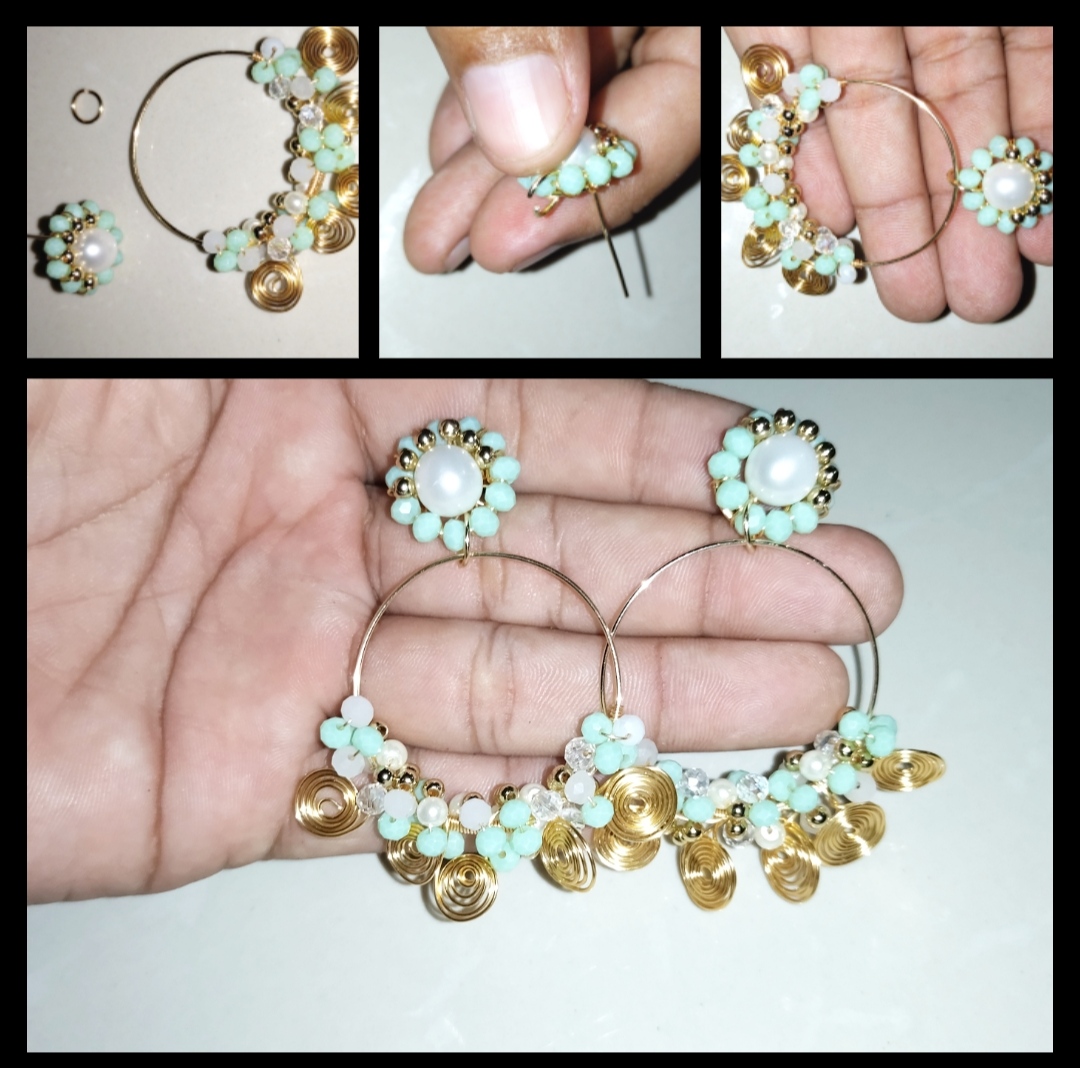
Step 1: First step to start we take pliers and twenty-gauge wire then we will make a round one remember that they are some rings, they are not that big, it can also be to your liking so that the round one looks very good, take something round to help yourself after making We will use twenty-six gauge wire for the round one. We begin to twist around the twenty-six wire just where the crossed wire is, so we will make sure that the round does not lose its shape. We will not cut the twenty-six wire, but we will cut the excess twenty-six wire.
Paso 1: Primer paso para empezar tomamos pinzas y alambre calibre veinte luego haremos un redondo recuerde que son unas argollas no las han tan grande bueno también puede ser a su gusto para que el redondo quede muy bien tomen algo redondo para ayudarse luego de hacer el redondo pasaremos a utilizar alambré calibre veintiséis empezamos a entorchar al rededor del alambre veinte justo donde está el alambre cruzado así nos aseguraremos de que el redondo no pierda la forma no cortaremos el alambre veintiséis pero si cortaremos el exceso de alambre veinte.
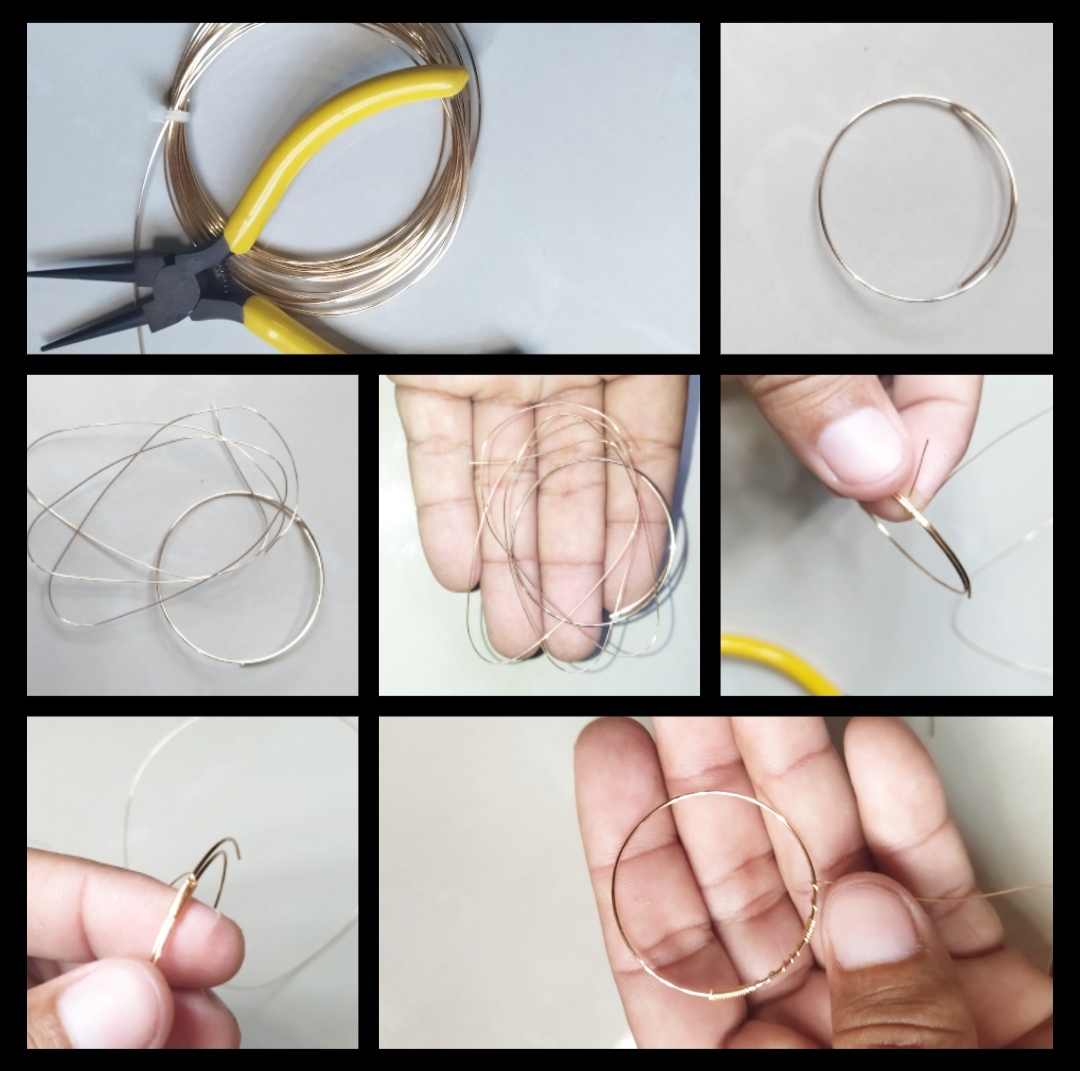
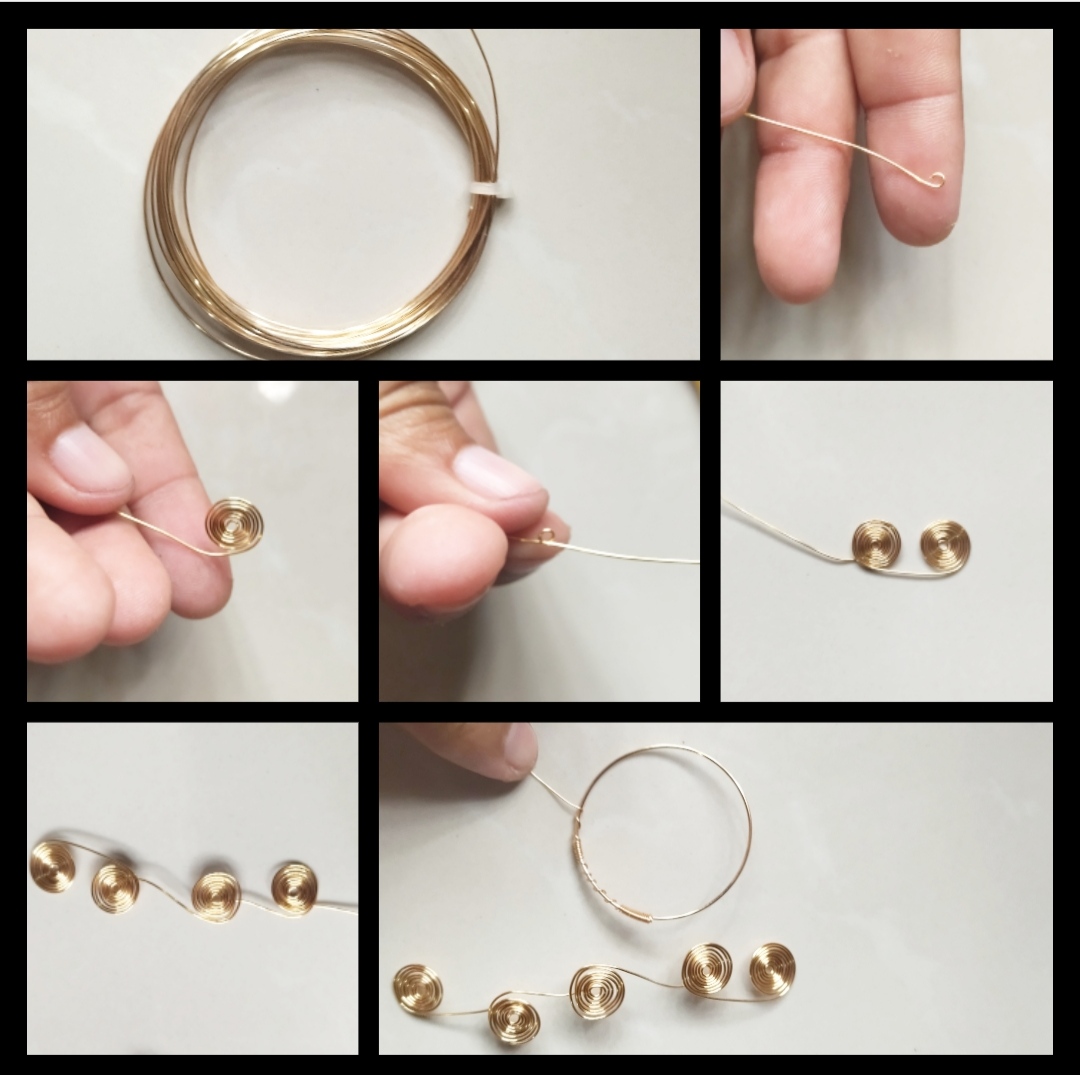
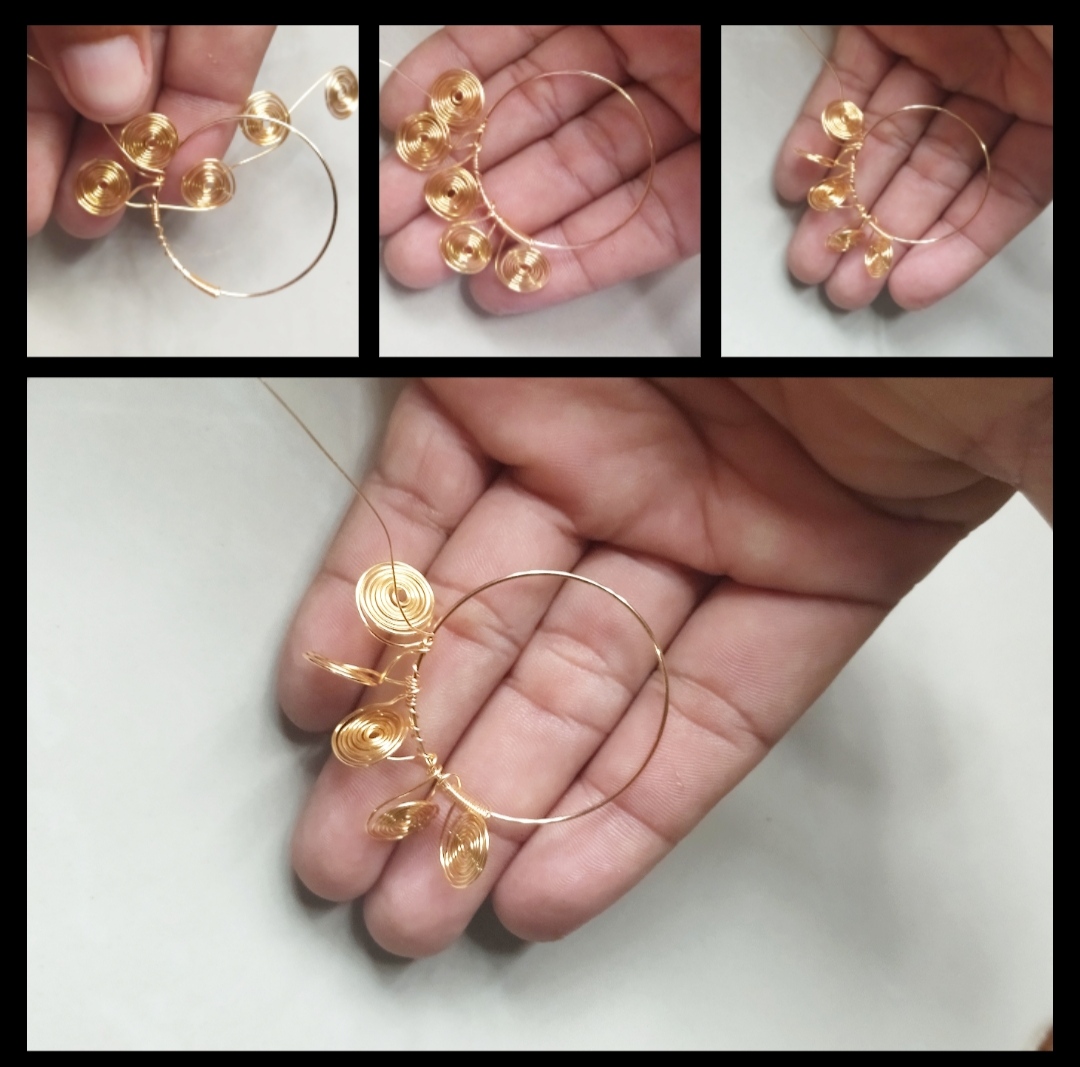
Step 2: For this step we will take the twenty gauge wire with the help of the tip we will make a small round and we will begin to turn the wire around that round we can count the turns or when we go to make the second round measure the distance that we must leave to be able to make the spiral and try to make all of them the same size we must do five applicants, I want to tell you something to make the spirals you need the flat pliers I don't have it and the truth is it was very difficult for me to bend the wire then we take the round and very carefully we are going to put or secure the aspirants using the space that we left between the spirals. Another thing must be very careful when turning it to secure the spirals of the ring because if we bend or deform them a lot we can lose the part as it is very difficult to re-mould it.
Paso 2: Para este paso tomaremos el alambre calibre veinte con la ayuda de la punta aremos un redondo pequeño y empezaremos a darle vuelta a el alambre al rededor de ese redondo podemos contar las vueltas o cuando vallamos hacer el segundo redondo medir la distancia que debemos dejar para poder hacer el espiral y tratar de que todos queden del mismo tamaño debemos hacer sinco aspirantes, quiero decirle algo para hacer los espirales necesitan la pinza plana yo no la tengo y la verdad se me iso muy difícil doblar el alambre luego tomamos el redondo y con mucho cuidado vamos a ir poniendo o asegurando los aspirantes utilizando el espacio que dejamos entre los espirales otra cosita deben de tener mucho cuidado al momento de darle vuelta para asegurar los espirales de la argolla porque si los doblamos o deformados mucho podemos perder la pieza ya que es muy difícil volver a moldearla
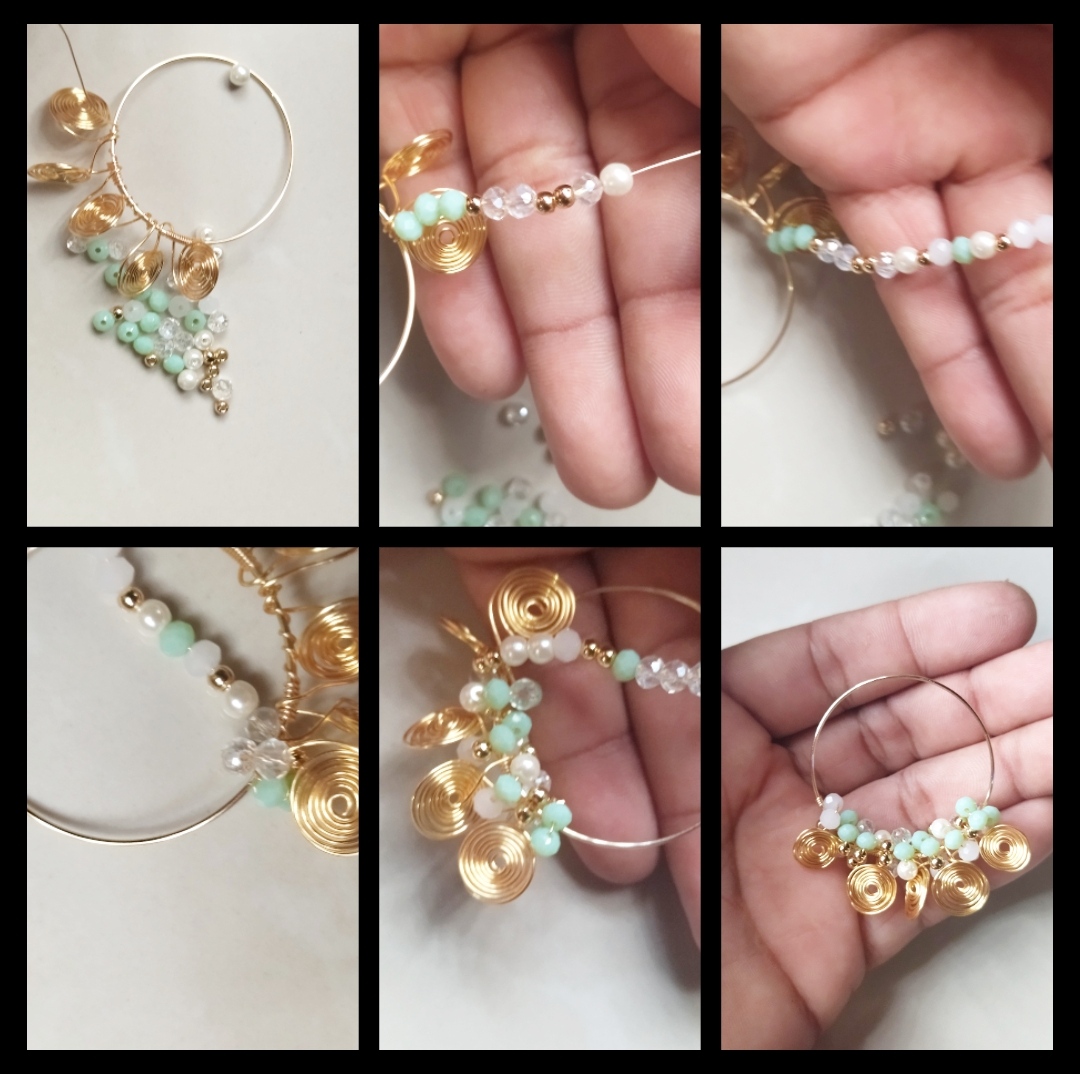
Step 3: To start, we take the stones, as you can see in the photo, several pearly green colors, transparent iridescence, and gold, which are the pellets, we will also take the piece that we made the ring, as I told you in the first step, we must not cut the wire twenty-six because in this step we are going to use it in that wire we will put the stones we do not have a pattern to put the stones you can do it as you like after putting the stones we will begin to turn around the ring and in the middle of the applicants we cover everything and finally we make sure by turning the wire twenty-six around twenty, we cut the excess wire and that's it.
Paso 3: Para empezar tomamos las piedras como pueden ver en la foto te gonde varios colores verdes perlados transparente tornasol y dorados que son los balines también tomaremos la pieza que hicimos la argolla como yo les dije en el primer paso no debemos cortar el alambre veintiséis porque en este paso lo vamos a utiliz en ese alambre meteremos las piedras no tenemos patrón para meter las piedras lo pueden hacer como más guste luego de meter las piedras empezaremos a dar vuelta al r dedor de la argolla y enmedio de los aspirantes cubrimos todo y por último aseguramos dándole unas vuelta a el alambre veintiséis al rededor del veinte cortamos el exceso de alambre y listo.
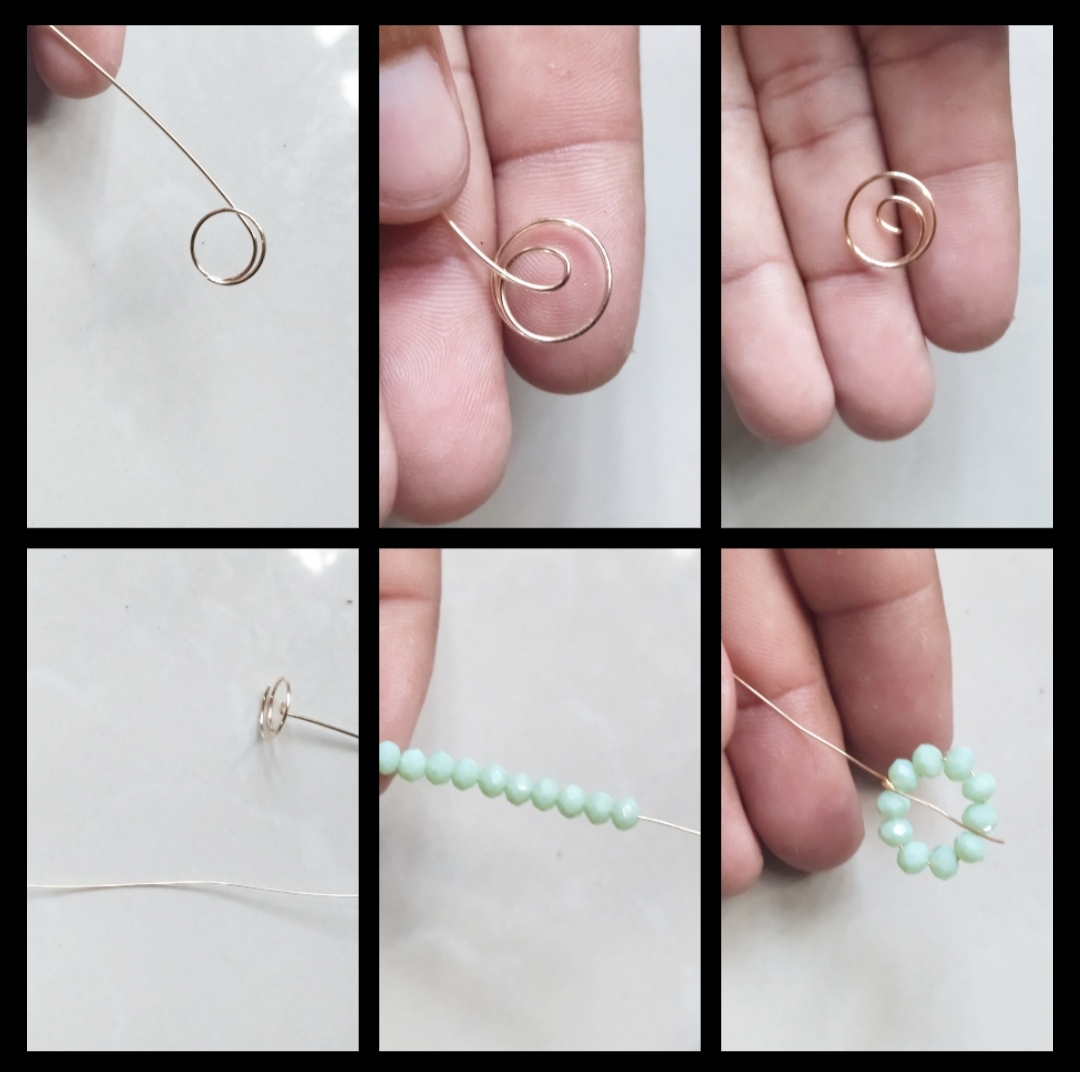
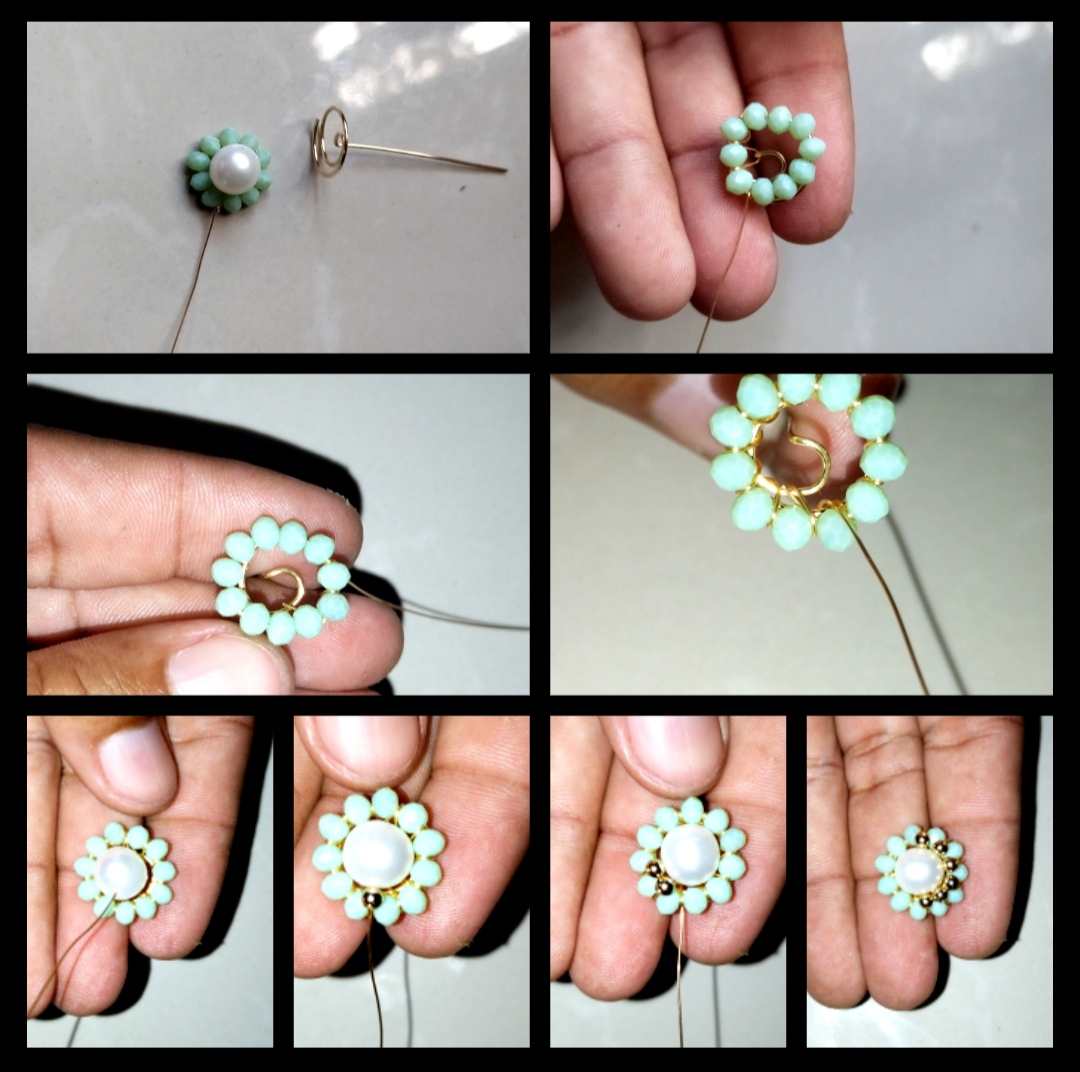
Step 4: Last step in this last step we take twenty-six wire and we make a round forming a spiral then we bend the wire back trying to make the double be in the middle of the round then we take twenty-six gauge wire and we will put eleven green crystals we form a round lo make sure as we can see in the photo we already have the two pieces now we join them we will pass the wire between the two stones weaving when we already have the piece joined we will use a large pearl which we will put in the middle of the stones we will continue using the same piece of lambre we put the pearl then we will pass the wire behind the piece we pull and so the pearl is secure now with that same wire we put a pellet and in the same way that we fixed the green stones we are going to fix these pellets we will put six pellets then we cut the excess and that's it we have that piece now we will make a small round which will help us to mix the two pieces together and that's it we already have some beautiful earrings 🤗🍓♥️❤️🌹😉👍👍👍💕
Paso 4: Último paso en este último paso tomamos alambré veinte y aremos un redondo formando un aspiral luego doblamos el alambre hacia atrás tratando de que el dobles quede en medio del redondo luego tomamos alambre calibre veintiséis y meteremos once cristales verde formamos un redondo lo aseguramos como podemos ver en la foto ya tenemos las dos piezas ahora la unimos pasaremos el alambre entre las dos piedras tejiendo cuando ya tengamos la pieza unida utilizaremos una perla grande la cual pondremos en medio de las piedras seguiremos utilizando el mismo trozo de lambre metemos la perla luego pasaremos el alambre hacia atrás de la pieza jalamos y así queda segura la perla ahora con ese mismo alambre metemos un balín y de la misma forma que fijamos las piedras verde vamos a fijar estos balines pondremos seis balines luego cortamos el exceso y listo ya tenemos esa pieza ahora aremos un redondo pequelo el cual nos ayudará a unos las dos piezas y listo ya tenemos unas hermosos pendientes 🤗🍓♥️❤️🌹😉👍👍👍💕
.
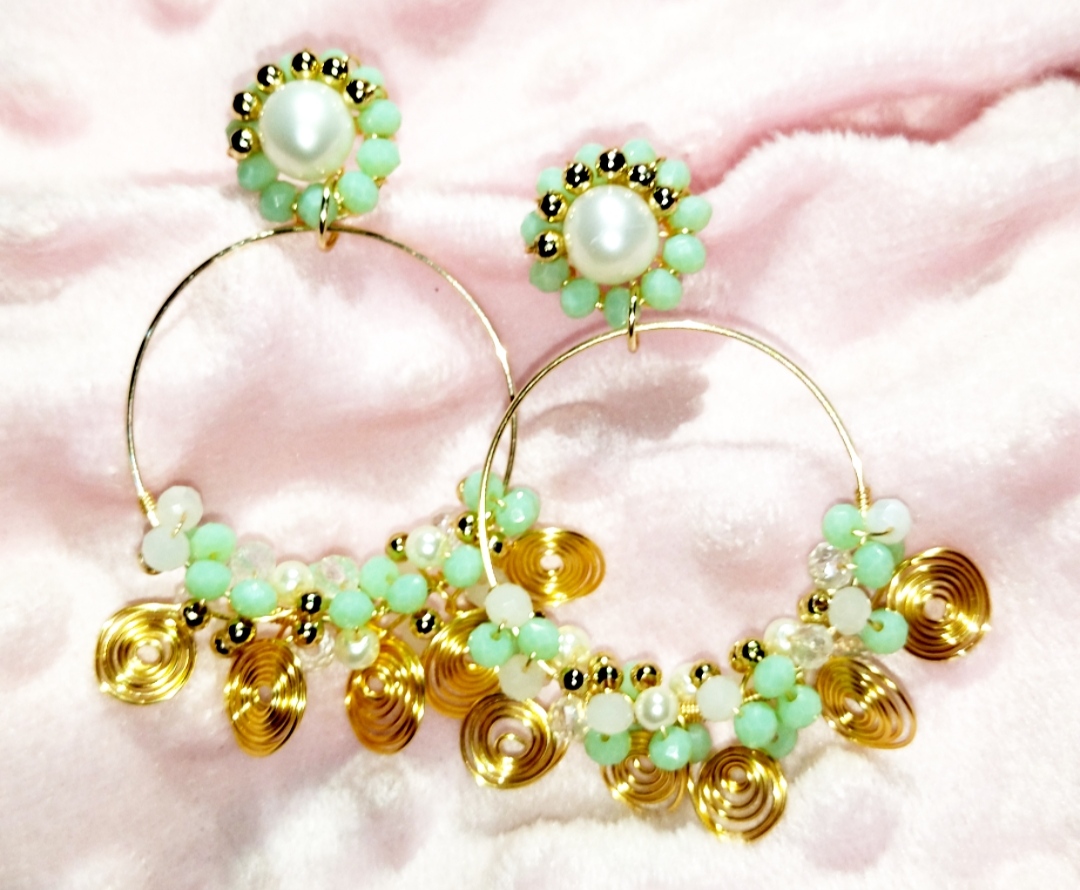
< beautiful earrings
<Hermosos pendientes
Todas las Fotos son de mi autoría y fueron tomadas con mi Celular Redmi 9T
Thank you for sharing this post in the DIYHUB Community!
Your content got selected by our fellow curator semarekha & you just received a little thank you upvote from us for your great work! Your post will be featured in one of our recurring compilations which are aiming to offer you a stage to widen your audience within the DIY scene of Hive. Stay creative & HIVE ON!
Please vote for our hive witness <3
Que preciosura.. Es color me encanta.. admira su habilidad para crear estos accesorios.. le quedaron hermosos! Buen trabajo.. Saludos!
Hola feliz día 💕 gracias por visitarme si el color es muy lindo la verdad que bueno saber que te gustaron 😊💕😉🌹❤️♥️
Beautiful creativity,you have done so well, the outcome is so lovely, I wish I can get one for myself.
Thanks for sharing @alexanderflx.
Hola buenos días espero estés bien 🌹🌹🌹muchas gracias por tu visita de seguro encontrarás los tuyos 💕💕💕.
https://twitter.com/491703210/status/1623719241466650632
The rewards earned on this comment will go directly to the people( @cetb2008 ) sharing the post on Twitter as long as they are registered with @poshtoken. Sign up at https://hiveposh.com.