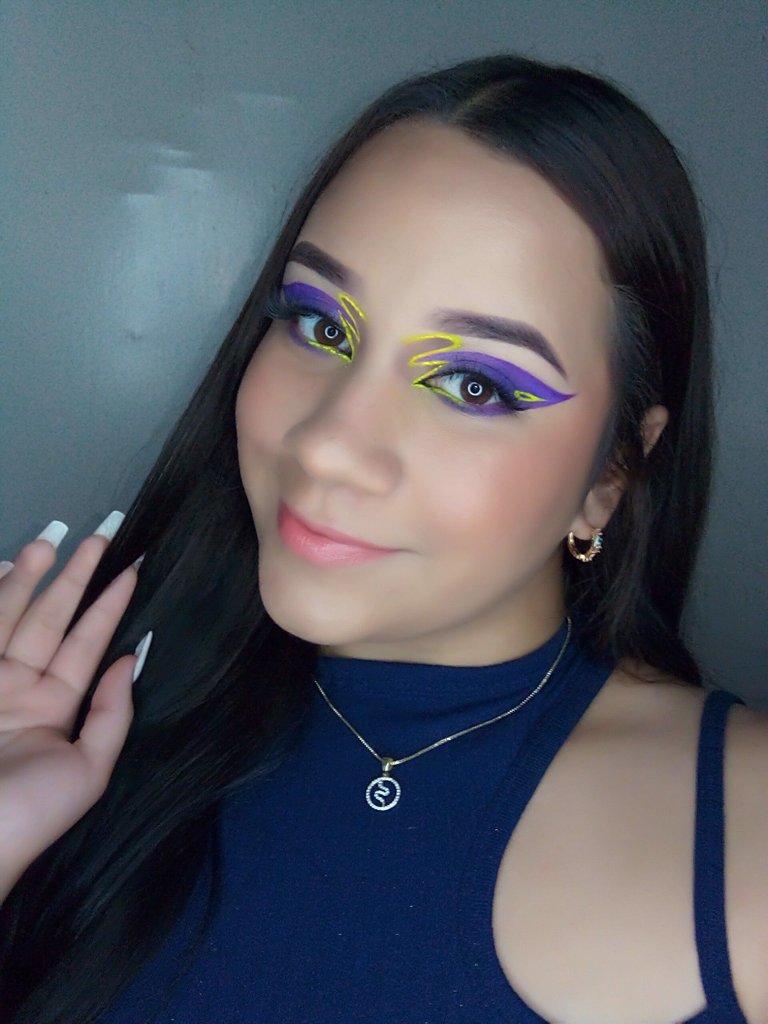
Look auténtico en tendencia ✨ // Authentic look on trend✨
Saludos, queridos seguidores de Hive y bellezas de GlowUp Art🤭. Hoy les compartiré el fácil proceso de un look muy bonito y bastante moderno que recreé para ustedes. Es sumamente sencillo de hacer y tiene detalles simples que llaman mucho la atención por su particularidad que normalmente no se ve en un maquillaje. Espero les guste, veamos ahora cómo se hace😌.
Greetings, dear Hive followers and GlowUp Art beauties. Today I will share with you the easy process of a very pretty and quite modern look that I recreated for you. It is extremely simple to do and has simple details that attract a lot of attention because of its particularity that you don't normally see in a makeup. I hope you like it, let's see now how to do it😌.
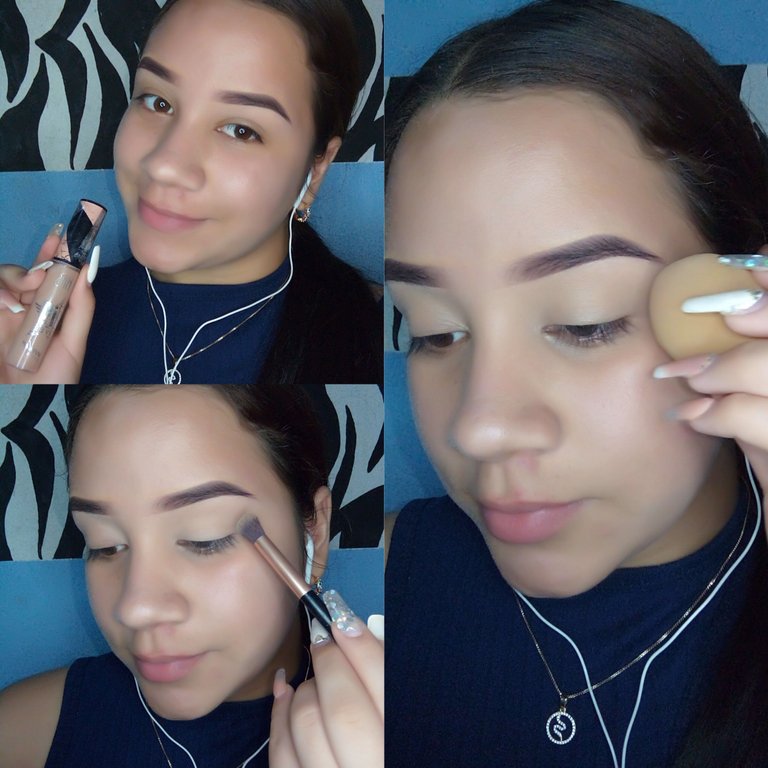
Step 1 // Paso 1
Aplico corrector en todo mi párpado móvil y luego lo sello con sombra beige o polvo compacto para que las sombras pigmenten correctamente tal cómo lo quiero.
I apply concealer all over my mobile eyelid and then seal it with beige shadow or pressed powder so that the shadows pigment correctly just the way I want it.
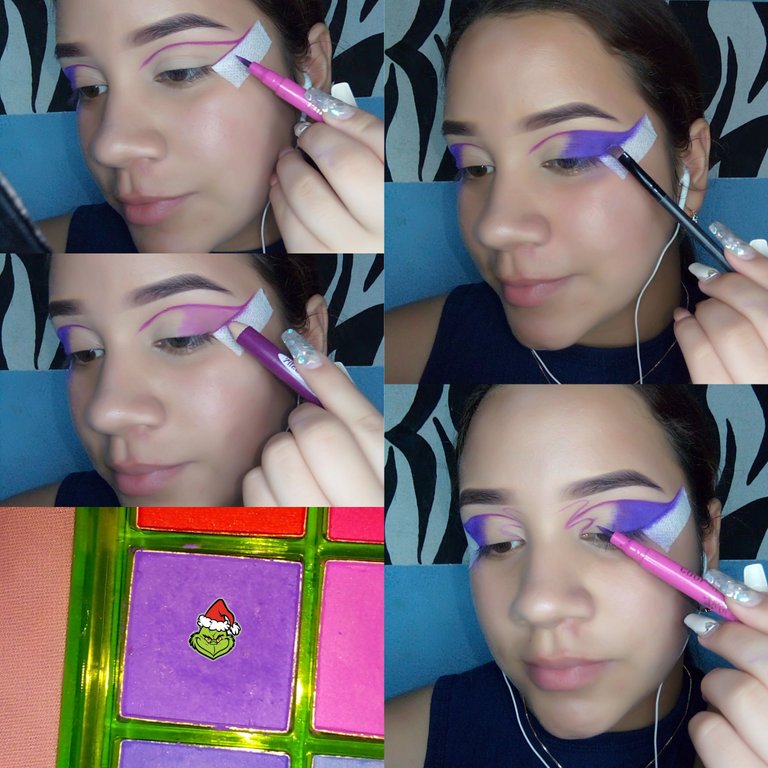
Step 2 // Paso 2
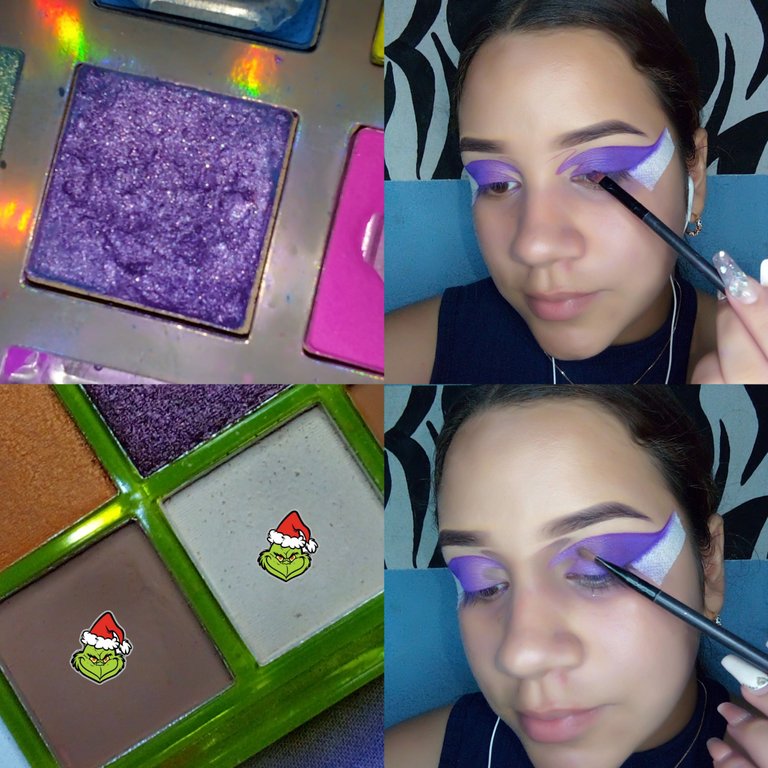
Con delineador morado me hago un trazo para saber exactamente dónde pondré cada sombra y me ayudó con un adhesivo para que salga perfecto. Después, con lápiz de ojos morado relleno el lugar en el que aplicaré la primera sombra. Una vez hecho esto, la sombra que aplicaré en ese lugar será un morado medio oscuro súper bonito. Por último, con el mismo delineador morado haré el trazo que le dará el toque particular a este look.
With purple eyeliner I draw a line to know exactly where I will put each shadow and I helped myself with an adhesive to make it perfect. Then, with purple eye pencil I fill in where I will apply the first shadow. Once this is done, the shadow I will apply on that spot will be a super nice medium dark purple. Finally, with the same purple eyeliner I will make the line that will give the particular touch to this look.
Step 3 // Step 3
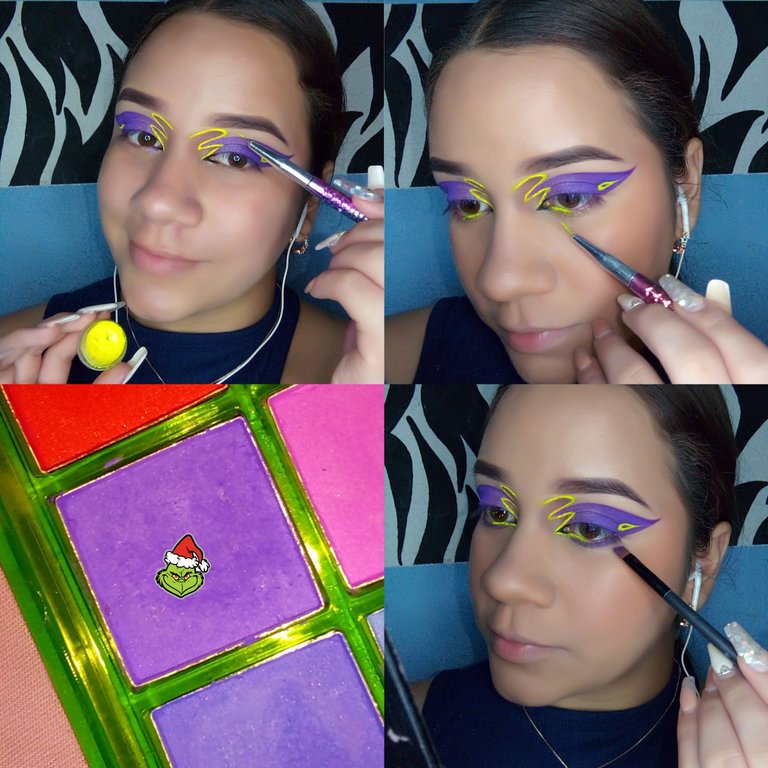
Aplico sombra morada brillante en el inicio del trazo y dentro de las curvas del otro trazo, aplico un degradado de sombra marrón con beige.
I apply bright purple shadow at the beginning of the stroke and inside the curves of the other stroke, I apply a gradient of brown shadow with beige.
Step 4 // Paso 4
Con pigmento neón líquido color amarillo trazaré los bordes de los trazos que hice anteriormente y también lo aplicaré en el inicio de la línea de agua, ahora sí se va viendo increíble, está tomando vida🥰. También aplico la misma sombra morada oscura en el párpado inferior. Y aplico marcará de pestañas en mis pestañas inferiores.
With yellow liquid neon pigment I will trace the edges of the strokes I did before and I will also apply it at the beginning of the water line, now it's looking amazing, it's coming to life🥰. I also apply the same dark purple shadow on the lower lid. And I apply lash marker on my lower lashes.
Step 5 // Paso 5
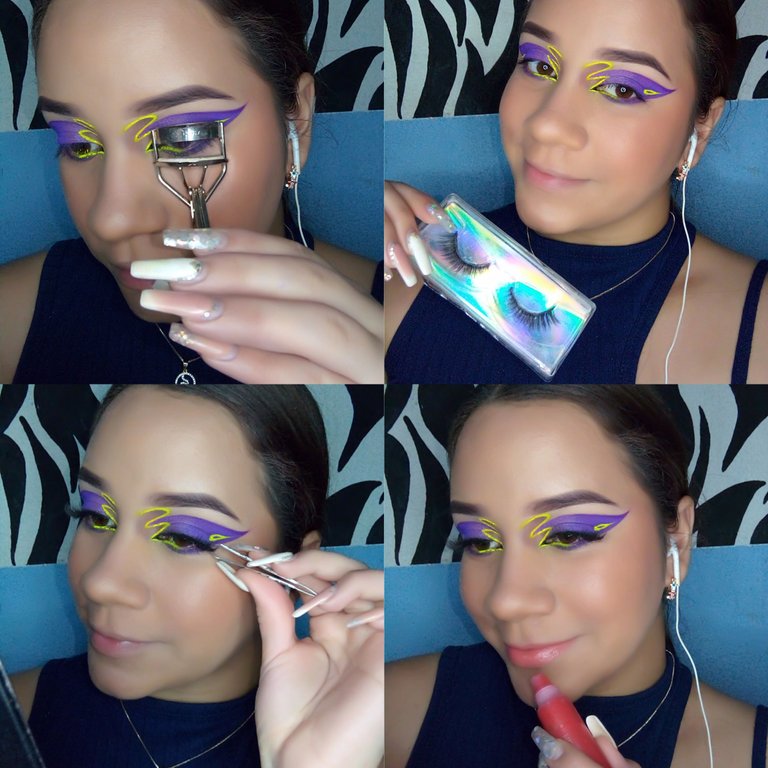
Para culminar con el look, rizo mis pestañas y aplico máscara en ellas para después pegar pestañas postizas bastante pequeñas y naturales para no recargar tanto el look. En los labios me aplico un labial tono nude y brillo labial para un acabado muy bonito en ellos.
To finish the look, I curl my eyelashes and apply mascara on them and then glue some small and natural false eyelashes to avoid overloading the look. On the lips I apply a nude lipstick and lip gloss for a very nice finish on them.
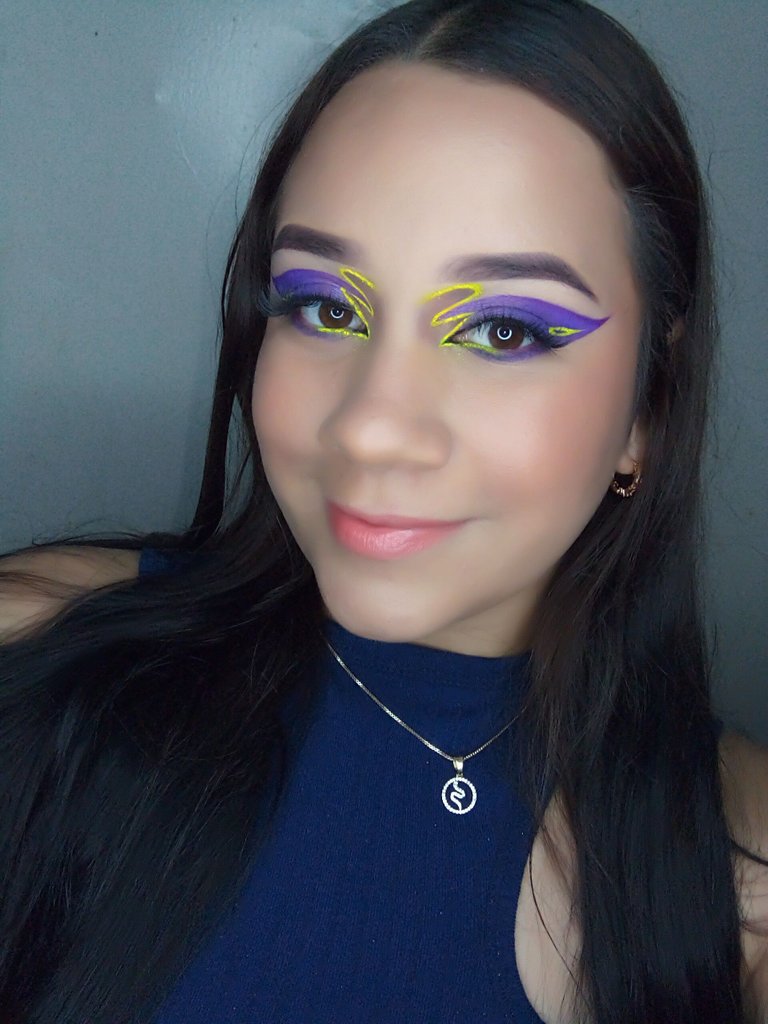
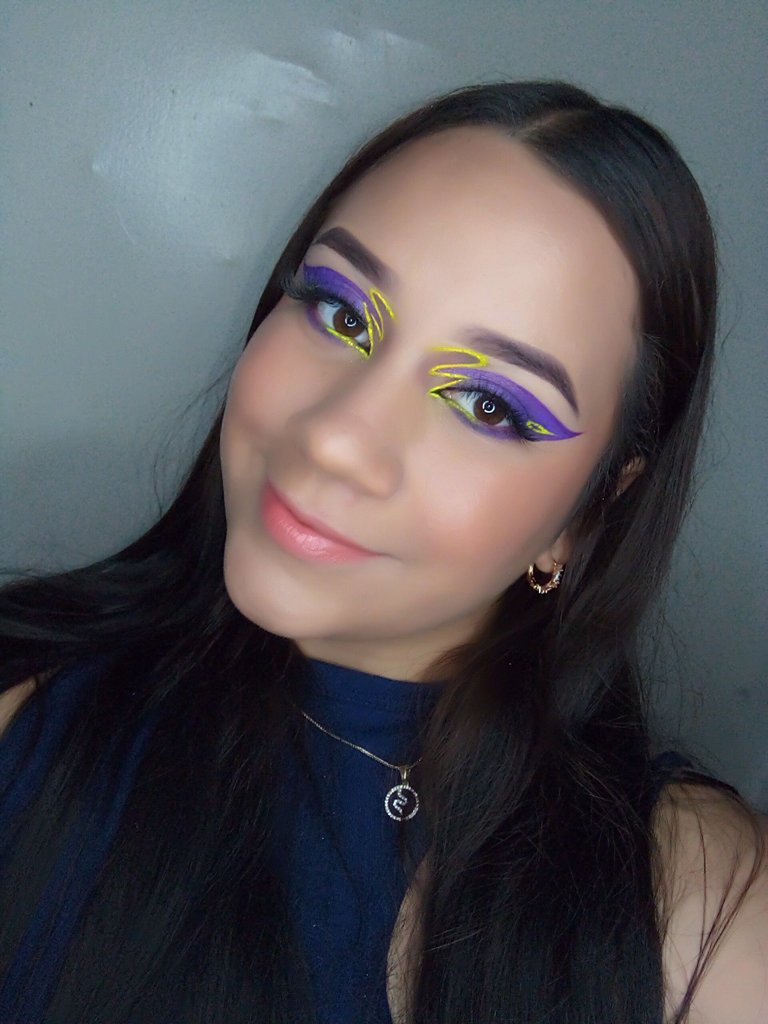
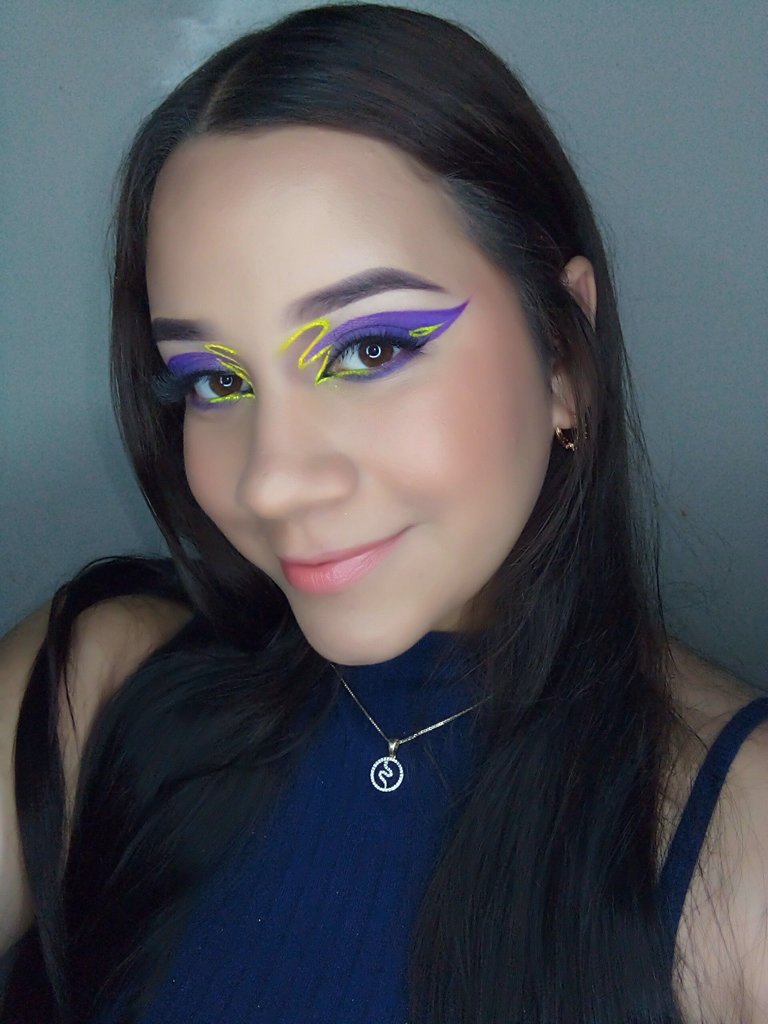
Y así es cómo quedó el resultado final. Me animé a hacerlo ya que me pareció muy interesante el detalle que tiene que a parte de ser neón, le da un toque curioso y moderno al look😌. Espero les haya gustado mucho, yo encantada de seguirles compartiendo muchos tutoriales bonito para que sigan aprendiendo nuevas técnicas🥰. Muchas gracias por ver, nos vemos en un próximo post💜.
And this is how the final result turned out. I decided to do it because I found very interesting the detail it has that besides being neon, it gives a curious and modern touch to the look😌. I hope you liked it a lot, I will be happy to continue sharing many nice tutorials for you to keep learning new techniques🥰. Thank you very much for watching, see you in a next post💜.

- El texto es completamente de mi autoría
- The text is entirely by me
- Traducción realizada con DeepL Traslate
- Translation using DeepL Traslate
- App's de edición: PicsArt y GirdArt
- App's edition: PicsArt y GirdArt
- Cámara: Tecno Pop 4
- Camera: Tecno Pop 4
- Las fotos tienen la iluminación de mi aro de luz led
- The photos are the illumination of my led light ring
- App's de edición: PicsArt y GirdArt
- App's edition: PicsArt y GirdArt
- Cámara: Tecno Pop 4
- Camera: Tecno Pop 4
- Las fotos tienen la iluminación de mi aro de luz led
- The photos are the illumination of my led light ring
- Cámara: Tecno Pop 4
- Camera: Tecno Pop 4
- Las fotos tienen la iluminación de mi aro de luz led
- The photos are the illumination of my led light ring
- Las fotos tienen la iluminación de mi aro de luz led
- The photos are the illumination of my led light ring

0
0
0.000
!discovery 35
This post was shared and voted inside the discord by the curators team of discovery-it
Join our community! hive-193212
Discovery-it is also a Witness, vote for us here
Delegate to us for passive income. Check our 80% fee-back Program
Dear @alesquisa18,
Our previous proposal expired end of December and the Hivebuzz project is not funded anymore. May we ask you to review and support our new proposal (https://peakd.com/me/proposals/248)?
Thank you for your help!
Esta demaciado lindo
Gracias💕