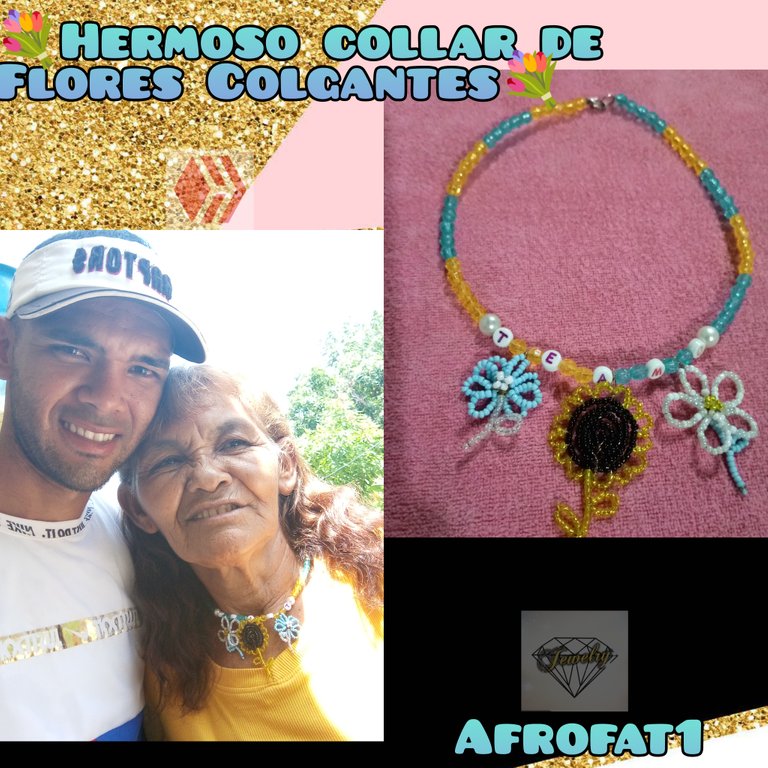
✨Esp-Eng] Iniciativa. "Un Regalo para Mama". HERMOSO COLLAR DE FLORES COLGANTES✨ Initiative. "A Gift for Mom". BEAUTIFUL FLOWER PENDANT NECKLACE✨
Feliz día tengan todas las madres en su día,que Dios las bendiga siempre y les siga dando mucha sabiduría para que sigan con la buena educación a sus hijos,que Dios las bendiga siempre.
Mis queridos amigos,hoy quiero hablarles sobre un HERMOSO COLLAR DE FLORES COLGANTES que realicé con mucho amor para mi hermosa madre
me gusta trabajar mucho con flores porque así lleva por nombre mi mamá,ella se llama FLOR y es la mujer más hermosa,humilde,amorosa, sincera,para mí la mujer perfecta y por ella me inspiro
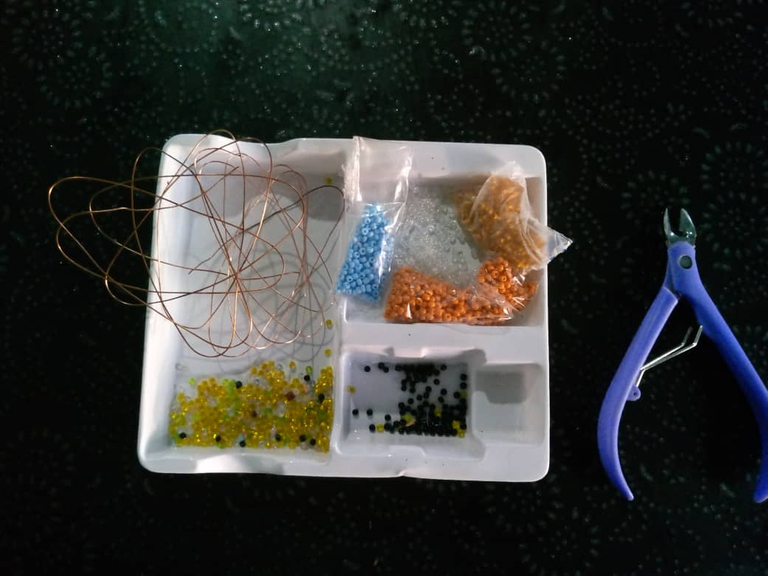
A continuación les estare presentando detalladamente el paso a paso de esta hermosa creación y los materiales utilizados en la elaboración de este hermoso COLLAR DE FLORES COLGANTES
Los cuales fueron los siguientes
💐ALAMBRE DE COBRE
💐PIQUETA
💐 MOSTACILLAS DE DIFERENTES COLORES
💐BICONOS AMARILLOS Y AZULES
💐2 PERLAS BLANCAS
💐1 SEGURO
💐CUENTA DE LETRAS
PASO 1
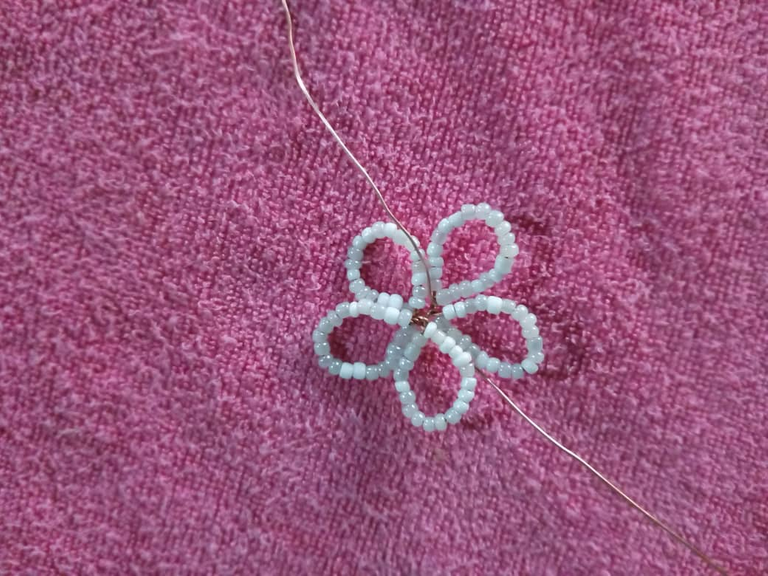
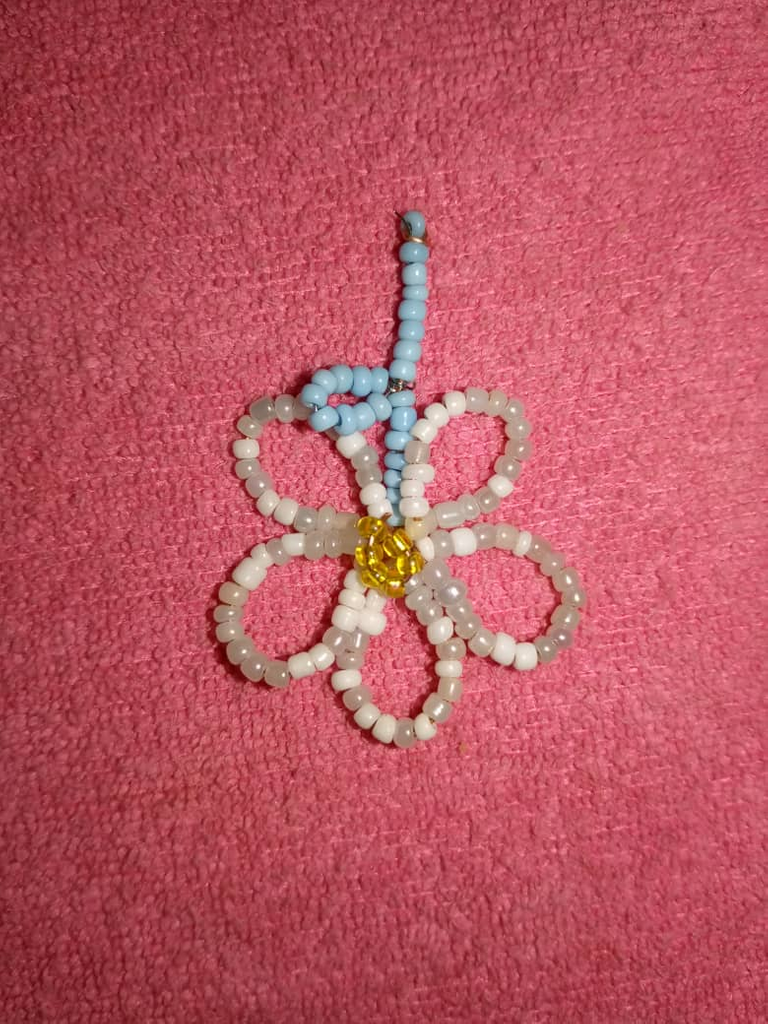
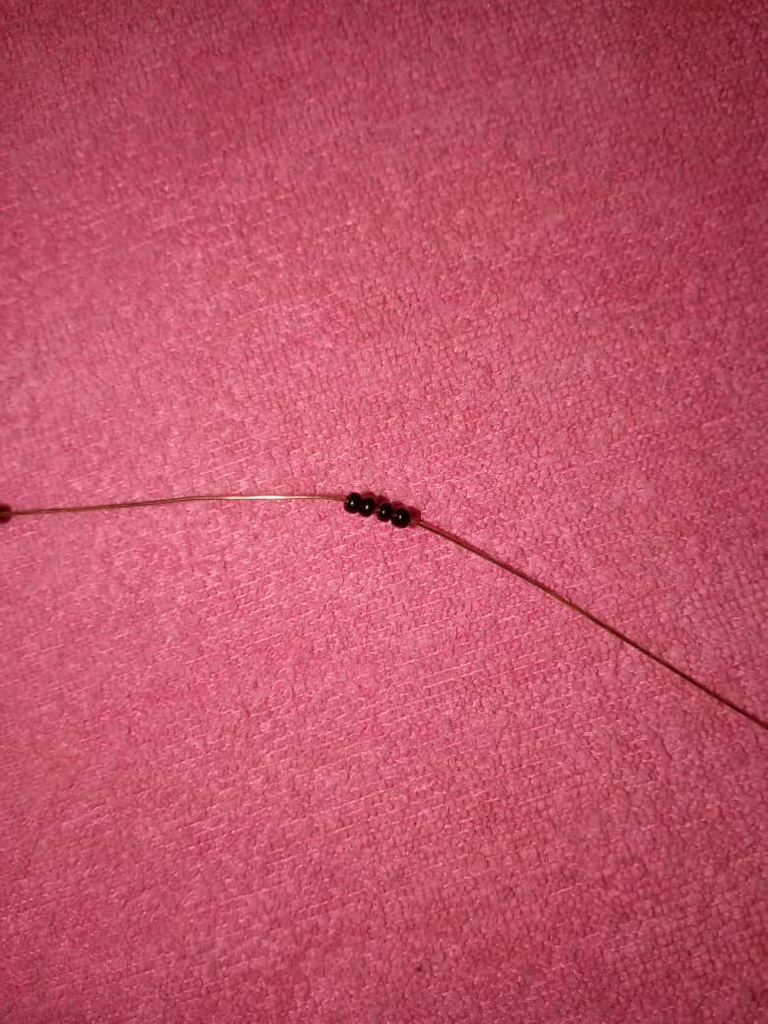
Comenzamos realizando una margarita y lo que haremos será tomar un aproximado de 40cm de Alambre de cobre y introduciremos 100 mostacillas de color blanco para así tomar 20 mostacillas y dejando 5 cm del un lado y haciendo un pequeño círculo se obtendrá nuestro primer pétalo
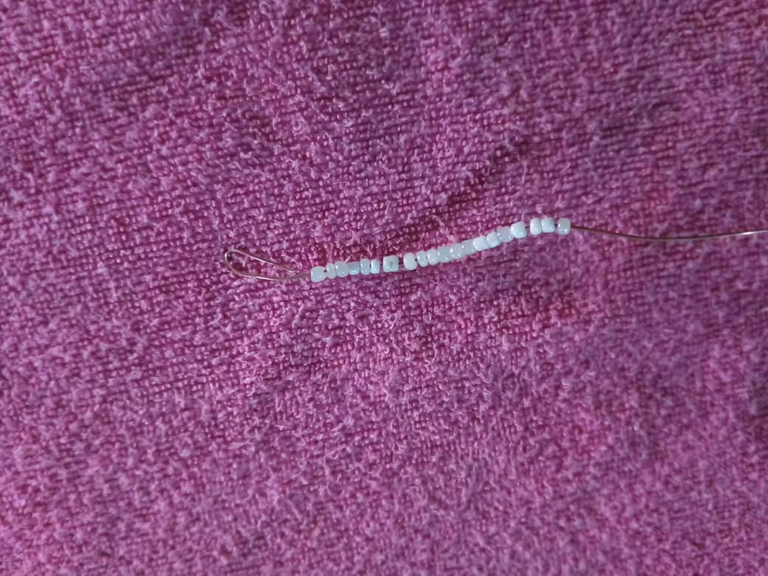
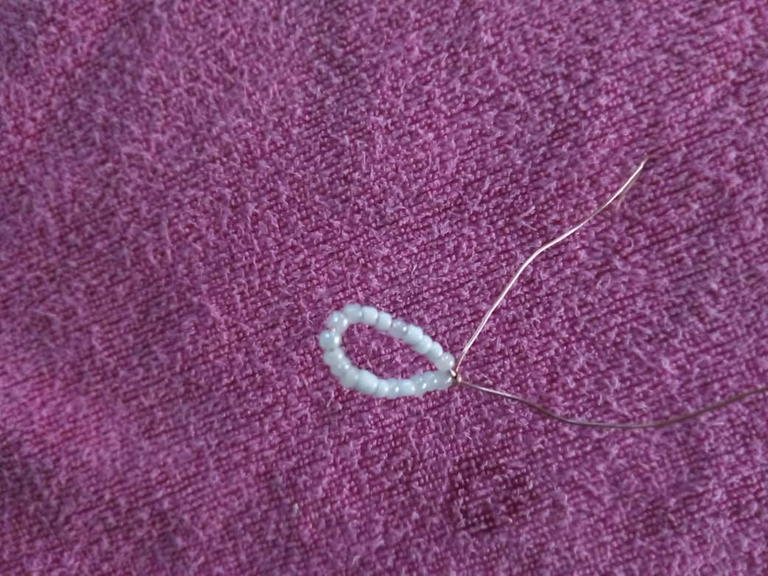
Luego tomaremos 20 mostacillas hacemos el círculo y damos 2 vueltas,esto hasta obtener los 5 pétalos que necesitaremos los cuales nos quedará de esta manera
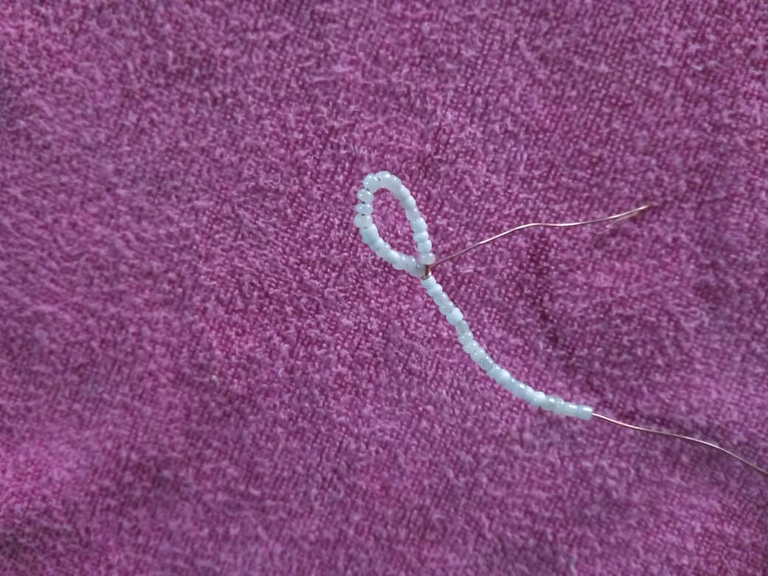
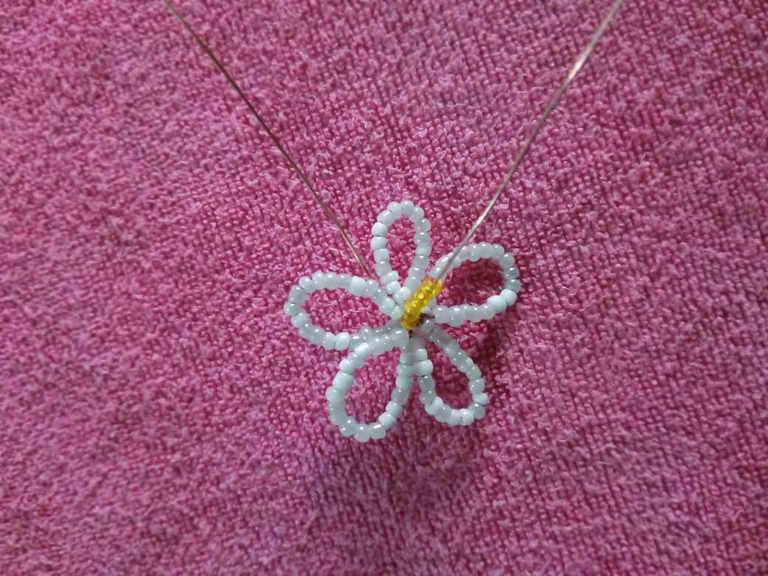
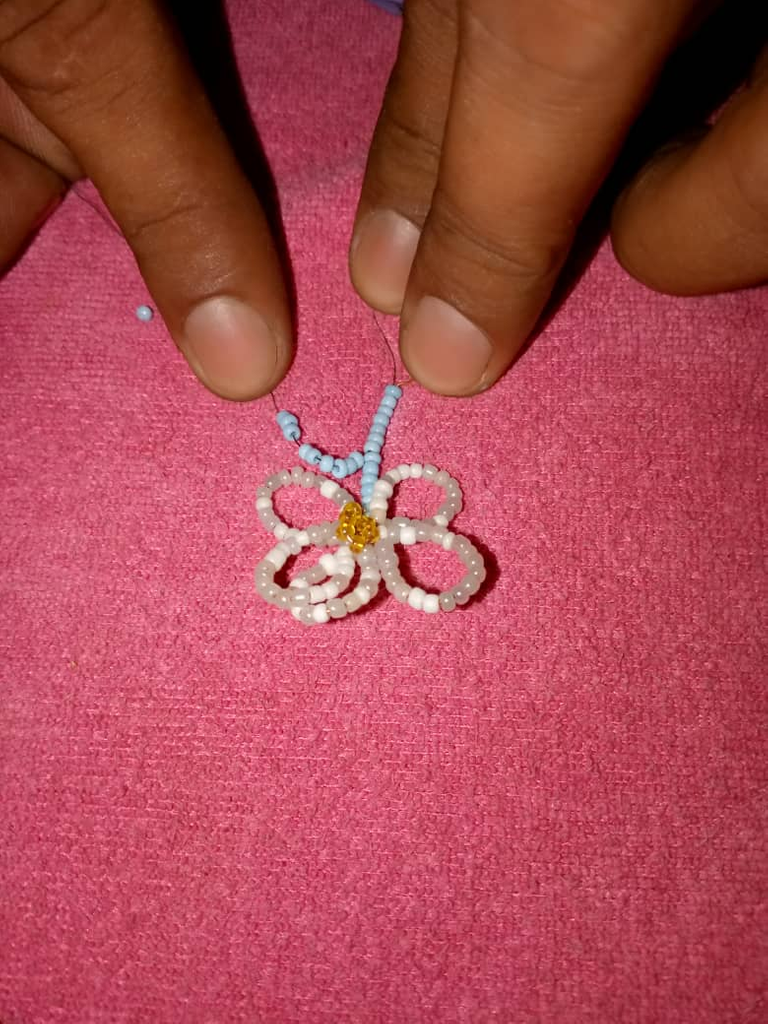
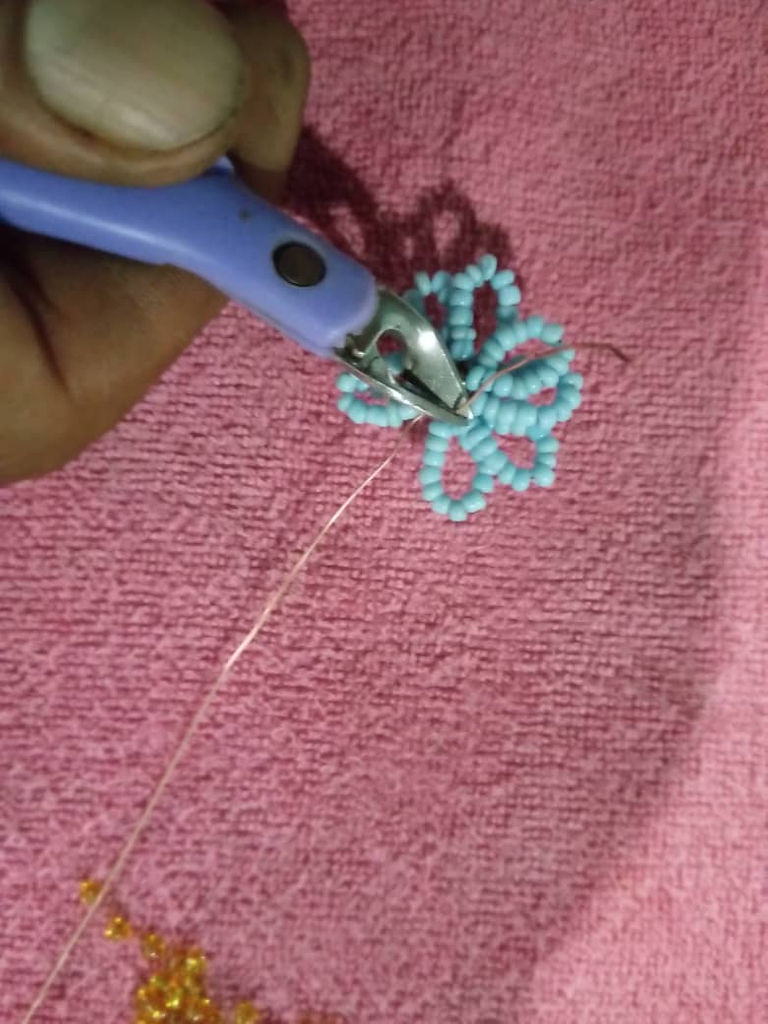
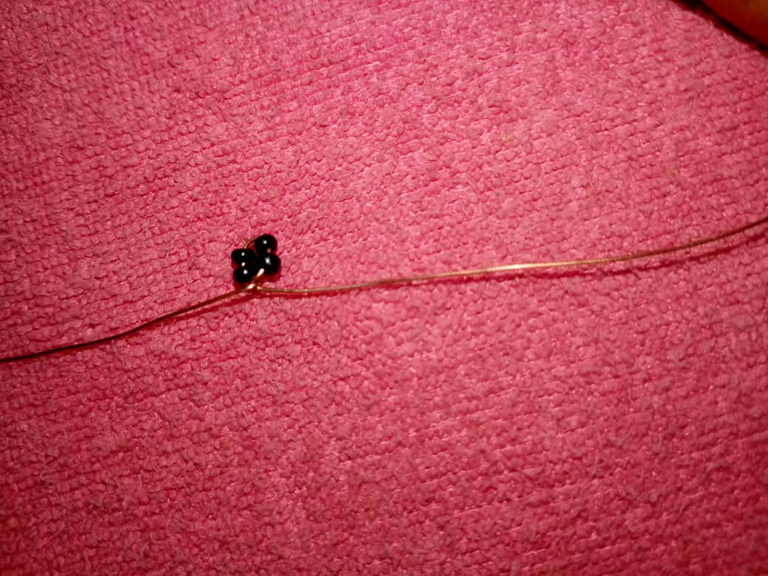
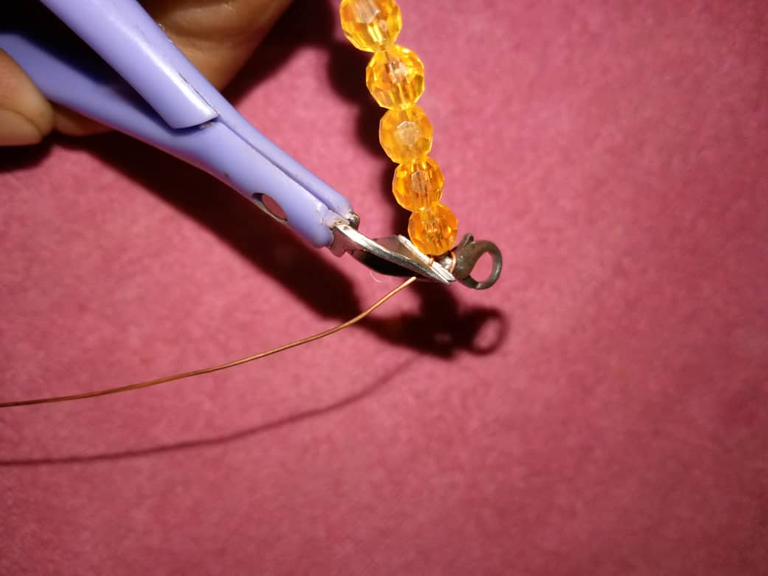
Ya teniendo nuestros 5 pétalos lo que haremos será introducir 5 mostacillas de color amarillo por los 5 cm de Alambre,hacemos 1 pequeño circulo y el resto del alambre lo pasamos por detrás,ubicamos cualquier pétalo y aseguramos y cortamos el excedente con nuestra piqueta y nos quedar así
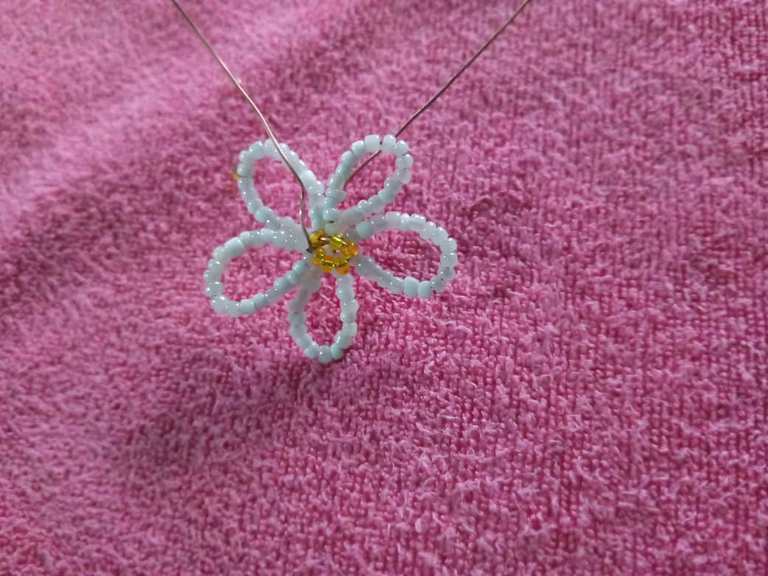
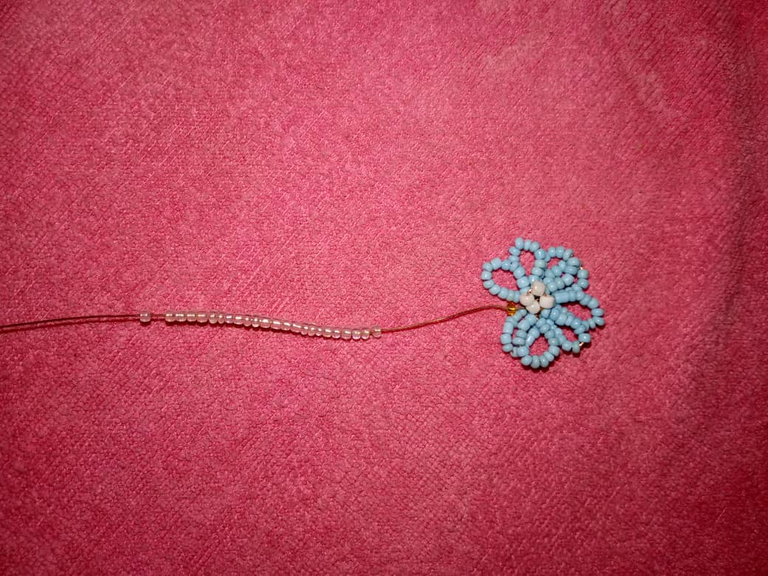
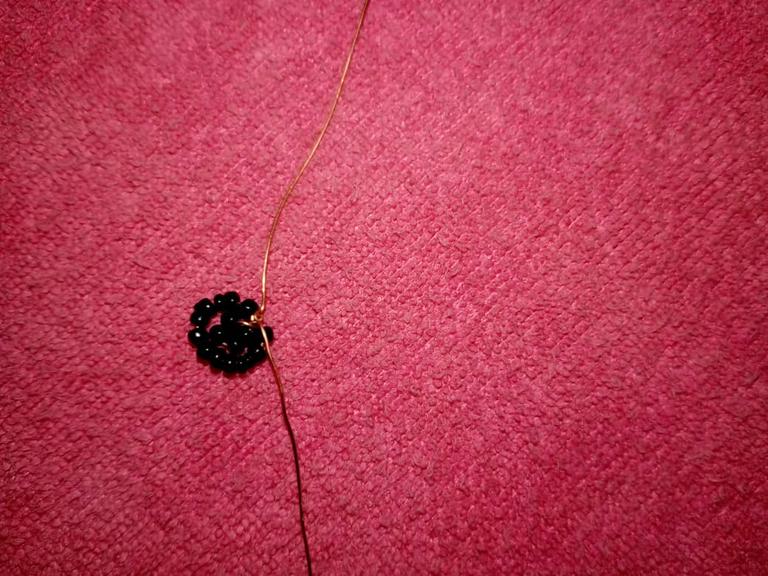
Lo siguiente es tomar 15 mostacillas de color azul para así realzar el tallo de nuestra margarita,lo que haremos después será saltar la última mostacilla y introducir el alambre de cobre por las mostacillas y sacamos en el centro

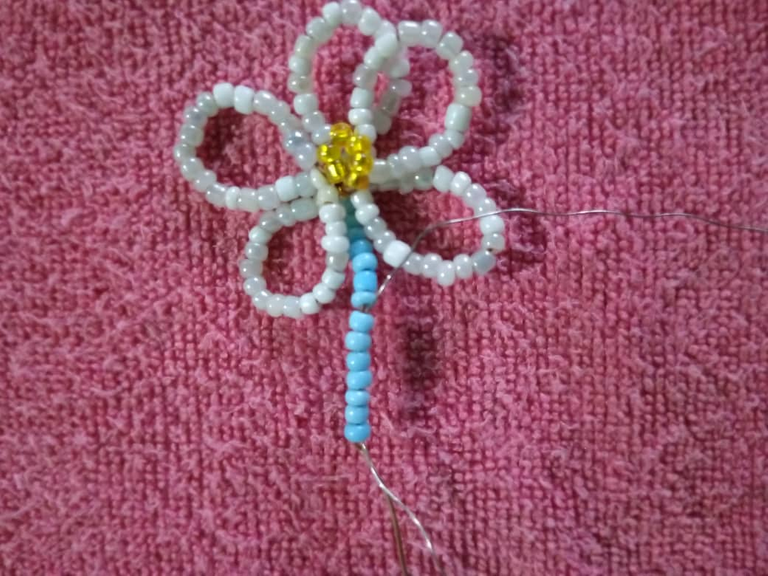
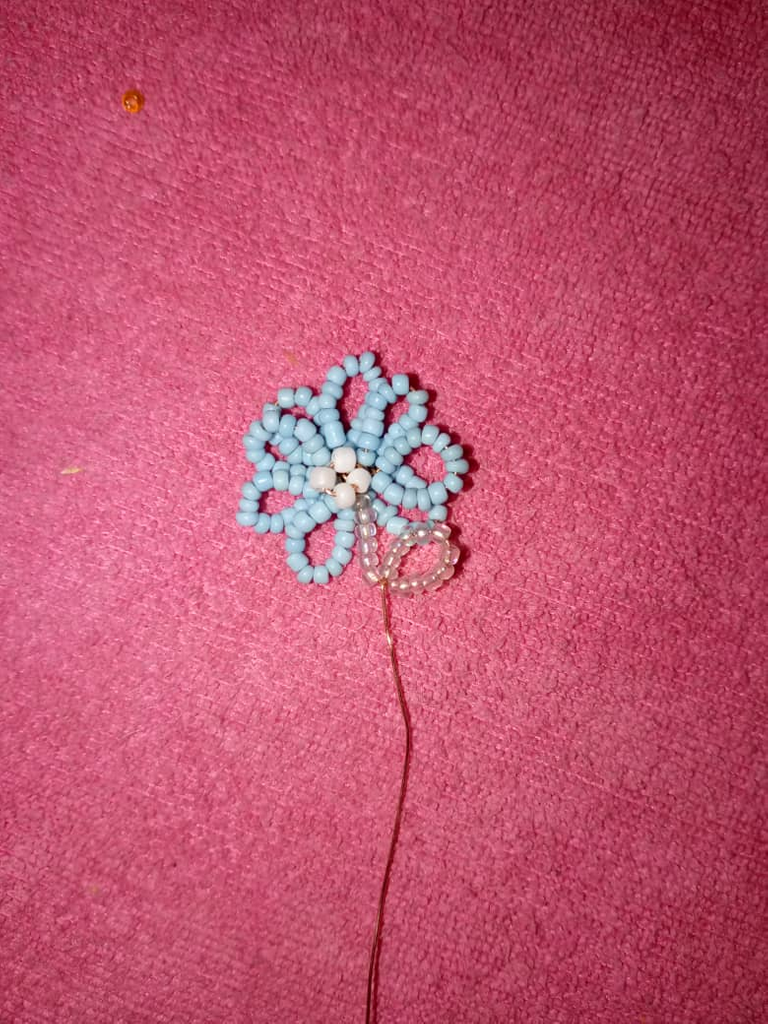
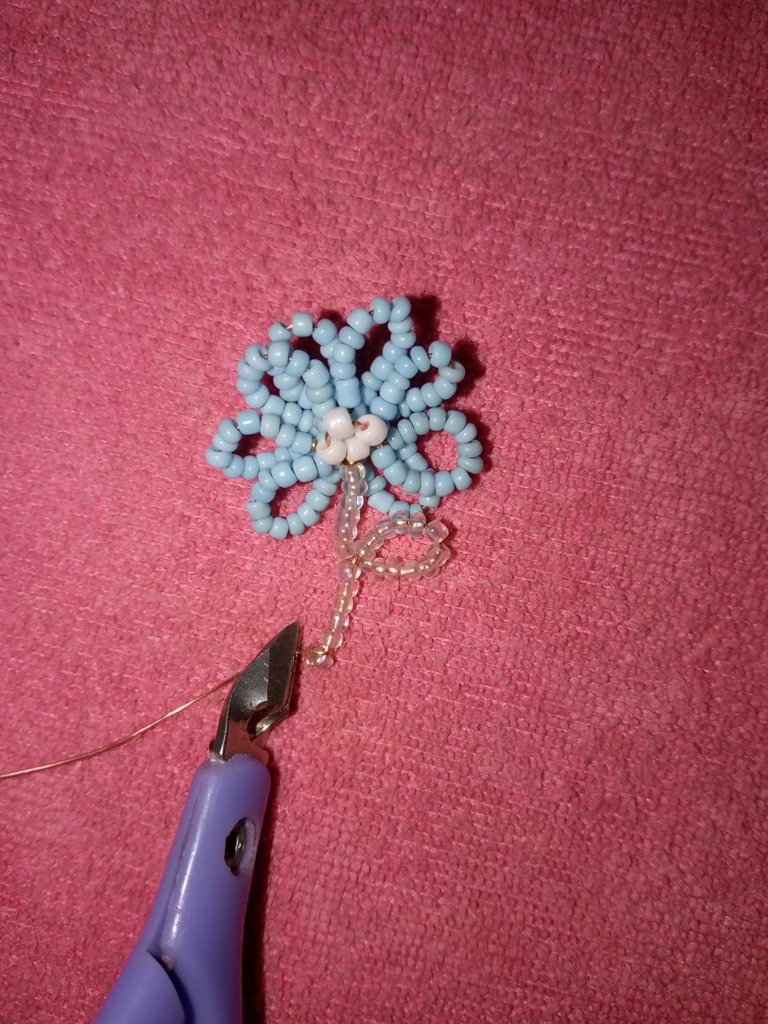
Luego agregamos 10 mostacillas y hacemos 2 giros y tenemos nuestra hoja,una vez cortado el excedente tendremos lista nuestra primera margarita
PASO 2
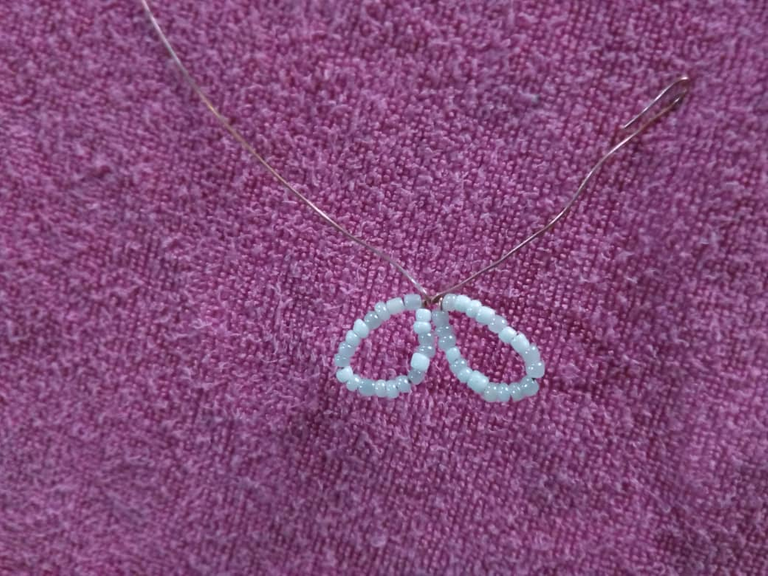
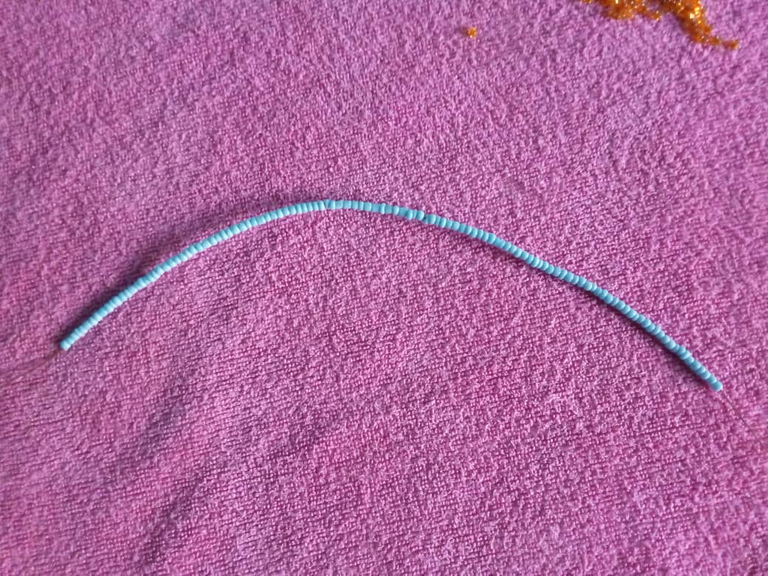
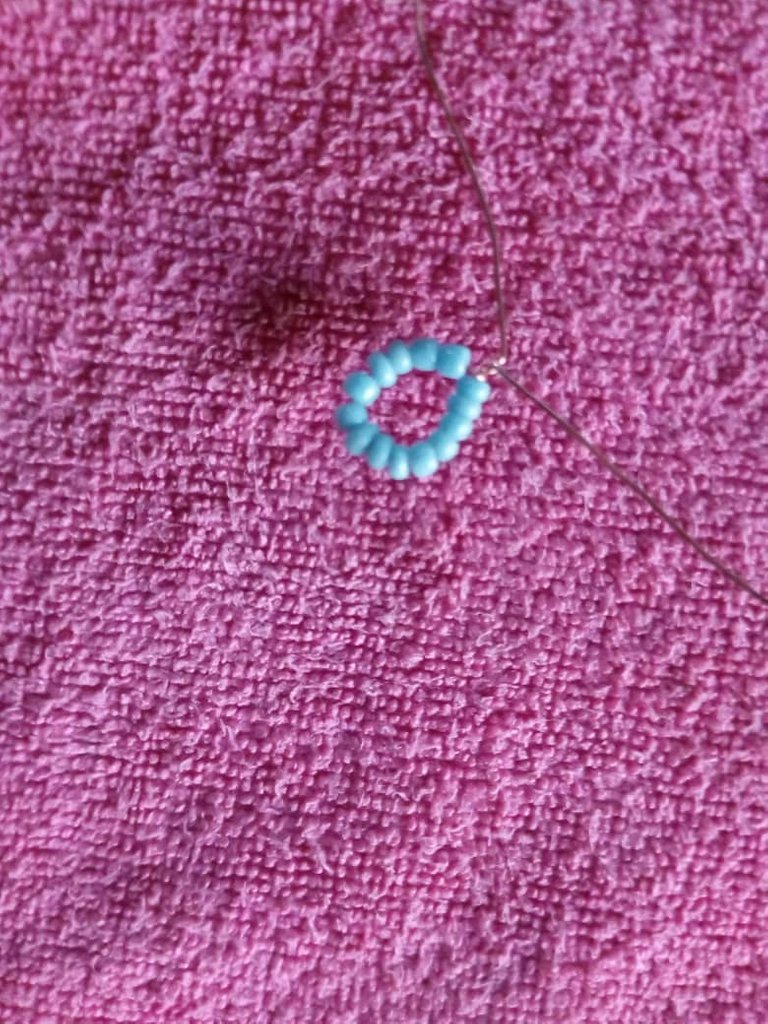
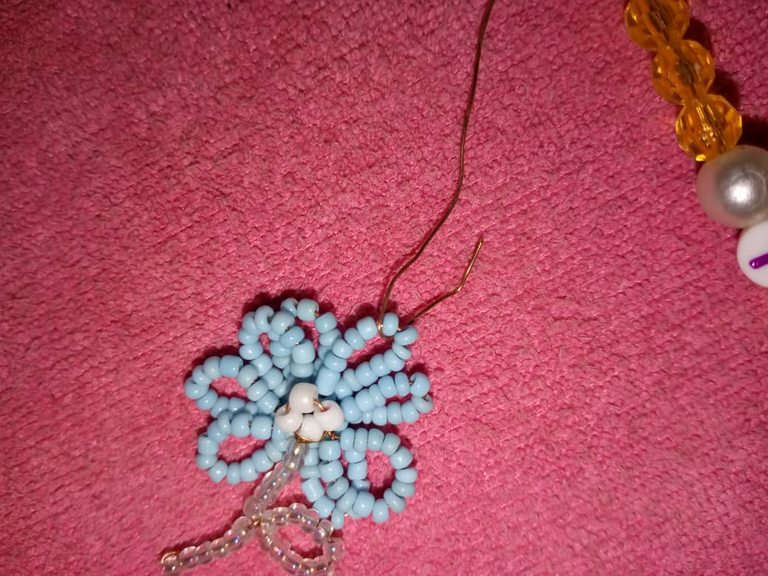
Para realizar nuestra siguiente flor lo que haremos será tomar nuestro alambre y 112 mostacillas de color azul,a está flor le vamos hacer 8 pétalos,tomando 14 mostacillas vamos hacer un pequeño circulo y tendremos nuestro primer pétalo,no olvidemos dejar del otro lado 5cm de alambre, seguidamente tomaremos 14 mostacillas haremos nuestro giro,este paso lo vamos a repetir hasta obtener los 8 pétalos deseados
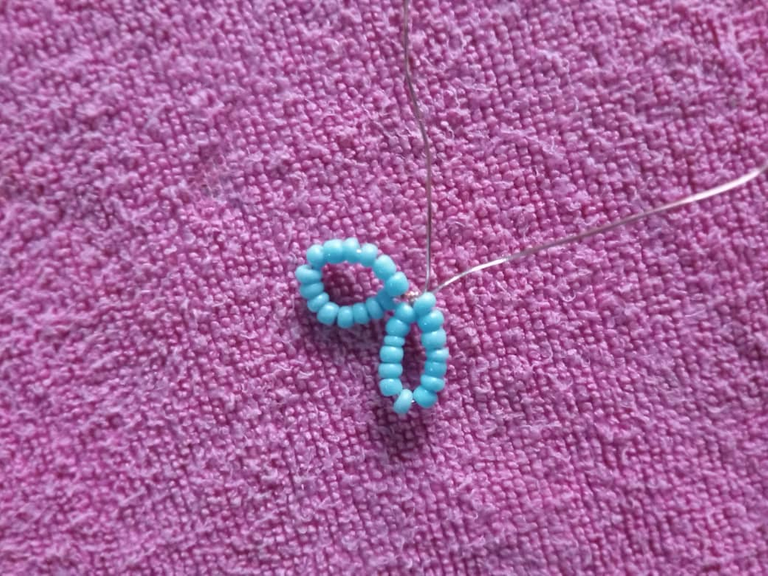
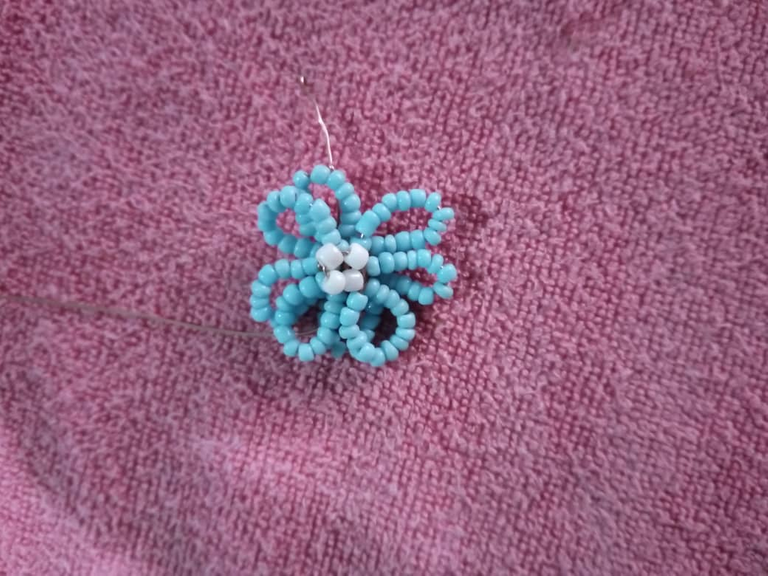
Luego tomaremos 5 mostacillas de color blanco por los 5cm de alambre sobrante,hacemos un pequeño circulo y llevamos el sobrante a la parte de atrás y cortamos con nuestra piqueta

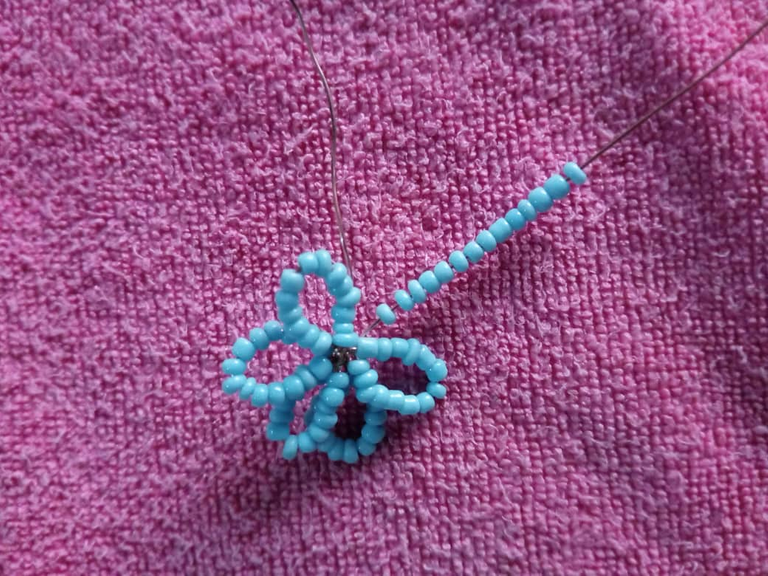
Lo siguiente que haremos será tomar 24 mostacillas transparentes y de arriba hacia abajo contaremos 6 mostacillas y contando 12 de las mismas haremos un giro para tener nuestra hoja
Luego subimos las mostacillas restantes y con nuestro alambre damos una vuelta a la última mostacilla para asegurar y luego cortar
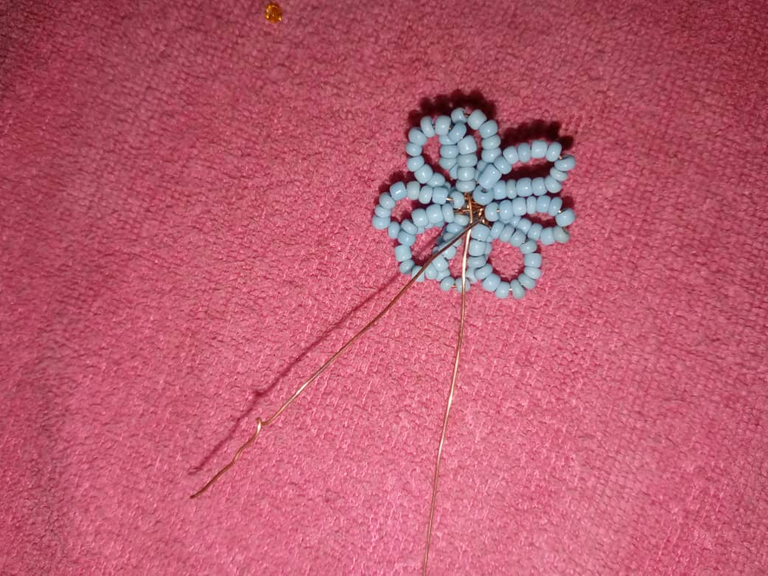
Así tendremos nuestra segunda flor
PASO 3
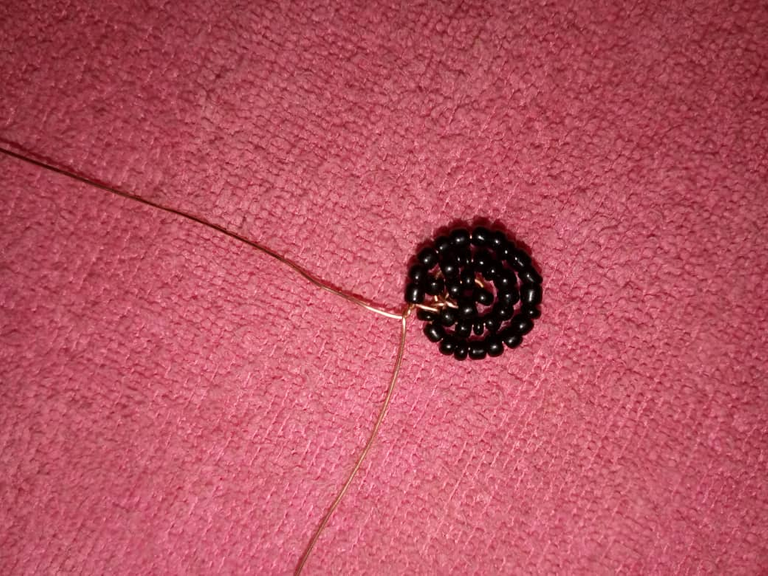
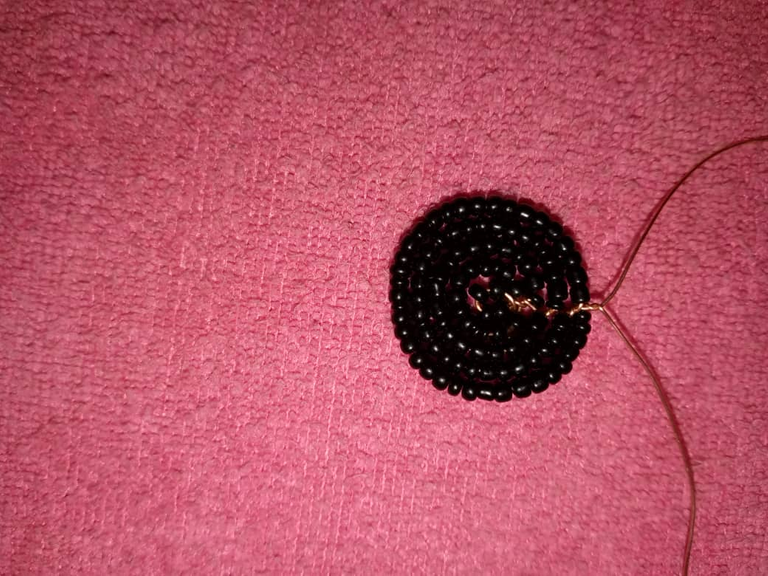
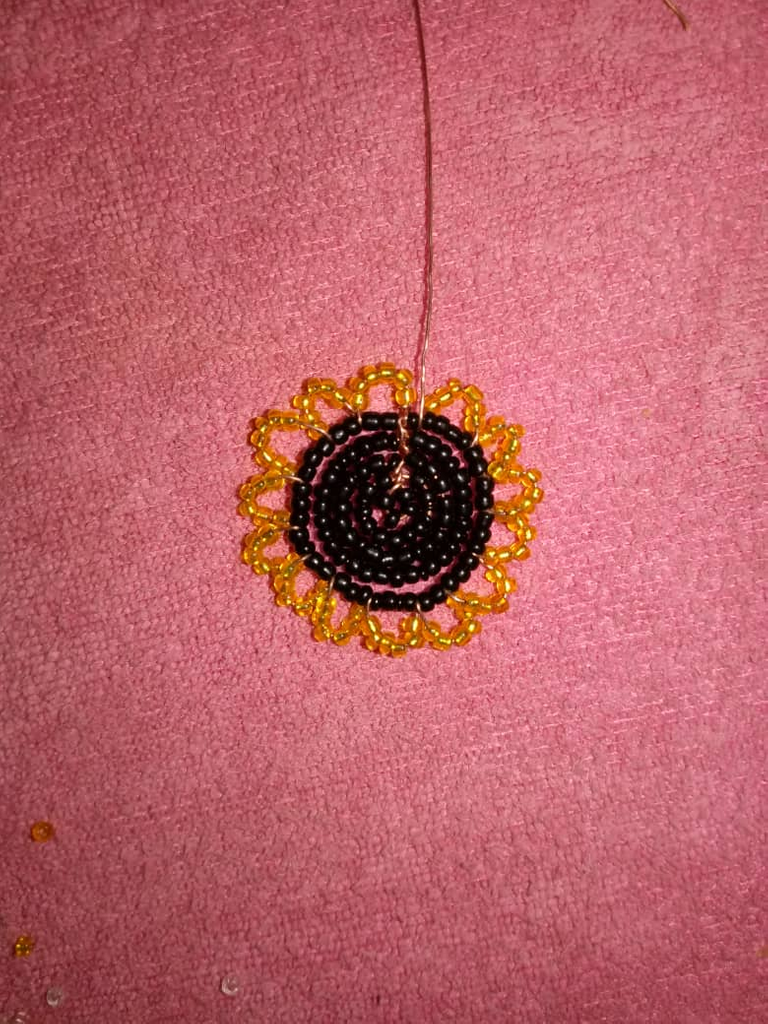
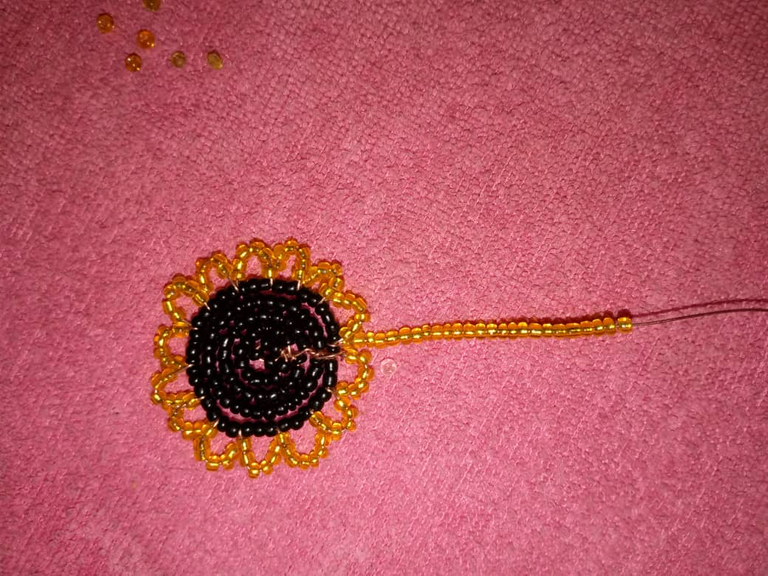
Seguiremos con la última flor esta será un hermoso girasol
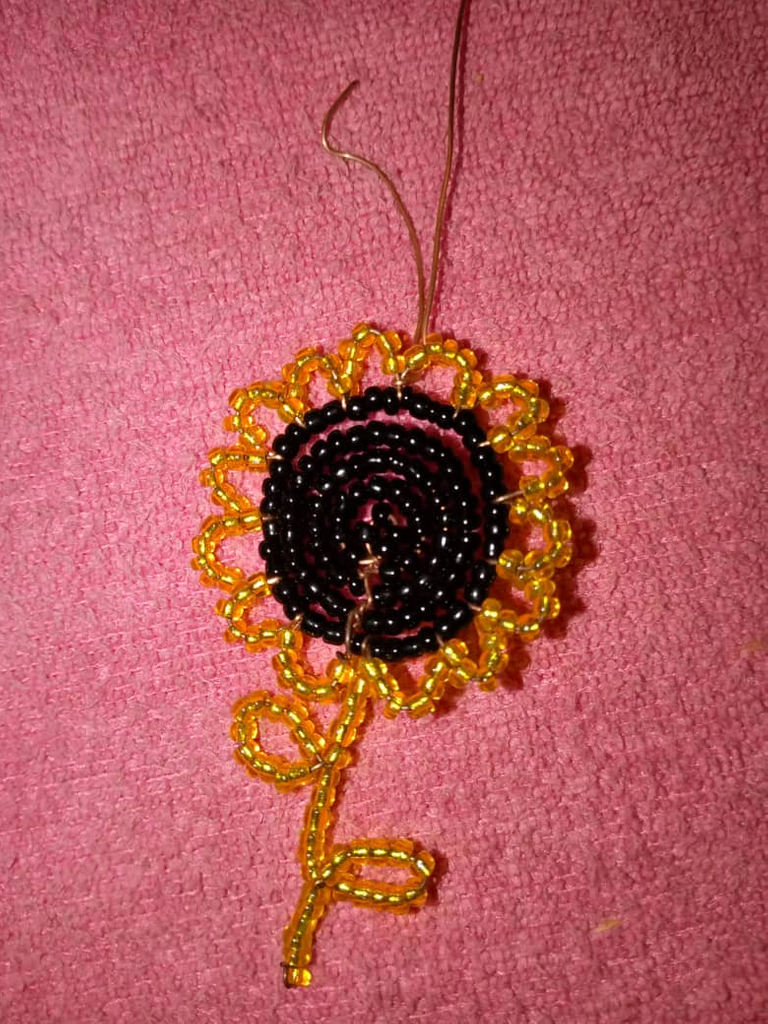
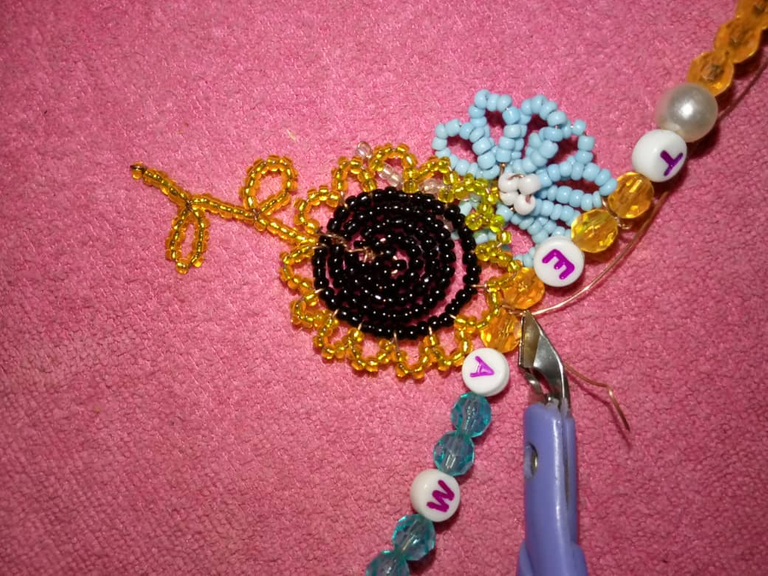
Lo primero que haremos será tomar un aproximado de 50cm de alambre de cobre y colocaremos 130 mostacillas negras

Dejando 5cm de alambre de cobre tomaremos 4 mostacillas y haremos un pequeño circulo y poco a poco vamos a envolver nuestro pequeño circulo,al llegar donde está el alambre aseguramos nuestro trabajo,esto hasta rodear todo el círculo,cortamos el excedente del alambre y así nos quedara
Lo siguiente es tomar 6 mostacillas de color amarillo,dejando 2 mostacillas de color negro introduciremos nuestro alambre y tendremos nuestro primer pétalo,luego seguiremos con el mismo paso,tomando 6 mostacillas de color amarillo y dejando 2 mostacillas de color negro pasamos el alambre y tendremos el siguiente pétalo
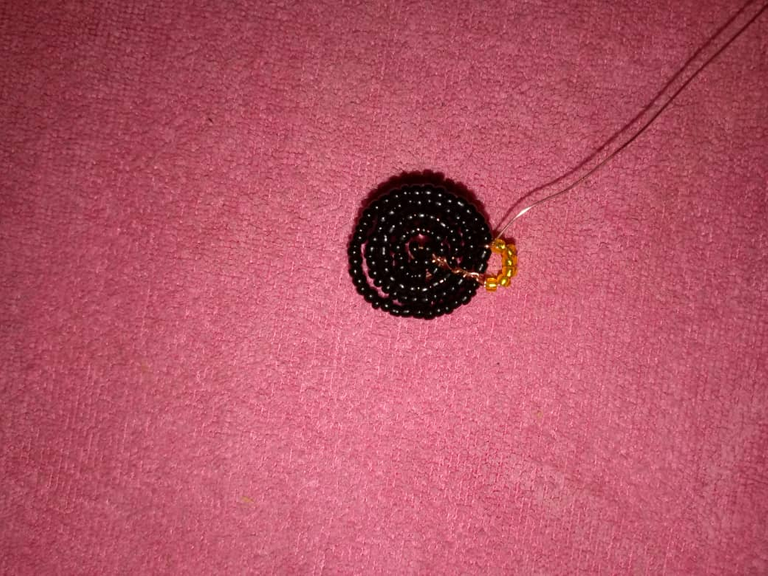
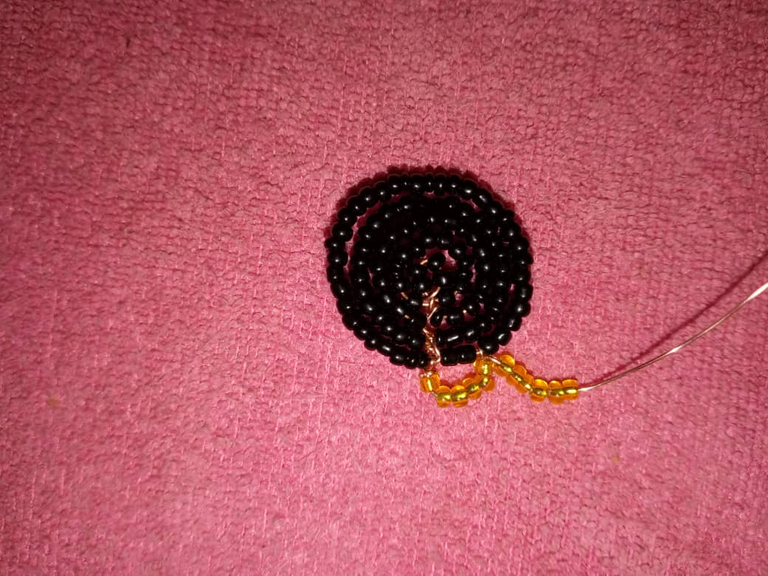
Seguiremos este proceso hasta cubrir todo el centro con mostacillas amarillas las cuales quedan de esta manera
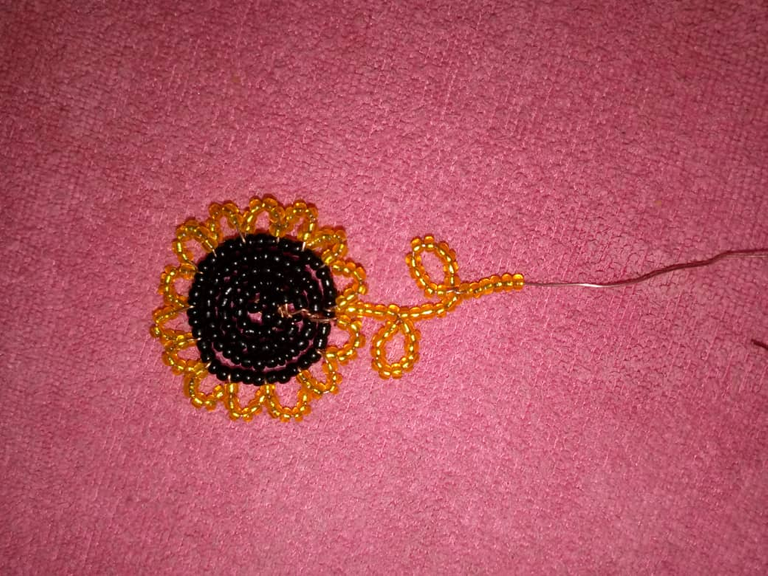
Tomaremos 40 mostacillas de color amarillo y contando de arriba hacia abajo 6 mostacillas tomaremos 12 y haciendo un círculo tendremos nuestra primera hoja
Luego contando 6 mostacillas de la primera hoja tomamos 12 mostacillas y de igual manera hacemos 1 circulo y tendremos la segunda hoja, aseguramos nuestro alambre y ya tenemos listo nuestro girasol
PASO 4
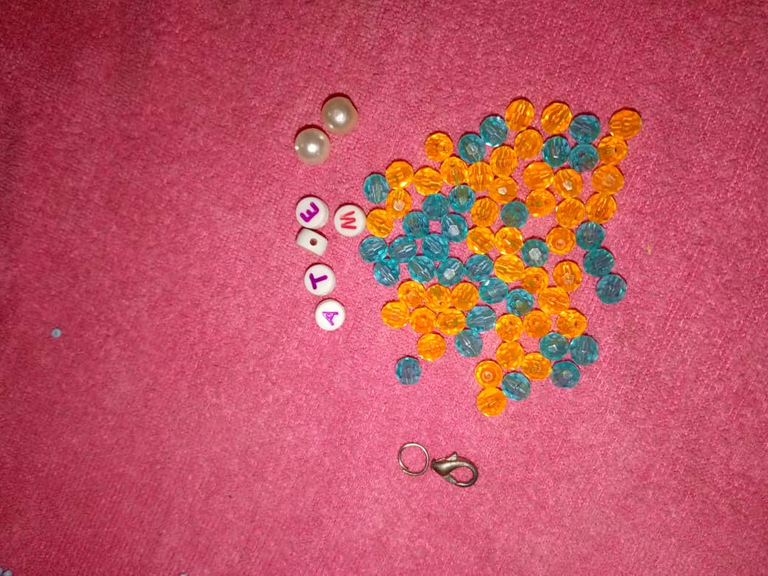
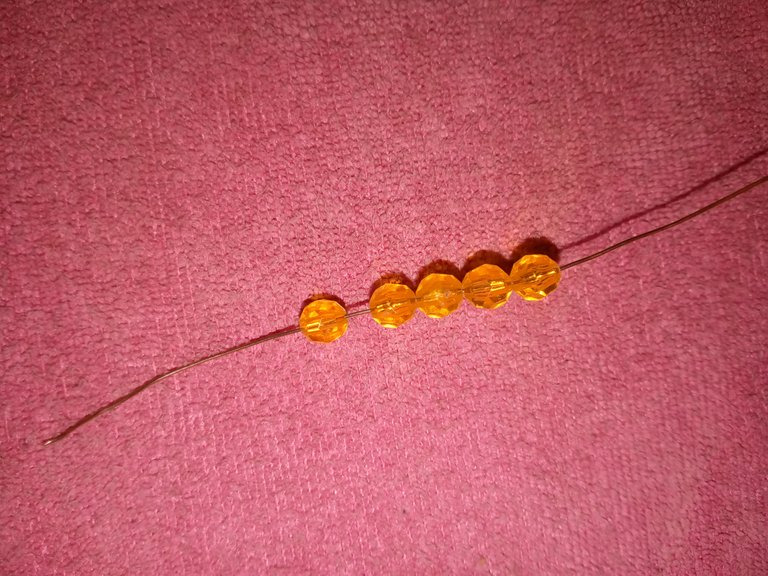
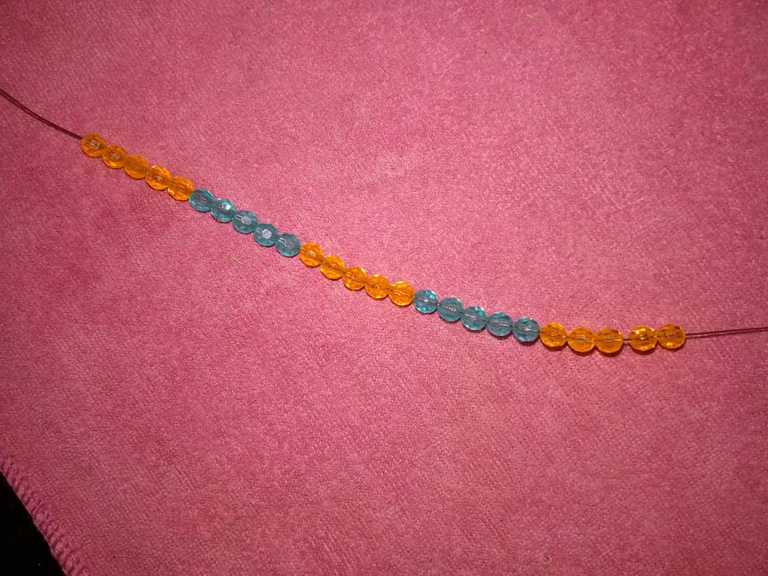
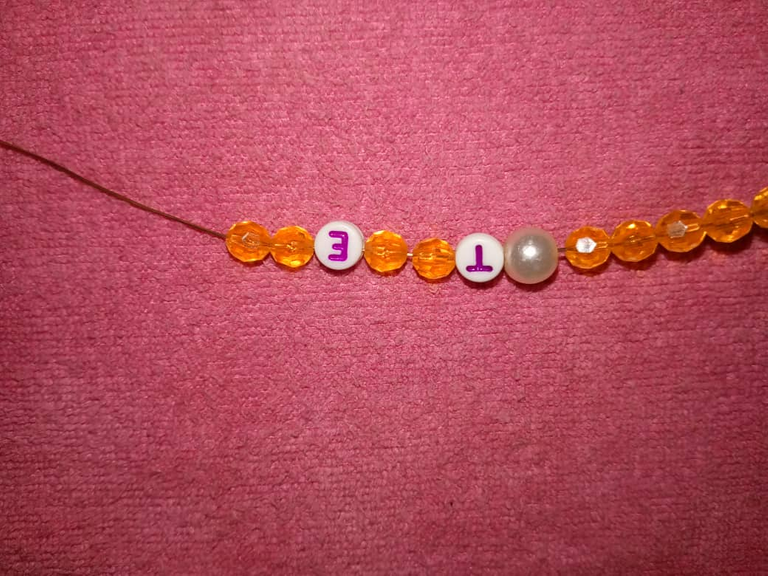
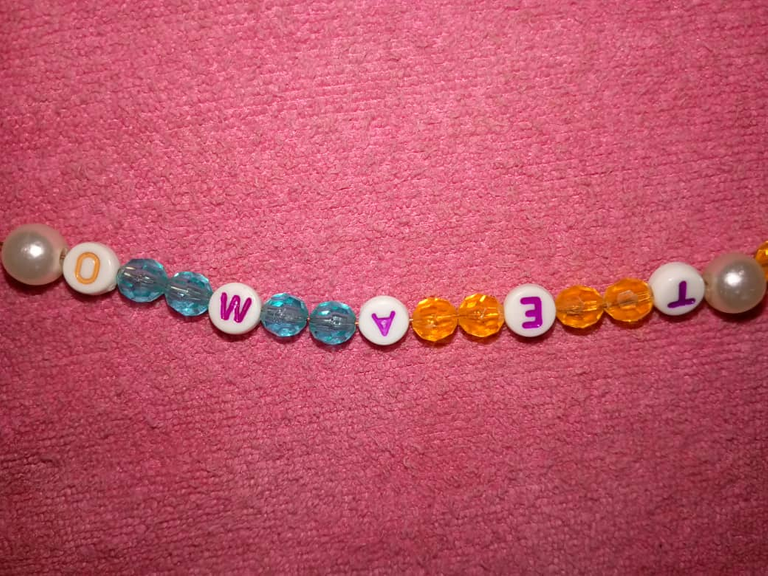
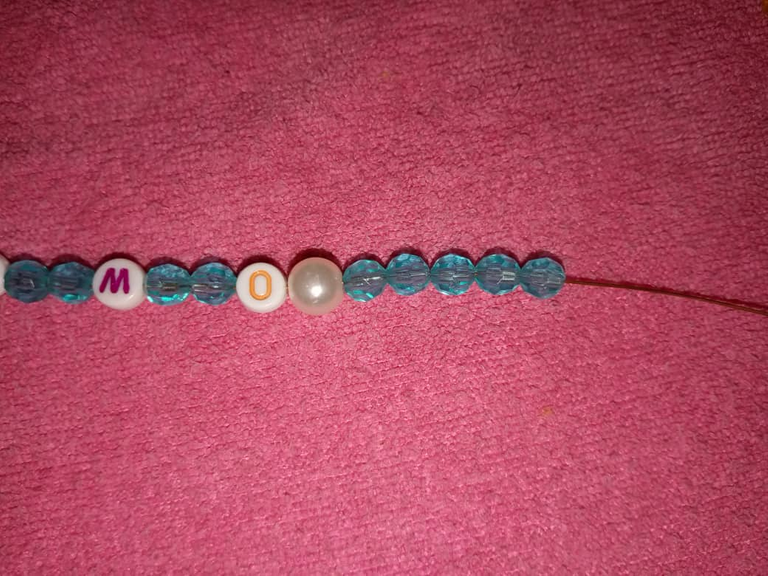
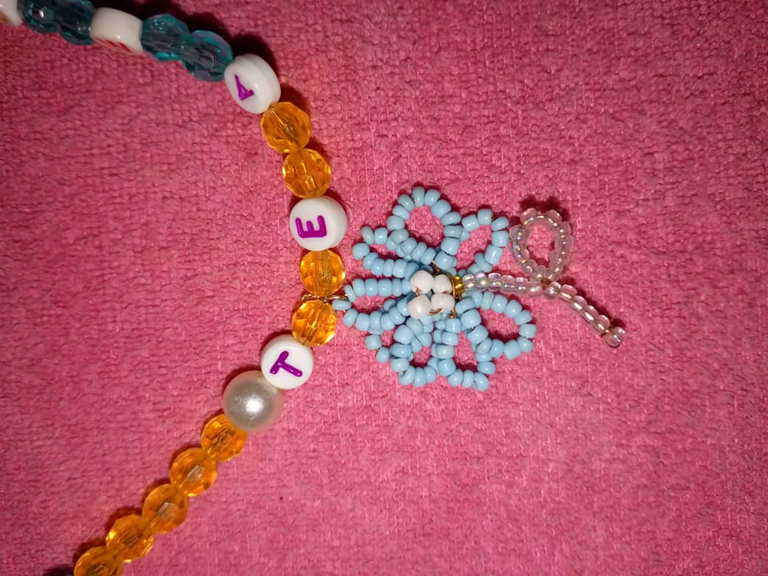
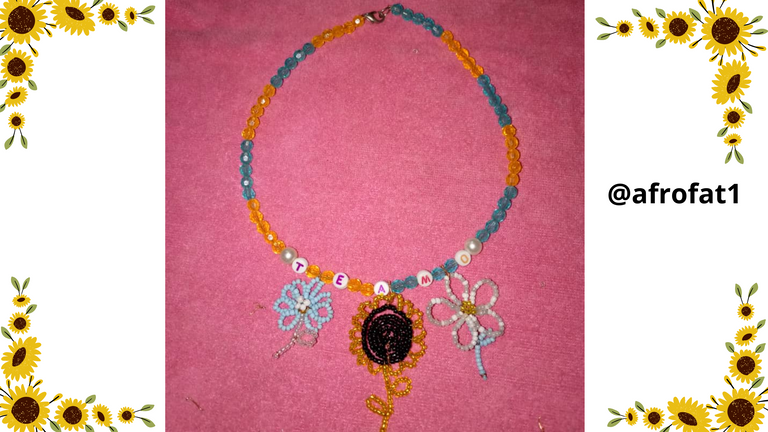
Para nuestro último paso realizaremos el collar,para ello he utilizado biconos de color amarillo y azul para darle una hermosa combinación de colores 2 perlas y unas letras
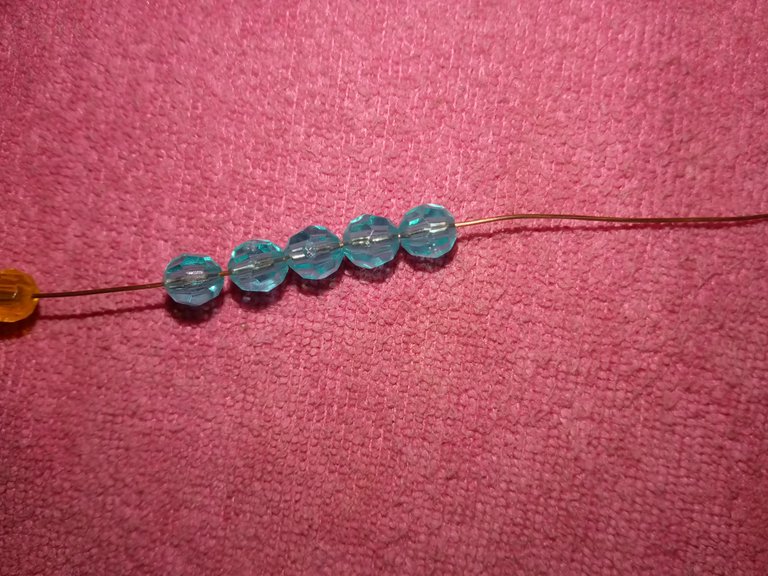
Lo que haremos será con un aproximado de 60cm de alambre de cobre vamos a introducir 5 biconos de color amarillo,luego vamos a introducir 5 biconos de color azul,vamos a colocar una serie de 3 biconos amarillos y 2 azules
Luego introduciremos 1 perla y la letra,para luego colocar 2 biconos de color amarillo 1letra repetimos con 2 del mismo color 1 letra,luego colocaremos 2 biconos de color azul más 1 letra seguidamente 2 biconos del color azul y 1 letra y después colocaremos nuestra segunda perla.
Para culminar nuestro collar,vamos a colocar 5 biconos de color azul y posteriormente 5 biconos de color amarillo,está vez vamos a combinar 3 series de color azul y 2 series de color amarillo
Ya por último colocaremos nuestro trancadero y cortamos el excedente y listo.
PASO 5
Este es el último y el más fácil que haremos será colocarle las flores a nuestro collar
Tomando un pequeño trozo de alambre lo colocamos en la parte superior de la flor y luego lo llevamos al medio de los 2 biconos amarillos y aseguramos y cortamos con nuestra piqueta
Esto lo repetimos con la siguiente flor que será nuestro hermoso girasol,colocamos un trozo de alambre En la parte superior del pétalo y llevamos al centro de los siguiente 2 biconos amarillos y aseguramos y cortamos
Repetimos el mismo proceso con la última flor y nos quedará lista nuestro HERMOSO COLLAR DE FLORES COLGANTES
Es un placer para mí poder compartir esta hermosa creación,en especial porque es un día de las madres y lo realice con mucho amor para la mía
muchas felicidades a todas las madres en su día!
Creditos
- Las fotos son de mi autoria y fueron tomadas por mi teléfono tenco spark go 2023.
- Traductor utilizado Deelp traductor
- Las imágenes son editadas mediante la aplicación editor de fotos polish y los separadores fueron editados mediante la aplicación editor de fotos canva.
Happy day to all mothers on your day, may God bless you always and continue to give you much wisdom to continue with the good education to their children, may God bless you always.
My dear friends, today I want to tell you about a BEAUTIFUL FLOWER HANGING NECKLACE that I made with much love for my beautiful mother.
I like to work a lot with flowers because that is the name of my mother, her name is FLOR and she is the most beautiful, humble, loving, sincere woman, for me the perfect woman and I am inspired by her.
Next I will be presenting in detail the step by step of this beautiful creation and the materials used in the elaboration of this beautiful HANGING FLOWER NECKLACE.
Which were the following
💐COPPER WIRE
💐PIQUETA
💐 BEADS OF DIFFERENT COLORS
💐YELLOW AND BLUE BICONES.
💐2 WHITE PEARLS
💐1 INSURANCE
💐LETTER BEADS
STEP 1
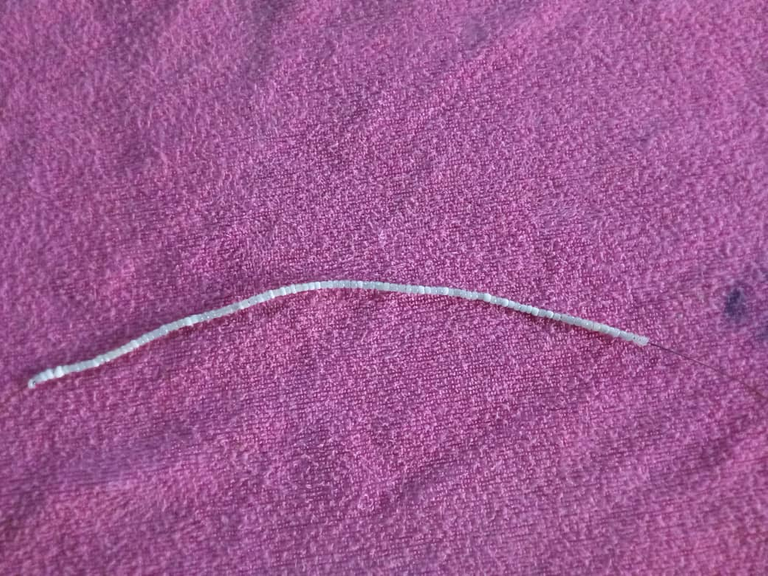
We start making a daisy and what we will do is to take approximately 40cm of copper wire and introduce 100 white beads to take 20 beads and leaving 5 cm on one side and making a small circle we will obtain our first petal.
Then we will take 20 beads, make the circle and make 2 turns, this until we get the 5 petals that we will need, which will look like this
Already having our 5 petals what we will do will be to introduce 5 beads of yellow color for the 5 cm of wire, we make 1 small circle and the rest of the wire we pass it behind, we locate any petal and we assure and we cut the excess with our pickaxe and we will be like this
Next, take 15 blue beads to enhance the stem of our daisy, then skip the last bead and insert the copper wire through the beads and take out the center.
Then we add 10 beads and make 2 turns and we have our leaf, once we cut the excess we will have our first daisy ready.
STEP 2
To make our next flower what we will do is to take our wire and 112 blue beads, this flower we will make 8 petals, taking 14 beads we will make a small circle and we will have our first petal, do not forget to leave the other side 5cm of wire, then take 14 beads we will make our turn, this step we will repeat until we get the 8 petals desired.
Then we will take 5 white beads for the 5cm of excess wire, make a small circle and take the excess to the back and cut with our pickaxe.
The next thing we will do is to take 24 transparent beads and from top to bottom we will count 6 beads and counting 12 of them we will make a twist to have our leaf
Then we bring up the remaining beads and with our wire we give a turn to the last bead to secure and then cut
This way we will have our second flower
STEP 3
We will continue with the last flower this will be a beautiful sunflower.
The first thing we will do is to take approximately 50cm of copper wire and place 130 black beads.
Leaving 5cm of copper wire we will take 4 beads and we will make a small circle and little by little we will wrap our small circle, when we arrive where the wire is we will secure our work, this until we surround the whole circle, we cut the excess of the wire and this way we will be left with
The following is to take 6 yellow beads, leaving 2 black beads we will introduce our wire and we will have our first petal, then we will continue with the same step, taking 6 yellow beads and leaving 2 black beads we will pass the wire and we will have the next petal.
We will continue this process until we cover the entire center with yellow beads which look like this
We will take 40 yellow beads and counting from top to bottom 6 beads we will take 12 and making a circle we will have our first leaf.
Then counting 6 beads of the first leaf we take 12 beads and in the same way we make 1 circle and we will have the second leaf, we secure our wire and we have our sunflower ready.
STEP 4
For our last step we will make the necklace, for this I have used yellow and blue bicones to give a beautiful combination of colors 2 pearls and some letters.
What we will do will be with approximately 60cm of copper wire we will introduce 5 yellow bicones, then we will introduce 5 blue bicones, we will place a series of 3 yellow and 2 blue bicones.
Then we will introduce 1 pearl and the letter, then we will place 2 bicones of yellow color 1 letter, we repeat with 2 of the same color 1 letter, then we will place 2 bicones of blue color plus 1 letter, then 2 bicones of blue color and 1 letter and then we will place our second pearl.
To finish our necklace, we are going to place 5 blue bicones and then 5 yellow bicones, this time we are going to combine 3 series of blue color and 2 series of yellow color.
And finally we will place our strand and cut the excess and that's it.
STEP 5
This is the last and easiest step we will do to attach the flowers to our necklace.
Taking a small piece of wire we place it on the top of the flower and then bring it to the middle of the 2 yellow bicones and secure and cut it with our pickaxe.
We repeat this with the next flower that will be our beautiful sunflower, we place a piece of wire at the top of the petal and take to the center of the next 2 yellow bicones and secure and cut.
We repeat the same process with the last flower and our BEAUTIFUL HANGING FLOWER NECKLACE will be ready.
It is a pleasure for me to share this beautiful creation, especially because it is a mother's day and I made it with love for my mother.
congratulations to all mothers on their day!
Credits
- Photos are my own and were taken by my tenco spark go 2023 phone.
- Translator used Deelp translator.
- The images are edited using polish photo editor application and the separators were edited using canva photo editor application.
Nos encanta que te inspires en tu madre para regalarle esta hermosa creación, como dicen una flor para otra flor.
Te ha quedado hermoso el detalle y ella lo luce muy bien, se nota fue hecho con amor. Felicidades 👏
Para mi es la flor mas bella,muchas gracias me alegra que le haya gustado.
Congratulations @afrofat1! You have completed the following achievement on the Hive blockchain And have been rewarded with New badge(s)
Your next target is to reach 2250 upvotes.
You can view your badges on your board and compare yourself to others in the Ranking
If you no longer want to receive notifications, reply to this comment with the word
STOPCheck out our last posts:
Support the HiveBuzz project. Vote for our proposal!
Que bonito detalle para mama, y para esa persona especial, felicidades, hermoso trabajo, saludos.
Muchas gracias, ☺️ saludos
Esto quedó demasiado hermoso, me encanto.. Felicidades.. 💗
Muchas gracias, saludos
Muy hermoso ha quedado este diseño, meencanta. y la señora es la modelo más linda del mundo! la amo., flor de nuestro corazones.