💥Elegantes Aretes para mi Hermosa Madre💥Elegant Earrings for my Beautiful Mother💥

Feliz y bendecido dia para todos los integrantes de la Colmena, les saludo con mucho cariño, deseandoles muchas bendiciones y que el Dios del cielo los bendiga siempre, les deseo feliz fin de semana lleno de muchas bendiciones.
Queridos compañeros de esta hermosa comunidad de Jewelry, quiero aclarar un comentario que hace poco se suscitó por este medio, el cual fue que le escribieron a mi esposa @yanetzi1 que ella manejaba mi cuenta en esta blockchain y también realizaba los contenidos que se publican en ella, gracias a Dios y a los observadores de esta plataforma hicieron sus investigaciones y todo se solucionó.
Mi esposa es la que mayormente luce mis accesorios de bisutería, ella es mi modelo y por eso aparece en la portada de la mayoría de los post, tambien se pueden apreciar en muchas de las fotografías del paso a paso donde aparece mi mano varonil.
Nosotros como pareja nos ayudamos por eso pueden observar el parecido en algunos de los post, como les dije anteriormente, nos ayudamos como pareja, compartimos ideas y nos prestamos algunos materiales, gracias a Dios y a ella es por quien realizo estos trabajos de bisuteria, porque observando su trabajo fue que descubri mi talento para realizar estos accesorios.
Cada uno de nosotros nos eforzamos por crear y diseñar los diferentes accesorios que dia tras dia compartimos con todos ustedes.
Espero no haber incomodado con estas palabras, que con mucho respeto quise expresar para todos ustedes mis queridos compañeros.
Bueno mis queridos compañeros hoy vengo a hablarles sobre unos hermosos aretes que he realizado con mucho cariño, en este caso fue un obsequio para mi hermosa madre, a pesar de su edad es muy coqueta y le gusta colocarse accesorios de bisutería, ella es la admiradora numero 1 le encanta cada accesorio que realizo, en este caso fue un obsequio para ella ya que es mi mas bonita inspiración.
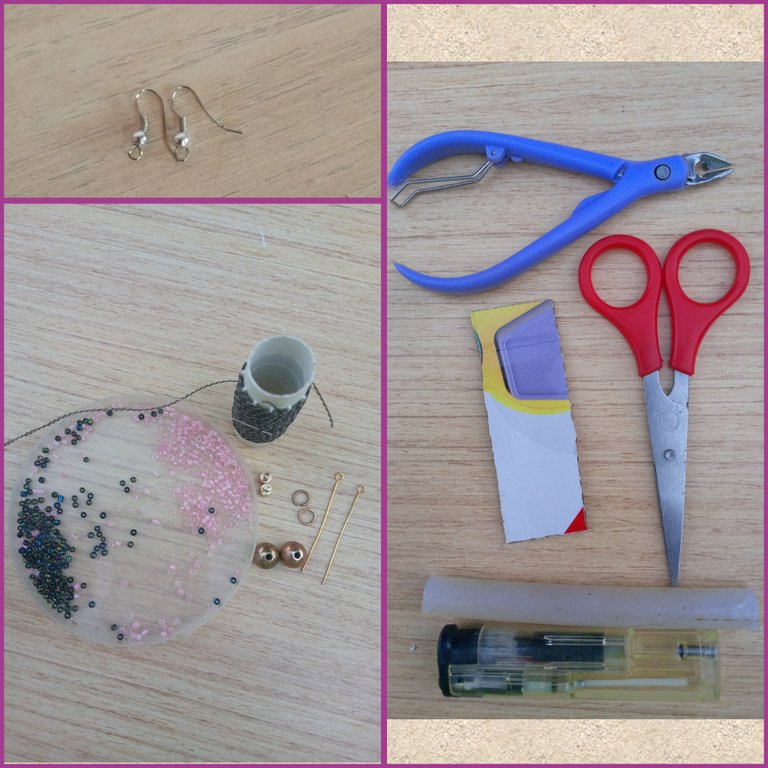
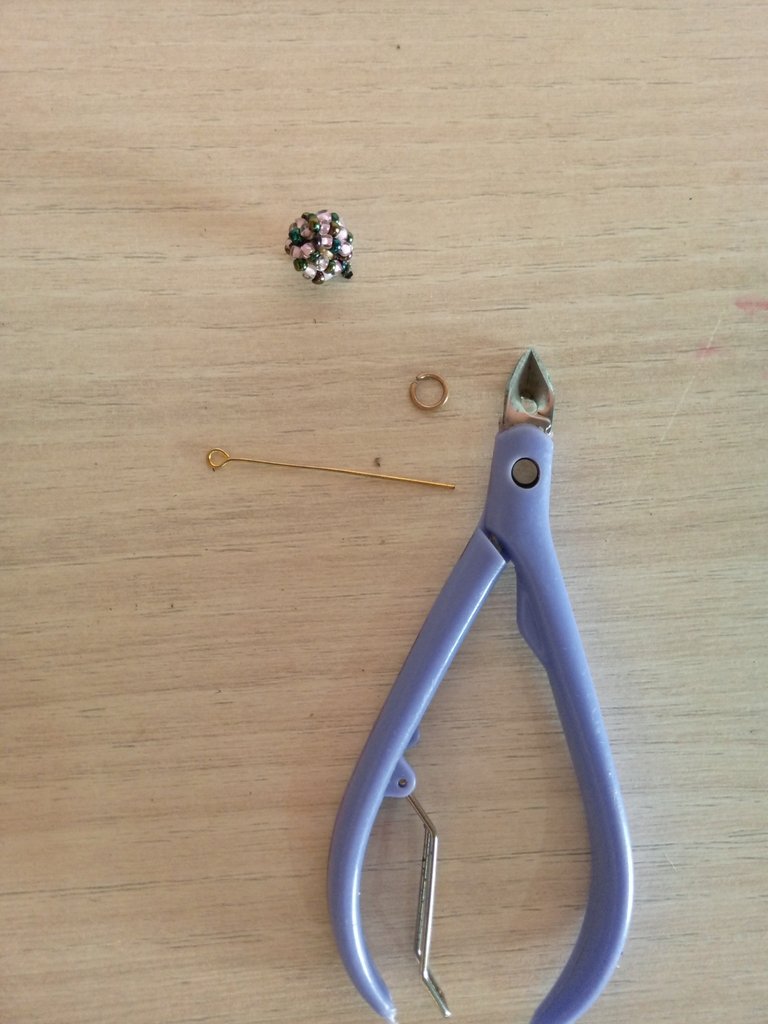
Materiales Utilizados
- Mostacillas negras tornasol
- Mostacillas rosadas
- Aguja #12
- Hilo zapatero
- 2 Ganchos con aros
- 2 Perlas
- 2 Argollas
- 2 Terminales
- 2 Alfileres con cabeza
- Encendedor
- Barras de silicon
- Tijeras
- Piqueta
- Carton de 17 por 2 centímetros y medio
Ahora les mostraré el paso a paso utilizado para la realización de estos hermosos aretes.
Paso 1
Para comenzar la creación de estos hermosos ateter vamos a introducir en nuestra aguja un aproximado de 80cm de hilo zapatero
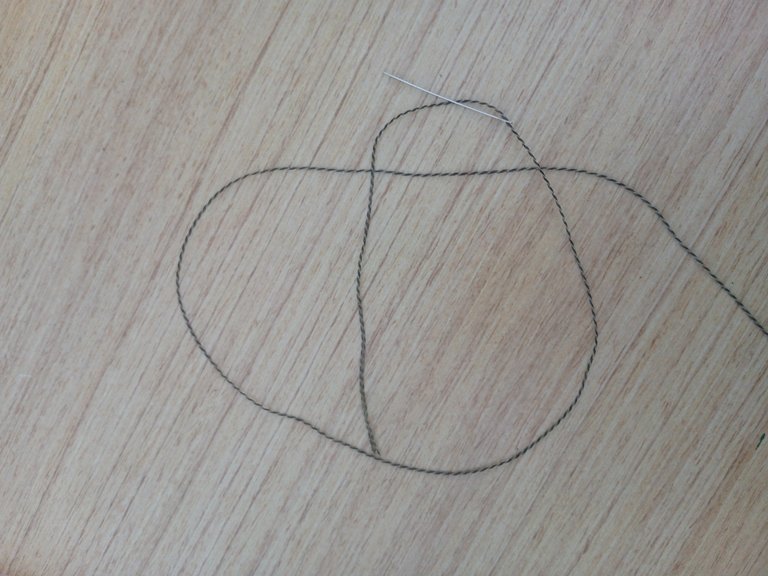
Luego vamos a introducir 100 mostacillas en nuestro hilo, colocaremos una mostacilla de color negro tornasol, luego una mostacilla rosada, repetimos hasta tener las 100 mostacillas, cincuenta y cincuenta.
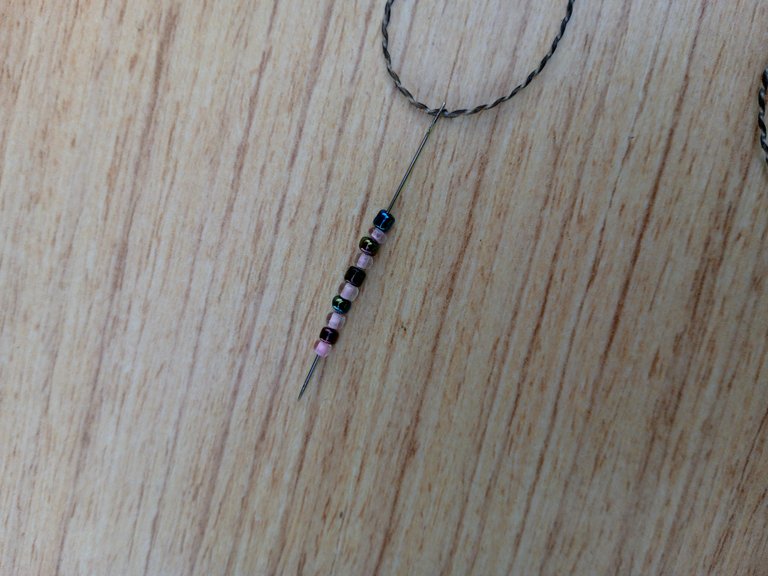
Paso 2
Vamos a tomar el cartor para luego ir enrrollando de cinco mostacillas de la siguiente manera
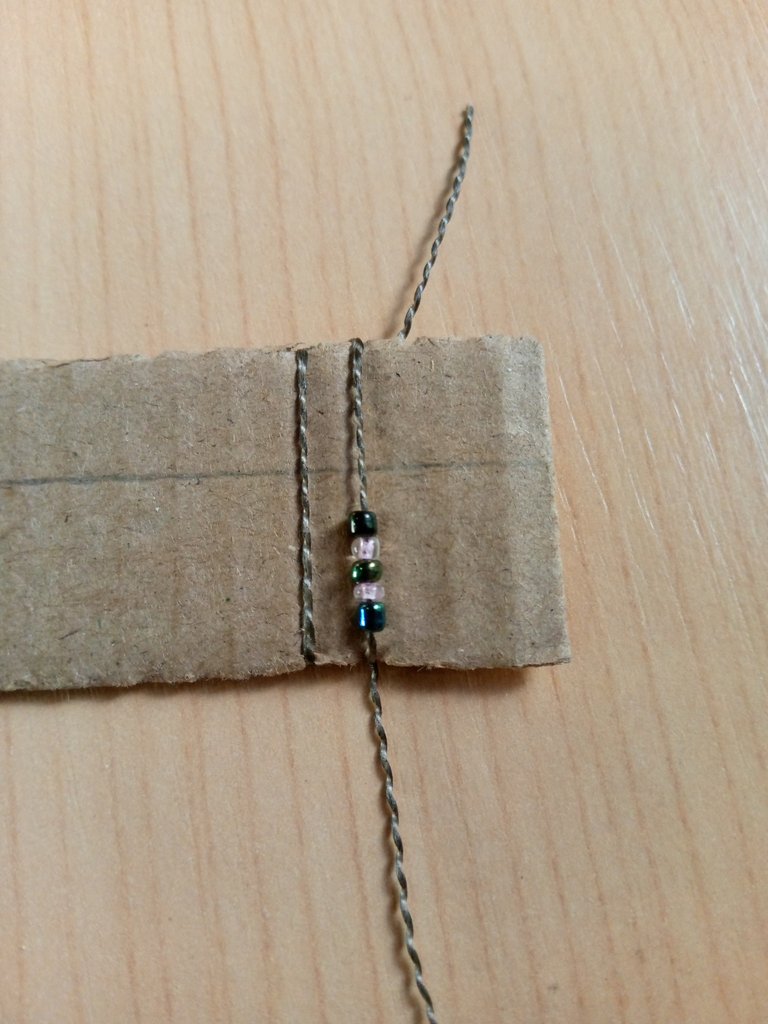

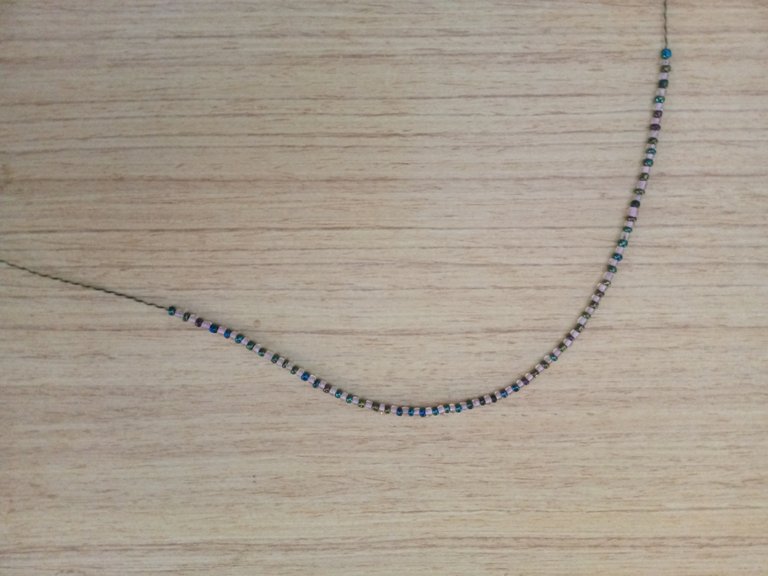
Vamos a ir enrrollando hasta colocar todas las mostacillas, luego cortaremos el hilo sobrante y hacemos varios nudos, con la ayuda de nuestro encendedor vamos a sellar.
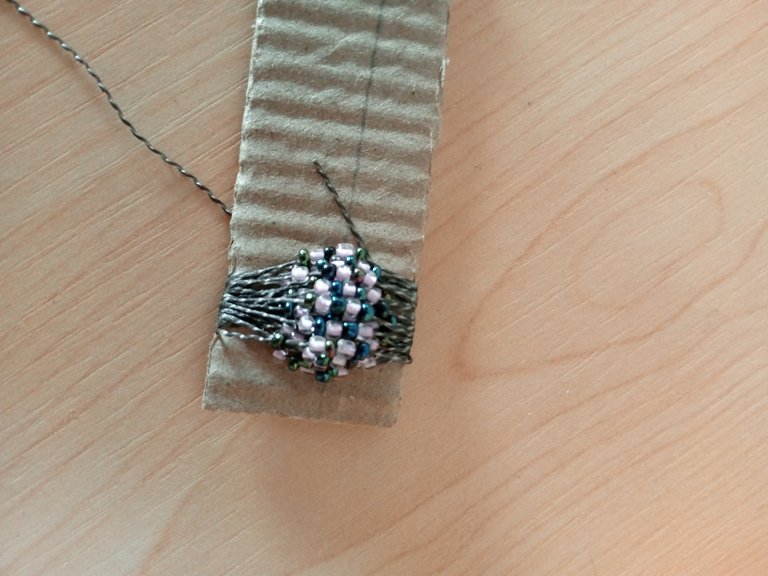
Paso 3
Para este paso vamos a enhebrar nuevamente nuestra aguja con 30cm de hilo, pero esta vez vamos a introducir las 2 puntas, un extremo y luego el otro, buscando que nos queden juntas al final.

Luego vamos a introducir nuetra aguja y pasamos por el mismo hilo de la siguiente manera
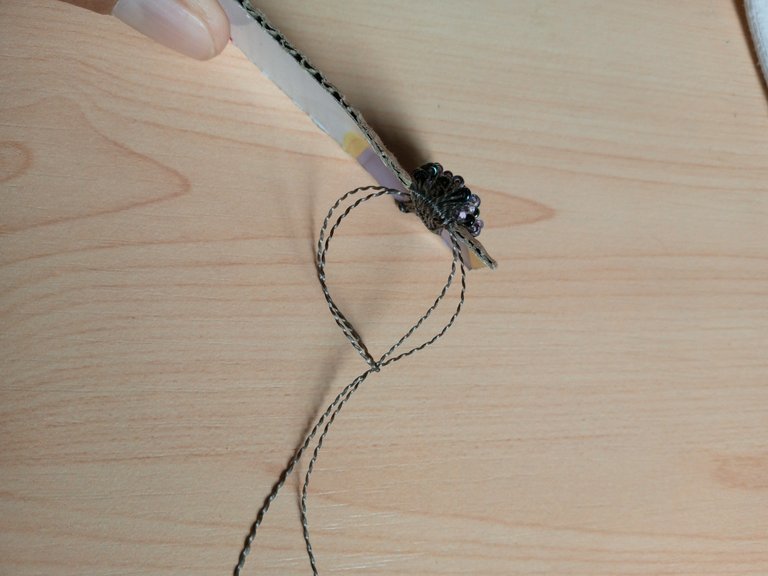
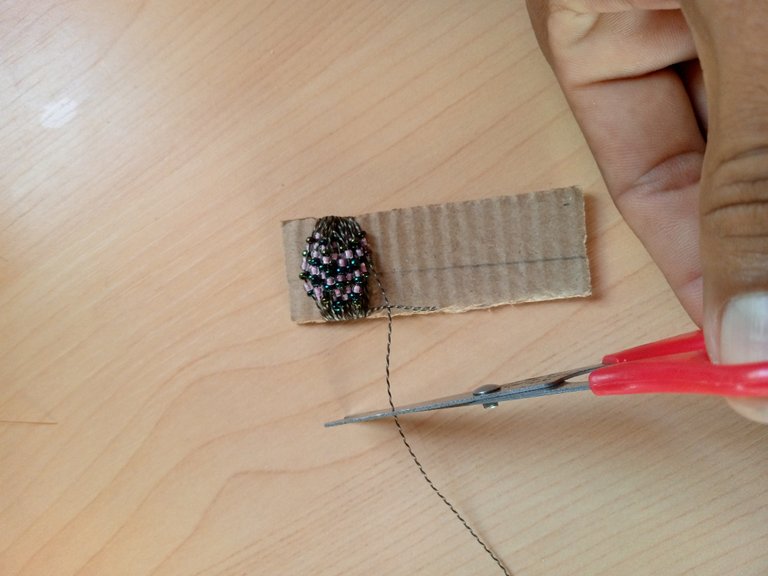
Introducimos la aguja por todos los hilos y vamos haciendo nudos, es decir, al salir el aguja damos vuelta con el hilo y tiramos de la aguja, esto hasta cubrir todos los hilos, luego cortamos y sellamos con el encendedor.

Ahora vamos a retirar las mostacillas de nuestro carton, doblamos el carton y retiramos, esta se vera como un anillo.
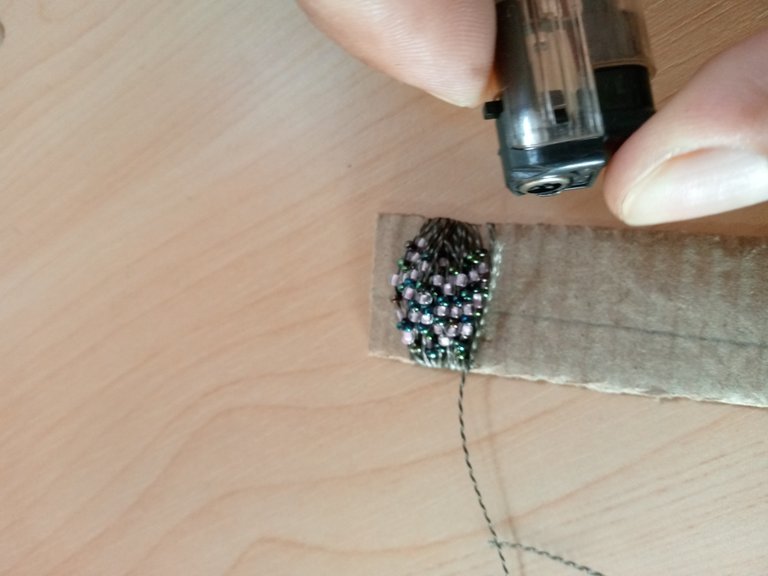
Paso 4
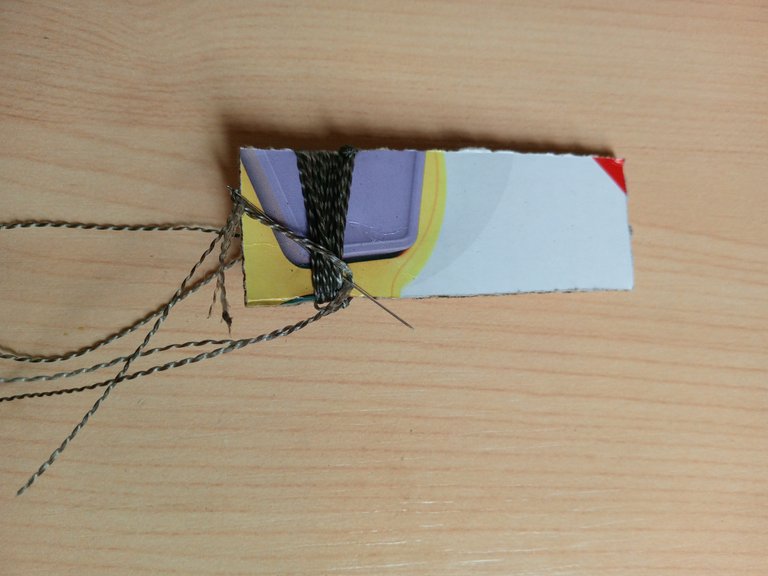
Con la ayuda de 1 terminal, el encendedor y el trozo de barra de silicon
Vamos a calentar un poco el silicón y vamos a colocar un poco en el terminal
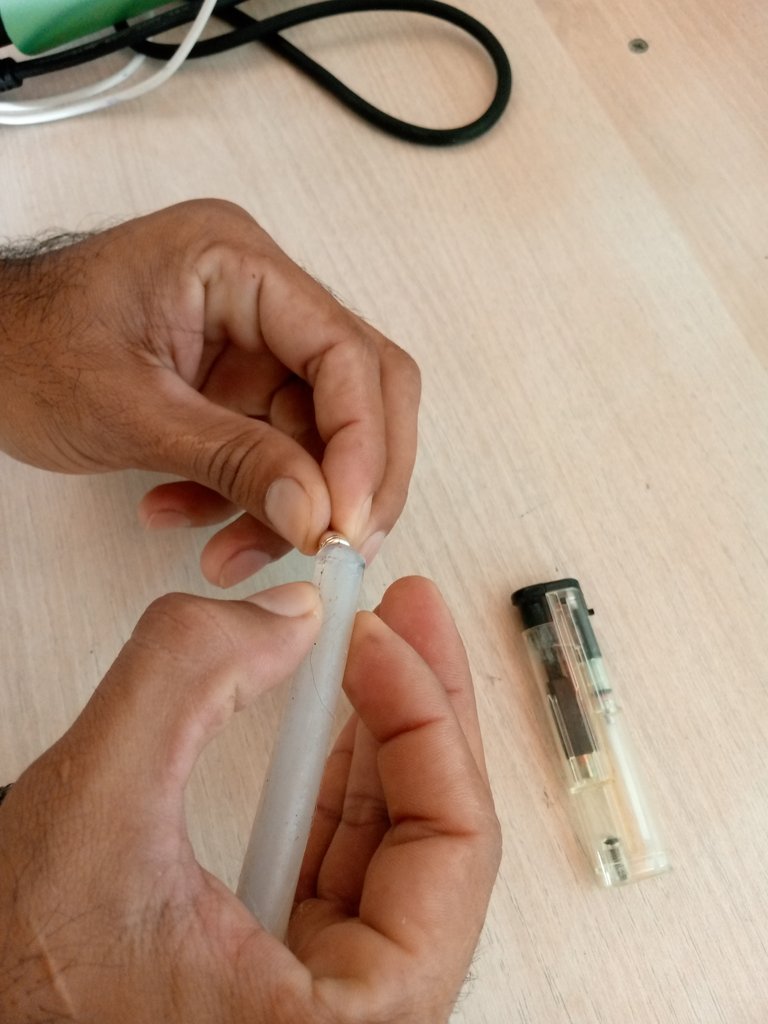
Juntamos los hilos, rápidamente y con mucho cuidado introducimos el extremo de los hilos en terminal, se vera de la siguiente manera.
Paso 5
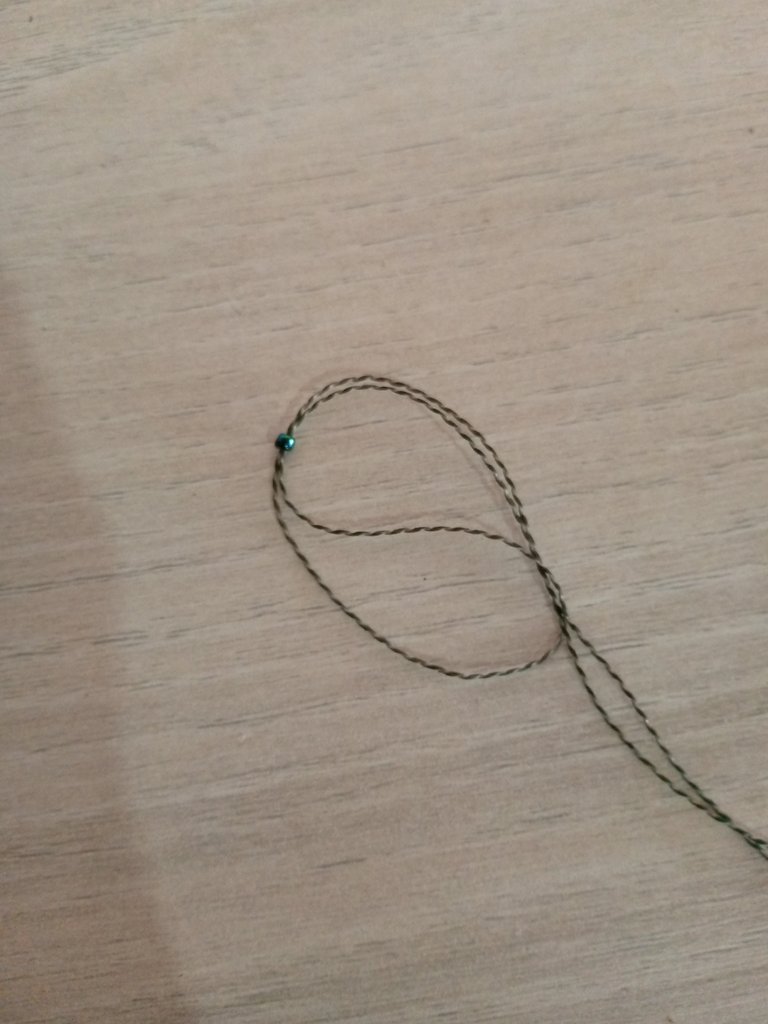
Vamos a enhebrar nuevamente la aguja con un aproximado de 40cm de la misma manera que las anteriores, primero un extremo y luego el otro.

Ahora vamos a introducir una mostacilla de color negro, la llevamos al final del hilo y dejaremos unos centímetros para poder pasar nuestro hilo, nos servira de soporte.
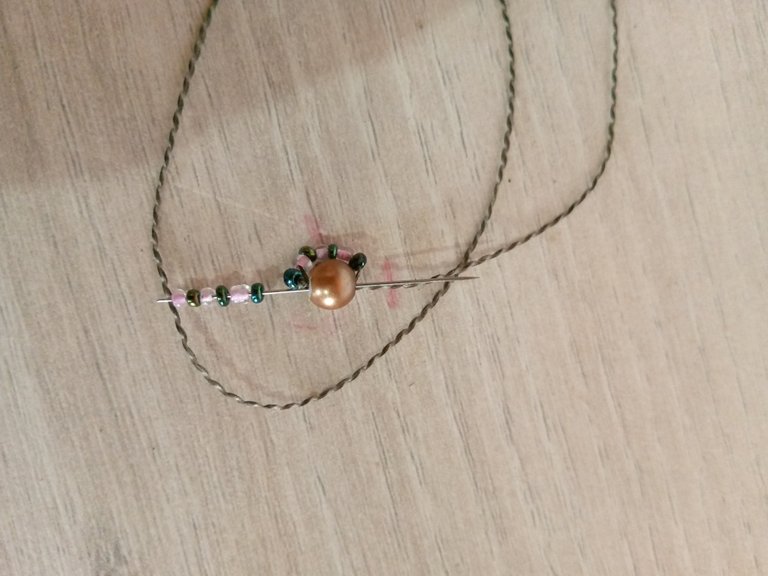
Luego introducimos una perla y la vamos a llevar al final.

Ahora vmos a introducir 6 mostacillas, primero colocamos una mostacilla rosada, una negra tornasol, una rosada, de esta manera hasta tener las 6 mostacillas.

Introduciremos la aguja al contrario de donde salió nuestro hilo

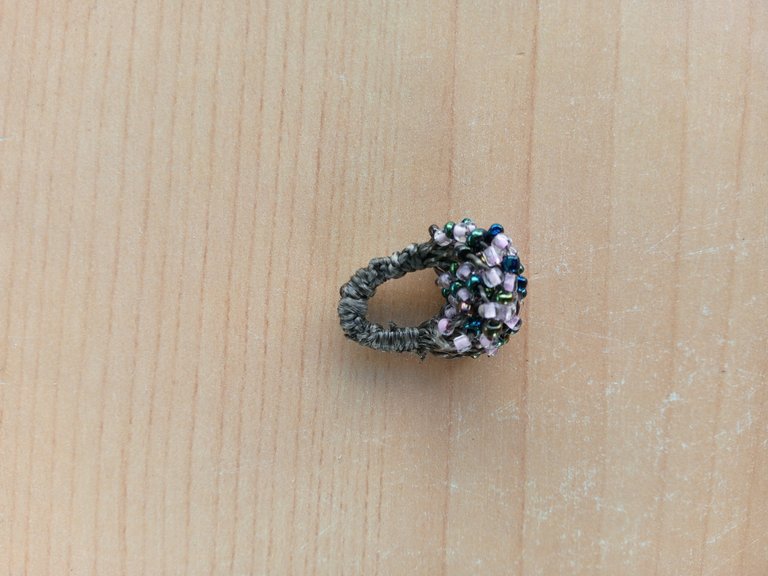
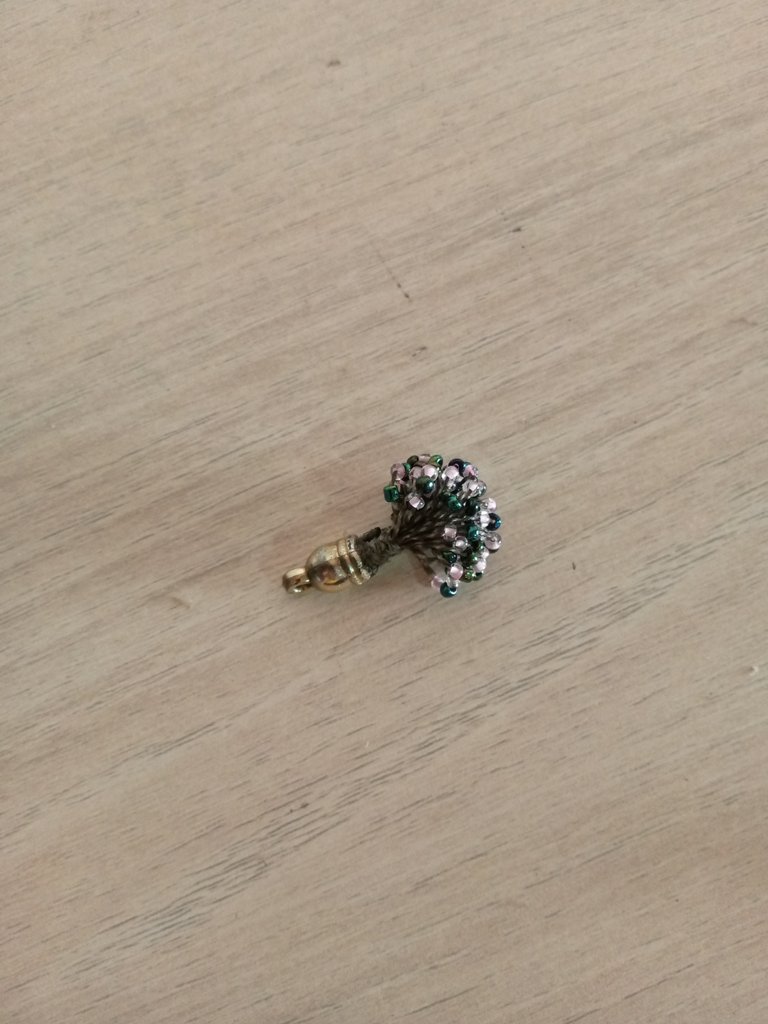
Para luego tomar 6 mostacillas de la misma manera, hasta tener la perla cubierta en mostacillas. Esta quedara como una esfera.

Paso 6
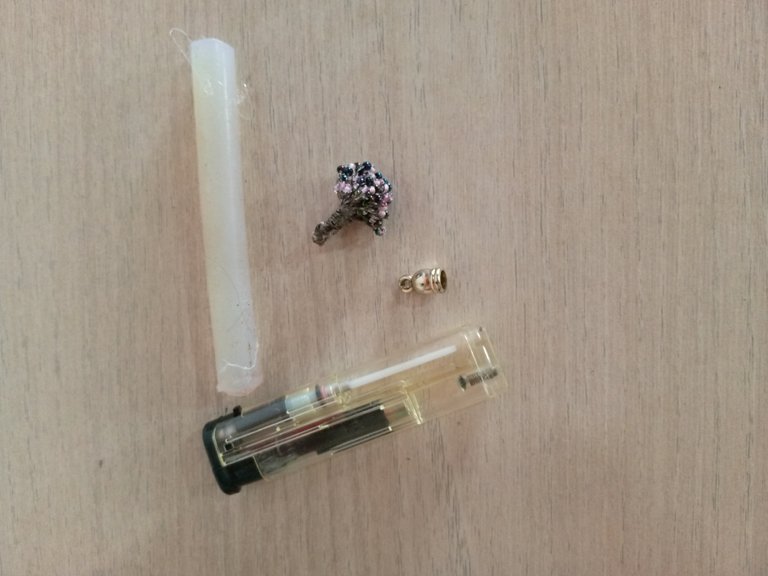
Por último vamos a tomar nuestra esfera, un aro y un alfiler, ahora vamos a introducir el alfiler de cabeza de ojo por el centro de la esfera, tomaremos el aro y con la ayuda de nuestra piqueta abrimos un poco y vamos a unir el terminal con el alfiler, para luego ajustarl con la piqueta.

Luego cortaremos el excedente del alfiler, calculando que nos quede para hacer pequeño aro
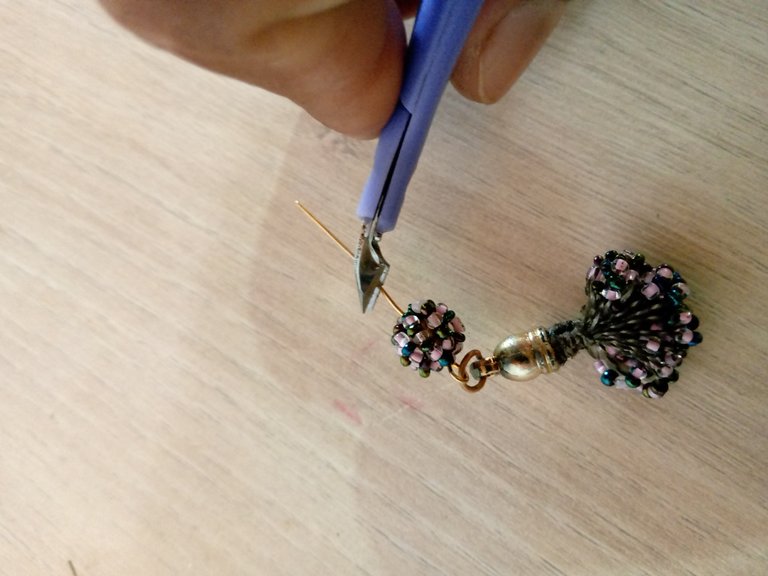
Por último vamos introducir un gancho y vamos ajustar el aro que hicimos con la piqueta para que asi quede listo nuestros hermosos aretes

Lo unico que nos quedaría seria repetir los mismos pasos para hacer el otro arete y asi quedarian listos para obsequiar.

Espero les haya gustado estos hermosos aretes que he realizado con mucho cariño para mi hermosa madre. Muchas gracias por leer este bonito tutorial, espero sus comentarios, Bendiciones
Las fotografías fueron tomadas por mi teléfono tecno spark Go 2023.
Traductor Utilizado:Deepl traductor
Las imágenes son editadas mediante la aplicación canva
Happy and blessed day to all the members of the Hive, I greet you with much affection, wishing you many blessings and that the God of heaven bless you always, I wish you a happy weekend full of many blessings.
Dear colleagues of this beautiful Jewelry community, I want to clarify a comment that recently arose through this medium, which was that they wrote to my wife @yanetzi1 that she managed my account in this blockchain and also made the contents that are published on it, thank God and the observers of this platform did their research and everything was solved.
My wife is the one who mostly wears my jewelry accessories, she is my model and that is why she appears on the cover of most of the posts, you can also see in many of the photographs of the step by step where my manly hand appears.
We as a couple help each other, that's why you can see the resemblance in some of the posts, as I said before, we help each other as a couple, we share ideas and we lend each other some materials, thanks to God and to her is for whom I make these jewelry works, because observing her work was that I discovered my talent to make these accessories.
Each one of us strive to create and design the different accessories that day after day we share with all of you.
I hope I have not bothered you with these words, which I wanted to express with much respect for all of you my dear colleagues.
Well my dear colleagues today I come to talk about some beautiful earrings that I have made with love, in this case was a gift for my beautiful mother, despite her age is very flirtatious and likes to put jewelry accessories, she is the number 1 fan loves every accessory I make, in this case it was a gift for her as she is my most beautiful inspiration.
- Black litmus beads
- Pink beads
- Needle #12
- Shoemaker's thread
- 2 Hooks with rings
- 2 beads
- 2 hoops
- 2 endings
- 2 pins with head
- Lighter
- Silicone sticks
- Scissors
- Scissors
- Cardboard of 17 by 2 and a half centimeters
Now I will show you the step by step used for the realization of these beautiful earrings.
Step 1
To begin the creation of these beautiful earrings we are going to introduce in our needle approximately 80cm of shoemaker's thread.
Then we are going to introduce 100 beads in our thread, we will place a black litmus bead, then a pink bead, we repeat until we have 100 beads, fifty and fifty.
Step 2
We are going to take the cartor and then we are going to wind the five beads as follows
We are going to go winding up to place all the beads, then we will cut the excess thread and make several knots, with the help of our lighter we are going to seal.
Step 3
For this step we are going to thread our needle again with 30cm of thread, but this time we are going to introduce the 2 ends, one end and then the other, trying to get them together at the end.
Then we are going to introduce our needle and pass through the same thread in the following way
We introduce the needle through all the threads and we are making knots, that is to say, when the needle comes out we turn with the thread and pull the needle, this until we cover all the threads, then we cut and seal with the lighter.
Now we are going to remove the beads from our cardboard, fold the cardboard and remove it, it will look like a ring.
Step 4 .
With the help of 1 terminal, the lighter and the piece of silicon rod.
We are going to heat the silicone a little bit and we are going to place a little bit on the terminal.
We join the wires together, quickly and very carefully we introduce the end of the wires in the terminal, it will look like this.
Step 5
We are going to thread the needle again with an approximate of 40cm in the same way as the previous ones, first one end and then the other.
Now we are going to introduce a black bead, we take it to the end of the thread and we will leave a few centimeters to be able to pass our thread, it will serve us as a support.
Then we introduce a pearl and we are going to take it to the end.
Now we are going to introduce 6 beads, first we place a pink bead, a black litmus bead, a pink bead, in this way until we have 6 beads.
We will introduce the needle in the opposite direction from where our thread came out.
Then take 6 beads in the same way, until you have the pearl covered in beads. It will look like a sphere.
step 6
Finally we are going to take our sphere, a ring and a pin, now we are going to introduce the eye head pin through the center of the sphere, we will take the ring and with the help of our pickaxe we will open a little and we will join the terminal with the pin, and then we will adjust it with the pickaxe.
Then we will cut the excess of the pin, calculating that we have left to make a small ring.
Finally we are going to introduce a hook and we are going to adjust the hoop that we made with the pickaxe so that our beautiful earrings are ready.
The only thing left to do would be to repeat the same steps to make the other earring and so they will be ready to give as a gift.
I hope you liked these beautiful earrings that I have made with love for my beautiful mother. Thank you very much for reading this nice tutorial, I look forward to your comments, Blessings.
The pictures were taken by my phone tecno spark Go 2023.
Translator Used:Deepl translator
Images are edited using canva application.
Congratulations @afrofat1! You have completed the following achievement on the Hive blockchain And have been rewarded with New badge(s)
Your next target is to reach 6000 upvotes.
You can view your badges on your board and compare yourself to others in the Ranking
If you no longer want to receive notifications, reply to this comment with the word
STOPMuy lindo. Siempre orgullosa de tu talento manito. ❤️✨️
Gracias manita, muchas bendiciones para ti.
Your mother's beautiful smile, compliments the earrings. Nicely
Thank you very much for appreciating my mother's smile, for me she is the most beautiful woman, blessings.
Wow maravillosos te han quedado.. siempre digo nunca sabemos de qué somos capaces hasta que nos atrevemos..sigue así .. tu trabajo es hermoso amigo.
Que bonitas palabras amiga, muchas gracias, bendiciones para ti y tu familia.
Bonitos aretes y bien entendible el tutorial, un buen trabajo; me da tristeza que en vez de apoyarnos se susciten comentarios malintencionados, nuestra comunidad es maravillosa y formamos un gran equipo sigamos haciendo contenidos de calidad y manteniendo nuestra unidad. Saluditos @afrofat1
Es lamentable, gracias a Dios se solucionó el mal entendido, estamos firmes gracias a Dios, tratando de hacer lo mejor posible para crear contenidos que sean de utilidad para todos ustedes, muchas gracias, bendiciones
Los aretes quedaron espectaculares. Muestras mucha destreza. Me gustó wla combinación de colores. Saludos. Muchas gracias por compartir.
Hiciste un gran trabajo al formar los zarcillos nos encanta como formaste la pequeña bola y les diste la forma, lindo trabajo seguro le encanto a tu madre.
Por favor recuerda tratar de colocar todas las fotos de buena calidad ya que la última no se detalla.muy bien esta borrosa.
Buenas noches, muchas gracias, estaré pendiente para la próxima, agradecido por el apoyo. Bendiciones
Congratulations @afrofat1! You received a personal badge!
You can view your badges on your board and compare yourself to others in the Ranking
Check out our last posts: